Premium Member Duncan Brown Posted January 25, 2021 Premium Member Share Posted January 25, 2021 1 hour ago, Michael Leake said: FYI. maybe this is already known, https://www.mcmaster.com/bearings this link is where I get bearings. american or metric. Mike Leake I of course checked there first. ( In fact, that is where I ordered some various dowel pins to try using to put the ball drive back on the shaft.) But the cheapest bearing I could find there in that size was a $22 stainless steel one. I'm too cheap to buy a sack of those if I don't have to! McMaster-Carr definitely does not specialize in itty-bitty bearings like this. I'm guessing some RC car or something uses them, though, for them to be so prevalent on ebay. Duncan Link to comment Share on other sites More sharing options...
Premium Member Duncan Brown Posted January 26, 2021 Premium Member Share Posted January 26, 2021 13 hours ago, Duncan Brown said: FYI I also have another constant speed motor coming. Labeled as 25 fps, but I expect to prove to myself that it's the same motor, just adjusted differently. I will then proceed to find out the extent of its adjustability (basically, what speeds it is running at when the adjusting stud runs out of room in each direction) just to settle that question, because I see various references to it not being very adjustable...but if half a turn changed it 1 fps, it seems like it would have a decently wide range. Man, you just never know with eBay stuff - this 25fps motor's bearings are pretty toast. Grindy, takes a second to get up to speed, makes a hell of a racket once it does. Though bless its heart it was maintaining the advertised 25fps speed once it got there! So this isn't the be-all end-all test of this concept, i.e. I bet the max speed can go higher, on a motor that has good bearings, but just as an early read on the situation, here's what I got: Screwing the screw all the way in, it eventually wouldn't go any farther for reasons that weren't clear. Maybe the spring was completely unsprung and now it was trying to compress it? But it was running at 14.7 fps. With the spring not really being part of the equation, it was a little wavering on that speed. But I think it's safe to say to that guy who was looking for an 18fps motor a while back: I think you could set that and have it be quite stable. Screwing the screw all the way out, it eventually pulls up the unthreaded part so far it run out, so that's definitely a hard limit. In this case it was running 34fps, but I'd be willing to bet with good bearings it would have gone somewhat higher. So there you have it, a much wider range than previously thought, if for some odd reason you wanted something other than 24 or 25fps. And yeah, same motor, just tuned to the labeled speed. (And yes, I admit, the motor was designed to be turned to 24/25fps, and running it near either of its physical limits is liable to be less reliable than sticking to the design specs. But for those who were curious...) Duncan Link to comment Share on other sites More sharing options...
steven jackson Posted January 27, 2021 Share Posted January 27, 2021 looking forward to the photos on the variable speed motor rebuild. Link to comment Share on other sites More sharing options...
Premium Member Duncan Brown Posted January 27, 2021 Premium Member Share Posted January 27, 2021 6 hours ago, steven jackson said: looking forward to the photos on the variable speed motor rebuild. Bearings are due in the mail today. Then there's a lot of photo editing, web page coding, etc. But soon. Duncan Link to comment Share on other sites More sharing options...
Premium Member Duncan Brown Posted January 28, 2021 Premium Member Share Posted January 28, 2021 Bearings showed up, look and work great, but I've run into some snags that require JB-Weld work (I can hear the Arri techs fainting dead away at this) and so need to wait for it to harden up. One of the desoldered wires goes down through the main body behind one of the field coils and attaches to the main power contact near the drive ball. It's "potted" in against the body, tucked behind the coil, so the armature won't rub against it while spinning. Arri didn't do a fantastic job of this, and it pulled loose while I was reassembling things. Simple matter to tuck it back in its groove in the potting material (it's just epoxy) and coat over it with JB-Weld (which is just epoxy) to get it to stay in place again. I only needed to let that harden up enough to hold it in place while I reassembled the armature and brush plate to the body, which I did, and now it can cure fully with time, as everything there is fixed in place, The other problem is with the screws that hold down the variable resistor contacts. They're machine screws, but just threaded into the plastic or bakelite that forms the brush and directional switch plate. One of the two of on each contact was stripped enough that it wouldn't tighten down. One of those is critical because it holds the electrical "eyelet" contact against the sliding contact. That could have been part of the reason the variable speeds were erratic. So I've rimmed the inside of those tiny holes with more JB-Weld and hope that after curing overnight the machine screws will act like a tap and cut new threads into the epoxy and provide a firm grip on the contacts and eyelets. If not, I'll need to fill those holes completely and drill and retap them properly. Wish they'd used brass nut-serts in those holes but maybe nobody made any that small back then. Duncan Link to comment Share on other sites More sharing options...
Premium Member Dom Jaeger Posted January 28, 2021 Premium Member Share Posted January 28, 2021 25 minutes ago, Duncan Brown said: I've rimmed the inside of those tiny holes with more JB-Weld and hope that after curing overnight the machine screws will act like a tap and cut new threads into the epoxy and provide a firm grip on the contacts and eyelets. If not, I'll need to fill those holes completely and drill and retap them properly. Wish they'd used brass nut-serts in those holes but maybe nobody made any that small back then. I've never found epoxy products like JB Weld to work well repairing small tapped threads, especially if you're using a screw instead of a tap to reform the thread. You're much better off using a helicoil, or just glueing a nut at the back if there's room. Or tapping a larger thread if a larger screw will fit. But see how you go, it might work. Link to comment Share on other sites More sharing options...
Premium Member Duncan Brown Posted January 28, 2021 Premium Member Share Posted January 28, 2021 2 minutes ago, Dom Jaeger said: I've never found epoxy products like JB Weld to work well repairing small tapped threads, especially if you're using a screw instead of a tap to reform the thread. You're much better off using a helicoil, or just glueing a nut at the back if there's room. Or tapping a larger thread if a larger screw will fit. But see how you go, it might work. Totally agreed, but this is not a high-torque application, and it's worth a shot to just wait overnight. They're blind holes, so no nut on the back. Next size up would probably work, though I'll have to drill out the through-holes in the contacts and the spring steel backer plates. I'm tempted to get nut-serts if they make them in that thread size. It's kind of hard to believe Arri just threaded machine screws straight into Bakelite, but as I said it's not high torque. Duncan Link to comment Share on other sites More sharing options...
Premium Member Duncan Brown Posted January 28, 2021 Premium Member Share Posted January 28, 2021 Yeah, epoxy in that thin a coat just doesn't have enough strength to hold screw threads. So, another order to McMaster-Carr for tiny metric screws and bottoming taps. The screws need to be precisely 4.5mm long, so I'll be filing down some 5mm ones. Even the low-profile rivnuts are too long, so that's not an option. If all else fails I can countersink thin nuts on the back side, but it's a curved surface and that would all be very tricky. I can't believe I'm going to be tapping Bakelite. Who ever heard of such a thing? Duncan Link to comment Share on other sites More sharing options...
Premium Member Duncan Brown Posted February 1, 2021 Premium Member Share Posted February 1, 2021 OK, finally, the variable speed motor teardown. http://backglass.org/duncan/arri//variable_speed_motor_teardown/ And it's about time to create a new thread for just the motors, so I'll do that in a bit. Duncan Link to comment Share on other sites More sharing options...
steven jackson Posted February 1, 2021 Share Posted February 1, 2021 yeow. that looks like a real job. The wires running to the ball drive on my motors are much thinner and fragile looking. Thanks for documenting and sharing this. A really valuable resource. Link to comment Share on other sites More sharing options...
Premium Member Duncan Brown Posted February 1, 2021 Premium Member Share Posted February 1, 2021 Over 30 years and 20000 cameras (not to mention things they learned from all their other cameras and equipment) they were bound to have changed things. For instance, I wouldn't be surprised if the thinner wires were how they made the earlier motors (because that is how you make a motor that will never be taken apart again) and then they switched to more robust wires after people were running the heck out of these things and then wanted to replace just the bearings or brushes. I have a real problem with how they pinned the ball onto the shaft, especially considering the need to remove it to replace that front bearing. There's just no mechanical need I can see for it being that semi-permanently affixed. I guess we'll see if my brass dowel pins wear with use or something. I chose brass in case I wanted to mushroom the ends a bit to keep them in place (which so far, does not look necessary). Duncan Link to comment Share on other sites More sharing options...
steven jackson Posted February 1, 2021 Share Posted February 1, 2021 I tried to push that pin out and saw that it wasn't budging so gave up out of fear of bending the shaft. Thanks again for sharing this really useful information. Link to comment Share on other sites More sharing options...
Premium Member Duncan Brown Posted February 1, 2021 Premium Member Share Posted February 1, 2021 My next attempt at getting the pin out without drilling will be an arbor press (I have to wait until we're working at work again to use the one there; still all working from home here.) But my past experience has been that if you can't even budge something with a drift, an arbor press isn't going to cut it. We'll see. Regardless, it's a crazy amount of force to require to remove something about 1.5mm in diameter. Duncan Link to comment Share on other sites More sharing options...
Premium Member Simon Wyss Posted February 1, 2021 Premium Member Share Posted February 1, 2021 Traditionally you have a grooved pin in such a situation. The support must be hard, the pin is either pound out with driver and hammer or pushed under a press. Link to comment Share on other sites More sharing options...
Premium Member Michael Leake Posted February 1, 2021 Author Premium Member Share Posted February 1, 2021 My 2 cents worth. That pin is a tapered pin and only comes out one directions ML Link to comment Share on other sites More sharing options...
Premium Member Dom Jaeger Posted February 2, 2021 Premium Member Share Posted February 2, 2021 Lots of Arriflex (and other cine gear) parts are pinned with steel dowel pins. I have a drawer full of them. Used for precision pinning much more than roll pins. I doubt it's a taper pin. If there are signs of corrosion you should soak the assembly in a rust inhibitor/penetrating oil (I use CRC 2-26) and use heat to try and break any seal. You should be able to eventually punch the pin out with the right size pin punch on a solid support or with a press if you have one. Keep soaking, heating and punching/pressing. Drilling should be a very, very last resort - it's very hard to drill out a pin without damaging the assembly. Bearings are often ultrasonically cleaned and packed with fresh grease. Unless the races are damaged a noisy or stiff bearing can often come good. I only replace them when they become notchy. Link to comment Share on other sites More sharing options...
Premium Member Duncan Brown Posted February 9, 2021 Premium Member Share Posted February 9, 2021 OK finally got a motor ball drive dowel pin out cleanly. Used a hand-operated 5 ton press and broke one of my pin punches in the process, but it's possible. It's a lot of force to be putting on a punch that's less than 1.5mm in diameter, trying to keep it from bending (which means snapping) in the process. What came out was a 1.5mm x 8.5mm steel dowel pin, with 3 approximately 1/3-length grooves. So the pin itself is not tapered, but you need to treat it like one. You insert the smooth end, it goes all the way through the ball, the shaft, and into the ball again, while the grooved end (which because of the grooves, ends up a bit wider than 1.5mm) ends up jamming into the hole in the ball. It needs to come back out the opposite of the direction it went in (like a tapered pin) because otherwise you'd be driving those grooves through the shaft and the other side of the ball unnecessarily. This pin looks completely reusable, but I'm going to order some of what looks like a similar replacement part from Grainger, just so we'll know of a source for them if they work out. (They're 10mm long, which is the exact diameter of the ball, but I can file it down a bit before inserting it.) I'll order something a smidge bigger, too, as a replacement for the ones I had to drill out, and drill them cleanly to the proper new size. Duncan Link to comment Share on other sites More sharing options...
Premium Member Duncan Brown Posted February 17, 2021 Premium Member Share Posted February 17, 2021 On 2/8/2021 at 10:14 PM, Duncan Brown said: This pin looks completely reusable, but I'm going to order some of what looks like a similar replacement part from Grainger, just so we'll know of a source for them if they work out. OK, there seems to be one manufacturer of those pins in the US, regardless of which supplier you buy them through - orders from Grainger and Zoro both got recalculated to end-of-May (yes, 3.5 months from now!!!) after I had placed the orders. Going to just let it ride and see if they come in sooner. The 2mm ones should be here much sooner and I can try drilling out one of the messed up ones and refitting it with a 2mm pin. Duncan Link to comment Share on other sites More sharing options...
steven jackson Posted February 18, 2021 Share Posted February 18, 2021 thanks for the update. Link to comment Share on other sites More sharing options...
Alex Aguilera Posted August 18, 2022 Share Posted August 18, 2022 On 23/9/2015 at 14:14, Sean Charlesworth said: Si el motor está realmente agarrotado, son los cojinetes o se cayó y la perilla de avance lento y/o el eje están doblados. Si el cañón no gira, probablemente se cayó y dañó la carcasa. Si el motor funciona pero la cámara no, probablemente sea el acoplamiento de goma el que tiende a deformarse y secarse. Tengo kits de reemplazo para eso. Si alguien necesita alguna pieza, tengo casi todo. Sean Hi Sean, do you still have pieces of arri 16s, I would be interested in buying some from you. Thanks greetings!!! Link to comment Share on other sites More sharing options...
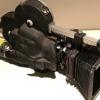
Premium Member Michael Leake Posted September 18, 2022 Author Premium Member Share Posted September 18, 2022 Three photos of my newly acquired tripod, with refurbished 'manfrotto' unbranded used 'floating' head The tripod I built. works great. Height adjustable from 39" to 57". I am working on a tripod spanner base to accommodate the legs(they have rubber feet and aluminum spikes. Link to comment Share on other sites More sharing options...


Recommended Posts
Create an account or sign in to comment
You need to be a member in order to leave a comment
Create an account
Sign up for a new account in our community. It's easy!
Register a new accountSign in
Already have an account? Sign in here.
Sign In Now