Premium Member Duncan Brown Posted April 7, 2022 Premium Member Share Posted April 7, 2022 2 hours ago, Heikki Repo said: The friction is present even when the mirror/magazine drive spindle (MIN 30E) is disconnected. Furthermore, at least when that spindle is connected, the friction seems to be higher at one specific point of the mirror. The previous three ACLs had old, dirty grease too and cleaning it out and replacing with new made the movement turn really well without friction. Then again, this one was totally stuck when I began my work, whereas the others weren't in that bad condition to begin with. Just going by every mechanical thing I've worked on ever, from cameras to cars, that's a bad bearing, Are there bearings (not oilite bushings) hiding inside that assembly? Duncan Link to comment Share on other sites More sharing options...
Gregg MacPherson Posted April 7, 2022 Share Posted April 7, 2022 Heikki wrote..lost the origin sorry... ..."If it's a camera body that would essentially lie unused due to dried, messy lubricants and you wouldn't send it overseas for servicing in any case, why not learn a bit about how it works, try to service it, learn as much as possible from different sources..." I may come off as one of the OCD ones, sorry. I'm basically like Heikki,but more cautious.. I'm a believer in doing for oneself and learning by doing, but I think with rare old cameras some learning and development of skills needs to come first. Otherwise, if DIY camera servicing becomes more popular, a significant proportion of the cameras in circulation will become compromised, and/hence the pool of used parts also. The age of lubricants is a major issue to unpick. Some proportion (perhaps most) of the cameras will never have had a full rebuild, so will still have some original lubricants in there, transformed by age and added contaminants into something akin to grinding paste. What proportion? Also, as mentioned before, the behaviour of the sintered bronze bushes with aged lubricant. So these need to be understood. We need a big change in attitude about keeping service history of cameras. It's natural to reach for advice from people experienced with servicing the camera type, but I don't believe they would all have the same technical opinion. Widen the field to include those techs working during the active history of the cameras...and there would be strata of service/skills from partial CLA to complete overhaul. The same idea applies now with the diminished pool of techs. Gregg. Link to comment Share on other sites More sharing options...
Gregg MacPherson Posted April 7, 2022 Share Posted April 7, 2022 (edited) I know that comes off as a bit of a waffle. Can I sumarise that, or what might ensue.... We need a few well qualified, experienced techs globally. Let's find them, support them, helping source parts, offering parts that we don't need. Let's encourage education and share information to help those determined to learn. But, do service manuals need to be kept off the public domain to avoid a proliferation of DIY f--kups? It needs to be considered. But if there is a subculture of serious minded people trying to learn some of the tech they need to share and communicate. Need to unpick the issue of aged, contaminated lubricants. Same for the sintered bushes. Gregg. PS: Anyone new reading this will struggle to find the short list of qualified techs, so we need to insert an easily visible update occasionally, or put it in a separate thread. Also, maybe a separate thread for random servicing questions. And the "shit list" for bad boy techs is still a viable thing I say... Edited April 7, 2022 by Gregg MacPherson more words Link to comment Share on other sites More sharing options...
Premium Member Duncan Brown Posted April 8, 2022 Premium Member Share Posted April 8, 2022 8 hours ago, Duncan Brown said: Just going by every mechanical thing I've worked on ever, from cameras to cars, that's a bad bearing, Are there bearings (not oilite bushings) hiding inside that assembly? Gregg clued me in to the parts manual floating around out there. Looks like not a bearing in sight in that assembly. Weird. Oilite bushings don't usually give that "lumpy friction" symptoms when they are going bad or dry. Duncan Link to comment Share on other sites More sharing options...
Gregg MacPherson Posted April 8, 2022 Share Posted April 8, 2022 1 hour ago, Duncan Brown said: Gregg clued me in to the parts manual floating around out there. Looks like not a bearing in sight in that assembly. Weird. Oilite bushings don't usually give that "lumpy friction" symptoms when they are going bad or dry. Hey, watch it mate, those "Olite bushes" are bearings. Actually, I'm used to considering any loaded contact surface, even stationary, for its bearing stress. Interesting observation, no ball bearings in the assy. I wonder what the exact reasons are... Gregg Link to comment Share on other sites More sharing options...
Premium Member Duncan Brown Posted April 8, 2022 Premium Member Share Posted April 8, 2022 14 minutes ago, Gregg MacPherson said: Hey, watch it mate, those "Olite bushes" are bearings. Actually, I'm used to considering any loaded contact surface, even stationary, for its bearing stress. Interesting observation, no ball bearings in the assy. I wonder what the exact reasons are... OK sure - I think "bearing" is often used as shorthand for "roller bearing" because "bushing" very specifically means the other thing. Roller bearings can handle bigger loads. If you don't need that, I suspect oilite bushings are longer lasting and more maintenance free. Just because you can't put more grease into sealed roller bearings doesn't mean they last forever. You can always look up bearings by number and generally find a replacement. I wonder how easy it is to find generic replacements for the Eclair bushings? Or do they really just need cleaning/re-soaking and then they're good to go? Duncan Link to comment Share on other sites More sharing options...
Gregg MacPherson Posted April 8, 2022 Share Posted April 8, 2022 (edited) 1 hour ago, Duncan Brown said: ....I wonder how easy it is to find generic replacements for the Eclair bushings? Or do they really just need cleaning/re-soaking and then they're good to go? I flicked through the English drawings (good exploded views) and saw a variety of forms for the bronze bushes, but I don't know if any are standard geometry. It wouldn't surprise me if the tolerances for the shaft to bush fit in the ACL were special. But hey, someone with some new bushes and skill with the right tools could measure a new bush and shaft. Don't know how you measure a bush that small. Like I've been opining at length about, we don't know enough about the aged lubricant issues yet, we don't have protocols for the cleaning and re-impregnation yet. The Aaton bushes I read were porous aluminum alloy, and I thought they had reservoirs. We don't know exactly how the fluid mobility works for them, etc, so we can't just port all the Aaton ideas over to the ACL bushes. I do have a formal list of Aaton lubricants here somewhere, and I scrounged some tiny samples from Stephen Spooner at Panavision a while ago. Course none of that helps. The concern about aged lubricants may apply to new bushes also, but we can't assume that they have the same life span as bushes/lubricants in service. I assume longer lifespan.. I'm so anti the idea of people randomly trying to feed oil into the juncture between shaft and bush that I think it deserves them a place on the sh-t list. I can pretty well guarantee that this was a routine "service" for you know who before he turned ACLs around on eBay. Gregg. Edited April 8, 2022 by Gregg MacPherson more words Link to comment Share on other sites More sharing options...
Premium Member Duncan Brown Posted April 8, 2022 Premium Member Share Posted April 8, 2022 24 minutes ago, Gregg MacPherson said: I'm so anti the idea of people randomly trying to feed oil into the juncture between shaft and bush that I think it deserves them a place on the sh-t list. Yeah, that's not how those work. Duncan Link to comment Share on other sites More sharing options...
Premium Member Dom Jaeger Posted April 8, 2022 Premium Member Share Posted April 8, 2022 Sintered bearings will dry out over decades. I don’t think just adding oil would necessarily be detrimental, but yeah it isn’t the correct way to lubricate them. Here’s an interesting discussion on ways to relubricate sintered bearings: https://www.lencoheaven.net/forum/index.php?topic=24899.0 1 Link to comment Share on other sites More sharing options...
Heikki Repo Posted April 8, 2022 Author Share Posted April 8, 2022 19 hours ago, Heikki Repo said: The friction is present even when the mirror/magazine drive spindle (MIN 30E) is disconnected. Furthermore, at least when that spindle is connected, the friction seems to be higher at one specific point of the mirror. So, last night I went further down the road of (partial) rebuild. I carefully first removed MIN 30E and the mirror assembly MIN 75E. Cleaned the MIN 30E surfaces and the opposing control shaft bearing 25E surfaces. The MIN 30E had very good, low friction feel to it. I then proceeded to remove transmission shaft assembly MIN 52E. I could now clean all dirt from the surfaces between it and MIN 25E. Also, could confirm that the shutter spindle assembly MIN 40E has low friction too, spins easily. Putting it all back together and then again removing the transmission shaft assembly shows that without the transmission shaft assembly, the claw+control shaft bearing+magazine drive spindle+mirror have very low friction and work great together. This would point the issue being located in the transmission shaft assembly. I'm not yet fully certain if the shaft has some friction or not, it's more difficult to assess. However, another point to consider is the angle of the gears MIN 53 SE and 54 SE. The assembly can be adjusted a bit with the adjustment shim MIN 57. If the transmission shaft assembly is put in its place with the shim in the same place as it was originally and I tighten the screws fully, the whole movement becomes tight with tightness varying in different positions. However, if I don't tighten the MIN40E screws, the movement works more freely. Now then, it's difficult to say how tight these screws were to begin with, since they had been closed off with varnish and paint. I'll next try to visually compare them with my other ACLs. Nonetheless, to summarize: If there is a risk of self lubricating pieces having dried out, I didn't feel anything like that in three out of the four shafts and judging the fourth one is difficult. Either way, the issue is with the transmission shaft assembly. Link to comment Share on other sites More sharing options...
Premium Member Aapo Lettinen Posted April 8, 2022 Premium Member Share Posted April 8, 2022 6 hours ago, Duncan Brown said: Yeah, that's not how those work. Duncan correctly re oiling the sintered bushings would require fully disassembling the camera to atoms first to get the bushing out of it. I totally understand why people choose to just apply some oil drops to the surface instead of fully disassembling everything in the camera to get the bushings out for oil cooking / vacuum method and thus making it often pretty impossible to assemble it again correctly with the same tolerances than it has when put together by a "proper technician" who had the original gauges and tools helping the assembling process . Link to comment Share on other sites More sharing options...
Heikki Repo Posted April 8, 2022 Author Share Posted April 8, 2022 1 minute ago, aapo lettinen said: correctly re oiling the sintered bushings would require fully disassembling the camera to atoms first to get the bushing out of it. I totally understand why people choose to just apply some oil drops to the surface instead of fully disassembling everything in the camera to get the bushings out for oil cooking / vacuum method and thus making it often pretty impossible to assemble it again correctly with the same tolerances than it has when put together by a "proper technician" who had the original gauges and tools helping the assembling process . Not to mention that originally even in the spares most of these parts are available only as full assemblies. Link to comment Share on other sites More sharing options...
Gregg MacPherson Posted April 8, 2022 Share Posted April 8, 2022 (edited) 2 hours ago, Dom Jaeger said: Sintered bearings will dry out over decades. I don’t think just adding oil would necessarily be detrimental, but yeah it isn’t the correct way to lubricate them.... Ok, I'll "check my fire",(stop the barrage) on that one for now. Good condensed read on re-impregnation methods. A simple infusion might work. Put the bearing in a small bag with two sealed tubes coming out. An exit path (with a tap) for the vacuum and an inlet path for the oil. A layer of fabric in there so that air and oil can move between the tube entry points and the bearing. Apply full vacuum, immerse other tube end in oil and remove plug. oil will migrate into the vacuum. I assumed this might be one of the ways it was done. Infusion is used a lot now with composites (carbon/epoxy etc) and some practical things can port from that field. I wonder if bushes could be left in their housings, cleaned and re-impregnated in situ like that. Just thinking aloud. I have tried oil re-impregnating the porous iron plain bearings for the feed rollers in an old wood working machine I have. I found a target temperature online, preheated the bearings and oil, watched oil sweat out of the bearing, then immersed them. I thought that by preheating the bearing I might remove some old oil, and as the temperature dropped oil would be sucked into the pores. Gregg Edited April 8, 2022 by Gregg MacPherson remove stray words Link to comment Share on other sites More sharing options...
Gregg MacPherson Posted April 8, 2022 Share Posted April 8, 2022 1 hour ago, Heikki Repo said: .....If the transmission shaft assembly is put in its place with the shim in the same place as it was originally and I tighten the screws fully, the whole movement becomes tight with tightness varying in different positions. However, if I don't tighten the MIN40E screws, the movement works more freely. ...If there is a risk of self lubricating pieces having dried out, I didn't feel anything like that in three out of the four shafts.... If I followed you, it sounds like the gear clearance between the vertical "transmission shaft" and the shutter spindle assembly is too tight. But I didn't get how you were going to adjust that. Something to do with the way that the vertical transmition shaft assembly is mounted/shimed/screwed to the main plate (MIN 5, Front plan). I have pondered that shimming before, when looking at the block, but can't remember. Which screws are you referring to as "the MIN40E screws"...? Re the aged lubricants issue in the sintered bushes, I'm not sure what that shaft/bush would feel like to the fingers. My guess is that aged original oil could feel free. Aged oil from over oiling might have friction. I wonder if Eclair had a factory exchange system so that regeonal techs could just swap out a movement block and have it overhauled at the factory. Gregg. Link to comment Share on other sites More sharing options...
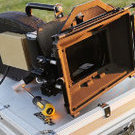
Heikki Repo Posted April 8, 2022 Author Share Posted April 8, 2022 32 minutes ago, Gregg MacPherson said: If I followed you, it sounds like the gear clearance between the vertical "transmission shaft" and the shutter spindle assembly is too tight. But I didn't get how you were going to adjust that. Something to do with the way that the vertical transmition shaft assembly is mounted/shimed/screwed to the main plate (MIN 5, Front plan). I have pondered that shimming before, when looking at the block, but can't remember. Which screws are you referring to as "the MIN40E screws"...? Re the aged lubricants issue in the sintered bushes, I'm not sure what that shaft/bush would feel like to the fingers. My guess is that aged original oil could feel free. Aged oil from over oiling might have friction. I wonder if Eclair had a factory exchange system so that regeonal techs could just swap out a movement block and have it overhauled at the factory. Gregg. Here's the shim, that seems to be factory fine tuned in every camera: These are the screws I mean: Both photos from a well working, low friction movement. Link to comment Share on other sites More sharing options...
Gregg MacPherson Posted April 8, 2022 Share Posted April 8, 2022 (edited) I have a spare body here but I don't want to open it to look. It has plastic shims under the movement block mounting screws for the FFD and they fall off easy when trying to set up for re-mounting the block. So I'm stuck with the drawings and your pics. Can I introduce a local reference axis system. X axis is along the lens axis, Y axis is to the operators right, Z axis is vertical. All positive, negative being in opposite directions. My interpretation is that the three screws you highlight are just to clamp the assembly in place. The wedge shaped shim can adjust up and down. I don't get yet how this adjusts the gear clearance. How does the gear on the transmission shaft shift in the + -Y direction. Is the shim tapered in the +Y direction as well? Should be able to see that, looking from above (pic please). The drawings show different shaped shims, English/French. The French one, obvious taper in -Z direction, can't read the Y direction. The Eng one, may have a tiny bit of taper in -Z direction and has none or unreadable amount in Y direction. We have fun pondering and agonizing over the issue, but one or two techs will know the facts and method. An experienced tech, even one unfamiliar, looking at the movement block might see easily how to adjust the gear clearance. But what the the gear clearance should be and how to set precisely that.... Did you say that the friction or binding feeling varied with rotation? So more quesing and speculation...If the feeling is varying like a sinusoidal wave then one of the gears is effectively non concentric, most likely by a bent shaft. If the gear clearance is set way too close, maybe the natural error in the machining of the parts is showing, and increasing the clearance would fix it. If the friction or binding feeling is momentary and sharp during a rotation then it's probably a damaged bearing surface on the bush/shaft at either end. Heikki, you had a beer and a chat with the flight instructor (Boris or someone) and now you are trying to fly the plane. Just as you get the hang of it you realize that it has many unknown ways to kill you. But you have some spare airplanes, so you have some confidence.... Gregg. Edited April 8, 2022 by Gregg MacPherson spelling Link to comment Share on other sites More sharing options...
Heikki Repo Posted April 8, 2022 Author Share Posted April 8, 2022 4 minutes ago, Gregg MacPherson said: Heikki, you had a beer and a chat with the flight instructor (Boris or someone) and now you are trying to fly the plane. Just as you get the hang of it you realize that it has many unknown ways to kill you. But you have some spare airplanes, so you have some confidence.... Haha, really well said! But honestly - I come from the OCD land, so starting to take these cameras apart didn't come to me all that naturally at all. I might have gotten a nudge from an older DoP who had also taken an Arriflex 35 apart in the desert and put it back together and who pushed me forward with this... In fact I'm happy that this one particular ACL is a bit more problematic. It's pushing me forward to challenge myself and learn more. I could probably read numerous general books on mechanics, but most likely a considerable number of techs have learned their trade through practical doing and, I argue, unavoidably also destroying something in the process. While I hope to be careful enough to avoid breaking anything, there is a reason why it's electronics wizards themselves who speak of components letting out "magic smoke" without which they no longer work. Without taking risks one can't learn new skills or achieve anything. I admit that secretly I hope I could have learned these things straight from someone who has learned in the Eclair factory or even from a general cine tech. There is a - I think - three year course for learning to become a still camera tech by Kameratori here, but since I'm quite happy with my current lines of work and working on my doctoral dissertation, I think I can learn best by just trying my wings with this ACL, even if it might crash land ? 1 Link to comment Share on other sites More sharing options...
Premium Member Aapo Lettinen Posted April 9, 2022 Premium Member Share Posted April 9, 2022 1 hour ago, Gregg MacPherson said: But you have some spare airplanes, so you have some confidence.... the trick is to make the airplanes so cheap that you can spare breaking one or two in the process when finding out how to repair them ? That is why I have liked the Soviet cameras: they are so cheap that I can spare breaking one completely and having two for spares and two for actual shooting ? the reason I started to open them by myself is that they were in incredibly bad condition when purchased and one would not have been able to shoot anything with them without cleaning the small rocks, couple of teaspoons of film chips and tons of dust from the inside and removing the dried up old lubricants replacing them with any kind of stuff which has even a single drop of actual working oil in it ? ------------- if the camera is too expensive you can't afford to mess up anything by trying to service it by yourself and you have to either not shoot with it at all or to pay for someone else to overhaul the camera which might be very expensive and then you don't have any money left to shoot with the camera, AGAIN. It is kinda same thing with expensive video gear: you buy too expensive video camera for your application and you don't have any money left to shoot with it anymore. Then it is a completely useless piece of gear and you can just as well sell it to someone else... 3 Link to comment Share on other sites More sharing options...
Gregg MacPherson Posted April 9, 2022 Share Posted April 9, 2022 (edited) 1 hour ago, Gregg MacPherson said: ...Can I introduce a local reference axis system. X axis is along the lens axis, Y axis is to the operators right, Z axis is vertical. All positive, negative being in opposite directions. Heikki, you had a beer and a chat with the flight instructor (Boris or someone) and now you are trying to fly the plane. Heikki, I'm glad (relieved) that you enjoy the humor... Perhaps a correction on my hastily introduced reference axes above. Most common convention for drawing may be the right hand rule (RHR). Thumb vertical, index finger pointing, second finger at 90 deg, so Z, X, Y, all positive. Sometimes the LHR is used in some engineering fields. Doesn't matter much, but if we use these spatial references, lets use the RHR. Gregg. Edited April 9, 2022 by Gregg MacPherson spelling 1 Link to comment Share on other sites More sharing options...
Heikki Repo Posted April 9, 2022 Author Share Posted April 9, 2022 23 hours ago, Gregg MacPherson said: My interpretation is that the three screws you highlight are just to clamp the assembly in place. The wedge shaped shim can adjust up and down. I don't get yet how this adjusts the gear clearance. How does the gear on the transmission shaft shift in the + -Y direction. Is the shim tapered in the +Y direction as well? Should be able to see that, looking from above (pic please). The drawings show different shaped shims, English/French. The French one, obvious taper in -Z direction, can't read the Y direction. The Eng one, may have a tiny bit of taper in -Z direction and has none or unreadable amount in Y direction. Sometimes the most unexpected things happen. I decided to try once more putting it all together. First result, stuck. I moved then the shim piece downwards along the Z axis (thumb up axis). The end result? It works! Tightened the screws, but not with force. Now this movement has the lowest friction of all the ones I have looked at, which is not surprising, since it's the only one that has been cleaned really thoroughly. It seems that the shim really is there to fine tune the Y-axis. Of course, it won't be until I run any of these with a motor that I know whether I was succesful or not, with film tests being the final judge. Anyway, currently it seems that I have at least been able to get this plane moving, things starting to look promising... Link to comment Share on other sites More sharing options...
Gregg MacPherson Posted April 9, 2022 Share Posted April 9, 2022 (edited) So is the shim tapered also in the Y direction, thinner to camera left. Wish we had an ECU of that from above. That's the only way I can understand it. The contact face of the transmission shaft bearing mount (MIN50) would also have to be oblique to match that taper, with its screws/pins orthogonal to the plate the assembly mounts to (MIN5). Is it a weird result of translation that gives the big plate that the whole movement block is assembled upon the name "front plan" (MIN5)...? I'm prepared to be wrong, so until we know the exact geometry of the shim and how that adjustment works, there's doubt...but I don't think the tension on the screws for the transmission shaft mounting are a means of gear clearance adjustment. One could try to observe the gear clearance at the extreme up and down position of the shim. We assume that the top position will bind the gears. Can one try to feel the clearance at the low position. Finger pressed hard on the lower transmission shaft gear and see if you can feel a little play in the shutter spindle assembly. All this speculation will disappear with a few short words from the wise....But it can be an unfair ask if the answer is long, so one needs to be careful not to tax too much the time of experts. The learning to fly analogy is a fun one...In gliders (sailplanes) the instructor sits behind you and you can have the illusion of being in control of your own fate..then he shows you a spin for the first time, and you are looking at the ground slowly spinning around your feet..... Gregg PS: All these interesting things may become lost on the forum due to the title. Maybe we need to plan more on the way we organize, categorize our information. Edited April 9, 2022 by Gregg MacPherson more words. Link to comment Share on other sites More sharing options...
Gregg MacPherson Posted April 10, 2022 Share Posted April 10, 2022 1 hour ago, Gregg MacPherson said: ..... The contact face of the transmission shaft bearing mount (MIN50) would also have to be oblique to match that taper, with its screws/pins orthogonal to the plate the assembly mounts to (MIN5). It's hard figuring this out without having a wreck to pull apart. I rethought, and the screws/pins would need to be orthogonal to the oblique plane, the contact face of the trans. shaft bearing mount and shim. Heikki, any chance of an ECU pic of the shim from above, or even an eyeball check. Your CUs already look quite sharp. I often use a reading glass lens or workshop magnifier as a diopter with cell phone. Link to comment Share on other sites More sharing options...
Gregg MacPherson Posted April 10, 2022 Share Posted April 10, 2022 Well cripes people, we are 4 pages in, 3.5k views, expansively off topic and still haven't gathered a summary list of techs and what they do, accessible so that someone new can find it easily. I'm gonna steal Heikki's idea, start a new list, and on that one, only have the research on who, where and what they do, and a clear summarized list. Doing it now. I'll notify here when it's done. Gregg Link to comment Share on other sites More sharing options...
Heikki Repo Posted April 10, 2022 Author Share Posted April 10, 2022 6 minutes ago, Gregg MacPherson said: Doing it now. I'll notify here when it's done. Thanks Gregg. The real challenge is to locate people who have experience with ACLs and are willing to also work on them. Link to comment Share on other sites More sharing options...
Gregg MacPherson Posted April 10, 2022 Share Posted April 10, 2022 (edited) Hei Heikki, (if those words are in the right order)...I'm right now second guessing myself and wondering if, instead I should just put a big loud update on this thread. But for new people I think we need a new thread. And all the interesting stuff where people figure out how to do the ACL teardowns needs it's own list too. Gregg. Edited April 10, 2022 by Gregg MacPherson added ) Link to comment Share on other sites More sharing options...


Recommended Posts
Create an account or sign in to comment
You need to be a member in order to leave a comment
Create an account
Sign up for a new account in our community. It's easy!
Register a new accountSign in
Already have an account? Sign in here.
Sign In Now