

Shane Bartlett
-
Posts
58 -
Joined
-
Last visited
Recent Profile Visitors
1,848 profile views


-
 $450 OBO.
 -
Okay, $500 OBO.
-
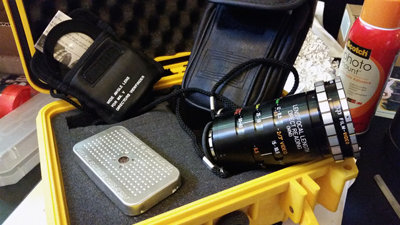
Alan Gordon MARK V Director's Viewfinder. Comes with black leather case and attached neck cord. Also comes with wide angle lens adapter in nylon case. All of this is nuzzled into a carefully plucked yellow Pelican 1200. I bought this from the original owner many years ago. I used it about 10 times, and it's spent the last 7 years in a closet. I take excellent care of my things, so it's in excellent condition: clean glass, no faults, no chips, no breakage. Only problems are: missing lens cap (I never received it), previous owner's name has been scratched out and my name written on the inside flap of the viewfinder case (you know, because people love to walk off with your stuff; true story), and there's a slight catch when changing to 2.40 Anamorphic. It's not broken, it just catches a little and then moves the rest of the way home (how I received it). This is about $1000 worth of gear. Selling for $525. --Shane
-
Sold.
-
Minolta Color Meter II + original case. Good to great cosmetic condition. Works fine, although probably needs to be calibrated. $275 OBO
-
Dutch Angle While DOLLYING?
Shane Bartlett replied to Jean Paul DiSciscio's topic in Visual Effects Cinematography
Weaver Steadman 3-axis head. -
To massage both the reverse shot of the forward actor, and the shot of the building, I'd consider whether there are any lights on in or outside the building--an entry light or two, as well as rooms that may be lit inside. They could appear brighter than your moonlight, the color contrast is always nice, and you'll have some motivated light behind your forward actor when he turns, if you can compose the shot so that it is visible in the background. (Picture a lit window behind the actor on his far- or off-camera side.) This light does not need to "hit" the actor to adequately provide separation. Then it's a simple matter of scrimming your moonlight (backlight) source while keeping the same relative position, so that it becomes a fill. If the story calls for the building to be dark, I'd go for beauty, as was previously suggested. Depending on how wide your building shot is, the size of the building, your composition, and the size of your lamps, you will probably need more than one moonlight source. It can look pretty bad when ground level items are nicely moonlit while rooftops and trees go to total darkness. Also depending on the situation, if there is any dark dead space visible around the sides of the building, I'd consider having some lights back there to suggest sources (streetlights, porch lights, etc) in the distance. 1k fresnels pointed toward camera work pretty well, if you can get them far enough away. If you can't get that far away, snoot the lights to make them appear smaller (blackwrap works just as well, and is cheap). Lastly--and not to sound presumptuous, but only because shooting at night is such a different animal at the low/no budget level--spend as much time as you can outside at night before you shoot, preferably in a location similar to that which you will be shooting. I once spent an hour a night each night for a month just observing moonlight in its different phases. Take someone with you when you can, but also go alone a few times. Best education ever. And still difficult to replicate, especially when shooting on a very low budget , as you mentioned. I've certainly learned that--especially at that level--it takes a good many lamps to make something look dark. Make the best with what you have available. One location I shot could have turned out beautifully with only 3 lamps, but the shot that we finally deemed necessary to the story required 7 when I only had 5 (I wasn't able to scout the location prior to shooting, unfortunately). In the end I sacrificed the rooftop and treetops to darkness because there were other story elements more important to the shot than my aesthetic taste. Shot selection and composition will make or break you. Be prepared to make such sacrifices, but also be prepared to fight for better choices in serving the story. Have fun. Let us know how it goes.
-
Creating Haze Outside
Shane Bartlett replied to Pete Wallington's topic in Lighting for Film & Video
There was a brief mention in a recent AC article about using a hazer outside, but I can't remember which model or for which picture. Sorry. The image displayed was of a grove or meadow with a row of trees...something like that. I imagine it would necessitate the rigging of some very large rags overhead and just out of frame to prevent the haze from dissipating too quickly, although I seem to recall (or perhaps I'm making it up) that wetting the ground/grass will also help--but perhaps that only helps to sell the effect. It's early and I haven't had my coffee yet, forgive me. I'd check with your local supply house(s), if you haven't already. All too often people just go in to pick up/drop off orders. From my experience, rental houses are staffed with knowledgeable people who really like to be involved in helping you solve production problems like this, and it's a great way to get to know the hardworking people on the staff. Show them a picture of the location and explain the effect you want. While they may not have what you need in house, they can probably help you locate it elsewhere. -
Unfortunately, not yet. I'm just now getting around to building my website. I hope to have it all complete by the end of the summer.
-
Ram, I didn't use any 35 adapters on this one, just an HVX200 right out of the box. It's been 2 years, so I don't recall all of the details, sadly--I always want a dedicated note-taker, but it never seems to work out. :blink: All I can say now is that I'm pretty sure I went with the Cinelike gamma setting--whichever is flattest. I cranked the detail level down quite a bit, set Master Ped at -3, and pulled the color a little (except that last frame grab, for which I dialed in a little more saturation). No bump in gain. UltraCon 4, and underexposure. Sorry I can't be any more specific.
-
Please do! Have fun. I think you'll like 7205.
-
With the Low Contrast filters, you'll also get halation in the highlight areas. The Ultra Contrast filters, on the other hand, will evenly lower contrast over the entire frame without halation. I've used them before, but only for video (ultracon 4), and they do help. Of course, as others have already indicated, choosing your color palette (location, design, wardrobe) is extremely important. Here are some frames from my last short film, shot 2 years ago with an HVX200 and the Ultra Con 4, with deliberate underexposure. I was going for a specific look, but I think it's close to what you are seeking. Should give you an idea at the very least. In that last shot, I added slight diffusion to enhance the effect created by the sheers hanging over the bed, and in post I restored the blacks a bit. I've found that 7205 with slight underexposure (1/3 to 1/2 stop) is wonderfully low in contrast and saturation. Sadly, I do not have any frames to show you--still waiting for my copies of the footage from the director. I imagine though that with the combination of an Ultra Con you could get pretty close to the look you want. Most people avoid grain/noise, but I think a little grain helps (and maybe that's simply my opinion) in achieving a muted look. Just look at Savides' work, especially in Birth.
-
The Pussy Cat Dolls - Strobe Effect
Shane Bartlett replied to Edward Roberts's topic in Lighting for Film & Video
I agree that they are Paparazzis, and I agree with Adam's comment as well, having been there myself. You will be sorely disappointed with a readily-available, low-wattage strobe light. Especially if you are shooting daylight exteriors. -
Is this camera suitable for sync sound?
-
I've got a few Altman par cans, very similar to the Chauvet, and I've got a few Mole Pars. I prefer the Moles for two reasons: they are very small (almost 1/3 the size), and you can rotate the fixture to position the beam without removing the globe. Very handy. I don't know if that is enough incentive for you to merit the significant price difference. However, if you're willing to wait, you can sometimes find the Moles on eBay. I bought 4 Mole Pars for about $35 each. --S
