Robert Hart
-
Posts
378 -
Joined
-
Last visited
Everything posted by Robert Hart
-
I thought I had replied and confessed to an error but the reply I cannot find so here is a repeat. - My bad. I mistook Barium for Beryllium Oxide which is the evil stuff.
-
If it is barium oxide, if you are a kitchen-table engineer with no PPE for yourself and your nearest and dearest, it may be very prudent to leave the stuff alone as it is apparently hazardous.
-
If your fire is a wood fire which is in the shot, my personal preference would be to replicate a fire which has coaled down to a glow and would be more controllable. Add some variously sized scrunched up chunks of alfoil into cold charcoals or maybe matte-painted stones with few small lamps wrapped with red gel inside the charcoal/foil mix. With careful teasing you may then achieve hotspots of coloured light in the darker coals. Your other lamps lighting your character(s) may need to be connected to the small lamps inside the coals so that all lights can be made to vary or flicker together. You could try covering a gas ring or burner with small rocks and lighting that up. You might control your other lights with something as simple as a human trembling a leafy branch in front of the light. Please heed better advice than mine which may emerge here.
-
Your roll of film appears it may have been made in March 1987. Here is a website with a bit of information if you scroll down. https://www.japancamerahunter.com/2020/12/film-review-tasma-t-42-400/
-
The small shutter is part of the main shutter-mirror parking system. When the camera is buttoned off, the motor remains running at a slower speed creeping the park shutter around until it breaks IR light between an emitter and detector. In the manual there is reference to not bending the little wire which feeds to either the emitter or detector because a glass part will be broken.
-
Slightly offtopic, the proposed new ORWO colour stock could be interesting. It is apparently based on Agfa Gevaert XT320 formulation but seems to have a different look. It's uniqueness may appeal to creative folk.
-
Shooting Handheld in River Advice
Robert Hart replied to Mateusz Czopek's topic in Camera Operating & Gear
If you cannot get hold of an underwater housing you might consider finding a thick sheet of white styrofoam about 3ft x 2ft, two pieces of plywood about 4 inches square as washers top and bottom of the styro sheet and attaching that to the base of your camera. If there is a mishap and you slide in, the camera may have half a chance. -
You will get better penetration with diesel fuel than cooking oil. You might try some diesel diluted with some automotive acrylic thinner. As the thinner gases off it will leave the diesel behind. Do this outdoors as the fumes are toxic. Be careful with the cooking oil as a preserver. It may gel and over time loctite some things together. Because it is edible, other things may also live on it in the future like mould. You might also try holding a soldering iron tip to the screw heads for a while to soften any loctite that may be on the threads of the screw. If it works for old BSR turntables it might work for your recalcitrant screws. Do not do this if the screws are holding together any plastic parts or you may damage them.
-
Arri 16s question re: fluctuations in speed / focus - why?
Robert Hart replied to Luke Fowler's topic in ARRI
QUOTE: "I'd suggest that the "fold" idea doesn't really account for the fault appearing in shots made a short time apart. Overnight, yes. But only on the first shot of the day." My CP16 only required about ten minutes of rest to make it happen. I should clarify that I was using it in a hot climate. I think the original author of this thread is now on the right track with his most recent reply. -
Arri 16s question re: fluctuations in speed / focus - why?
Robert Hart replied to Luke Fowler's topic in ARRI
I don't think the scan is bad. So long as the lens aperture is tight, movement of the film off the gate will not affect focus as critically as when the lens iris is opened wide. What I am seeing is consistent with the shape memory of the upper fold of the loop going through the gate and momentarily lifting the pressure plate as if there is a weak spring. The signature double-clatter of some CP16 cameras is the shape memory of the film passing through the gate and momentarily lifting the pressure plate. In the CP16, The film becomes deformed when parked around narrow rollers in the upstream film path within the camera. In the ARRI style cameras, the upstream and outgoing film paths are within the magazine itself. However, as with the CP16, I expect maybe 15-20 frames of film would pass through before the artifact occurred. Your issue is occurring after about four frames which may eliminate shape memory from narrow rollers as a cause. The visual fault in your film is also consistent with the pressure plate being hung away from full contact against the back of the film due to accumulated debris under its limit stop. This might also occur if the magazine is prevented from seating fully home in the camera by worn latching, debris or physical damage having bent something. Is the magazine when latched to the camera snug or a little loose? In that event, the film will be finding its own place between the pressure plate and the gate face and floating in a clearance between the two. As the shape memory of the upper loop fold passes the the gate, the film will momentarily move closer to and away from the image plane until the fold passes and the film settles. The pressure plate as far as I can observe is the smaller rectangle within the longer chrome guide path in the front of the magazine. There may be some other defect if the magazine has been dismantled for servicing and not reassembled correctly. Except for the initial bad frames after buttoning on, the performance seems satisfactory and may not have attracted the attention of the operator or been reported back to the operator by an editor. My bet is that if you shoot in low light with the lens aperture wide-open, whilst your viewfinder image will be sharp, your film image may momentarily sharpen, soften and clarify a little but remain out of focus after the fold passes through. Do you have another magazine to test with? I doubt that this issue will have anything to do with drive motor speed variations. Another possible cause may be that your loading is causing the upper loop fold to be a little tight maybe by one frame and the initial start-up before the magazine film transport responds may be momentarily pulling the upper loop fold snug. If there is workspace within the magazine for the upper loop fold to be one frame deeper then that would be my next trick to try. As a defect, it may have always been accepted as an ideosyncracy of that particular camera. In the edit suite it might not have attracted enough attention to prompt reporting back to a camera department or the operator. -
I observe there have been no replies as yet. To have the projector gate modified, the best would be a motion picture camera repair service. Widening the gate would likely be a fairly simple but necessarily high precision task. A simple widening of the gate will locate extra image area away from the optical centre axis. If the light beam from the lamp is narrowly prefocused, there may be delivered an image which is dark in the right side upper and lower corners. A more thorough method would be to move the widened gate slightly to recentre the image to the optical axis but this would be complicated and expensive. What brand and model is your projector? Some projector lenses may deliver a Super16mm image which is vignetted at the right upper and lower corners. I copy-pasted the following list for some european services from this web address. https://re-voir.com/shop/en/content/10-film-services SUPER 8/16mm CAMERA REPAIR/MODIFICATION RESOURCES : BJORN ANDERSSON - BEAULIEU Sweden, Atelier RAYBAUDI - BOLEX France, CINEFIX UK UK SUPER 16, INC. New York, USA, JK CAMERA Oakland, USA, LIST OF GERMAN CAMERA TECHNICIANS Germany, PRO8MM Burbank USA, DU-ALL New York, USA, CLICK & SURR Berlin, Dr. Bolex USA, LES BOSHER UK, MICRODELTA Spain, PIGEON CREEK CAMERA - Bolex Ontario, Canada, L'ATELIER DE CELESTINS Montrouge, France
-
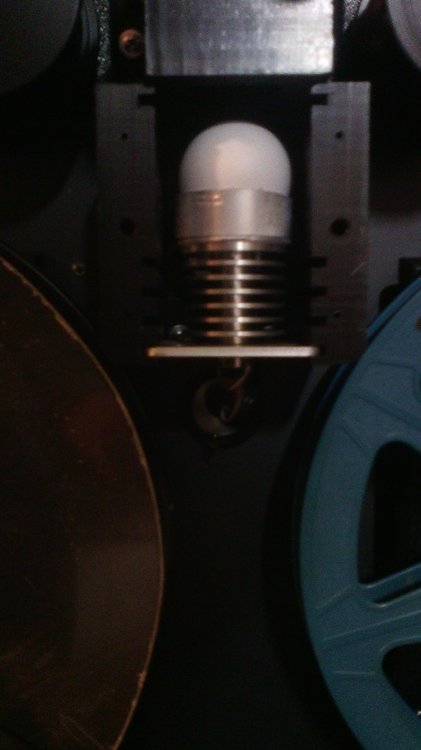
For what it may be worth, I thought I would try my understanding of the notion of a spherical light source. I trimmed off part of a table tennis ball with the intention of the opening being directed towards the film plane. The ball sat on a PVC ring cut from some water pipe. The ring inside was sprayed with some bright chrome paint in hope of a bit more light scatter. That plan did not work. The round end of the ball was too close to the centre LED and created a hot spot. There was a bit of weird stuff going on with specks of dust on the clear film test. They acted like little lenses and created ring stains in the image. I guess this might be the defocus effect on scratches. I turned the ball over and set the opening towards the LED panel. The light spread seems to be quite even. The colour looks a bit grubby. Neg seems to scan and invert a little better but that is purely subjective on my part from live previewing as a test.
-
Untidy fillets in the frame corners suggest some intervention may have occurred. Maybe somebody was minded to tidy up what may have been perceived as apparent roughness in the metal finish at the frame edges. As suggested in previous replies, blackening the inner surfaces of the frame edges may help if those edges are shiny bare metal. With such a thin border between frames some crossover flaring remains likely to occur due to internal reflection within the film itself. The remjet backing on film can only do so much.
-
Loose pressure plate? (major footage issue - link included)
Robert Hart replied to zachary pape's topic in 16mm
Going by the damage to the sprocket holes, my bet is on a short loop. Weak pressure plate springs might allow the film to spring back out of registration with the next incoming claw movement and then a frame may drop leaving the loop short on the outfeed of the gate/pressure plate. If you can get hold of some junk film, run that through the camera with the cover off and observe the film movement through the gate/pressure plate. Stop and start the camera a few times. Allow a half-hour rest between at least two of the stop-starts to allow the film to shape-memorise around a sprocket or roller. A bend in the film which has become set, may be enough to force the pressure plate away and allow the sprocket holes to move out of registration with the incoming claw. A signature double-clatter after buttoning on some CP16 cameras is caused by shape memory in film which has been resting around rollers for a while, lifting the pressure plate as it passes though. If this is happening, you should see an initial lift-off then a violent lift-off as the claw strikes the film between the sprocket holes and catches the next sprocket hole as it drags across the lifted film. Witness marks from the claw between frames suggest the loop had gone short and the claw was punching in, lifting the film/pressure plate, then dragging down the film until it found the sprocket hole and the film/pressure plate sprang back. After two slips or maybe more, the downstream loop will have become short and the film will then be pulling through the gate constantly with the claw clattering the film and pressure plate away from the gate. The sprocket hole damage is consistent with the upstream face of the claw abrading the edge of the sprocket hole as the film slips back against the gate. Another issue may be if the claw crank mechanism is worn. The claw may no longer make full pulldown distance between frames but come up short and punch the film at the beginning of the next pulldown, which may force the film and pressure plate away from the gate. The sprocket hole damage is also consistent with the claw punching in against the upper edge of the sprocket hole before engaging with the lower edge and pulling the film down one frame. The sprocket hole damage also seems to wander sideways which suggests the claw and crank may be end-floating a little. The observed lateral movement would be acceptable as it does not cause the claw to strike the sides of the sprocket holes. However it does suggest there may be some wear. Looseness in the claw and crank wearing surfaces, backlash in the gears and the normal nature of the governor in a clockwork drive to hunt for correct speed, combined with dry bearings might be enough to cause the claw to move out of correct registration. Renewal of lubrication might be enough to put it right but that could be wishful speculation on my part. Please take heed of more informed commentary from others who may reply. -
It might simply come down to what satisfied people at the time versus practical availability. 50mm to a 4:3 motion picture frame might be the same aesthetic crowd pleaser as the 85mm lens is to stills imaging although some stills folk preferred the 105mm for human portraits.
-
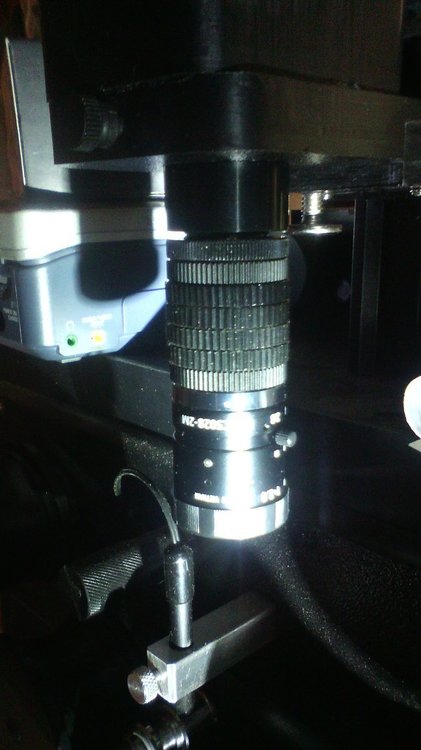
This is what I am using on the Mark II, the suppled Ricoh 50mm lens, the supplied adjustable extension plus a bunch of CS-Mount to C-Mount spacers. I have been tempted to try a C-Mount to Nikon F-Mount adaptor and Micro-Nikkor lenses but so far I have not been tempted enough.
-
It is one of those "not because I can but because I should" situations. I operated on the "assume the worst, then anything better is a bonus" doctrine and learned to load my Bolex with 100ft rolls in the dark or under a dense cover. That can also go horribly wrong if you mis-thread the film. Being a tight@$e (translation = cheapskate) in my younger days, I would also load my Yashica stills camera in the dark in the hope of gaining a few extra images out of a roll of film.
-
Methods for contrast control in intermediate stages
Robert Hart replied to Seth Baldwin's topic in Film Stocks & Processing
David. Would pre-flashing the camera film assist or would that be the DP equivalent of running with scissors? -
If you are missing any of the nylon rings which the platters rest upon and cannot get hold of a replacement, a ring tidily cut from leather furry side up makes a fair substitute.
-
Tele or zoom lenses for Bolex H16 reflex camera
Robert Hart replied to Anu-Laura Tuttelberg's topic in Bolex
I understand that the Angenieux 12-120 will not give you full Super16mm coverage. It will vignette at the wide end and maybe again in the range 25mm-35mm and clear to 120. I understand that the Angenieux 15-150 is Super16mm capable. The Angenieux 17-70 "compact" which was built for the Cinema Products GSMO camera definitely is. They were being sold as new old stock a few years ago. People seem to be hanging on to them as I could not find any listed on eBay. -
Slightly off-subject, here is a lens which is not common now but may yield results pleasing to you. It has a limited zoom range so might be best described as a variable prime, rather than a zoom lens. It is not as fast as your preferred Angenieux 0.95. It will fit to and work on a Bolex H16RX5. Used specimens may have gone tight with dried internal lube so may need servicing. https://www.ebay.com/itm/144544646495?hash=item21a788455f:g:bz4AAOSwsAJid9F1&amdata=enc%3AAQAHAAAA4Ba3n7B0ZTyEnIBIKgNmQ%2F%2BX6dyMavyrHAz%2FXArxyGr03RVk9tUcSu4htQJYE07nDHwSKq6H8cxoHOBpu%2BnteH%2FtJ4AzshXdAH7lLNAJ7Dn9I7fMez4sV4ojOvPmRWXnyhSJZSfUwepuIZ%2B9d1MS%2FLykaiNqrSx1QKzRfr8XXuI%2F5X9bgcTm7ljN5afRaJ97wHA0g5RErud%2FLflPTpGLrhaLXnKelOY1CsC0RjDvXU4S%2FU5tCnjz0Vq5RGpOBgqjUmspErfQqPeqyVk1VrH7JDIzMAGsrSzZc3kLKE%2FhcN%2Bn|tkp%3ABFBMvJb90uVg
-
The GoPros may do this on their own. They are fixed lens cameras with a wide view. Wide view fixed lens cameras or wide-angle lenses on conventional cameras accentuate the speed of objects moving towards or away or if agile POV the riders, their motion moving forward or departing when viewing directly ahead or rearwards. The lens choice for your other agile cameras should desirably be wide view as well. My personal preference would be also to include some pan follows of the travelling subjects viewed from the side of their movement. To accentuate the motion and to blur rolling shutter artifacts with shallow depth of field, the lens should desirably be a telephoto lens with ND filters to enable the lens aperture to be selected to lower f/T numbers enabling that shallower depth of field. Shutter speed is perhaps a question of personal style. With high shutter speeds, motion will be stuttery. That will be fine when there is a lot of motion happening within an agile shot as it will clarify the apparent image by reducing motion blur. My personal preference of a locked off wide-angle view of the small-in-the-view cyclists racing through the frame from one side to the other, across something like a plaza or street crossroad would be to select a normal shutter speed so that motion blur reduces the apparent stutter of the standard frame rate. Your overhead drone views may eliminate and need for this shot but my personal preference would be to take the trouble. Please heed the better advice of others who respond. There are far more accomplished practitioners than I who comment here.
-
Mark. Thank you very much for that. Cheers.
-
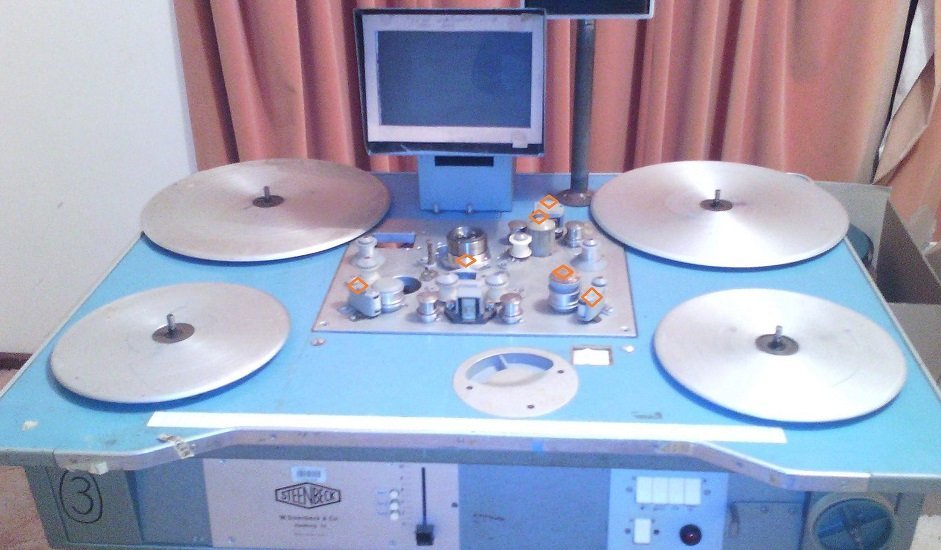
Just a footnote about strapping the machine down. It is very top heavy so make sure the upper part is firmly secured by more than a wrap just under the tabletop but also the bottom of the legs in case they skip out during a bounce and let the top drop down through its straps and land the machine on its back no longer secured. Also use diagonal ties like springlines on a boat across and just under the metal casework to stop the machine from working back and forth and stretching the main straps. The mid strapping of the machine into the corner of the van looks good to me. The only extra I would do would be add a strap through the legs under the chin of the metal casework up to the next higher rail in the van.
-
When you have a team of guys to help you lift it, grab the metal framework to lift it, not the wooden deck or you may break the deck. The deck is made of early chipboard with a blue formica veneer on the upper surface. It is not as strong as it looks. Do not transport the machine on its back. Oil will flow up a column from the drive transmission and leak out. Most of the plastic parts on the deck deteriorate with age and can be easily snapped. The light from the halogen lamp under the deck near the vision capstan causes the plastic parts associated with the optical path to discolour, become brittle and easy to damage. The right-angle prism which redirects the lamp light into the optical path is particularly fragile. Avoid removing it as just doing that may see it off as the prism may drop out as you lift its enclosure and shatter. this prism is a combined right-angle prism and condenser element. It cannot be remade except at great cost and possibly only by the manufacturer. It is a toss-up whether to leave the rear projection screen mounted or remove it and risk damage to the optics and mirrors by leaving them unprotected. Tape over the sound pickup unit which is to right of the screen box, cover this with corrugated cardboard and tape that down. The screen box secures only with two small thumbscrews so can be dislodged if bumped during carrying or catching the wind if carried on the open bed of a pickup truck. If you leave it attached, tape it down very securely to the deck with corrugated carboard around it and across the front of the groundglass screen. Remove the platters and stash them in a safe place. When they get bent they are hell frustrating to use and hell difficult to straighten out. If you are transporting on an open tray bed or tub, tape over the platter hubs and friction faces so they cannot shake out, catch wind and get lost. It may be best not to rely on the skinny metal legs and castors alone to support the machine during transport. You should make a sturdy wooden crate to go under the base of the machine's metal casework and carry its weight. The rotating prism is optical glass and easily chipped. Tape plenty of padding around it and corrugated carton cardboard over that again. The little right-angle prism which directs light into the optical path is not firmly attached and gets chips in it just about as easily as if you look at it sideways. You should tape this securely in place and tape corrugated cardboard over that again. The rear metal cover is attached with fragile plastic dzus-style fasteners. These may fail in transport and allow the cover to fall open or blow off the back of a pick-up vehicle. So tape this to the casework securely. There is a Steenbeck specialist in the US who stocks parts from disabled units and also has made some upgraded circuit boards for motor control and audio which are better than the originals. My PC with the contact info laid down a couple of years ago and I no longer have contact information. However a google search should find him. The cogbelts used in the Steenbeck are of a unique pitch and tooth depth. They also deteriorate into jello. The US specialist has them. If you find that the playback speed stutters, you can make it work for a while by momentarily paddling the control to fast-forward then back to the playback position. The motor will settle from fast to normal speed. It is a sign that the control board is failing and there will be smoke eventually. Do not leave the machine unattended with the mains power plugged in and switched on. There have been instances where the machines have caught fire and burned down. Steenbeck recommends that people stop using their old machines and replace them. That may well be part of the business plan to sell new ones. In the image below, the orange markers indicate the plastic bits which are easily injured. The inner capstan and rotating prism have been removed along with the optical path. All the best with your endeavours.