renfield sonia
-
Posts
42 -
Joined
-
Last visited
Everything posted by renfield sonia
-
SONY VENICE scaling image options
renfield sonia replied to renfield sonia's topic in Camera Assistant / DIT & Gear
Thanks Miguel Angel, we'll end up by shooting 7K 8/9 on a RED monstro with x2 dequeeze factor which will give us a 16/9 image on which to crop to the final 4/3 image. -
SONY VENICE scaling image options
renfield sonia replied to renfield sonia's topic in Camera Assistant / DIT & Gear
Hi Robin, this is just a choice based upon aesthetical criteria, anamorphic lenses have their own personality which is impossible to get through post processing (and I mean just in a reasonable post workflow, as it's going to be an indie movie), not only it's strange flares, but also the focus and chromatic aberrations such as the progressive lost of resolution and focus at the border of the image). It will be way easier to go for aespherical lenses, no doubt about it! -
SONY VENICE scaling image options
renfield sonia replied to renfield sonia's topic in Camera Assistant / DIT & Gear
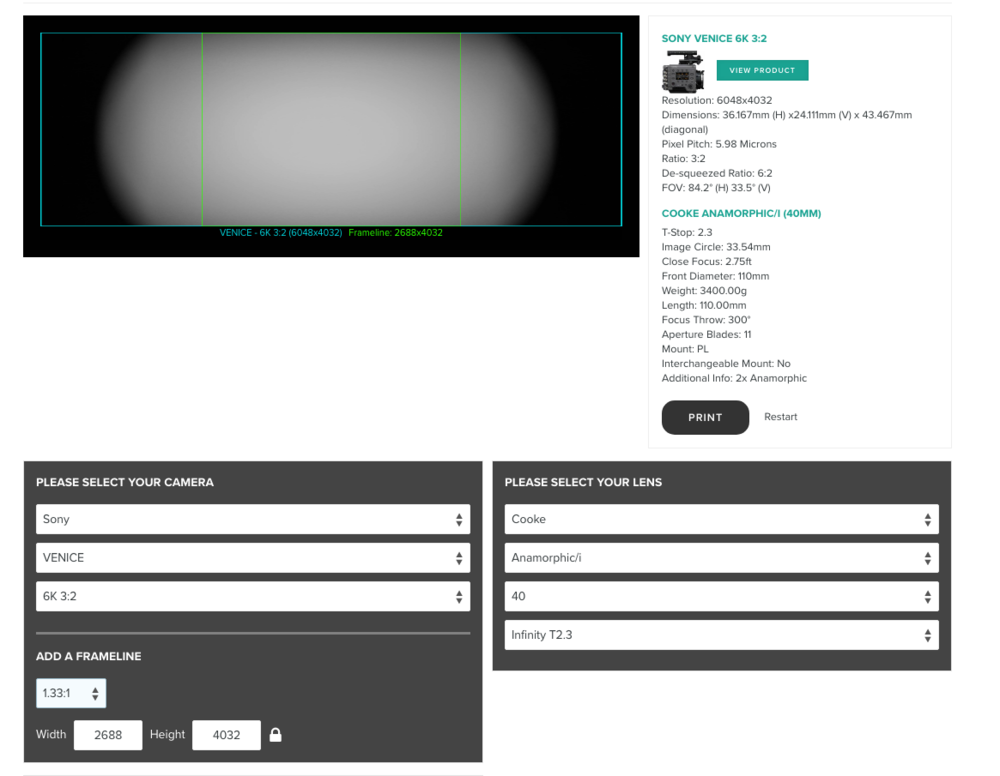
Hi Dave, this is the way we've calculated our resolution: let's say 4K is 4096 × 2160 so 8 847 360 pixels as total count, by shooting on venice 6k we will get a frameline with 2688 X 4032 pixels and 4/3 crop ratio, so 10 838 016 total pixels, so we thought this will be enough to match 4 k resolution (as pixel count matter). Do you think we are making a mistake in our reasoning? By the way, we are thinking about changing to RED Monstro and 8K 8/9 sensor crop with 2x dequeeze option, that also will give us a total amount of pixels matching the 4K resolution (and using full heigh of the sensor). What do you think? -
SONY VENICE scaling image options
renfield sonia replied to renfield sonia's topic in Camera Assistant / DIT & Gear
It's just a matter of monitoring the signal, but if we shot at 4/3 on venice the final resolution of our usefull image is not going to be enough (we need at least 4K), so we need to go to a different format, for example 6k 3:2, which will give us the desired resolution, but a nightmare of an image on viewfinder / monitors if we can't achieve the zooming of the image.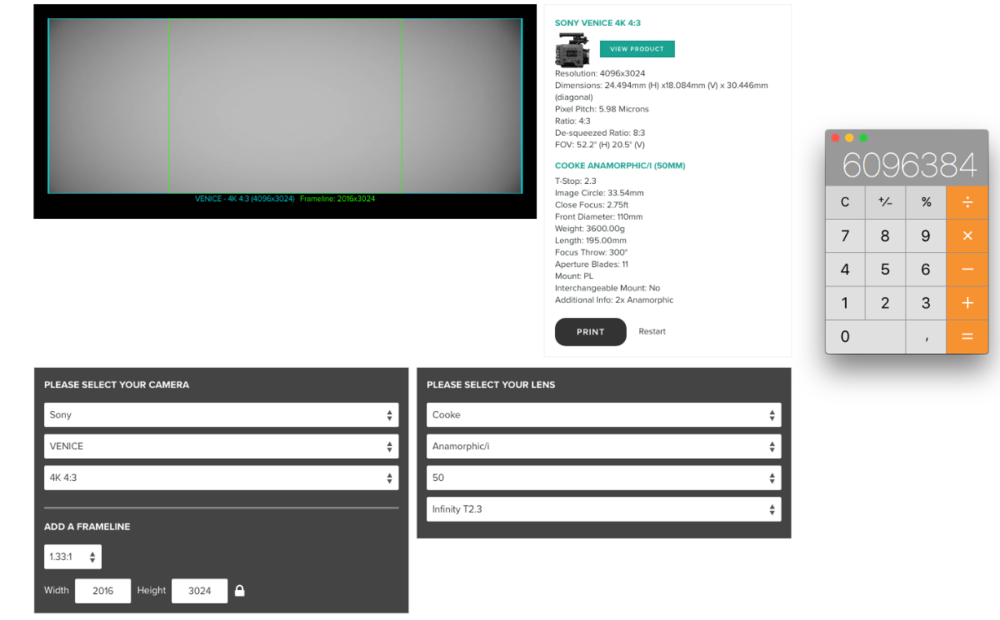
-
SONY VENICE scaling image options
renfield sonia replied to renfield sonia's topic in Camera Assistant / DIT & Gear
Hi Angel, we're trying to avoid qtake as processed images usually have some sort of delay, which might not be acceptable if the director wants to be on the set with actors. Anyway, we'll return to that option if red monstro is rejected and have to go back to venice. By the way, do you know if there's the option of dequeezing the image on monitor instead of on camera? -
SONY VENICE scaling image options
renfield sonia replied to renfield sonia's topic in Camera Assistant / DIT & Gear
And that would be the final image after the 1.33 crop. Still retaining most of the features of the anamorphic lenses but with a delivery format of 1.33.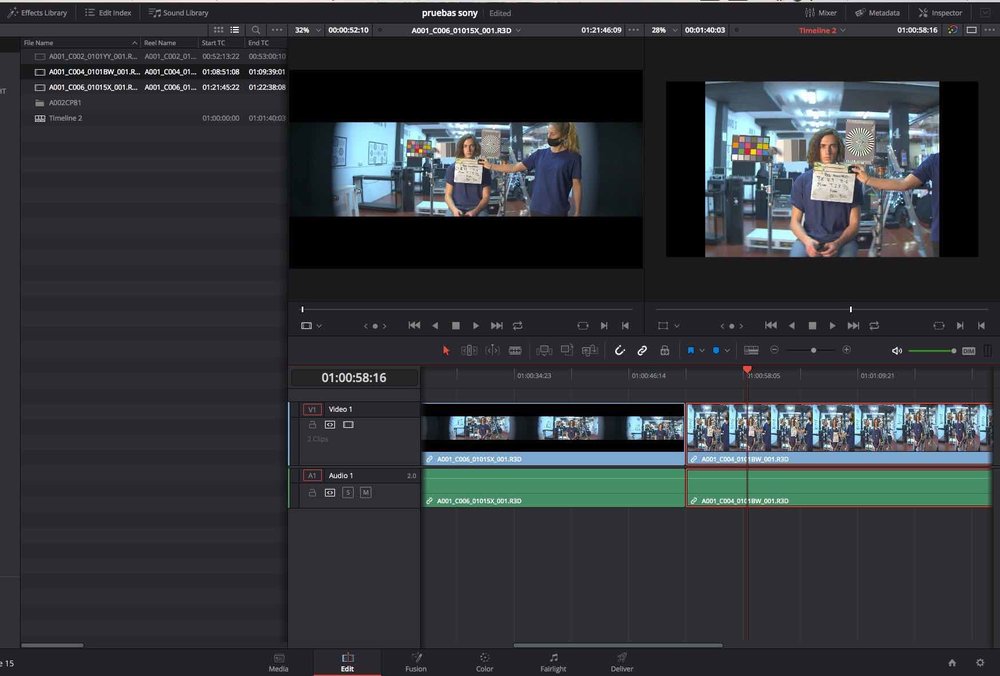
-
SONY VENICE scaling image options
renfield sonia replied to renfield sonia's topic in Camera Assistant / DIT & Gear
That image would be after applying the cinemascope aspect ratio, as you see, full 16/9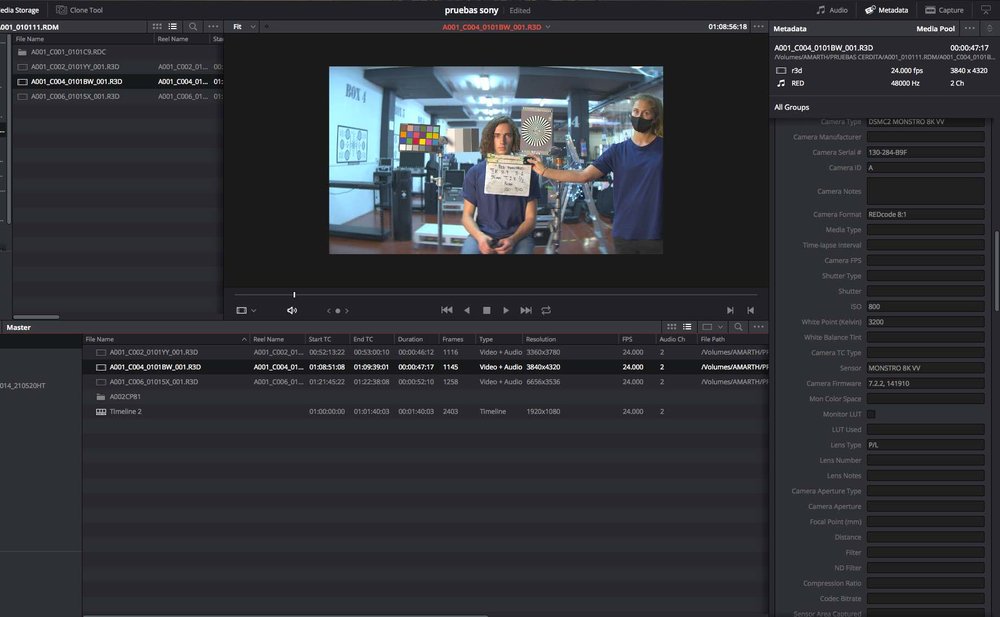
-
SONY VENICE scaling image options
renfield sonia replied to renfield sonia's topic in Camera Assistant / DIT & Gear
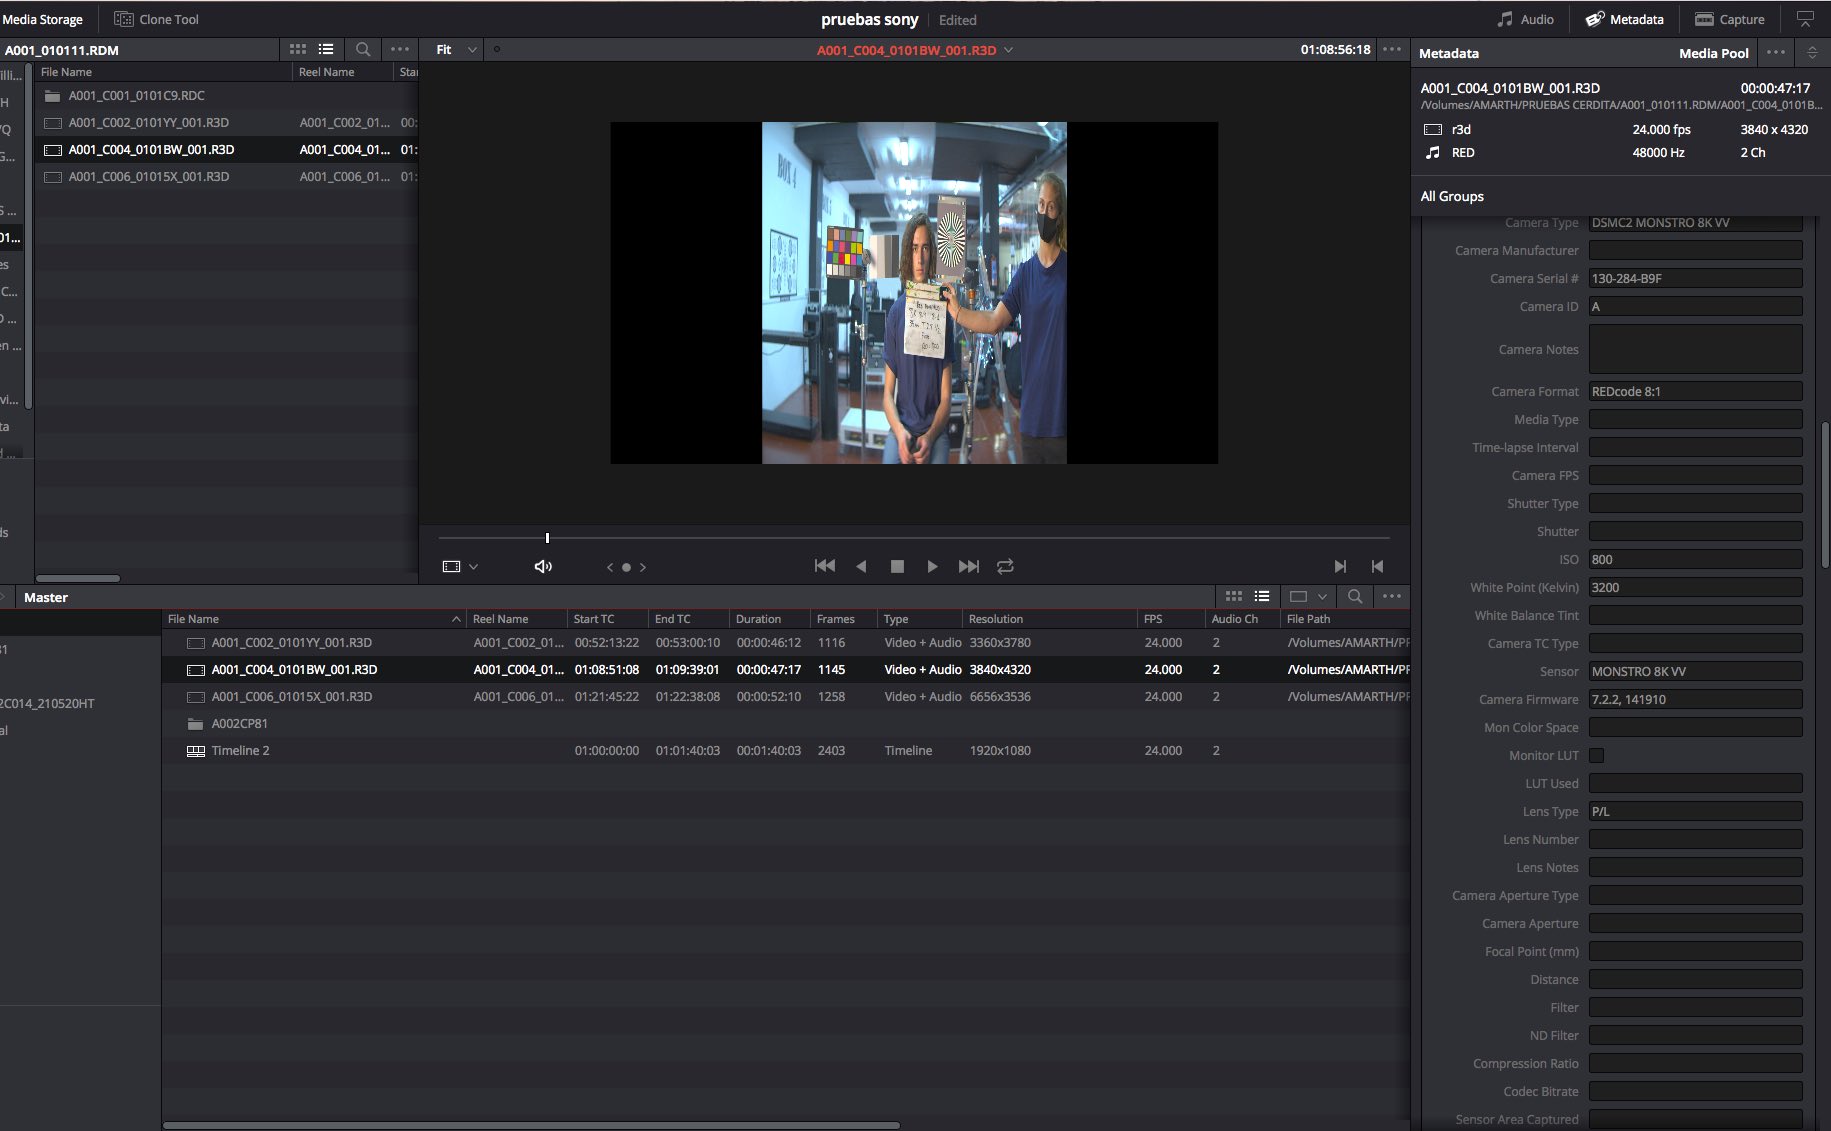
Hi Dave, what is the thing you find crazy? I'm going to send you the pictures of the test as I'm not sure to have been clear enough. In this first image you can see the image as it is delivered directly by the camera: 8 by 9 crop.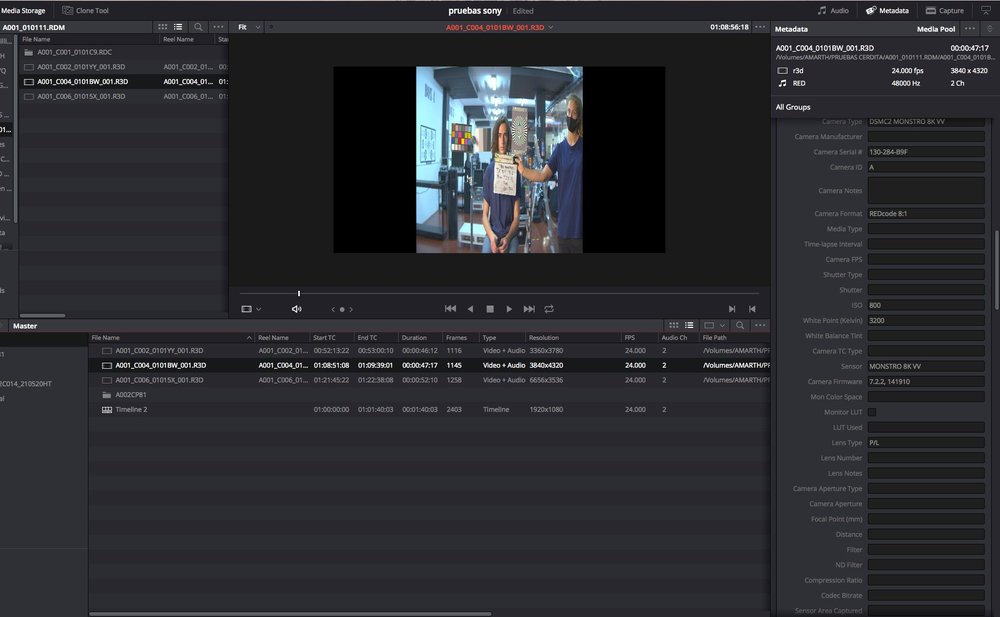
-
SONY VENICE scaling image options
renfield sonia replied to renfield sonia's topic in Camera Assistant / DIT & Gear
Yes, I'm sure. We shot some more test yesterday on a RED with monstro sensor. This camera has a 8/9 sensor mode to use with anamorphic lenses, this means that the output will be full 16/9 image (with a x2 dequeeze option as the hole heigh of the sensor is used) with the benefits of using anamorphic lenses, I guess this was made for series shows or tv commercials that wanted to use anamorphic lenses but keeping the 16/9 aspect ratio on the delivery. Well, my case is the same but with an aditional 4/3 aspect crop. I have to say that the monstro 8/9 8K (or even 7K) will work for us, as the viewing conditions will be optimal (the hole heigh of the screen will be filled by the 16/9 output) while keeping the required 4k resolution of the footage. My question still the same, as we haven't decided yet which workflow we will be using: is there any way you can think that we can scale the ouptut image if needed? -
Hi, I'm a DIT based on Madrid, just preparing the shooting of a motion picture in which the DOP intends to be using the sony venice and anamorphic lenses, but with a 4:3 image crop on delivery. I wonder if there's any way so to scale up the image both on viewfinder and sdi so that we can display the best part of the frame (which will be a 4:3 box inside a 2.35:1 box, so: very little usefull image will be available on screening and thus on the viewfinder, so I guess it could be painfull during the shooting). I'm concerned about the operator and the director regarding they display options. Up to now I have only found a possible solution that would be the use of a QTAKE machine so to zoom in the image and deliver the proper screening of the 4:3 at full heigh on a monitor, but still not the best option as processed image has a small delay on the output (and could be a pain if director wants to be near the actors), and still doesn't offer a solution for the display on the viewfinder. Hope I've been clear with my concerns...
-
Hi, I've been working with viper a couple of years up to now, but recently shot a documentary short film using 2.35 aspect ratio format. I ran a couple of tests some time ago and noticed than viper seemed to have more sensitivity at this format, which seemed strange, also noticed that this was just an fake sensitivity as it presented more noise in this mode, so to avoid noise I had to overexpose the camera for about 2/3 stop, so achieving the same rating than with 16/9 aspect ratio. I had to shoot a low budget documentary, sometimes using available light... and kept on noticing this noise, very noticeable on the low range of the image... the point is that even if I tried to keep the image within the best range sometimes I had to underexpose due to lighting conditions... wonder if there's some kind of clue to avoid such a noise patterns. Wonder the way to unsqueeze the images, as I used final cut anamorphic feature on the timeline options. I recorded a 422 RAW signal on a P2 AVCINTRA 100 recorder.
-
I'm shooting a film using viper cam and this time the audio guys seem to be more picky than other times I've used viper... the point is that it doesn't have a silent mode, in other words, switching of the fan while shooting... so we have to put some stuff under the camera to silent the noise and some other times I have to go to the menu and turn the fans off... something I hate to do, because, even if the viper is supposed to turn on the fans automatically as soon as the temp goes to high... I've heard other opinions... scary ones... any one has a tip?
-
Don't know to much about this precise software you're talking about, but seem to understand that lut buddy is applying some sort of standard lut to your material isn't it? I use to work with on set LUTs and haven't found yet a quick way to apply them onto the offline process. What I do is to recreate a color preset with a 3 way color corrector, is a cheap and easy way to do it, so to create a buch of favorite presets to use as translation of the lut. I know there are other ways to import my luts but this is the only way I found to avoid renders. If lut buddy is applying an auto lut... well it's badly done, the point is for you to create your own luts.
-
I've noticed that today, while shooting with a viper, the focus puller told me the shutter wasn't spinning while he changed a lens, after checking the status of the menus and confirmed that the shutter angle was 172.8 confirmed that the shutter was running, but wonder if there's any kind of shutter protection that's been activated while changing the lens.
-
Ok, I could calibrate the cinema display but couldn't achieve to match the two monitors (thomson TV LCD LED)... In addition to this problem I find the next issue: whenever I open a flat grey image, it's shown differently in photoshop, apple color and final cut... with slights dominants for each one... now it's time to dig into the way those programs deal with color profiles and so... so now, what would be the starting point in a regular color correction? I've find that the presets I created in final cut so to match the LUTs created on set for the correct display on monitors are imported weirdly on apple color, that seems to keep the color correction but giving a quite different color dominance than the display on final cut... of course, the director is now used to fcp look so he wants to keep that during grading... now I really don't know where to start with...
-
Thanks for the tips Phil, I have another question, now about the ambient light on the edition room. I asked yesturday to the seller if the ambient light was taken in consideration while profiling the monitor, he told me that it wasn't. So, let's say the LCD monitor white point is natively 6500K (which is kind of a standard in us or europe), my quesiont would be if this has to be our starting point for ambient illumination, should it match this white point so to avoid chroma dominants to appear by contrast? (sort of metamerism?). The director told me that, even no direct light is hiting the screens, they use to work under different lighting conditions, let's say daylight shadow during the day and maybe tungsten during the night... which could be a problem during serious color correction isn't it?
-
We finally decided to buy a spider calibrator, the reasons where the following: I called samsung to ask about the possibilities to calibrate their tv LCD led monitors and didn't have a clue about what I was talking about, they just answer that this monitors could only be calibrated manually and trusting the eye. So we decided to start by calibrating our cinema display and then try to match the other screen by eye. I don't know yet the answer but I think that it's possible to calibrate this TV LCD even through the computer, as it's the graphic chart what's controlling the display being output to the TV... so the calibration tool would have the ability to create the corresponding profiles...
-
Wikipedia says that those monitors inherit the exact same features that the panel in which it's been built but enhancing the elements related with lighting, so I guess you were right in the question about treating them as a regular LCD screen (so the answer would be to use the same calibration tool for both cinema display and LED backlight monitor)
-
It's a LED backlight monitor, the director has bought this tv as a reference for the color correction process, he will correct the image using apple color, apple cinema displays and this monitor as a reference. When I saw the two screens at producion meeting I noticed the huge difference between the two screens... but didn't have time to check the two basic settings (temperature and standards). The point is to match the two displays while setting a proper and neutral calibration so they can perform a proper color correction, for that I've been looking for average tools and found out a spider series, have you heard about them?
-
Hi Phil, I may haven't explained our workflow properly, the compression codec we're using isn't dvcpro HD even if we're using P2 cards, we're compressing in AVCINTRA 100, which is 10 bit 422 HD stream, up to now I've been told that this is the best way to record a 422 video stream. The video that comes out of the viper, using the HDSTREAM mode matches (it's the filmstream like raw curve but in 422) our recording system, I haven't noticed any compression artifacts, just some strong noise in the low end of the curve when the lut's been applied... noise that doesn't seem so noticeable without the LUT... I'v tried the HD LINK system for monitoring purposes but it proved to be a pain in the ass for heavy shootings with many locations (the image and the connections end by failing). About using the HD link for edition displaying, I haven't thought about that... but I guess that it will take me the same amount of time to create colour presets for the FC than recreating the same luts for the cinema display. Anyway, about LUTs monitoring, I found out that they create lots of noise that added to the cinetal's own noise they can be a problem mainly in underexposed scenes... hope the colorist will find our original footage more useable...
-
Anyone knows any tool to calibrate LED monitors?
-
I'll check out the final cut plugin, it would be awesome to have the possibility to run monitor LUTs into the system and to provide a properly precorrected offline. About your quesion we're using different LUTs throughout the project as there are at least two different looks for the movie, the fake documentary scenes (black and white) and the fake interviews (the dp wanted to create a colour correction imitating what would have been the colour in 1930 if those interviews had been shot... nice concept! The LUTs are just created for monitoring purposes and we record the image in a RAW-Like mode, which brings out greenish footage, my concern is to colour correct those images so the director can cut the material without having to make any mind exercice to be in the correct mood. My colour presets are just very raw corrections to imitate the LUTs previously created and also correcting the differences of the footage (due to lughting conditions and so). When I've used other recording devices such as stwo OB1, the idea is to provide the offline with the exact LUts created on set.
-
Hi, I'm shooting a feature film on Viper camera. As it's supposed to be a sort of fake documentary that takes place before spanish civil war we're using lots of LUTs as a way of previsualizing the final colour results, and to correct the green cast of the viper camera. I'm using an iridas speedgrade software to create luts and using them on a cinetal monitor. The problem comes when we import the footage into final cut, I don't know how to import those luts onto the system so the method I use i quite poor as I create 3 way colour correction presets and by adding them to the timeline the director will have the option of watching the offline with a proper colour. Does anyone knows a way to keep the onset colour timing process from monitoring to final cut timeline?
-
Exposure on Viper Filmstream (Raw)
renfield sonia replied to renfield sonia's topic in Cinematographers
We're using a P2 recorder (10 bit 422) for the hd stream of the viper. I used to work with a Stwo OB1 with bigger budgets where you could apply a LUT on itself and preview the image with an onboard monitor (astro in that case) with the LUT. Now the operator has to work with uncorrected image, but, as the viewfinder is black and white and most of the footage will be processed to be black and white the issue is not that big. The LUTs were made with the intention you talked about, boosting the whites to clip before the sensor does (increassing the contrast and color correcting the green cast of the viper), but not too much so to avoid the DP to underexpose too much. Now he's exposing by eye and we use to have some white almost clipped points in the image (if there are practical lights the chance for them to be out of the range are important, as the DP's using them as light sources aswell). What would you do with grey points and skin tones (the luts are made to respect the average mid tones, but if the faces are underexposed, or there's big contrast on the scene, sometimes it's difficult to judge if not by eye... I just trust the DP and call his attention if I see the whites above 100IRE) I'm also using an early version of IRIDAS SPEEDGRADE to create LUTs for the CINETAL, do you know any other application (my version doen't have a waveform monitor). I'm also concerned about green channel overexposure, as I'm judging a YCbCr 422 signal with the astro monitor, I don't know where my 3 channels are one in relationship to another, just guess that luminance channel still the green one and guessing that this channel will be the first one to clip... -
Hi, I'm working as a HD Technitian in a HD feature film in wich we're using a couple of viper filmstream cameras. As they feed a sort of Log curve the image is flat and greenish. We've been correcting the monitoring image by applying LUTs and would like to hear some opinions about exposure. Eventhough we know where our grey, black and white points are supposed to be (around 40, 10 and 70 IRE) the DP is using almost always the whole range the camera can take, which in some cases, reach the 109 IRE for specular highlights or 100 for bright whites (white backlights or white clothes). I'm used to check the raw footage by grabbing some frames using a cinetal monitor or checking out the footage, just to see if we've clipped any light. By adjusting the frames with photoshop I can see roughtly how the colour correction will apply to the image and because of that I'm confident about using the whole sensor range because it's easy to control highlights and so. I was trained to try to expose images technically, using the waveform as a basic tool, but shot my last jobs with some DPs that like to expose the way they want the image to be at final point, rejecting the safety room I would recomend as a technitian) My concern is about the final broadcast image: I know that the DP us exposing like we would do with a negative stock, but I'm not quite sure about how this increased latitude will output in TV, basically I'm concerned about the possibility of loosing too much detail in highlights (we're exposing until 109 IRE) Would like to know opinions about if it would be better to expose using the Input-output levels recommendations (setting the grey point at 40IRE and the skin tones at 50-60IRE, which would feed an underexposed looking image) or if to expose by eye and then trusting colour correction... I know this post can seem a little basic but I've heard so many opinions about that that I'm not sure about the best reasons to use one or another method.