

Benjamin Davis
-
Posts
20 -
Joined
-
Last visited
-

Man of Steel - 2013 Superman Reboot
Benjamin Davis replied to Benjamin Davis's topic in In Production / Behind the Scenes
Interesting. I looked at Larry Fong's IMDb page, and he's working on a film titled "Now You See Me" to be released in 2013. He is shooting in anamorphic, so it will be interesting to see how it turns out compared to his other work. -
240 fps to capture shattered bottles, or glass
Benjamin Davis replied to James B's topic in Visual Effects Cinematography
Yeah, I'd guess that 240 fps would probably be slow enough, especially if he's planning on using Twixtor and slowing it down even more by duplicating the frames (1, 1, 2, 2, 3, 3, 4, 4, vs. 1, 2, 3, 4,) and then adjusting the speed to make it a lot slower. If he can effectively remove all of the distortions that come with Twixtor and similar plugins, then I would recommend this to save money for the prop pieces or something. -
I haven't actually had the chance to see "Ted" yet, but I was wondering if anyone here has worked on a similar project, with choreographing lighting and camera work around something that's not in the scene until post-production. Gathering as much information on the film through behind the scenes videos and photos, information on the visual effects studio's websites who worked on the film, and snippets of information from the cinematographer and visual effects artists from various film websites and whatnot, I've begun to seriously appreciate the amount of work the cast and crew has to go through to successfully create a realistic and good looking shot based around a digital teddy bear! I've never worked on such a project, and my post-production experience really only goes as far as color grading and editing, so I've not been able to really understand the efforts behind pulling off such a film. So back to my original question! Has anyone here worked on such a project? I can only assume it's similar to shooting a traditional scene, except with a slightly different set of objectives and tactics to actually shooting. What's the process of shooting like, and what's the preparation for shooting something like this entail?
-
240 fps to capture shattered bottles, or glass
Benjamin Davis replied to James B's topic in Visual Effects Cinematography
Shooting at 240 frames per second will allow you to have a fairly smooth slow motion shot, but capturing every single little piece of glass breaking apart may require a higher speed camera. You could rent a popular high speed camera like a Phantom, but it's daily renting price is pretty expensive. There are probably cheaper alternative cameras that are rentable for much cheaper, but I'm not exactly sure who makes them, and where you could rent them. Using Twixtor to slow down the shot is alright, but Twixtor is prone to distortions and blurring. I believe there are ways to get around that with additional plugins that scan each frame that's been affected and correct it, as well as manual methods of adjusting the affected frames. Otherwise, most editing systems will allow you to adjust the clip's speed fairly easily on the timeline, and you should have no problem with distortions or blurring doing that. You can buy prop bottles and glass specifically made to be smashed over the head of an actor without causing any damage, called breakaway glass or sugar glass. It comes in all shapes and sizes like bottles, windows, vases, vials, etc. It's made by dissolving sugar in water and heating it to a certain degree until it hardens somewhat. Then you let it cool down, and it becomes far stronger, but still very easy to break and safe for stunts. Making it yourself is a project on it's own, and will require a lot of trial and error with molding it into the proper shape, but it may save you quite a bit of money doing it that way. Looking through breakaway prop sites, the average breakaway beer bottle price is $10-$25 each, and a simple lab vial prop is $150. Otherwise, you could use a traditional glass bottle and explode it, but I'd exercise safety precautions and be at a distance while also protecting the camera generously with some sort of plexiglass shield in front of it. The last thing you'd want is to see a pieces of glass lodged into the camera. Good luck! -
While casually browsing IMDb, I came across a user-created list of movies being released in 2013, and saw that Zack Snyder is directing a new Superman film titled "Man of Steel" that's apparently a reboot film of the story. Usually Larry Fong is director of photography in Snyder's films, but interestingly enough, Amir Mokri is listed as the DP for "Man of Steel." The film is co-written by Christopher Nolan and David S. Goyer, the very same as the recent Batman films, and apparently was handed to Snyder to direct after several other directors before him turned down the offer. Buzzing through the IMDb, I saw some of the technical specs are available, and it says it's being shot on the Panaflex Millenium XL in 35mm, and the aspect ratio being 2.35:1. Other than that, there's no other specific data on the lenses, film, and so on. The film apparently has approximately a $175m budget, too. I googled around, looking for any more information and found some of these set photos, as well as an officially released promo photo for the film by Warner Brothers. Other than that, there's just a lot of speculation by bloggers and many rumors going about. Here's the IMDb page for "Man of Steel": http://www.imdb.com/title/tt0770828/. If anyone knows anything more about it, do share! Below are some of those photos I mentioned:
-
Music video: Stepdad - Must Land Running
Benjamin Davis replied to Chad Terpstra's topic in Please Critique My Work
I really liked this! The entire thing is really beautiful, and is put together very well. I especially liked how they typed and clicked their controls along to the synth beats and whatnot, as if they were playing an instrument. The whole "underground life-size remote controlled ninja fighting" idea is awesome, and didn't feel ridiculous or cheesy. There were a lot of light flares, though, which is not a bad thing at all, but I always advise to be careful not to go overboard. The flares in this weren't too overbearing, but there were a few shots here and there that could have been toned down just a little. Otherwise, this was really great! Keep up the good work, man. -
DSLR Cinema: Crafting the Film Look with Video
Benjamin Davis replied to Tim Tyler's topic in Books for the Cinematographer
I actually picked up this book from Barnes & Noble a couple months ago and I don't even own a DSLR. I use a Canon HV40, which doesn't utilize a 35mm lens (but can with a 35mm adapter attached) and this book still applies to digital filmmaking. I really enjoyed the first few chapters, giving some back-history upon Canon's creation of installing video capture as an almost last minute decision between the CEO and the engineer. Overall, the book did give an inspiring insight regarding the "renaissance" of filmmaking. How cinema evolved from still photography, and how that evolution is taking place again with this DSLR. Not to say that this book is one gigantic advertisement for Canon, in fact is gives A LOT of very helpful information regarding blocking, framing, and composition that seriously help accommodate what digital movies are missing from film movies. It uses a good amount of exemplar work from short films that were shot with DSLRs, giving illustrations, specific breakdowns of lighting and lens set-ups, and overall a very addictive reading experience. I liked it, would recommend it if you're having some difficulty finding that professionalism with your digital work. I'm still learning as much as I can, so it helps to have books that give pointers from time to time. -
I want to thank you all for your replies. They are very helpful and will definitely be taken into account when I'm shooting! I shot the next part of the film yesterday (June 18th, 2011) and I have to say I was stumped when it came to lighting the kitchen. In all honesty it was partly my lack of experience and partly a tough time making a decision. The story didn't specify if this part of the movie would be taking place at day or night, which gave me freedom to do whatever I wanted, but I knew I didn't have the proper tools to light through the window outside (my brightest bulb is a 250w bulb with a 3500k color temp. and I only have one of them). The other choice was to play it off and use natural light coming from the windows, but it was a grey overcast day, ending up looking too flat and "blah" on camera. I wasn't entirely sure how to fix this problem, so I tried shooting at night. This was a bit easier because I had far more control over the lights, plus it worked continuity-wise with the office scene. I didn't want to have every single light on and make everything flat again, so I took a lamp, stuck a 60w clear bulb in it and put it on the same dimmer I used for the desk lamp in the previous scene. That was definitely not enough light and "How stupid of me!" I thought thinking it would be, so I grabbed another clear 60w bulb and put it in the stove top. I had enough illumination to see my face partly, and it worked beautifully until I moved forward 3 steps. I ended up putting a very faint light in front of me, which didn't do much in terms of illuminating me, but added an ambient light to the scene. I figured I'd let this fly and try it out. I shot maybe 30 different takes of that single walk in shot at MANY different angles, and only one appeared nice to me in the end; a moving track shot with a tripod attached to this "dolly" type object. This is the time where I begin to think "If only I could round up every single person on Cinematography.com, have a room full of pizza and drinks, and have them give me a thumbs up when I've lit something right, and throw pizza slices at me when I've done something wrong." If only it was that objective. The main point of interest that my character is walking towards is a toaster. Not just any toaster, though. A toaster that has been stabbed to death in the back with a knife, screw driver, hammer, and kitchen fork to provide enough of a space to insert a light socket in. I still feel I've over-done the intensity of the light, but I wanted it to feel somewhat surreal. The bulb was a clear 40w bulb. I had a little hazy fog going on, too, but as I'm sure all of you know it's difficult to contain the haziness without a sealed set. It was trial and error for an hour, but I eventually got the shots I wanted. I may have sounded a little crankier in this update, but I'm really just trying to make sure things are going to look alright. I try not to stress over it too much, and its very reassuring when I get back online and learn something new, or accidentally turn a light off, look in the view finder and see that it looks ten times better. Here are some screenshots of the film. I also have to thank my mother for being so helpful. She's let me clear big spaces of the house at very inconvenient times, hogging a lot of a space in the kitchen, living room, turning lights on and off and being up till 4 AM shooting or editing. Just in case you're concerned about the lighting continuity, the shot above and the shot below are not sequential to each other. When the toaster's door is closed it lets out much less light. I put a very sketchy diffusion on it made out of some BBQ sauce and skin cream (Bleh!)
-
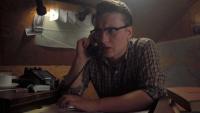
Hey everyone, yesterday (June 17th, 2011) I began the first day of shooting a very short film I'm working on called Toasted. Due to the film being around only 3 minutes, giving a lot of information regarding the plot could give you guys too big of a spoiler before it's even done, so I want to apologize ahead of time! Being 16 and incredibly new in terms of making movies, I am constantly trying to learn the ins and outs of cinematography and art direction which will allow me to visualize the story I'm trying to tell better. Before I get in depth on the film, I really want to thank all of you at Cinematography.com for just being here. Reading through posts, looking at problems that have various solutions, and even trying to help someone out myself, you guys have given me so much confidence that didn't exist prior to signing up here. Sorry for all the sappiness, now on to the good stuff! Toasted was an idea my Dad had partially thought up, regarding a man who finds him self in a satirically humorous yet unbelievable situation with a toaster. I took that idea and attempted to stylize it a bit more by placing the story sometime in the 1950s, and attempt to turn a seemingly sturdy story into an almost "Pee-wees Playhouse" experience as the plot progresses. With some minor adjustments here and there, I began to mark out a schedule as to when I could begin shooting. A big problem was that I don't have a job, so I had no money to buy any props. Luckily, our house is a mess and I was more than happy to clean up every single thing imaginable in exchange for money to fund the film. I bought all of the props majorly necessary first, then began working on the production design. Due to the film surrounding the mysteriousness of a toaster, I wanted the color palette to follow a very brown "toasted" look. I knew most of the color temps of the lights would follow anywhere from 2500k-3500k. This, in turn, also helped solidify the 1950s illusion I was hoping to get. There's something about beige, black, and brown being associated with the past, while white, chrome, and blue being associated with the future. Luckily, one of the rooms in our house did have brown walls, so I moved all of the furniture out of the way and reserved a single corner to begin building this tiny set. I took my sisters old vanity desk and ripped off the mirror and it worked well at looking like some kind of office-type desk. I took the only beige/black lamp we had in the house and decided to fix in a typical clear 65watt bulb to it, putting the lamp on a dimmer. I did notice the lighting was incredibly flat, so to try to "bump up" the dimensionality of my head and torso, I took a 150w flood light, put it in a lamp socket, hung it on a ceiling hook and duct-taped the chord to the ceiling down to an outlet. I know this follows absolutely no safety guidelines, but it was the only way to make sure the socket's cable wasn't visible. Originally, the flood light let out too harsh of a light, and I didn't have an extra dimmer, so I took white baking parchment and duct-taped it around the flood light to act as a diffuser. It was the only thing I knew that would withstand the heat and diffuse properly. After that, part of my face had too harsh of a shadow, and the desk lamp did not illuminate me enough, so I used a very large Chinese paper lantern with a 45w bulb in it to help act as a soft fill light. This set up seemed to work alright! Next, the illusion of this tiny space being a larger "room" needed to be solidified. I took a tiny bookcase we had in the garage and filled it with books that had bindings that appeared older or used. It ended up mainly being old Reader Digests and different copies of The Odyssey and The Iliad, as well as a few other brown/black bound books in between. I also put some interesting wooden statues my uncle sent to my mother a while back, and a small slightly beaten up sailboat on top of the bookshelf for some small decoration. To help solidify the color palette even more on an almost meticulous level, I bought yellow notebook paper, a black Cortelco desk phone, black pens, gold-painted paper clips, and beige manila folders! I also invested in a funky pair of half-frame glasses to help scream the time period to the audience if set design fails to. I made sure to slick my hair back, rock the skinny tie, and roll up the sleeves! The last touch was ambient haze. This idea was brought upon me while watching The Astronaut Farmer and asking David Mullen about how he lit a particular scene in the kitchen. Everything seemed so warm and beautiful, and when he gave me the run down as to how he lit the scene, I also saw that there was this natural-looking haziness. I knew that that haziness would help A LOT in setting more ambiance in the set, so I used the last bit of money I had and bought a very cheap party fog machine. Turns out, it worked awesome, so I have to thank Mr. Mullen for that bit of inspiration. The film is being shot on a Canon HV40 that my Dad bought me for a birthday present about two years ago. Many people argue about the cameras abilities, but with constantly using it, working around its limitations and taking into account using the camera correctly, you can get some pretty incredible shots from it. None of the short film is being shot with a DOF adapter, simply because they are expensive and it's not exactly economical to just buy one. I have found many tricks to manipulating the camera to get shallower depth such as moving set pieces and props farther away and closer to the lens to give the illusion that the depth is much shallower while the set is still the same. For the master shot of the office space, I used a wide angle lens and moved the camera in just enough to allow the eyes to assume the room is bigger. I also utilized the wide angle lens on the tilted close-up shot, giving a bit of a "feel like you're in the set" feeling and allowing me to move some props around to manipulate the illusion of a shallow depth. I hope all of it works out, and here are some shots of the film and a couple shots of the set. My makeshift hair light/back light A shot of the set so you can see its size somewhat
-
That effect isn't just the flare, but the glow from the light when the actual lamp isn't shown. I couldn't be entirely sure as to what lights they used in those particular shots, but the blocking is done to have the light source very close to the edge of the frame but not in the shot. A lot of the time a flag is used to remove that light so you can obtain a particular look without having that huge glow enveloping your picture. In this case it emphasizes the model somewhat, so I can see why they are called beauty flares. Or... it was done digitally and the effect is something composited into the shot. Seems easier to just do it in-camera to me, though!
-
New Arri L-Series Fresnels
Benjamin Davis replied to Nathan Porter's topic in Lighting for Film & Video
Very cool. Any idea what the prices for the locational fresnels without the passive cooling systems? -
lighting a livingroom, the dark style
Benjamin Davis replied to hans gruber's topic in Lighting for Film & Video
Obtaining a "dark mood" takes into consideration three things: Your lighting, your production design, and your script. Even if you have incredibly low lighting around the room, if your walls are bright pink the mood won't feel very "dark." From the looks of your set in the screen shot, it would appear you have some fairly flexible colors for your production's color palette. The only thing is, I can't tell you a specific way of lighting your set because there are so many variations as to what you could do. Also, if you could upload more pictures of your set, that would help a lot! You can try using a couple lamps in the background to create a dark ambient light, and use the china ball to act as a fill in certain shots, but try to avoid making the image too flat or else the image may appear less dramatic and dark. I hope this helps. -
Well the product itself looks really nice. As far as what it does, it's fairly straightforward and that's also very good. I have just two things I can immediately add: -In the "Performance section of your website you have a paragraph with the sentence, "Every Cinematographer uses tools to help him tell the story he sees inside." I would just be sure to add "he or she" to not exclude female cinematographers. -If you can, shoot some demo footage of the camera moving along the Inline Dolly. As well have some footage of the scenes that used the Inline Dolly so people can see the quality of the movement it gives when you use it. Hope that helps, and good luck!
-
This is really awesome. Love it a lot.
-
INCEPTION's lighting is something that is memorable to me. Of course, having used a Panavision film camera for most of the movie, the quality of the image is going to be increased, but there is still something to say about the quality of the lighting. Wally Pfister was able to light particular scenes in a way that were so warm and even that it made the unrealistic aspect of the film seem realistic. Watching particular scenes over and over again and taking notes, I see key aspects of the production design that took a major role in creating the feel of the film. Look at figure 1 for example. The brown and beige palette for this shot really played into the color of the walls and wood, as well as the upholstery of the carpet. Joseph Gordon Levitt's outfit also blends in rather well. My question is: How do they diffuse the lights in such a way that they are not completely blowing out the picture and making everything over exposed? I seem to have this problem with my lights. Also, are the lights used to light this shot very specific, or are they just traditional 40 watt - 60 watt bulbs? Also, is it entirely color correction, or is the light really that yellow/orange warm? If anyone can answer these newbie questions I'd be super appreciative!