


Michael Maier
-
Posts
215 -
Joined
-
Last visited
Posts posted by Michael Maier
-
-
No, the reflective meter is reading the brighter skin tone and will give you a reading so that it will be 18% grey in reflectance if you use that reading, so you have to compensate and open up the f-stop to make it look brighter than 18% grey. You can think of it this way, if the skin is twice as bright, the reflective meter is "compensating" for that extra brightness by "stopping down" to get it to be 18% grey -- you're the one that has to compensate for that by opening up to get it to be lighter than 18%. If the skin tone is normally 1-stop brighter than 18% grey and you take your spot meter reading and then close down 1-stop on the lens, now the skin tone will be 2-stops darker than its normal appearance.
The incident meter dome doesn't average exposures between shadow and key unless you aim the dome so that it gets both lights hitting it -- often you point the meter at the key and read the light coming from that direction (if you have a traditional 3/4 frontal key and frontal fill, then the bright side of the face is lit by the combination of the key and the fill, so pointing the dome towards the key will give you an accurate reading, you don't need to shadow the fill light off of the dome. However, if you want to meter the fill alone, you'd want to use your hand to shadow the key off of the dome.
The incident meter isn't averaging the brightnesses on a subject, it's just telling you how much light is hitting the dome -- it doesn't care if the object is black, grey, or white. So by using an incident meter, you know the exposure for the light hitting the space regardless of who or what moves through the space -- you know that the light hitting that desk against the office wall is, let's say, f/2.8 and when the actor walks into that light and sits down at the desk, they will also be "normally" exposed at f/2.8.
All meter readings are just information you take into account -- the actual choice in exposure will be a creative decision. If you shoot a scene of someone standing outside in full sun, you may want it to "feel" sunny and hot and set your exposure to be a 1/2-stop brighter than what the incident meter tells you. And in shooting in backlight, where the sun is mainly just a halo edge around objects, you will usually read the shadow side since that's the majority of the shot and decide how dark they should be to "feel" like shadows, 1-stop under for the shadows would be very conservative and your backlit highlights would be very bright (probably too bright for some video cameras), 2-stops under would still have shadow detail but definitely "feel" like you were looking at shadows, 3-stops under would be quite moody, almost like exposing for the highlights instead.
One good practice is to imagine or actually shoot a 360 degree shot that circles the subject -- think about how the exposure you choose would look as you went around from frontally lit to fully backlit. Think about how it would look if you didn't adjust the f-stop during the circle and how it would look if you did, etc. That will give you a good sense of how bright to let highlights go and how dark to let shadows go.
I understand now why you need to open the iris to correctly expose the skin with the spot meter. Thanks for clarifying.
So you prefer pointing the incident meter to the light instead of to the lens?
I understand I will have to judge and nudge the exposure to match the mood I'm trying to achieve. I'm just trying to understand how to get my first base number and how to interpret it. Which now I have understood that the incident meter gives me 18% gray, which is always the normal exposure. So all skins should look correct under it. And if I want it to look darker or brighter to match a scene which shouldn't be normally exposed, I have to adjust and either overexpose a little or underexpose a little. I think this seems to be clear now.
Although like I said, sometimes going by the incident meter reading, some skin complexions look darker than in real life even when other skin complexions, sometimes even in the same shot look like they normally do in real life. This I'm still trying to understand the reason for.
-
Years ago Walter Lassaley, BSC, instructed me to balance practical’s such that an incident reading of the direct output one foot away from the bulb is one stop over exposure. I have found that rule of thumb gives a realistic output to the practical - the light emitted downward onto the table top and upward onto the wall or ceiling is realistic. After establishing the practical’s output using an incident meter, you then use a spot meter to determine how dense an ND gel is needed to line the inside of the shade to place the brightness value of the shade on the characteristic curve of the emulsion so that it does not too hot and without detail.
Very interesting rule of thumb. If we were talking about a bare bulb practical, making it difficult to gel, would you see it worth going through the trouble of figuring the t-stop the bulb would read one stop over exposed from a foot way and starting from this t-stop as a reference to your key, just to be able to keep the rule of thumb in effect? Or in this case would you abandon the rule of thumb for this one shot?
-
To help make sense of my post above let's take the scene below from “Miller’s Crossing” as an example.

It is a common fallacy that dark scene’s like this are “underexposed.” This scene is not underexposed, but rather the reflective values of the objects in the scene are carefully balanced (placed on the film’s characteristic curve) relative to the key tone by lighting so that most of the scene remains dark but serves up the full contrast range the film emulsion is capable of. In other words, even though the scene is correctly exposed, nothing in the scene is “correctly” exposed. The flesh tones are underexposed and the lampshade is over exposed in order to create the mood of the scene.
In an instance like this, the DP would not use a meter (incident or spot) to find the exposure of the key tone; rather, he would choose the exposure of the key tone from the outset - say T5.6 for deep focus. And, having balanced the elements of the scene to that exposure using either his incident or spot meter, he will “lock it in” for lab timers or transfer colorists, by giving them the key tone (by properly exposing a chip chart with an 18% gray patch) as a reference at the head of the scene. Without providing the key tone, a timer or colorist will not know how dark the shadows should be or how bright the highlights should be because there is no other reference value at full exposure by which to calibrate the brightness of the scene.
Here are a few techniques, all of which are evident in this shot, that one could use to balance the lighting to create a dark scene without under exposing it.
1) Edge light objects in frame. Use reverse keys for talent and underexpose flesh tones by at least two stops or more. As long as you define the contours of your subject with subtle underexposed edges, don’t be afraid to let your talent fall off into black. There is a scene beautifully lit by James Merifield in the “Deep Blue Sea” of Rachel Wiesz and Harry Hadden-Paton standing in a dark alley way. They are back light by a practical at the end of the alley. Their contours are defined by the rims motivated by the practical, but otherwise their flesh tones fall off to complete shadows. James Merifield probably used a spot meter and negative fill to make sure that their flesh-tone would fall off the emulsion’s characteristic curve and reproduce as a pure silhouette. Sonnenfeld probably did the same in this scene to assure large parts of the frame had minimal detail.
2) I personally believe you should always have a hot spot in a frame – a practical in the scene or something in the deep background. You can shift your overall exposure in the camera or in post to create a dark scene, but without a hot spot reference in the frame it will lack contrast and look underexposed. A hot spot in the frame serves as a reference point and creates contrast. Practicals should be close to clipping and appear to be the source of light in a scene.
3) Don’t try to light your talent with only practical’s because they will blow out – the hot spot in your scene has to look natural. Not only is supplemental lighting required to light your talent, but you must also treat the practicals to make them look realistic. I find that practical lamps never look convincing unless one treats the lampshade as well as boost the bulb wattage. That is because if you stop down to keep the shade from burning out, the output of the practical, on the table it sits on or the wall its on, looks rather anemic. I find you get a more realistic look if you boost the wattage of the bulb and line the inside of the shade with ND gel. It is a delicate balance to obtain.
You can obtain this delicate balance without a monitor, by using the old school method with incident and spot meters and a selection of practical bulbs including PH 211, 212, and 213 bulbs. Years ago Walter Lassaley, BSC, instructed me to balance practical’s such that an incident reading of the direct output one foot away from the bulb is one stop over exposure. I have found that rule of thumb gives a realistic output to the practical - the light emitted downward onto the table top and upward onto the wall or ceiling is realistic. After establishing the practical’s output using an incident meter, you then use a spot meter to determine how dense an ND gel is needed to line the inside of the shade to place the brightness value of the shade on the characteristic curve of the emulsion so that it does not too hot and without detail.
4) Define the edges of your frame with a little detail. As long as you define the edges of your frame with a little detail, as Sonnenfeld does here, you can leave most of it black without it looking under exposed.
5) Soft sources like China Balls and Kinos are the wrong kind of fixtures for this kind of scene. You will need fixtures that you can easily control because you will need to cut them off large parts of your set. It will be hard to keep china balls and Kino Flos from spilling light all over the place and filling shadow areas that you want to keep dark. Fresnels with light diffusion inside the doors, cut with flags and nets, will give you the control you need. Spot meter readings of objects on the edge of the frame, like the upholstered chair on the left, will tell you if they are within the exposure range (characteristic curve) of the film. If they are not, use a little light to bring out detail that will define the edges of the frame as Sonnenfield has done here with the chair.
Guy Holt, Gaffer, ScreenLight & Grip, Lighting and Grip Equipment Sales and Rentals in Boston.
I guess this is the best part of digital's WYSIWYG. Looking at a calibrated monitor with a waveform a shot like the above is much easier to set up than in film where you can't see it and have to figure all the values.
-
Thanks for the detailed reply.
If you don’t have an incident meter, but want to peg the key tone under your subject's key light, an old trick is to take a spot meter reading of the palm of your hand under the key light and open up one full stop. This will give you a close approximation because the average Caucasian flesh tone is one stop more reflective than 18% gray.But if the skin is one stop more reflective, it means it reflects twice as much light as 18% gray. So shouldn't you close the lens one stop instead of opening it? It seems to me if skin reflects more light than mid gray it is already overexposed if you leave it at the same stop, let alone if you open the lens even more. Or what am I missing?
You use the reading from the spot meter to be sure that the object you are metering will be within the exposure range (characteristic curve) of the film stock you are using. If the stock has a nine stop range (five stops over before detail burns out, and four stops under before detail blocks up), and your reading of a dark object is six stops under your key tone, it will not be rendered on the film after it is processed normal (to reproduce mid gray as mid gray).
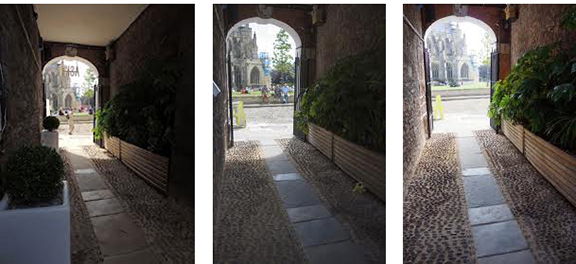
(The contrast range of this scene exceeds the film’s exposure range, so when the image is exposed for the light outside the arch (Left Image), detail is lost in the archway. Likewise, if the image is exposed to hold detail in the archway (Right Image), detail is lost outside the arch. Pegging the key tone centers the contrast range of the scene on the straight line portion of the curve such that some detail is lost outside and inside the arch way, but the luminance values of most of the scene are rendered accurately.)
It seems the spot meter has basically the same function as a waveform and if you have a waveform a spot meter is not needed. Or is there a need for one even if you have a waveform on set?
And exposing by incident meter, meaning taking the direct T-stop reading and setting your lens to it, since it exposes to 18% gray, it will expose to the mid tones and will average the exposure. Since it sets your exposure in the middle it gets you a compromises between exposing for the shadows and exposing for the highlights. Did I understand correctly?
-
You got it right by "...reading from the meter will always be the correct or optimal t-stop for my key, and only if I want the face to be darker or brighter to fit the mood I will have something else to factor in".
...
Make a shot with 2 heads.
One Caucasian skin the other African American.
How will you expose on a waveform?
Probably as you said, putting the Caucasian at 70IRE.
Where would the dark skinned person fall on the IRE?
Definitely lower.
Under that same amount of light you have properly exposed
light and dark skin.
Take an INCIDENT reading.
(If the meter readings don't match with your camera settings,
adjust the meter ISO until you got the same or near stop as in your camera.
Note the ISO differences)
Start from scratch, but measure with you meter first
(taking into account the possible differences in ISO between meter and camera).
Fire up your waveform, you should see the IRE's as before.
70 and lower for the dark skin.
...
Under the Sun, the white persons skin is white, the dark is dark.
They are lit by the same amount of light.
...
I have the impression, you might have exposed the dark complexions a bit hotter,
to appear lighter on screen and now be uncomfortable with the result of incident meter
making them darker. The above relationship of IRE's in the two shot will remain when you
meter with the dome.
Yes, I find it that sometimes you need to wiggle a bit to get the skin to look as you see it in real life. If I just take the straight t-stop reading from the incident meter, especially darker skin it sometimes looks darker than it looks in real life.
-
Sorry for the confusion. I'm using an incident meter. I guess I confused the info with the spot meter or thought it applied to both. Thanks for clarifying guys.
But what David said is exactly what prompted me to ask the question. David, when you said "ALL meter readings are just information that you factor in when placing your exposure, there are many situations where a face is brighter or darker than "normal" exposure." This is why I was thinking the reading the incident meter gives me won't be exactly my lens T-stop for my key. It seems I still have other things to factor in to decide on my t-stop for my key? Or do you mean the t-stop reading from the meter will always be the correct or optimal t-stop for my key, and only if I want the face to be darker or brighter to fit the mood I will have something else to factor in? So as long as I want a correctly exposed face the t-stop from the meter will always give me that? Maybe correctly exposed is not the right word. Maybe normally exposed is a better term.
With a waveform if I'm setting a key light for a face and want the key side to be normally exposed, I will just get the key light to get me 65-70IRE and I'm done. Then based on the key and the contrast ratio I want I will set my fill etc. I will just eyeball my monitor till the contrast looks good and what I want and then I check the IRE and judge if it's enough contrast or too much difference.
If I want the face to be darkly lit, like for a scene which is supposed to be at night inside a dimly lit bedroom, I will instead set the key to give me less than 70IRE for the key. Then proceed to set fill etc if needed based on the key light.
With a meter it's easy enough to check contrast ratios. Actually easier than with the waveform in my opinion. My problem is how to arrive at the first reference point, the key.
So if I'm understanding this right and the t-top from the incident meter is indeed my key light t-stop, does that mean whatever t-stop the meter gives me will also give me 70IRE in the waveform? Somehow it doesn't seem that would be the case. Because the waveform measures the actual face. The incident measures the light. So regardless if it's Caucasian skin or African American skin the incident meter will always give me the same reading. Which is what made me think the straight reading from the incident meter can't be my final reading and there is still something else I have to factor in.
-
So you are basically saying the meter gives you your key t-stop?
So if I set a key light up for an actor and the meter gives me T2.8 for that light, I can just set my lens to T2.8 and shoot ? Since a meter gives you 18% gray and I have always heard skin is around 1 stop above 18% gray, I didn't think the meter reading was a straight stop for the key.
-
What I mean is, the reading you get in the meter is not really your T-stop right? It's just your starting point. So for example, if I'm shooting ISO 800 with a 180° shutter and my meter says T4. Putting my lens at T4 does not guarantee I have the right t-stop for the shot.
-
I've been using the waveform in the viewfinder to set exposure. But I want to get to using a meter. I know many say they are not good for digital. But I still want to give it a go.
I have heard the rule of thumb to put caucasian skin at 70 IRE, darker complexion at 60 IRE and African American skin at 50 IRE.
But when it comes to an incident meter the reading is based on 18% gray, right? So that does not mean this is the correct reading for skin. So what is a good workflow for using the meter to set your key light etc? Thanks.
-
 1
1
-
-
New Category?
in 3D
Can you do your next movie in 3D? Of course, just depends on your budget and delivery format needs. It might not be entirely feasible quite yet for the truly indie (no budget) but if you have any budget at all 3D is becoming more and more realistic.The question is why should you?
Not every story benefits from 3D. I would say most don't. 3D is more for a theme park ride, which is what Avatar basically was, a park ride with some story. I was kind of hoping the fad would soon past but as Avatar made a behemoth amount of money it seems the fad will stick around a bit longer as money is the thing most people respect the most, specially Hollywood. But knowing Hollywood they will shoot themselves in the foot by over flooding the market with 3D crap till the gimmick wears out and people see 3D or not films still need a good story and most stories do not need 3D or are made better by 3D. Then the fad will go away as it has many times before in the past. The flood is already in the horizon. The next 3-5 years every blockbuster, comic book movie and 3D animation will be in 3D.
Was never a big fan of Cameron's and am even less now.
But you gotta handle it to him. Took himself to break his own record because we just have too many morons ahead of business in Hollywood.
-
The IR issue was not really corrected in the EX1R. It's supposedly better but definitely still there. I would still use a T1 filter to be on the safe side.
The best would of course be an EX1R+Nanoflash, but if I had to choose between an EX1R and an EX1+Nanoflash I would go with an EX1+Nanoflash in a heartbeat! In the end of the day what counts is the image quality and the image quality is EXACTLY the same between the 2 cameras as is also the EX3. The small ergonomic differences between the EX1 and EX1R are minimal. The much better quality of the Nanoflash makes a much bigger difference. About the only thing I really miss in the EX1 is the new HDMI connector. All else is pretty superficial. Just my opinion.
-
I just took delivery of my F900/3, when all was said and done I probably paid about two EX3s for it - that includes the HD-SDI board and so on (lots of the cheap deals do not have viewfinders). As far as I'm concerned, it's more than twice the camera. I'll be adding a nanoflash to it so I can have the benefit of high quality solid state recording along with tape backup, never have been a huge fan of exclusively memory based cameras.
Well done James.
The one I was talking about actually included a HDVF 20A viewfinder. All for $5,800.
Anyways, something to keep in mind when getting a F900 is the lens. Lenses normally don't drop in price as much and you need a great HD lens to use with the F900, unless you just want to keep renting. When all is said and done, with body, lens and all needed accessories one will be at way more than just two EX3s for sure and probably higher than RED ONE territory. But it's just interesting to know you can get a F900 body and finder these days for much less than you can a new XDCAM shoulder body or even a EX3. For a camera whihc used to cost over a $100K not long ago this is sure a huge drop!
As Dylan wisely said, "Times are changing fast".
-
Talking about "stunning deals" for a F900, they have been selling for dirty cheap lately, specially compared to what they used to sell for not long ago. Right now there's one selling for the price of an EX1 on Ebay via "buy it now". Crazy times. I wonder if it's RED or if its the fact that an EX1 or EX3 gets you pretty much the same quality as a F900 or at least close enough. 4:2:0 1920x1080 vs 3:1:1 1440x1080.
Anyways, no matter the reason their price has fallen incredibly fast.
-
This reminds me of those "lamborghini" kitcars based on the horrible and unreliable pontiac fiero. Looks like something that it is entirely not.
As Phil said, the betacam body is not of much use. It just makes the thing much bigger and makes you look like you may be shooting with a F900. He could have just as well put all the "improvements" in a metal box with a top handle and it would be just as useful and more compact. Better than a semi empty betacam body. Looks odd.
-
A lot of people are loving the Genesis for TV. Some of our shows went F-35 because they couldn't get a Genesis package -- they're all out, except for however many they keep in reserve as spares.
- J.S.
They seem pretty similar anyways right? The Genesis and the F35? Sony probably makes the Genesis for Panavision. Or is there any reasons to prefer the Genesis over the F35? I heard a lot of good stuff about the F35.
Unless is the lens mount but I'm sure a F35 could be Panavised.
-
The 5D only does 30 fps which is the deal breaker for many.
Yeah, I never cared for the 5D and now that we have the 7D why should we? I just wanted to make sure the 7D had full manual exposure control and wouldn't override anything I did with my exposure.
-
Hi,
Thanks. So just to reiterate, now, both the 5D and 7D have full manual exposure controls out of the box.
-
Exposure control work around is a pain in the arse but becomes second nature eventually. With manual iris lenses you can stop down while pointed at almost any light source until you trick the camera into displaying an approximation of the ISO and shutter rate that works for you, and then lock the value with the * button. Getting repeatable results take to take was a concern, but seemed to work out okay in the tests we did.
I'm looking into buying one of those cheap photo frames that displays jpegs in a slide-show and shooting a series of grey cards as way to easily repeat brightness values to hold to the lens.... another user forum suggestion I picked up in research. Silly but should be effective. As you may know, the camera uses a combo of ISO and shutter speed rates to control exposure once you take away Iris control as it's third option. At the slower ISOs, 100 and 200, the frame rates are all over the place - up to and beyond 1/160th a sec. ND filters come into play here to make sure you are shooting 1/50th at the f-stop you want, and the camera also has two stops exposure correction available with the thumb wheel. (for 1/50th a sec exposure, always choose and lock 1/40 on the display. 1/50th display can sometimes force a 1/100 shutter in actual practice)
At higher ISOs than 200, it is our understanding that the shutter rate is always 1/30th.
here's the table we went by. I can't take credit for this, but I can't refute anything in it either:
------------
From tests performed by Jon Fairhurst and Mark Hahn, the following findings have been made:
When shooting video with Nikon lenses or any lens where you are setting aperture manually:
Rule 1. Camera shoots at 1/33 of a second, any time the ISO is above 100, or above 200 with HTP mode employed. There is no way around this no matter what shutter speed reads out on the LCD.
Rule 2. At ISO 100, or 200 with HTP set, you can adjust shutter speeds. The following table shows the LCD reading on the left and the right shows the actual shutter speed the camera will use.
LCD -> Actual
Reads
1/40 -> 1/50
1/50 -> 1/50 or 1/100
1/60 -> 1/100
1/80 -> 1/100
1/100 -> 1/100
1/125 -> 1/125
1/160 -> 1/160
1/200 -> 1/200
Rule 3. With a non-aperture control lens, even higher shutter speeds than the 200 shown can be attained, despite Canon's indication of the limited shutter speed of 1/125.
---------------------------
There is some exposure related speculation that concerns using bayonet adaptors that include an interface to the auto focus/auto iris interface, but we have not chased down that rabbit hole yet ourselves. It seems that without a connected circuit to the lens, the camera's tiny brain assumes a value of f2.8 or f 2.0 and keeps it there, which is enough to work from as a good start. In theory I suppose you could hack that method and gain some more manual control back, but we've been too busy to ponder it.
No one said this was easy. But it is hackable, to an extent that the camera's specific advantages can be used and controlled. I think it is best used as spy cam and night vision thing for night exteriors in downtown mixed lighting, and as a way to steal shots inside clubs and museums, etc. For day to day production I don't trust it fully not to overheat or act up, but if I were making a verite doc I'd give it serious consideration over any HD DVX type unit, and I think it also may be better than my beloved s16 Aaton in a lot of ways.
The focus pulling won't be fun with Nikkors either, and the 7" 720 line monitor is not the world's best eyepiece, etc. There are clearly many many issues that can be worked out in future camera systems but again, this is an exciting format and a lot of fun to shoot with.
Am I correct to think the above exposure problems or limitations only apply to the 5D and not to the 7D which seems to have full manual exposure control when in movie mode?
-
define "useful..."
The form factor of being able to do decent follow focus on even one or two lenses in a kit makes this idea worth pursuing.
Yeah, I thought about that and betting one to use with my longer PL lenses and use normal Canon still glass for wider lenses, but I'm just concerned they wouldn't match at all, besides I would have to find a way to gear the Canon glass so I could have a follow focus.
It's not the ideal verite camera either but it seems great for stealing shots with just a couple of actors and a director, you know, sneaking into the Louvre or something.That's something I always wondered, about stealing shots, specially in famous locations. Is it just a matter of stealing the shot? Meaning if you can get away with it on the day you can get away with it and they can't say anything else? Can't the Louvre direction for example sue you if they see their location in your film and realize you had no permission?
-
I'm not sure I would hold my breath for a useful PL adapter for the Canons. If you noticed, the lens he is using on that prototype is a 300mm. Most likely because wider lenses protrude beyond the rear flange, hence their fine print warning:"Remember: this mount works with PL lenses that do not protrude beyond the rear flange. " Even Panavision which has a much longer flange distance, if I'm not wrong, only some zooms and telephoto primes will fit. Without the ability of using wider lenses these adapters won't be really useful.
-
I just read the March issue of American Cinematographer where Dexter's DP Romeo Tirone said they shot the last season on the Sony F23 (and first 2 seasons were all F900) and also extensively used the Sony EX1 along the F23 and they cut great. As an EX1 owner it would be great to know the settings they used and specially what cine gammas etc. I thought maybe somebody here works in the show or would have access to this info or know Romeo Tirone and could get some info on that. Anything you could get would be greatly appreciated. I love the look of the show and although it has very little to do with the camera used it would still be great to get some info on how they were getting the best out of the little EX1. Thanks in advance for any insights.
-
I think this is just a characteristic of the SI2K. After all it's a 2K camera which in 16:9 is not that much different from 1080. When you throw the Bayer in, it gets even closer if not lower. From what I have seen from the SI2K it's not sharper than the Sony EX1 or EX3. I would actually say it may be softer than these cameras.
Having said that, if it is really soft, like almost SD soft, it may be the lens. If you are using and old C mount 16m lens you probably won't get all the sharpness the camera can produce.
-
In this day and age of HD cinematography, I find myself more and more being asked to shoot projects with the Mini35 or Pro35 or other 35mm adapters. RED may end that soon with its 35mm sized sensor, but for now folks who shoot digital and want a shallow DOF have to put up with the adapters.
One thing that has always bugged me is the field of view matter. Those adapters, especially the P+S ones are supposedly designed to get you the exact FOV of a 35m lens as if it was being used in a 35mm camera. But given that when using the 35mm adapters you have to zoom in on the image to retro photograph it, you can pretty much get any FOV you want, depending on how much you zoom in. Now this wouldn?t bother me that much if it was for the FOV alone. But the FOV comes with a ?sweet spot? zone. The way I normally do it and I think everybody else who uses one of those adapters, is to zoom in until I can no longer see dark corners/vignette. The thing is there?s no telling if this is getting me the right FOV for the given lens I?m using. I normally have the feeling I?m not zoomed in enough as objects on the edge of the frame look very soft and are sometimes impossible to focus on. This tells me these objects are out of the ?sweet spot? circle of that lens and for that reason makes me feel like I have not zoomed in enough and the FOV is then wider than it should be. But if I try to zoom in more the Director will normally complain the lens is then getting too tight and we should use as much of it as possible, also saying that it will probably mess the FOV and no longer have the right FOV for that lens in 35mm. It?s a little confusing, but basically what I?m looking for is a way to make sure I have the right FOV for that lens and a way to make sure I?m in the sweet spot and not really much wider. Apart from putting the lenses in a 35mm camera and comparing the frames which is normally not practical and nearly impossible for most projects I shoot, is there another way?
Sorry for the long post but I felt it would be a good idea to explain it all in detail since it?s already confusing as it is. Thanks for the input
-
I was not sure of where to post this, but since we are mainly talking about digital cinematography and DI processes I thought this area was the most appropriated.
In the last few years since the advent of digital cinematography and DI’s there has been a bleach bypass crazy. While before Saving Private Ryan you barely saw any, today every movie seems to have some sort of bleach bypass look to it. With digital grading, it seem bleach bypass is no longer limited to silver retention. Looks of movies like 300 for example are clearly inspired by bleach bypass and could be said to be a variation of the same. But are there names for these new digital variations of bleach bypass? Are they even variations at all or are they so changed they their deserve a new name? What are everybody’s opinions on this bleach bypass crazy of late? Is it just a way to get way with lazy lighting and production values? Just a cheap way to make ordinary footage look interesting?
Check this still for example. It surely looks like some sort of bleach bypass:
http://www.flickr.com/photos/26295363@N07/2466868903/
In the negative days you could never get a look like this.
Updated Frontbox Plans
in Camera Assistant / DIT & Gear
Posted
How do you mean? What have made front boxes obsolete? I think they are still incredibly useful.