Elliott Atkinson
-
Posts
25 -
Joined
-
Last visited
Everything posted by Elliott Atkinson
-
 Recently I was in St. Louis shooting a music video, and we wanted to get a big wide shot from the top of the Arch. However unbeknownst to me I had to put my bolex, and 500T film through a X-ray machine. It looked similar to one at an airport, but the people working there refused to hand check my film and insisted that if the iso was under 1600 the machine would not harm it. Does this check out? I’ve had 35mm still film go through airport X-ray machines with no issues, but when ever I’ve flown with 16mm film Ive always get it hand checked and I was struggling to find info online.
 -
This is great news! Thankfully everything else about the camera seems to be ok, motor runs, zoom still works, shutter stills works etc. will probably be investing in a new carry case though, cause the friend who used it last time didn’t close it properly and thus when I grabbed it off the shelf it fell and hit the ground. Feel like I hopefully dodged a bullet.
- 7 replies
-
- 1
-

-
- super8
- elmo super 110
- (and 1 more)
-
Will go buy some super 8mm film, to test this. Also it’s worth noting that running the camera with the film door open it doesn’t look like anything is blocking or obstructing the gate.
-
I was looking down the barrel of my 7-70mm fixed zoom lens on my Elmo 110 super 8mm camera and I noticed this black square poking out into the lens. I was wondering if anyone knew what this was? The camera is in good working order, but recently it did get knocked over and fell several feet to the ground. Everything seems to be working fine but I'm just trying to make sure it’s not gonna obstruct the film. But in the past I’ve had no issues. Also It seems to be in front of the Iris cause the Iris blades close behind it, my best guess it’s to transfer some of the light from the lens to go to the view finder? But any input would be appreciated I’ll attach photos below. https://imgur.com/a/xDiSPz0 https://imgur.com/a/sKNQmhQ
-
The short can now be found here, hopefully for good now.
-
Looks like the director reuploaded the short with a new link it can be found here


-
No problem at all! My hope is that more people give it a try it was such a cool and rewarding experience.
-
So glad to have hopefully helped, good luck!
-
That is awesome! I think it's a great way to help people learn and get better. Loved reading through your post.
-
Thanks for the kind words, it was a really cool experience and I cant wait to shoot on film again.
-
That’s really cool! Over all I really loved using the camera. I can’t wait to shoot more projects with it when we can afford to shoot on film again haha. We got very lucky, for this project. My 16mm cinematography class got nixed cause of covid with everything moving online. But all the film had already been purchased for the class. So I was able to buy about 2000 feet of film for like 300 bucks since no one wanted it. The part that sucked was that we couldn’t afford to pay to get it scanned so I had to wait like 4 months to know how the film looked, back when I came back to school in September.
-
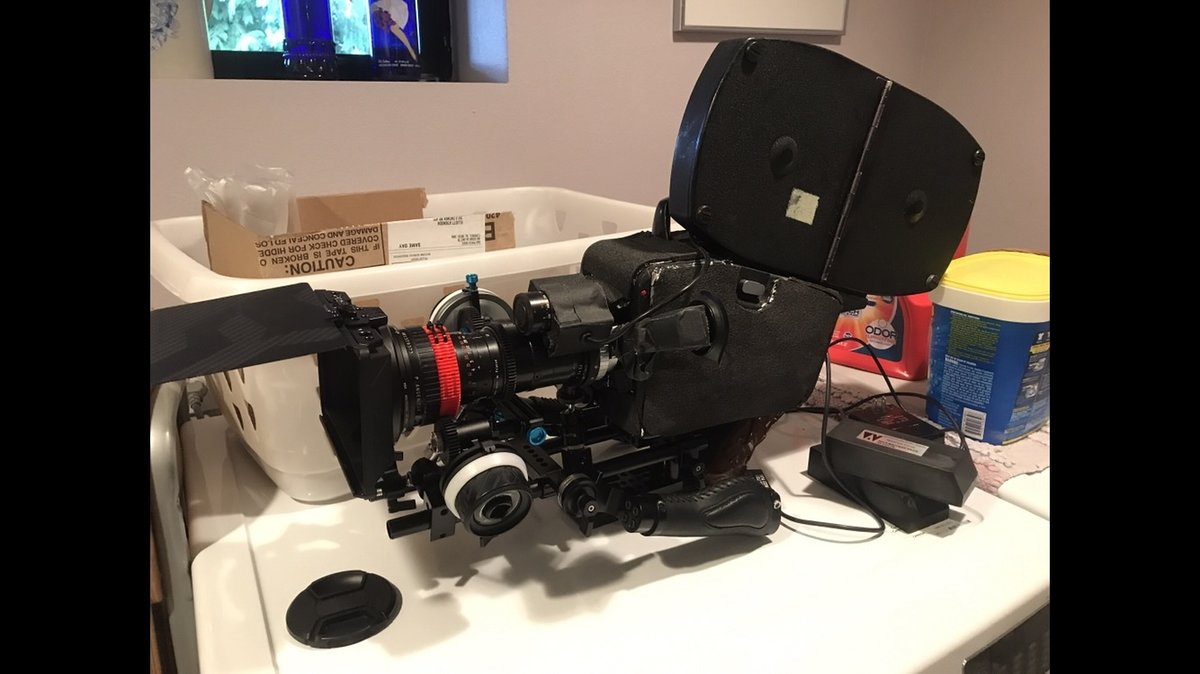
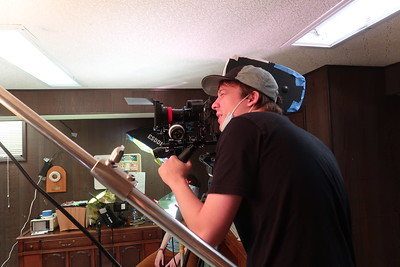
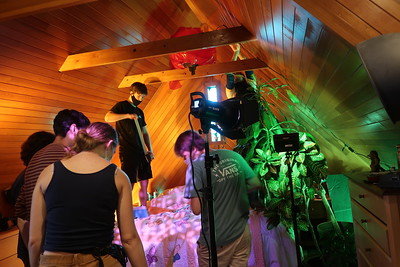
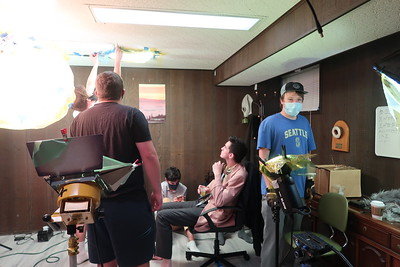
Everyone on this forum was so incredibly kind and helpful that I wanted to make a post reflecting on the things I learned from shooting on 16mm for the first time and my experience using the CP-16/A. Hopefully, those in a similar boat can find some use here. This post is gonna be long but I’ll title each section if people want to hop around. In case anyone is interested here is the film I shot, using the CP-16/A. https://vimeo.com/480617629 BUYING THE CAMERA Starting off on this project, I ended up buying a broken/as is CP-16/A for 400 dollars off eBay, which was mistitled as a CP-16/R. This was the absolute cheapest Crystal Sync 16mm camera that I could afford. Through my general research, it seems like the consensus is that the CP-16R is the superior camera because it has a reflex viewfinder and more lens options. That being said It would be wise to not make the mistake I did and purchase a CP-16/A on accident. The best way to tell the difference in hindsight is by the viewfinder. If the viewfinder is coming off the lens with a dog-leg it is a CP-16/A if it is on the side of the Camera body and looks more compact it is a CP-16/R. However, after fixing the CP-16/A (will get into more details later) it ended up working fine. From the eBay listing, the seller had stated the camera turned on, and the lens looked to be in good shape, but he had done no further testing. After doing further research the consensus that I found was that if the electronics still worked, there was a decent chance that only the belts would need to be replaced. Buying the camera was still somewhat of a gamble, and I could have easily been burned but this was the only option we could afford. Fortunately, upon receiving the camera and opening it up with hex keys, there was no corrosion on the electronics, the camera did indeed turn on and all that was wrong with it was that the blue take up belt had disintegrated. From the prices, I have seen it seems like CP-16/A’s and CP-16/R’s sell for around 400-1,000 used on eBay. If the electronics are bad from what I have gathered it is nearly impossible to fix. I would definitely recommend doing a camera test before shooting anything meaningful with these cameras. REPLACING THE BELTS As far as I can tell Ken from Whitehouse Audio Visual is the only person that sells the replacement parts needed to fix these cameras. Fortunately, on his eBay store (as of 12/10/2020) he is still selling replacement belt packs which can be found here for $100.00. (https://www.ebay.com/itm/Parts-Kit-for-Cinema-Products-Cameras-types-CP16-CP16R/293882089416?hash=item446cbccfc8:g:1hsAAOSwV~1Zldnr) Ken is an extremely good resource, I was able to get in contact with him through his Facebook page and he was willing to help me every step of the way whenever I had a question about the camera. One quick note as well the belts are identical to both the CP-16/A and CP-16/R. The process of actually replacing the belts is fairly easy. As someone who had never attempted to repair any kind of camera, I had no issue what so ever. The guide by AWCINEMA on YouTube is the best one I can find. (Belt Replacement Part 1) https://www.youtube.com/watch?v=dC5eBfLlIm8&feature=emb_title (Belt Replacement Part 2) https://www.youtube.com/watch?v=wKlRoavqqQM&feature=emb_title As far as replacing the black drive motor belt, there is a tutorial in the CP-16 manual on page 22 of 68. This was also a fairly easy and intuitive process. (CP-16/R MANUAL PDF) http://canon-s8-repair.yolasite.com/resources/CP-16R/Cinema Products CP-16R User and Maintenance Manual.pdf REPLACING MAGAZINE DRIVE PULLEY This process is also fairly simple and can help reduce the noise from the camera. The best guide for this process can be found on canon-s8 repair’s website. Whitehouse AV’s belt replacement kit comes with the necessary parts to do this procedure. Just make sure you are careful and don’t lose or break the tiny screws or pins. (Drive Pulley Replacement guide) http://canon-s8-repair.yolasite.com/cinema-products-cp-16r.php LUBRICATING THE CAMERA It was hard to figure out what kind of oil was needed for this, and perhaps people in the comments could help with this part. Regardless through forum digging it sounded like ARRI makes chronosynth camera oil, which optimal for this procedure but I was unable to source any for a reasonable price. The two oils I had seen mentioned as alternatives to ARRI’s was Kluber Catenera KSB 8 and Mobius watch oil. I couldn’t find any exact guide for where to exactly apply any of the oil but after reaching out to a Reddit user with the same question, it seems a few drops on the gears, and other contact points did the trick. I ended up using a small combination of both oils for this process, the Kluber stuff is thicker and more expensive and the watch oil is very thin and cheap. I don’t really know if both are needed or which is preferable but using it definitely helped the camera run quieter. There was only one instance when a sound blanket was needed to muffle the camera when we were filming in a really small room. (Kluber) https://www.qualitybearingsonline.com/kluber-catenera-ksb-8-50g/ (Moebius) https://www.amazon.com/Moebius-Multi-Purpose-Lubricating-Grade-Swiss/dp/B004GZQSZQ/ref=sr_1_2?dchild=1&keywords=watch+oil&qid=1607623146&sr=8-2 LOADING THE MAGS Loading the CP-16 mags ended up being a pretty easy and straightforward process, but threading the film through the camera is rather challenging. If your loops are too tight it will result in a very loud chattering sound from the registration pins hitting the pressure plate. I was recommended by Ken from Whitehouse AV to make the bottom loop slightly bigger than what the picture shows to avoid this problem. I found this youtube guide to be extremely helpful in this process. (CP-16 Mag Loading guide Part 1) https://www.youtube.com/watch?v=-piv7D0Y34E (CP-16 Mag Loading guide Part 2) https://www.youtube.com/watch?v=ZkSIRZl7fdA (CP-16 Mag Loading guide Part 3) https://www.youtube.com/watch?v=DGoSHS3BExU To rewind the film back onto its original side undo all the threading using the back rollers and move your rubber band to the front sprocket and turn it to wind the mag back up. I would highly recommend having some dummy film to practice with before you shoot for real. I had to practice loading and threading the film for days to feel confident I could do it when it came time to shoot for real. Also, it is a good idea to take a sharpie and draw little lines on each of the white film rollers that way when you are practicing you’ll know if the film is going through the camera correctly if each one is spinning. TYPES OF MAGS There are a couple of different types of mags that work with the CP-16’s. Most of the ones on eBay will come with either a Mitchel Mag, PLC-4, or a PLC4-A. The Mitchel mags are made of metal and look like mickey mouse ears, and the PLC mags look more rectangular and are made of a high quality plastic material. I ended up buying extra mags and was able to acquire all three of these variations. All the mags worked fine with 400ft loads, however, it should be noted that the PLC-4A was the only style of magazine that I could run daylight spools through without it being too loud. I don’t know if this was just the mags that I had purchased or if this is a general trend. Make sure to check if the mags you purchase are coming with film core adapters if you plan on using 400 feet mags. PLC-4 and PLC-4A mags look very similar the best way to tell them apart is to look for the metal identification tag on the middle of the magazine. Also, it is really important with daylight spools to push them onto the pin in the magazine really snuggly, you should be able to lift the mag by the spool without it coming off. I didn’t do this for two of our rolls and it came loose and messed everything up. I had heard mixed information on if having daylight spools wounded back onto plastic cores was a good idea. There was some concern among people that the plastic boxes would have light leaks. I had no such problems, with light leaks or the film fitting back into the plastic box. Winding the daylight spools back on to daylight take up spool made the camera loud. Just make sure to label that they are on plastic cores. THE LENSES 95% of the time if the CP-16/A’s you purchase come with a lens it will be some variation of the Angenieux 12-120mm F2.2 zoom lens. From my research, there were only a few other lenses made for the CP-16/A that come with the necessary dogleg viewfinder. Theoretically, I believe it is possible to use C mount lenses on the CP-16/A but you would not have any way to view the image. Pacific Rim Camera has some old sales brochures that show you could purchase a 9.5-57mm and a 12-240mm (links below). I have heard that 9.5-57mm is a good lens, and I know nothing about the 12-240mm. These lenses seem to be very rare and I can’t find any for sale on eBay that fit the CP-16/A at the moment. The CP-16/R has more lens options but they are in CP mount which unless you purchase one with an upgraded PL mount. The Angenieux 12-120mm is a pretty average lens, but should totally suffice for most instances. I never used the lens wide open as it was pretty soft in our camera tests. I never went below an F2.8 and if I was able to I tried to keep it at a 3.5 or higher. When shooting outside in Day exteriors I stopped down to an F8.0 and the lens was quite sharp. Another drawback to the 12-120 is the lens’s close focus distance of 5 feet. Luckily the zoom range can easily compensate for this, but keep this in mind if you are going to be filming in small locations. To the best of my knowledge, the Lens is Par-focal and it has a 72mm filter thread. The lens also spins when focusing so keep this in mind if you plan on using clip-on matte boxes. My Angenieux 12-120mm did not come with any focus gears and because of the dog-leg viewfinder and the shape of the lens, it is hard to get seamless gears on it. I ended up using zip tie focus gears like the ones below and they worked great. (Zip tie follow focus gears) https://www.bhphotovideo.com/c/product/839296-REG/Lens_Gear_605859_LENSGEAR_UNIVERSAL_LENS.html/?ap=y&ap=y&smp=y&smp=y&lsft=BI%3A514&gclid=CjwKCAiAq8f-BRBtEiwAGr3DgXehS_kmy78qCaFvg89ifnS1pWK9wEv66CMw4gBdvRlF26sQt-aAiRoCZr4QAvD_BwE The outer window on the viewfinder is the one to use for reference, for what the camera will capture in standard 16mm. I found focusing with the viewfinder to be rather challenging and not ideal, I would definitely recommend getting focus marks with a tape measure if you can. The few times I tried focusing without one I often missed the mark. It may seem silly but I struggled to figure out how to remove the lens from the camera. You have to loosen the outer silver locking ring. Because these cameras are so old and often not being used frequently this can be challenging I had to use Channel locks on a rubber jar opener mat just to get it loose. I would recommend putting a little bit of grease on the threads when putting the lens back on to avoid this problem in the future. If you can’t do a proper lens test, I found this little camera hack to be kinda neat. By taking a piece of semi-translucent material like folded tape and putting it in front of the gate you can test the infinity focus on the lens. This is not optimal but can help in a pinch. (Testing 16mm focus without film) https://www.youtube.com/watch?v=1TEAukxs8DQ (Pacific Rim Camera CP-16 Brochures) https://www.pacificrimcamera.com/rl/01360/01360.pdf https://www.pacificrimcamera.com/rl/00925/00925.pdf https://www.pacificrimcamera.com/rl/00874/00874.pdf RIGGING THE CAMERA The body of the CP-16 is not the most conducive shape for Narrative filmmaking, it was definitely made more for Docu-Style ENG work. It was mildly tricky to rig my matte box, rails, and follow focus but I eventually got to a place where I was able to make it quite functional. I’ll attach a photo below if people have any questions about specific parts on the rig I’d be happy to answer them. https://www.flickr.com/photos/legoguy830/50703611197/in/dateposted/ To further reduce noise I also attached some rubber car insulation and foam around the camera, since we were going to be filming in very small locations. I had a UV filter, and a heavy-duty sound blanket as well to help with the noise which I only ever had to use once. Once you lubricate the camera it becomes quite quiet. I think the rubber insulation and foam were probably overkill. BATTERIES Often times the batteries that come with the camera will need to be re-celled or new ones will have to be purchased. The battery that came with the camera I purchased still worked, however just to be safe I purchased another one from White House AV’s eBay store. I don’t experience re-celling batteries but I know there are forum posts with tutorials if you should go this route. (Replacement Battery) https://www.ebay.com/itm/NC-4-Cinema-Products-Battery-Pack-CP16-CP16R-cameras-/274607377806?hash=item3fefe00d8e The battery life was really good, I never had to swap batteries while shooting the new Whitehouse AV one lasted me all day, and I would simply just charge it every night. I believe the charge time was about 12 hours so just keep that in mind it takes a while. TIPS DURING THE SHOOT. Our entire crew was a combination of high schoolers and people in film school, so none of us prior had ever shot anything on film. Because of this, there were some definite growing pains that I’ll share that hopefully others who are brand new to shooting film can learn from. Some of these seem obvious but I’ll still mention them. 1. Be diligent in labeling and checking your mags. I wasn’t as diligent as I should have been which resulted in a potential Snafu where I accidentally loaded a roll of 500T when I thought it was 50D. Luckily I was able to figure out what roll it was and made sure to have it pulled two stops. But it could have been bad. 2. Make sure your film is snug in your mag. I messed up loading two mags because the spool was not tight all the way. This resulted in massive amounts of smearing occurring halfway through the roll making most of the footage unusable. 3.CHECK THE RUBBER BAND ON YOUR MAG. I almost forgot to do this twice. If you don’t put the rubber band on the take-up spool of your mag it will run and clump up inside the camera and make a huge mess. 4. Having a digital camera to double-check exposure is not a bad idea. Because everyone was so inexperienced using film, I brought my GH5 with my Atomos monitor on set to use to double-check exposure and to give the director some reference. I still mostly relied on my light meter but this was a nice comfort to have. 5. You need more film than you think. The director and I were very diligent about what shots we actually needed. Obviously, it is really easy on digital to overshoot things from every angle. But on film, you need to be very disciplined because it’s quite easy to mess things up. Having extra film in case something goes wrong, can be a lifesaver. For this short, we used 2500 feet for our 9-page script. We shot about at 5:1 ratio. 6. Allocate how much film you can use for each scene. Breaking down the amount of film by feet for each scene is hugely important. And will help you stay on schedule. 7. Have a lot of light. Coming from digital you get used to being able to crank up the ISO and use smaller light fixtures. But having to shoot low-speed film indoors was quite the challenge and required a lot of creativity to look good with our limited resources. DEVELOPMENT We had our film developed at Fotokem Burbank. They have extremely good student rates and the people who work there where all very professional and kind. I think the grand total for 2500 feet of the film ended up being around 400 dollars. Additionally, make sure you label your mags properly. I messed up the labeling and Fotokem had to call me to clarify my intentions for how I wanted it developed. I also didn’t have camera logs which was a mistake in hindsight as well. Luckily I was able to get everything sorted out and everything was ok. SCANNING I was able to get my film scanned at my University free which was a huge help in saving costs. The scanner used was a Black Magic Cintel one. The film was scanned at 2k resolution. POST I did all the color grading in Davinci Resolve 16, I found the film to have quite a bit of flexibility and could push it as much as I needed. I tried to keep things pretty light but I definitely brought out a lot of color in the actor’s outfits. Some of the film was a little bit too grainy so I ended up needing to use a little noise reduction. OTHER USEFUL LINKS http://super8wiki.com/index.php/CP-16 http://www.whitehouseaudiovisual.com/ https://www.facebook.com/WhitehouseAudioVisual/ http://canon-s8-repair.yolasite.com/cinema-products-cp-16r.php http://www.mishkin.yolasite.com/using-16mm.php https://www.youtube.com/watch?v=7604jDy4rrs http://canon-s8-repair.yolasite.com/resources/CP-16R/evergreen_edu.pdf http://canon-s8-repair.yolasite.com/resources/CP-16R/CP-16R Technical Manual.pdf http://canon-s8-repair.yolasite.com/resources/CP-16R/Cinema Products CP-16R User and Maintenance Manual.pdf
-
Help, plastic core came off shot 16mm film.
Elliott Atkinson replied to Elliott Atkinson's topic in Film Stocks & Processing
I did that, thanks for the advice. -
Help, plastic core came off shot 16mm film.
Elliott Atkinson replied to Elliott Atkinson's topic in Film Stocks & Processing
Thanks so much for the advice! -
I've been shooting my first ever short film on 16mm, and things have gone pretty well but I just had a speed bump. While unloading one of my mags in my changing bag I accidentally pushed the plastic core out, so now my film has no core but it is still wound tight holding its shape. I attempted to try and fit the core back on but was unsuccessful so I resealed it and put it back in the light tight box it came in out of fear of damaging it or it coming undone. Will a development lab still be able to process my film?
-
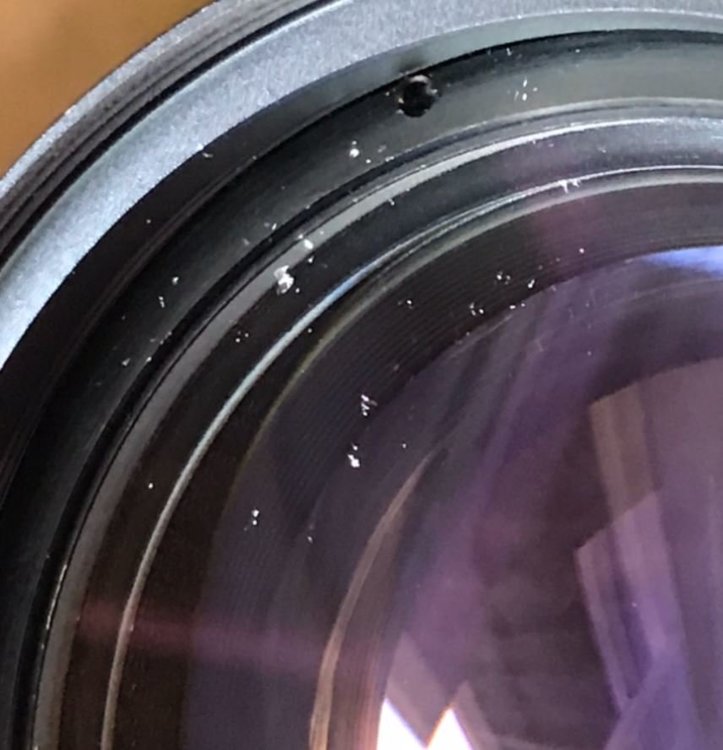
Currently the front element on my Angenieux 12-120 has a few little tiny chips on the front element but other wise in perfect shape. Seeing how the lens was not very expensive I purchased a new one with the proper CP-16A mount and dogleg view finder online. However despite this new being lens being advertised as in great optical shape there seems to be a lot of what looks like to be very feint speckled fungus on one of the middle elements, but the front element is in very good shape. Normally I would just return it and move on but I cannot find another online with the proper mount that isn't extremely over priced or in good shape. So my question is if anyone has experiences with taking these lenses apart how hard would it be to swap and the front elements? Or is this a job that should be left to a proper camera repair shop? And if so how expensive might it be, or is it not even worth attempting. From what I have read in other threads it seems like taking the entire lens apart to clean is very difficult, but perhaps just taking the front element out would not be as challenging? Currently am planning on shooting a short film on 16mm with this lens in mid-late June so it's getting to a point I need to decide if I should roll with the punches of just having a minor chip on the front of the lens or if I should try and fix it before we shoot. I appreciate any input anyone might have.

-
Okay thanks for the advice, through some testing it seemed that the chips really only show up on the wide side of things when there was a strong source of light pointing right at the lens.
-
Would you say it’s worth getting a new lens? Do you think they’ll be that noticeable? I think I fixing it would probably be out of the question since it’s such an old lens. More or less just trying to determine if these little dings are gonna make a noticeable difference shooting on 16mm. I was looking online and I couldn’t find much with 16mm specifically on hand but did notice some posts with people using lenses with bigger scratches and it didn’t seem to mess up the image to badly.
-
Recently I noticed my Angenieux 12-120 Zoom lens that came on my CP-16 has gotten a tiny chip and some tiny scratches in the upper corner of the lens. Currently I don't have any 16mm film to test to see if it will have any effect on the image quality, nor do I have an easy way to mount it to a digital camera. I am wondering if anyone here has experiences with using lenses with similar level of scratches/chips on the lens and if it made a discernible difference in the image. Also the front of the lens rotates as well when focusing, which I am also wondering if it will have an impact. My gut feeling is it probably won't, but until I get some film to test it I would appreciate any input and or experiences people people have.

-
how do you remove lenses on the CP-16A?
Elliott Atkinson replied to Elliott Atkinson's topic in Cinema Products
Here is a image of the lens if that helps. So from what you can recollect does the silver ring just unscrew.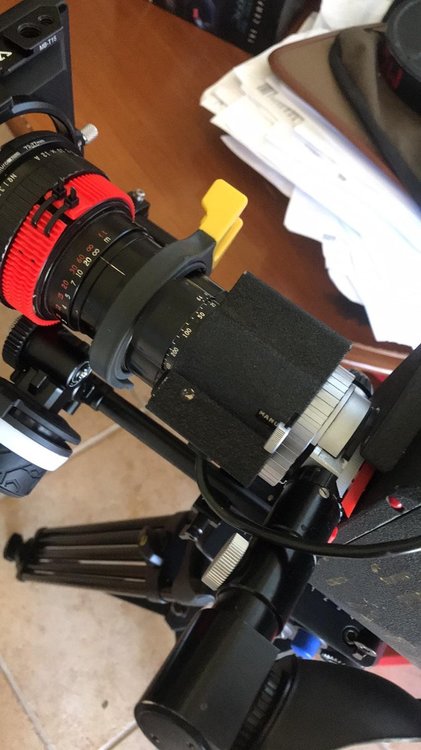
-
I was just wondering if it possible to remove the Angenieux 12-120 lens off the CP-16A. I had read online that there might be other lenses that work on this camera that also have the Dog Leg view finder. Currently my cameras lens is a little loose, which might just be normal because of the lenses weight. However I have been able to correct thus problem with lens support on 15mm rails. Also I should note that the lens focuses correctly, and seems to be in great condition other wise. But I was wondering since I have seen pictures online of the camera with out the lens so I am wondering how to remove the lens. I have read that the mount is a C-Mount for the CP-16A so I assume it should just twist off. However when I attempt to unscrew the lens it doesn't seem to really budge. Out of fear of damaging the lens or the camera further I have not attempted any other way to remove the lens. Ultimately in the immediate future I don't plan on seeking out any other zoom lenses that might work with the camera. I am more curious if it is possible to tighten the lens further to eliminate some of the play it has currently and to clean the rear lens element. Any input would be greatly appreciated.
-
How loud are your CP-16 Cameras?
Elliott Atkinson replied to Elliott Atkinson's topic in Cinema Products
Okay thanks, this is good to know I will shoot them an email. -
I made a post last week about fixing an old CP-16A camera that I purchased on eBay, surplussed from a film school. I was able to diagnose and fix the clutch belt, which had disintegrated previusly. Luckily everything else seemed to be in good shape; now the camera seems to work and run fine. However, it seems sort of loud relative to the cameras I've seen running online. I was able to use an app to measure how loud the camera was and it averaged around 45 Decibels when running next to the camera and around 30 or so around 6 feet away. I don't think this is going to be an issue for most cases, however, I'm worried about it maybe being too loud in small rooms. I was looking into maybe building a Barney for the camera to help, however, I do have some lube that came with the repair kit, so perhaps some of the gears just need to be lubed up to help. Here are the tests I conducted below if anyone wants to give them a listen. More or less, just trying to determine if this about the average self camera noise, or if mine is louder then it should be, and if so what is the best way to fix it. Any feedback would be appreciated. Elliott https://drive.google.com/file/d/1PfX6Yy5FbGZQS8kH75ZFqKBraFWxGJl5/view?usp=sharing https://drive.google.com/file/d/13tj5UChzrLrKSr2l-XnlMXpsqDV4aPuo/view?usp=sharing
-
Okay thanks, that is good to know. I think at this point the only real question I have is if it is possible to swap the lens out.
-
Recently I purchased a CP-16/A that was surplussed from a film school on ebay. The camera turns on and seems to run alright, however on the box it came in it says "missing take up belt" dated from 2009. After doing some research it seemed like it was possible to perhaps do this repair yourself some what easily? However I could only find tutorials for the CP-16R version, so I don't know for certain if it is the same process. Additionally, I was wondering is it possible to remove the lens on this camera. It came with an Angenieux 12-120 with a iris servo motor attached, and a viewfinder. I haven't been able to determine if the lens is removable or not out of fear of breaking it since it seems pretty stuck on there. Also the view finder frame in the camera, becomes crooked when adjusting the position of the eye piece is this a fixable issue? Lastly is it possible to load 100 foot day light spools into the mag of this camera, or only 400 foot roles? I am really new to the 16mm format, so any other general advice using this camera would be greatly appreciated as well.