Karl Lee
-
Posts
104 -
Joined
-
Last visited
Everything posted by Karl Lee
-
When Kodak consolidated their film ordering and shipping operations to Rochester in November, I was a little concerned about order fulfillment time as there was mention on Kodak's website that "anticipated delivery will be five working days after the date of your order". I ordered a few rolls of 16mm this past week, and I'm happy to report that, at least for my order, fulfillment and delivery were speedy as usual. I placed my order around 3 PM ET last Monday, and as I wasn't in a big hurry, I opted for FedEx ground delivery (which is two days in transit from Rochester to my location). To my surprise, the film was delivered on Wednesday morning, so it must have shipped on Monday afternoon. I'm guessing that the "five working days" might just be a worst case scenario, as ground service from Rochester to the west coast is likely 4 or 5 days. Time in transit aside, it looks like they're still fulfilling film orders in a timely manner, and I'd imagine that if ordered early enough in the day, most orders (especially overnight shipping orders) will probably ship the same day.
-
Grading a Log DPX Scan...Anyone Want to Show Me How it's Done?
Karl Lee replied to Karl Lee's topic in Post Production
I've been playing around in SpeedGrade and trying to color grade a few scenes in my S16 film scan. I've created an album with a few before and after images showing both the original flat log scan (top image) and my attempt at color correcting the scenes (bottom image). Could someone take a look and offer some creative criticism? In all three of these scenes, I used overall offset to adjust the black level, overall gain to adjust the maximum IRE, then adjusted overall gamma and saturation levels to what I thought looked best. While I think my corrections certainly look better than the original log scans, I'm still not overly-impressed with my work so far. In my opinion, the blue sky in the LV sign and fountain shots seems to have somewhat of a greenish tint...almost with a sort of color reversal-ish film look. I've tried playing with the offset, gamma, and gain tints/hues, but adjusting those creates an overall color shift that makes the overall image look worse. My goal with this film scan was to have something to play around with and try my hand at color grading, but as I've discovered, decent color grading is definitely a skill and something that's easier said than done. Next time, I'll probably stick with having the colorist perform the grading and leave it to someone who knows what they're doing :) -
Grading a Log DPX Scan...Anyone Want to Show Me How it's Done?
Karl Lee replied to Karl Lee's topic in Post Production
Thanks for posting the video, Jeff. Initially I was just adjusting the contrast and saturation levels in SpeedGrade, but I've been getting much better results using the scopes for reference (particularly the RGB parade) and making adjustments to offset, gamma, and gain. I've been searching for more video tutorials for SpeedGrade and Resolve, but unfortunately most of what I'm finding involves color correcting and making adjustments to video captured in Rec.709. Ideally, something that focuses on color grading a log film transfer (or even video shot in log) would be the most helpful, so I'll just have to keep looking. -
Hi everyone. I recently had some S16 scanned in log color space, and I've been playing around with color grading in SpeedGrade. This is my first attempt at color correcting a film scan, so I'm not all that experienced. That said, my approach to color grading has been more of adjusting the levels until something looks good as opposed to using a proper technique or process. If I were to upload a few .dpx frames from my film scan, is there anyone who would be willing to spend a minute or two doing a rough color grade on the stills? I'd really like to compare someone else's color grading with what I've done, and perhaps see the potential in my film scan in the hands of someone who actually knows what they're doing :) I was a little hesitant to post this request since I don't want to come across as, for the lack of a better phrase, looking for someone to do my work for me. This is strictly a hobby for me, so I'm just interested in trying to learn through the experience of others. So, if anyone might be interested, just let me know and I'll try to upload a few scans. Thanks!
-
Understanding DPX Files and How They Preserve Details
Karl Lee replied to Karl Lee's topic in Post Production
Thanks for all of the information. Quite honestly, about everything I know about log and Rec.709 color spaces I've learned within the last 24 hours. I've been reading through about any resource I've been able to find regarding log and Rec.709 and how they relate to film scans and video, so I'm a little more understanding of the whole concept now than I was when I wrote my initial post. I guess at this point, I know enough to be dangerous :) That said, am I correct in assuming that ideally, the best option for me would be to color grade my OCN log film scan would be to apply a LUT in SpeedGrade that mimics the characteristic curve of the original film stock? Apparently SpeedGrade CC includes presets / LUTs for a number of Kodak film stocks, but unfortunately I'm using SpeedGrade CS6 which does not include the Kodak film stock characteristics. That said, I've read that LUTs can be converted to work with multiple color grading applications, so are LUTs freely distributed and shared anywhere online? As I'm not an experienced colorist, having some variety of a film LUT would be a good starting point and help me get started. I'm following up with the lab which scanned my film, so perhaps they will be able to provide some suggestions. Just to make sure I'm understanding this, a color grading preset or LUT intended to mimic a film stock is best suited for video recorded or film scanned in log mode, correct? I was watching an Adobe tutorial video in which a Kodak LUT was applied to video which appeared to be recorded in standard Rec.709, so I found that to be a little odd. Finally, are the terms "Rec.709" and "linear" in terms of color space essentially interchangeable? I've seen it referenced using both terms, so I'd just like to make sure I'm clear on that. There's still a lot to learn, but I'm getting there! -
<Posted in error.>
-
Hi everyone. Some of my questions are similar to those addressed in another thread recently started in this sub-forum, but I think my questions are a little more focused specifically on the finer points of DPX files, so I thought I'd start a new thread. Anyway, a couple of days ago I received a DPX sequence (as well as a ProRes4444 rendering of the DPX sequence) of some S16 I sent off for processing and transfer, and I'm really looking forward to tinkering with color grading for the first time (I have Adobe SpeedGrade CS6). While I understand that a DPX sequence, or a ProRes4444 rendering of a DPX sequence, is advantageous in color grading as opposed to grading a standard telecine transfer, I'm still trying to clarify my understanding of DPX files at a fundamental level and comprehend how they can preserve details that, in their original non-corrected form, may not initially be visible. Here's what I'm trying to understand. Let's say, for example, that you have digital copies of the exact same frame of film. One is a single frame from a 1080p24 telecine transfer, and the other is a DPX image from a film scan. If I were to import the frame from the telecine transfer into SpeedGrade and decrease overall brightness to adjust for some blown out highlights, odds are that this would just result in the highlights becoming uniformly darker and without any increased detail. However, if I were to perform the same brightness adjustment on a DPX image, I may be able to reduce the size and brightness of the highlights and reveal details behind the highlights that previously were too bright to be visible. Therein lies the crux of my understanding of DPX files. While I realize that DPX files are high resolution, not only in terms of pixel size but also in color depth, how do they pack in this "extra information" into a single, static scanned image that can be brought out by adjusting parameters like brightness? In essence, being able to reveal details behind highlights by adjusting brightness is almost as if you were adjusting the aperture on the lens, so I'm just trying to wrap my mind around the "magic" of how this is done and how the details behind the highlights are captured in the DPX file. I guess I'm thinking about this along the same lines as an audio recording. Let's say that you have an audio recording with hot and, at times, clipped audio. Generally speaking, once the audio is clipped, there's nothing you can do to fix it. Even if you bring down the overall level of the recording upon playback, any clipping that occurred during the recording process is still present and audible. I'm not sure if this is a true apples to apples analogy, but it's just one way (incorrectly, perhaps) that I've been trying to approach an understanding of DPX files.
-
Thanks for the tips and information, and I'll try to upload some of the transfer when I receive it. Considering the lighting conditions and that my lens opens up to only T2.5, I went into this expecting that the shot will turn out quite dark, but as I'm still learning about and experimenting with filming at night, I wanted to give it a try nonetheless. To add to the uncertainty, the film I used was an older 100' roll of Fuji Eterna 500T, so I'll probably end up repeating with some fresh 7219 at some point :)
-
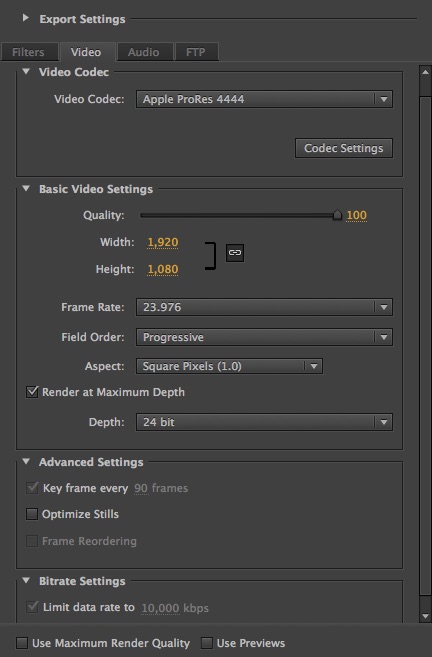
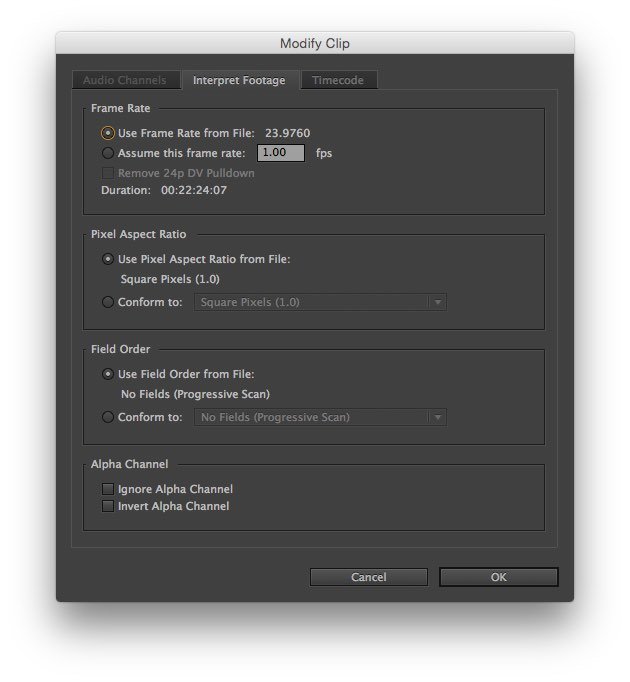
Hi everyone. These questions may be better suited for a NLE or Adobe Premiere forum, but we have some pretty knowledgeable members here, so I thought I'd see if anyone might be able to offer some advice. I have a couple of S16 film transfers that were mastered as ProRes422 HQ files and will soon have a ProRes4444 file from a film scan (all of which are 1080p @ 23.98 FPS). I'd like to start doing some editing in (OS X) Premiere Pro CS6, but first I'd like to make sure that I've optimized Premiere to preserve the progressive video and prevent Premiere from applying some type of pulldown, and also make sure that I'm preserving the progressive scanning and overall quality of the original transfer when selecting an export format. Premiere Pro has a number of sequence presets when opening a new project, but as far as I could tell none of the presets were really optimized for editing a 1080p24 ProRes file, so I created a custom preset as shown below. Do the project settings below appear to be correct for editing a 1080p24 clip? Additionally, Premiere Pro has two pulldown schemes ("repeat frame" and "interlaced frame") which can be applied to 24p clips so they play at 29.97 FPS. This is something I don't want enabled, but as far as I can tell, this option is enabled only for projects based on an NTSC frame rate. Since I've set my projects for 23.97 FPS, I don't believe I have to worry about this option being enabled. When viewing the "modify clip" for one of the clips in my project, for example, note that the "Remove 24p pulldown" option is grayed out... Finally, when selecting an export format, I'd like to keep the rendered file as close to the original as possible. Assuming my original file is a ProRes4444 file and I'd like to keep the same format for the file export, do these export settings appear to be correct? Assuming that my editing sequence consists of only ProRes4444 files (and not a mixture of ProRes 4444, ProRes 422, or other formats), and my export is configured for ProRes4444, is Premiere "smart" enough to pass along any portion of the video timeline not modified by a transition or filter straight to the output file without any transcoding, or are all source files usually transcoded to conform exactly to the export settings? Finally, if at some point I wanted to burn my project to Blu-ray, is ProRes (either 422 or 4444) a suitable file format for authoring a Blu-ray disc, or does a more compressed format with a smaller file size generally work better? Conventional wisdom would be to author a disc using the highest quality source file available, but in terms of transcoding and rendering time, I'm not sure if using a ProRes source file is necessarily the most practical choice. Also, when burning 1080p24 content to a Blu-ray disc, is it generally better to start with a 1080i60 file and have the pulldown rendered by the editing software, or stick with 1080p24 and leave the 3:2 pulldown to the Blu-ray player? Lots of questions here, so thanks to anyone who can help!


-
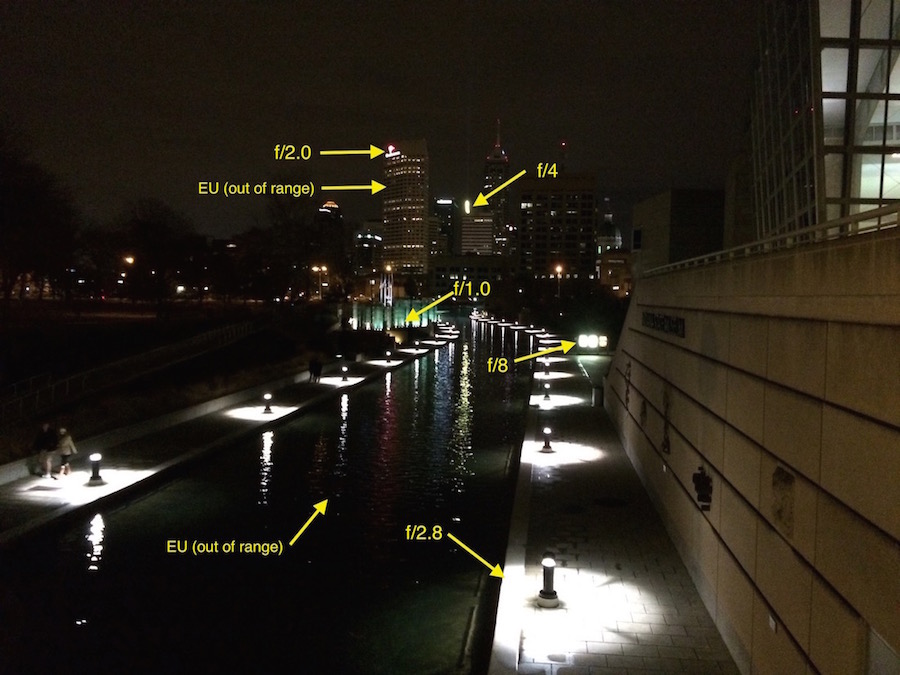
I just took this photo with my iPhone, Stuart, so I didn't have the precision of a DSLR. According to the EXIF data on the original photo, my iPhone was set to f/2.2 @ 1/15 sec. exposure, but again this is using the iPhone's tiny camera, so that information probably means little or nothing.
-
I've been experimenting with filming 16mm 500T at night, with my ultimate goal being to become more comfortable with using spot metering to determine aperture for any given scene, particularly night shots where incident metering isn't practical. It's said that pictures are worth a thousand words, so below I've posted a photo of a skyline scene I filmed, and I've included spot readings for various parts and highlights within the shot. I ended up filming the scene at T2.5, the widest aperture on my Canon zoom. Since my meter returned "EU" (out of range) readings for a number of spots within the scene, I'm really curious to see if / how the shot will turn out. The film is off for processing and transfer so I'll just have to wait and see, but in the meantime I thought I'd ask how others would set aperture for this particular shot, given the spot readings I've noted. So, if you were filming this scene (let's assume 500T at 24 FPS with 180 deg. shutter), what aperture would you select for the shot, and do you think a T2.5 lens would be sufficient for the shot? Thanks for any advice!

-
I'm a little embarrassed to ask this, as I'm probably just missing something obvious, but could someone explain how to upload a file to the 5 MB image allowance provided to each forum member? I've discovered how to view and "manage attachments" in "My Settings", but I can't figure out how to upload an image. I've also found the "My Media" function in the full text editor, but there doesn't appear to be any option to upload any images. So, what am I missing? Thanks to anyone who can help!
-
If it makes you feel any better, Bill, just keep in mind that Kodak offers UPS air services for delivery of raw stock (my last couple of orders have been shipped UPS 2nd day air), so I'd say that if Kodak deems UPS air service safe for delivery of their raw stock, then you should be ok. I doubt Kodak film shipments get any preferential treatment once they're picked up and in transit, so putting some type of "DO NOT X-RAY" indication on the box, just as Kodak applies the sticker, should be sufficient. FYI, Kodak has posted a .pdf of their x-ray label which is available for anyone to download and print. You can download it here. Incidentally, tomorrow I'm sending off some S16 for processing and transfer which passed through airport carry-on x-ray twice...once on the way out, and once on the way back home. Judging from the information I gathered from a few other threads prior to my trip, I should be ok, as apparently the carry-on x-rays aren't as powerful as the carry-on x-ray machines, but the "what if" is still in the back of my mind :) On a related note, does anyone know if FedEx and UPS x-ray their air cargo? I'd imagine that USPS deliveries might be a little more susceptible to x-ray since USPS uses passenger airlines to transport some of their mail, but since FedEx and UPS have their own fleet of cargo planes, I'd be interested to know if they do x-ray their air cargo.
-
Thanks to everyone for the tips. Unfortunately I don't have a DSLR, so using one for reference isn't an option at the moment. I'll probably end up getting some 500T, using my spot meter to make some semi-educated metering guesses, and just giving it a try. I suppose it wouldn't hurt to learn a little more about the Zone System before I start :) Using the top image that John posted (with the Chase billboard) as an example, how would one go about spot metering for that particular scene? Conventional wisdom might be to take a spot reading of the billboard, but not only is it white, but it's also heavily illuminated compared to everything else in the scene. Instead, I suppose being able to properly interpret a spot reading from the illuminated billboard, in addition to spot readings from other subjects in the scene, is ultimately the key in being able to determine an optimal exposure for this any given scene.
-
Thanks for the note, Kalle. Looking at the specs for the Focus HD, I noticed that it's rated at supporting cameras up to 26 lbs. My SR3 when completely assembled weighs in at around 23 lbs., so this seems a little too close for comfort. Do you use a heavier zoom or a lighter prime with your SR3, and do you have any other accessories attached to your camera when using the Focus HD?
-
While looking through Wikipedia's list of motion picture film stocks, I was reminded of Kodak's former 5289/7289 Vision 800T film stock which was released in the late '90s and discontinued in 2004. Out of curiosity, does anyone remember shooting with this film stock, and if so, what were your thoughts? My guess is that its reception wasn't too stellar on account of its relatively short lifespan, but I'd be interested to hear about others' experiences with the film.
-
So far, a vast majority of my S16 experimental filming has been daytime exterior, but I'd like to pick up a roll of 500T and try some nighttime exteriors. When filming outside in daylight and shooting objects far off in the distance, I'll typically take an incident meter reading at my location and use it as a starting point and rough estimate to determine my exposure for the shot. Metering for nighttime shots, however, seems like it would require a completely different approach. If, for example, I was filming a nighttime skyline, a street illuminated by a few streetlights and cars driving by, or another object or scene far off in the distance, an incident reading from the camera location would likely be of little to no help, especially if the camera is situated in a spot that is much darker or brighter than what's being filmed. That said, is determining proper exposure for nighttime exteriors (and specifically distant objects or scenes) more about working form experience and intuition as opposed to relying on a meter reading? And, when shooting nighttime exteriors with 500T specifically, do some just set aperture at something around T2.8 and take a "set it and forget it" approach, or is this generally not a safe assumption? I suppose spot metering is also an option, but I'm not terribly experienced with proper interpretation of spot readings, so I'll probably steer clear of that at this point. Thanks for any help!
-
Help With Selecting Proper Fluid Head and Sticks for a Camera Rig?
Karl Lee replied to Karl Lee's topic in General Discussion
Thanks for the tips, guys. Since I'm just a hobbyist, I don't want to throw a boatload of money into a new fluid head and sticks, so I'll definitely be going the pre-owned route. Even at that, I think an OConnor would be out of my price range, so I'll probably go for a second hand Sachtler, Vinten, Cartoni or Miller system. And, since weight isn't too much of an issue for me, I may even save a few bucks and go with aluminum sticks instead of carbon fiber. I haven't had much experience with Vinten, Miller, or Cartoni heads or sticks, so any thoughts on their overall quality? I've seen a number of Vinten 100mm ball systems out there (like the Vision 10, Vision 11, and Vision 12) at reasonable prices, so that's something I might consider. Judging from my personal experiences, I'd probably agree with Dom that regardless of a head's max load rating, a 75mm bowl is too small for a fully-loaded SR3. That said, is the extra 25mm in diameter of a 100mm bowl enough to create sufficient stability for a loaded SR3, or would a 150mm bowl be preferable? Having seen some of the load ratings of the 150mm bowl fluid heads, I'm guessing that a 150mm head might be overkill for an SR3. -
This video may have already made the rounds, but in case anyone missed it... <Click here to view the Facebook video.> Yikes! So ultimately, what was the culprit here? Was it simply the rising center of gravity? Also, out of curiosity, is that an Elemack dolly rig?
-
Hi all. I'll preface this message by saying that it's somewhat similar to another thread I started in the 16mm forum, but I'm trying to make the scope of these particular questions a little more general and thought the general discussion would be a good place to start. In any event, I was curious if I could get some tips on selecting a proper, adequate fluid head and sticks for a camera rig. I know most fluid heads are rated by a maximum load capacity or a load capacity range based on the counterbalance system. That said, is looking at a fluid head's maximum capacity or counterbalance specs the primary factor to consider when selecting a fluid head and sticks, or is there more to it than only that? Case in point. I have an SR3 rig which, when fully assembled with film, battery, lens, etc., weighs in at around 23 lbs. I also have a Sachtler Video 14II fluid head (75mm ball mounting) with a set of Sachtler single-stage aluminum sticks (which I've had for quite some time and didn't acquire specifically for the SR3). The Video 14II is rated for a maximum load of 33 lbs. and a has a counterbalance system of 15 - 35 lbs. Based on the specs alone, it would seem that the Video 14II would be more than sufficient for my 23lb SR3 rig. In practice, however, I'm getting the feeling that the fluid head/sticks combo is a little under-powered for my SR3. While the Video 14II pans and tilts smoothly with the SR3 rig attached, the tilt resistance (even at its max setting) seems a little light, and as a whole, the entire rig does seem a little top heavy. As for actually testing whether or not a fluid head is adequate for a particular camera, I vaguely remember reading somewhere that with a properly selected fluid head, you should be able to tilt the camera backward and forward, and the camera should remain in the tilted positions after letting go of the handle. If that's the case, then I'm guessing my fluid head is insufficient, as the camera always wants to swing back to the center position when tilt up or down. I think I'll end up looking for a set of fluid head and sticks that are a little more sturdy and well-suited for my SR3 rig, but I just wanted to have a few of my questions answered and learn a bit more about selecting a proper fluid head before doing so. Thanks to anyone who can help!
-
I was fortunate enough to have been given a Sachtler Video 14II fluid head and tripod about 15 years ago. It has served me very well for some DV and super 8 projects I've done over the years, and now that I'm shooting S16, I've been using it with my SR3 package. It's a quality and incredibly smooth fluid head, but I'm starting to get the feeling that it's perhaps a little under-powered for a fully-loaded SR3. The 14II has a 75mm ball mounting, and the sticks I have (also Sachtler) are single-stage aluminum. According to the specs I found online, the Video 14II head is rated for a max. load of 33 lbs. and has a counterbalance system of 15 - 35 lbs. Completely assembled (with a full mag of film, zoom lens, matte box, battery, etc.), my SR3 weighs in at around 23 lbs. That said, it would seem that at least on paper, the Video 14II would work just fine with my SR3. However, in practice, while the head seems to pan and tilt ok with the camera attached, I just have the feeling that the head and sticks combination isn't quite up to par with what I should be using with a camera that's the size and weight of an assembled SR3, and I'm afraid that the entire assembly is even a little top-heavy with the camera attached. In the meantime, I've been looking around at some options for a more formidable head and sticks. I'll probably want to keep it under $1500, so right now I'm considering some pre-owned options, like perhaps a Vinten Vision 11 or Vision 12 head with the signature Vinten gray aluminum sticks. I think the best option would be a 100 or 150mm mount, so any thoughts or suggestions would definitely be appreciated. Thanks in advance! For some perspective, here's a photo I found (not my photo) of the head / sticks combination I have...
-
Good point, Bill. I've already shot a few rolls of 50D, so now I'd like to try experimenting with 200T and 250D and throwing some of my filters into the mix :)
-
Let's say that you're filming 16mm daylight exteriors with 200T or 250D, and your metering indicates proper exposure at f/22 (for the moment, let's forget about the 85 filter and 2/3 stop compensation when shooting 200T). Using my particular setup as an example, an SR3 with a Canon 11.5 - 138 zoom, and based on your personal experience and preference, would you prefer: A. Shooting at T22 with no ND B. Shooting at T8 with an ND.9 C. Shooting at T4 with an ND.9 and ND.6 (effectively ND1.5) Given these three choices, which would be your preference, and the reasoning behind it? Does the decision ultimately come down to desired depth of field, or is there more to the decision than just that? I know lenses are sometimes considered their sharpest at certain apertures, so if DOF isn't that big of a factor, I'm curious if it's best to shoot closed way down without ND filtration, relatively wide open with heavy ND filtration, or somewhere in the middle. Realistically, a meter reading around f/32 isn't uncommon when shooting 200T or 250D in direct sunlight, in which case shooting without any filters isn't really an option. For the sake of discussion, though, let's stick with the hypothetical f/22 reading. Thanks!
-
I've read that in many cases, cine lenses are considered to be at their "sharpest" at a certain aperture or within a particular aperture range. Is there a particular aperture or aperture range at which most lenses tend to perform the best in terms of sharpness, or does it really vary from one lens to another and depend on a number of different factors (focal length, prime or zoom, etc.)? I, for example, have a Canon 11.5 -138 S16 zoom, so I'd be curious if there's a particular "sweet spot" in terms of a specific aperture or aperture range. Thanks!
-
I'm by no means questioning your statement, David, but I'm curious...what's the logic/science behind 200T being considered sharper than 50D? Conventional wisdom is that slower films yield finer grain, but then grain structure and sharpness aren't necessarily the same thing. That said, would 200T be considered the sharpest of all Kodak color negative camera films currently in production, also trumping 250D & 500T?