Search the Community
Showing results for tags 'filtration'.
-
My Eclair ACL has a little cartridge that slides in in front of the film and behind the lens. The cartridge has a circle cutout that is about the image size of 16mm, and the intention of it is that you can load it with a circle gel to act as a filter. If I could use this feature of the camera instead of using square glass filters on the front element, I’d save about 10x the money and I’d be able to have more filtration options. I’ve got a couple questions for those who have used filter gels like this before, though: 1. Are gel filter sheets of lower quality than glass filters? Will the image be different between using an ND filter on the front element versus using a gel behind the lens? 2. Will the possibility that of the gel not being perfectly flat (since it is flexible) affect the image quality? This is what I’m most worried about; that it would cause flares. 3. More practically, the camera I have was converted to super-16. Does anyone know if this filter holder covers the full super-16 image? I just discovered this feature of the camera the other night since the previous owner had it taped up (which I assume indicates I should tape it over if I end up using it or not, to prevent light leaks).
-
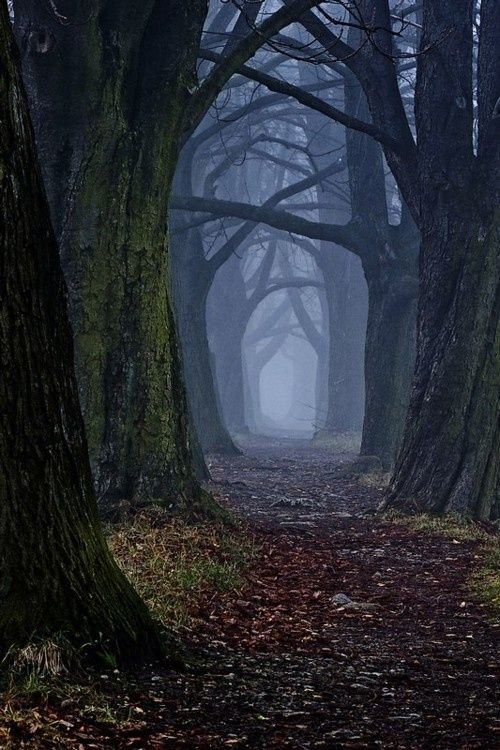
Hi everybody, I'm gonna shoot a thesis project at the end of the month and I started thinking about the look I'd like to achieve. I'm not super familiar with filtration and I wanna try to work with filters more rather than put all my trust into post production and color correction. I'm gonna shoot in the woods and the director would like to have a desaturated/soft/ dusk kind of look. I'll have to shoot day for dusk because I'll probably have access to the location during the day and not during actual dusk hours. I'll go to the filter gallery in NYC to make some tests but I'd like to hear everybody's opinion in order to make up my mind if there's a specific kind of filters I should check out. To be more clear I'm attaching a reference photo given to me. If it makes any sense I'm also planning on renting the artem exterior fogger. Thank you so much in advance for the help!
- 23 replies
-
- filters
- filtration
-
(and 4 more)
Tagged with:
-
Hey everyone! This is a continuation of the thread where I was asking for some ideas on how to filter my 9mm lens since the matte box was showing in the field of view. Please see the original thread (http://www.cinematography.com/index.php?showtopic=65936&hl=) as the suggestions and information contributed were quite helpful! (Thanks to Gregg, Miguel & Dennis.) DISCLAIMER: I haven't shot anything using this set-up yet, but it looks like it will get the job done. I am always hesitant to post any kind of tutorial, but I think this is pretty neat! So here's the solution I came up with :) ... Items required: -Alligator clips -Household pull-string with tassel at end -Gaffer's tape My first concern is always keeping all of my equipment in excellent condition. It was obvious that I would need to place the filter directly in front of my 9mm Cooke lens, but I really didn't want to put any kind of tape on the filter itself. So... 1- Fold 2 very small pieces of gaffer's tape onto each side of the filter with the non-adhesive sides touching the filter. These pieces act as a cushion so that the alligator clips never touch the surface of the filter. 2- Attach the alligator clip to the upper right-hand corner of the filter. 3- Put the pull-string through the circular notch on the front of the camera until it reaches the tassel. Tape the beaded end of the of the pull-string to the circular end of the alligator clip. This is your first fastener. 4- Pull the string back so that the filter is close to the lens and the tassel falls to the bottom of the camera on the left-hand side. Repeat steps 1 & 2, then tape the tassel end of the pull-string to the second alligator clip on the lower left-hand corner of the filter. This is your second fastener. 5- At this point, you may need to start attaching some gaffer's tape - first to the pull-string & then to the camera - for some tension. 6- Repeat steps 1 & 2, and attach the third (and final) alligator clip to the lower right-hand corner of the filter. This is your third fastener and it is a "floating clip" in that it does not get attached to the pull-string. Put gaffer's tape on the circular end of the alligator clip and attach it to the right-hand side of the camera. 7- Adjust for tension as needed. You should still have the ability to adjust the f-ring. Here are some pictures of the final product! Sorry I didn't take any step-by-step pictures, but I hope this helps for anyone with the same issue! It may not look sexy, but it seems like a pretty good rig for $5.00. Thanks for reading and comments/critiques are always welcome! Happy New Year!


