


Seth Baldwin
-
Posts
123 -
Joined
-
Last visited
Posts posted by Seth Baldwin
-
-
Cheers John
-
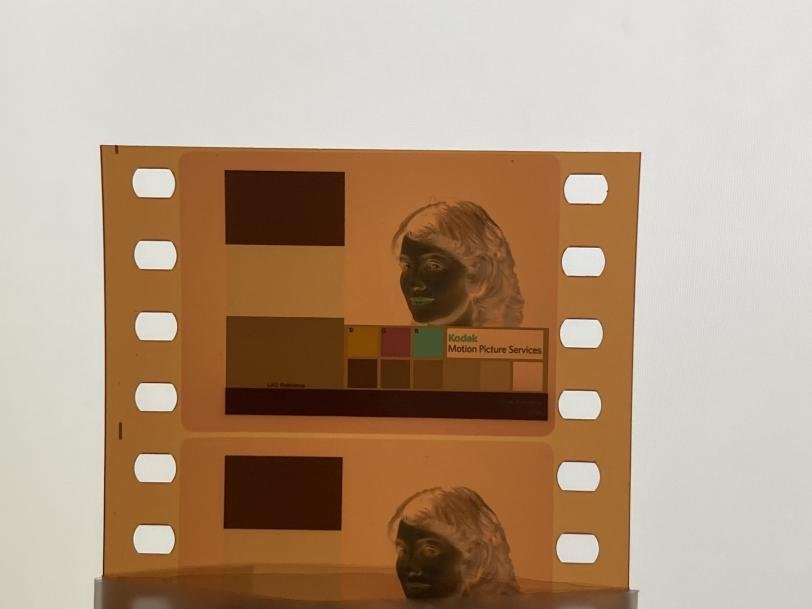
I plan to use this older LAD film for process control, I have laser recorded LAD to 2254 as well but comparatively I'm noticing this Kodak supplied target is quite small. Would the XRite 310T be able to read this target without cross dye contamination from the surrounding patches?
-
How was 35mm slide film like ektachrome typically duplicated in the past for preservation purposes? Did they use color-negative intermediate stock like 2242, a stock designed specifically for slide, or a completely unique process? I'd imagine the gamma wouldn't transfer well over to 2242.
-
Just to confirm, is 2242 intermediate film able to meet IP aims from an IN?
I ask because of course the traditional pipeline is camera negative > IP > IN > print. And since the camera negative has a different gamma to the intermediate film, and that was used to create an IP, would that mean the intermediate film is unable to create an IP from an IN? Where such a pipeline would be camera negative > IP > IN > IP. Or can one move from IP to IN to IP without issue.
-
Yeah it could be the case that raw scans of Vision3 are associated to look somewhat early 90s because they would just color-time an IP, scan with a telecine and call it a day. Here's a raw scan of Vision3 250D.

Vectorscope:
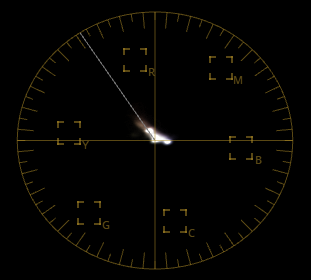
As you can see the water in this scene from this raw scan is clearly pulling toward blue, with skin tones where you'd expect. When I take that same raw scan and apply Davinci's built-in Kodak 2383 D65 emulation LUT from cineon log, this is the outcome.

Vectorscope:
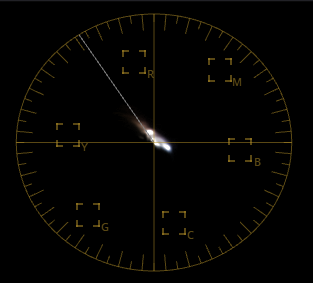
As we can see by default, the 2383 gamut pulled the blues closer to cyan, with the water now sitting somewhere in between blue and cyan. And pulled the skin tones a little redder. This resulted in more of a complementary scheme between the skin tones, water and shadows. There does appear to a bias, to which can be easily corrected for of course if the goal is to match the scanned original negative.
When increasing the gamma manually to the raw scan to match the 2383 gamma, there isn't a natural bias towards cyan. So clearly there is something specific here to 2383.
-
If interpositives were scanned in the past for digital mastering, wouldn't that mean they look almost identical to the scanned original negative, rather than the intended print medium given it's designed to dupe.
-
Hi,
For converting daylight balanced film to tungsten, what would be appropriate filtration? I’d expect it to of course be a cooler filter, probably something like the inverse of an 85/85b filter.
-
I have thousands of feet of old and new motion picture stock, including print materials both unprocessed and processed.
From what I understand the archival storage standard for motion picture film desires a temperature no higher than 10 degrees Celsius with an average humidity no higher than 40%. At one archive I checked out, they had their film storage room at 9 degrees Celsius with an average humidity of 25%.
These kind of conditions are quite expensive to achieve for a cabinet. With the current storage cabinet I have, the lowest controlled average humidity I can achieve is 70% at 10 degrees Celsius. To achieve the average humidity standards of under 40%, the lowest possible temp would have to sit around 20 - 25 degrees Celsius.
What would be the most ideal compromise in this situation? 10 degrees Celsius with 70% average humidity or 20 degrees Celsius with 40% average humidity?
-
15 hours ago, Mark Dunn said:
I'd assumed this was in the nature of a thought experiment. After all, I have a Steenbeck and a K3, but next time I want to make a movie, no way. It's going to be the DLSR and Lightworks.
I'm running some experimental timed prints with a BHP printer. In small quantities though for photography. As mentioned above, the idea of choosing none native original negatives is an interesting idea actually. I'll just start by meeting regular intermediate aims and try to achieve a particular gamma from the original negative. Then proceed from there.
Thanks guys.
-
28 minutes ago, Mark Dunn said:
You don't control contrast in development with colour film at all. It's not a standard tool as it is with b/w.
There was a low-contrast option with VNF, in order to get flatter reversal prints for TV, but that's long extinct.
Well contrast control probably isn't the best word. I more so mean we obviously know pushing original negative increases contrast along with grain structure. With of course the disadvantage of dye density offsets. But none the less, a particular gamma change is likely observable through status m densitometry.
I take that because 2242 under correct development is designed to have a straight line portion appropriate for duplication, that pushing an intermediate would affect the linearity of that straight line portion. Causing loss of highlight or shadow detail depending on whether it's an IP or IN print and potentially introducing none linear printing densities for each record.
In the end though, is contrast actually increased in the print?
-
When going to IP / IN, what are the options for contrast control without implementing silver retention? I would have thought it might be possible to get away with pushing and pulling an intermediate print but from what I've heard it's a process control nightmare. I'm talking contrast control strictly in terms of classic intermediate printing (no film out). Just ON > IP > IN > print.
Is the only option to push and pull ON for contrast control or is it worth experimenting with push and pulling IP / IN.
Perhaps there's another form of contrast control i'm not aware of.
-
13 minutes ago, Ludwig Hagelstein said:
In case anyone is interested: Here is a pretty much definitive guide on several silver retention techniques. Please note, before you add "but you said partial camera original neg silver retention is impossible": I was referring to actually skipping or shortening the bleach time. ENR, which is resilvering the neg, is possible and controllable. This basically means that after bleaching, which does nothing else than rehalogenize the metallic silver, you can redevelop a tiny amount of that rehalogenized silver before fixing, resulting in a more controllable amount of metallic silver in the negative.
cheers
https://theasc.com/magazine/nov98/soupdujour/pg3.htm
Very interesting, thanks for sharing these resources. I've heard about that silver retention demo from Fotokem, but I can't seem to find it anywhere on the internet? Did they ever publish these demos publicly because I'd love to see them.
-
12 hours ago, Robert Houllahan said:
We have done this in the past, ECN2 has allot of bleach and if you run some tests you can bypass enough racks to get partial retention.
It takes most of the bleach racks out if I remember correctly from when Bob did it so the film runs through about 1/5 of the normal bleach time.
Great thanks Bob.
Is this silver retention process controlled to a set aim? As I understand this can be achieved with an infrared densitometer. Is a particular relative percentage of silver retention expected from a 1/5 bleach duration?
-
I heard the term partial bleach bypass thrown around the internet a lot. I’m aware of various kinds of silver retention processes, a full skip bleach being and obvious one, But I’m also aware of more controlled silver retention processes used in the past like ENR, and processes that used to be offered at Deluxe (CCE and ACE), where B&W developer baths were used in between the bleach and fix stages.
But what is a “partial” bleach bypass which seems to still be offered nowadays? Does it retain a percentage of silver through some other means? Is it like a diluted or shorten bleach duration?
-
Since second-hand 35mm Super F series stock is quite out of date by now, i'm wondering if there are any similar-looking alternatives for taking stills. Out of the line of 35mm photo stocks currently available by Fuji, which comes closest to their older Super F-Series stocks?
-
 1
1
-
-
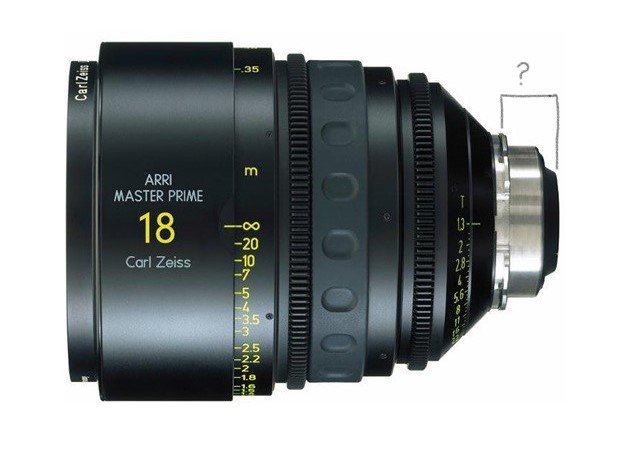
44 minutes ago, Dom Jaeger said:
There is no standardised technical term for this that I'm aware of, I call it "rear protrusion" or "behind the mount protrusion".
Flange depth or focal flange distance is a different thing, referring to the distance from lens mount flange to sensor or film plane. This differs for each mount standard, PL for instance is 52.00mm, EF is 44.0mm etc.
As David mentioned earlier, every lens is different in terms of how far they protrude past the mount flange, but wider lenses typically protrude more than longer ones.
The rear protrusion limit of older PL or Arri B or S mount lenses was dictated by the mirror shutter position. For this reason the safe protrusion space is more or less cone shaped.
The following diagram is the safe protrusion area for the Alexa Studio, a digital camera with a spinning mirror/shutter, but it can serve as a guide for 35mm film movie cameras also. Note that 16mm lenses may protrude a little further than this, so never mount 16mm lenses to a 35mm film camera (or Alexa Studio) before very carefully checking that they clear the mirror at infinity.
.jpg.7591e3df7d948d90dc5faa453e2d22e3.jpg)
With digital cameras there is more room, but there are still baffles, sensor cover glasses and occasionally internal filter systems that limit the rear protrusion. The nominal 31.5mm depth illustrated above tends to be a limit most lens manufactures stick to as a maximum rear protrusion standard, which is also safe for digital cameras. Whether lenses or adapters fit can also depend on the diameter however, and different cameras will have different limits. Certain PL adapters for older Arri mounts for instance will foul on the inner baffles of PL mount Alexa cameras because they protrude more than about 20mm near the edge, even though they worked on PL mount film cameras.
Exactly what I needed, thanks Dom
-
12 hours ago, David Sekanina said:
it varies from lens to lens, usually wide angle lenses protrude further back, tele lenses less. there's a limit on how long it can protrude for film cameras because of the spinning mirror.
The PL mount lens diameter is 54mm, so for a rough measurement you can measure the diameter on your image and calculate the scale multiplier.
Thanks for the insight. Do you know what the rear lens element max protrusion limit is in millimeters from the PL seat face to the spinning mirror of super35 film cameras? I'm struggling to find this information online.
-
5 hours ago, Robino Jones said:
What you're looking for is "Flange distance".
https://en.wikipedia.org/wiki/Flange_focal_distance
this wiki page says 44mm but you should double check that elsewhere.. you know wikipedia ?
Flange focal distance is the distance between the PL seat face to the image plane. I'm referring to the distance from the PL seat face to the last point of contact on the lens itself (for most pl lenses). I'm already aware the PL flange focal distance is 52mm
-
I've been trying to find information on what the typical distance is from the mount of a PL lens to the last point of contact at the back of the lens. I'm not sure what this metric is called, I have attached an image below to help illustrate what I'm looking for. From my observations, it appears this distance varies across lenses. If it varies from lens to lens, do lens manufacturers abide by at least a max depth for how far the back of the lens protrudes from the PL mount? If I can't get an exact measurement, is there at least a ballpark estimate for say Arri Master Primes?
Thanks,
Seth
-
Thanks for the insight everyone. Yeah I understand he’s an older guy and has a lot on his plate, I shouldn’t be jumping to conclusions too fast. Over the past 6 months I’ve sent 3 emails in total. Useful advice to try and call through whatsapp but I think I’ll just forget the camera exists and buy a new one. My timeline was much much shorter for this kind of wait. Unfortunately I wasn’t given an ETC upon request. So I suppose I had it coming.
-
Okay, I’ll have to pay for an international call to get in contact with him. It’s so odd how he just ignores emails for months on end.
-
Okay so les is clearly active on the internet. Which means he has likely checked his emails, and knowingly keeping my camera. Guess it makes sense to contact the local authorities to retrieve it off of him now.
-
1
-
-
I’ve been sending him email after email for 6 months. I sent my camera to have its mount modified. Since he is not responding to any of my emails, I’ve requested to cancel the modification and have him send my camera back. He has not responded even to that request. So unless something else has happened to him. He is knowingly keeping my property, which is completely unacceptable
-
 1
1
-
-
Been experimenting with preflashing, I've had no issues manually preflashing by exposing a gray card prior to shooting a scene, however it certainly takes up unwanted time prepping each can. I don't have any first hand experience renting an Arri Varicon or Panaflasher but it looks like a massive time saver. Are there any similar products to the Varicon and Panaflasher on the market that an individual can purchase?
I've had so little luck finding anything that i'm considering trying to make my own.
Help with Printernet software. B and H 6127 contact printer
in Film Stocks & Processing
Posted
Hi Richard,
I'm based in Australia and will be acquiring the same light valves and printernet unit quite soon. It's to operate a Bell and Howell Panel Printer for 35mm. The printernet unit has the PNet software cloned from a floppy disk onto a CF card. If you shoot me a message we may be able to arrange something when I have it all setup. Assuming you don't find someone else prior.