


Justin Oakley
-
Posts
147 -
Joined
-
Last visited
Posts posted by Justin Oakley
-
-
Hello again guys.
sorry to kind of drag this thing out. So here’s what I’m working with. I’m thinking we may have to do this earlier in the day as it doesn’t get dark until around 8ish. ...The kid and whatnot.
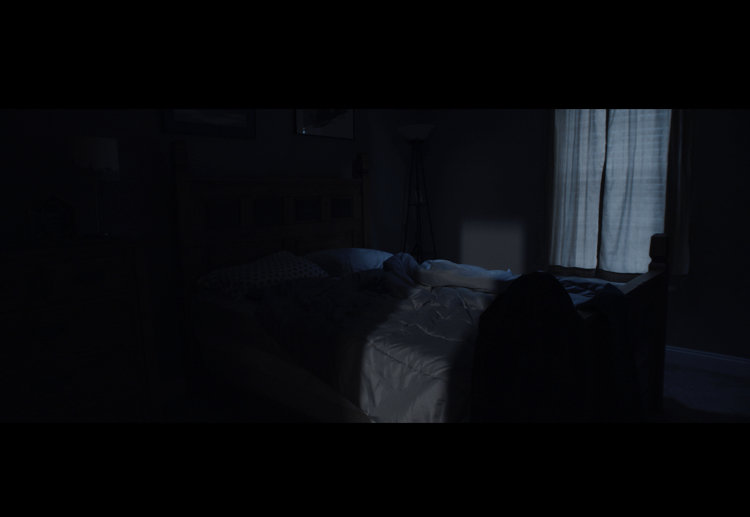
as mentioned before, I’m not a huge fan of the blue “moonlight” day for night stuff. But I’m not sure I have a choice.so I used the daylight through the window. I put a bunch of diffusion on the window outside (it could probably use more). I then cooled the temp in camera and used a full cto on the 120d ‘hallway light’.
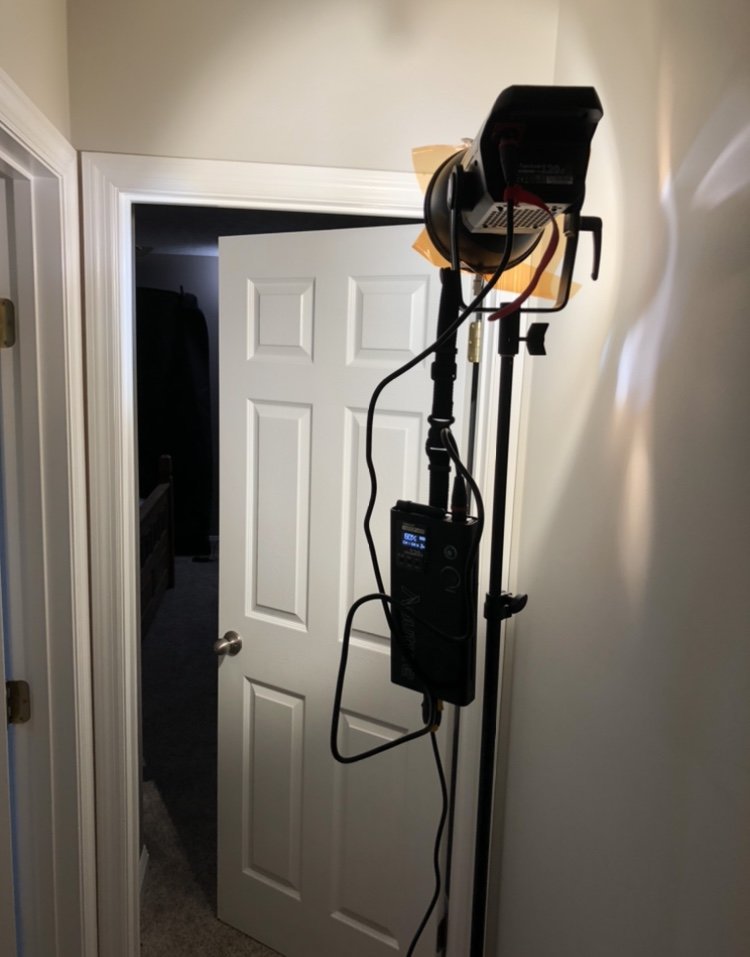
I did as Mr. Mullen suggested and flagged the light from the hallway using the doorway as a topper, since it’s kind of a tight spot and I couldn’t fit a flag in.
I then used a handheld, dimmable, bi-color, tubular light and wrapped it with some cinefoil to focus it on the subject/bed. It was suspended overhead using a couple pieces of fishing line, taped to the ceiling with gaff tape.
does this work or nah? Given what I have to work with.
If so, I think I can bring the window down a bit in Resolve using some sort of mask. And I can probably lift the shadows up a smidge? I don’t know...
-
I just saw a brief clip of this focus puller rockin’ it on Instagram. This is just a snapshot but he’s moving around...really into it.
what I noticed is that he’s not even looking at the tool (sorry, I’m not sure what the proper name for it is). I’ve only seen pictures of them, but from what I understand they have various distance marks and whatnot? He’s just whipping that thing back and forth, watching the monitor (and dancing along apparently). I think it was a music video.

-
3 hours ago, David Mullen ASC said:
This day scene shows what I'm dealing with when lighting through that window, there's a fire escape with staircase and a 10' drop below:
I liked how this day scene turned out, we covered the top of the air shaft set with a diffusion frame and put blue on a 5K hitting it for a cold skylight effect, then on the opposite brick wall just above the frame, we put two trombone arms and hung two 1K spot PARCAN's to hit the two halves of the window as a backlight. And the shot starts out panned to the left into the room, which was only lit by the glow of the PARCANs hitting the window shade and bouncing off of the floor and window frames. By the time they get to the window, they are just filled in with all the ambient bounce from the backlight.I just want to say thanks to you, and everybody here really. It’s cool that you’re even bothering to take the time to share your experience and methods with me...and my silly thread about lighting a small bedroom with my three cheap-ish lights.
There’s no reason why you should feel obliged to even entertain such questions. But you do. And I appreciate that.
-
1 hour ago, Stuart Brereton said:
Assuming that the stand, lean and slap are something that you know is coming, there's ways of dealing with it. You know what the distance is when they're sitting. As people stand, they lean forward. That's measurable too. Then they lean across the table. How far? Well, it will be to their arms length of the other actor because they're going to slap them. Again measurable. You'd be surprised at just how predictable body movements can be, even when they look fast and uncontrolled. Another mitigating factor is that big movements don't play well on tight lenses, so you may have a little DoF than you would on a long lens.
No focus puller gets it right every time, particularly not at wide apertures, but a large part of their skillset is being able to read an actors movements, and to "feel" where the focus should be.
Gotcha. I guess I was getting wrapped around the axel about the idea of some improvised stuff. Kind of forgot about blocking and rehearsals and multiple takes and whatnot.
-
3 hours ago, Stuart Brereton said:
I'll defer to the actual 1st ACs on here, but you need to split your attention between what the camera "sees", and what you see. If you just watch the monitor, you are basically just reacting, and that means that you are always slightly behind whatever the actor is doing. If, however, you watch the actor, you can anticipate their move and adjust focus as they do it.
Imagine you are pulling focus on a head and shoulders close up of someone who is sitting down. Halfway through the scene, they stand up. When people go to stand up from a chair, the first part of their body that moves tend to be their hips, as they start to sway their body forward in order to stand. If you were just watching the monitor, you would never see that happen because it would be out of frame, but if you were watching the actor, you'd see it coming, and be able to anticipate the move they were making. It's the same with many other movements that people make. It's almost always feet or hips that move first, upper body second. If you're not paying attention to that, you're going to be purely reactive in your focus pulling. A large part of the job is learning how to read an actor's body language and movement. Those skills also carry over into operating.
And what about with a really shallow depth of field? I guess that’s what I wonder the most. When it’s a game of inches is it ever just a guessing game? Again, for shots with a lot of energy. You’re watching the actor...the hips, etc. They bolt up, lean in, and bitchslap the other person across the table in like a second and a half. Then as soon as they got up, they’re back in their seat. You throw the wheel that fraction of a millimeter or whatever, and hope and pray they’re in focus?
-
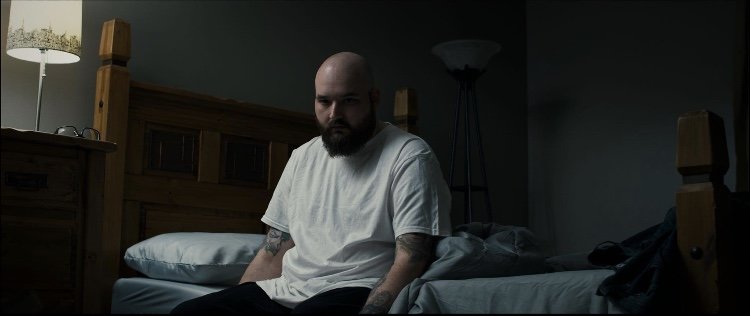
5 hours ago, Satsuki Murashige said:
These two frames look pretty good!
Damn. Thanks man!
so I want to get a pretty good look like this...but 86 the practical and I’ll be content. -
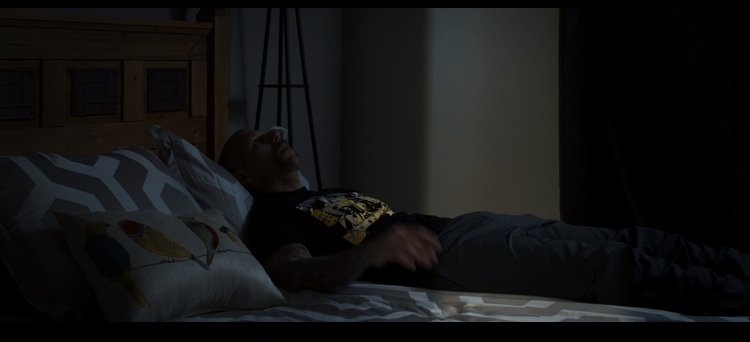
In the shot of him sitting on the bed you can just baaaarely see the edge of the window. So I wonder if I can motivate a light from that general direction (without blasting the walls), elevate the camera height a bit and shoot the scene from there. Keeping the shaft of doorway light—cut like you said with a topper. Obviously the practical won’t be on.
sorry. I know this is probably a basic setup but for some reason it’s the bane of my existence. Anything in a room with some practicals I’m sort of ok with figuring out. But this nighttime stuff is a real ball buster. I just see a lot of low budget stuff that involves creating this unrealistic blue atmosphere that is somehow supposed to emulate evening time. But he just looks overdone and fake as hell to me.
-
3 hours ago, David Mullen ASC said:
If you forget the real arrangement of the room, since you aren't seeing either the door or the window in this shot, what would be an interesting lighting design?
For example, I can imagine one where a bright slash of door light falls on the man's face (to see his reaction) and the killer is silhouetted by a glow on the wall behind them from some off-camera window. You could even flip the shot around so that the door is in the background and the hallway light backlights the bed when the door opens, or hits the man and the killer is framed against the bright door.
Or I can image a slash of window light that is always on the man and bed, but off of everything else, and then the door way off to one side creates a slash on the wall next to the bed and the killer is silhouetted against that bright slash.
Or I can imagine a shot done at night where the bed is backlight through the window, which is framed in the shot, and the light is falling on the man's face throughout.
I really like the idea of reversing the shot. Or the very first example you provided.
It kind of sucks that it’s such a small room too. I understand that it’s important to have an “establishing” shot to keep the audience oriented. That’s where I’m kind of intimidated by how I’m going to make this work. Pretty much every example you gave I kind of smack my head because I’ve already filmed another sequence in the same room. And turning the set around might disorient (?). It’s not a super wide shot revealing a whole lot, but it gives a pretty good idea of the layout.
this is a shot sequence with a reverse OTS showing the doorway in relation to the bed. He’s watching the boy’s shadow through the light leaking under the door...as he roams the halls at all hours of the night.

-
17 hours ago, Mark Kenfield said:
The 120D in the hallway is having a somewhat strange effect because the light is coming straight through the doorway (and playing high up the bedroom wall). If it were an actual practical light in the hallway, it would be mounted in the ceiling and the top of the doorframe would be cutting off a lot of the light that plays higher up the wall.
If you simply lift the 120D higher, the top of the door frame will act as a cutter and you'll get a tighter pool of light on the bedroom wall. This will make the image lower-key overall and should help a bit.
I'm with David though - white/light-toned rooms are incredibly difficult to make low-key - you really have to keep all of the light off them for a truly dark feeling environment. Do you have a snoot or the fresnel attachment for the 120D? A more controlled backlight/edge light on the subject as he sleeps would probably be your best bet for keeping the overall scene low-key, whilst still being able to clearly discern your subject.I do have a fresnel. I don’t have a snoot, but could I maybe make one out of some cinefoil or something? I’ve got some of that.
also, there still needs to be SOME light in the scene though, right? The viewer needs to at least see that he’s lying in a bed and not just suspended in darkness. Maybe not necessarily see a detailed picture on the wall, but that there is a picture on the wall.
-
Ahhh, ok. I think I’m picking up what you’re putting down. So a topper on the hallway light to simulate the ceiling light being cut off by the top of the doorway. Instead of just shooting it straight through.
And make it brighter.still flag the bounced light if possible
moving in tighter for the close ups and meds isn’t as big a struggle as getting the wider master shot. That’s what’s really kicking my butt here. But the shot is kind of necessary as it will keep everything somewhat oriented.
I also might try shooting light through the window.
The reason why I was planning on shooting it during the day is mostly a scheduling thing. It gets dark a little later, and there’s a kid, and I don’t want to keep him up til all hours of the night. His dad is a buddy of mine and he’s been cool about letting me use his kid for this project...which is already a little messed up and weird. -
3 hours ago, David Mullen ASC said:
A vertical flag wouldn't cut into your shot if you had to frame this window out anyway, but this is another reason to use the window and light through it so you can widen out.
If you're saying that the door slash was also lighting this wall as well as the bounce, then at least that hallway light needed a topper flag to create a cut halfway down the wall plus the flag to take the bounce off of that wall (also if that bounce is supposed to represent something coming from outside then that wall shouldn't be hit by the bounce).
I also think the hallway slash should be brighter than the ambient window light because right now, it's too subtle. Make it brighter but use a top flag (or raise it so that the door jam cuts it more) so that the upper half of the wall stays dark, unless you need the slash to silhouette the killer (but likely they'd be lit by it unless it came from further off to the right.
If it helps you, you could consider flipping the bed to the opposite wall.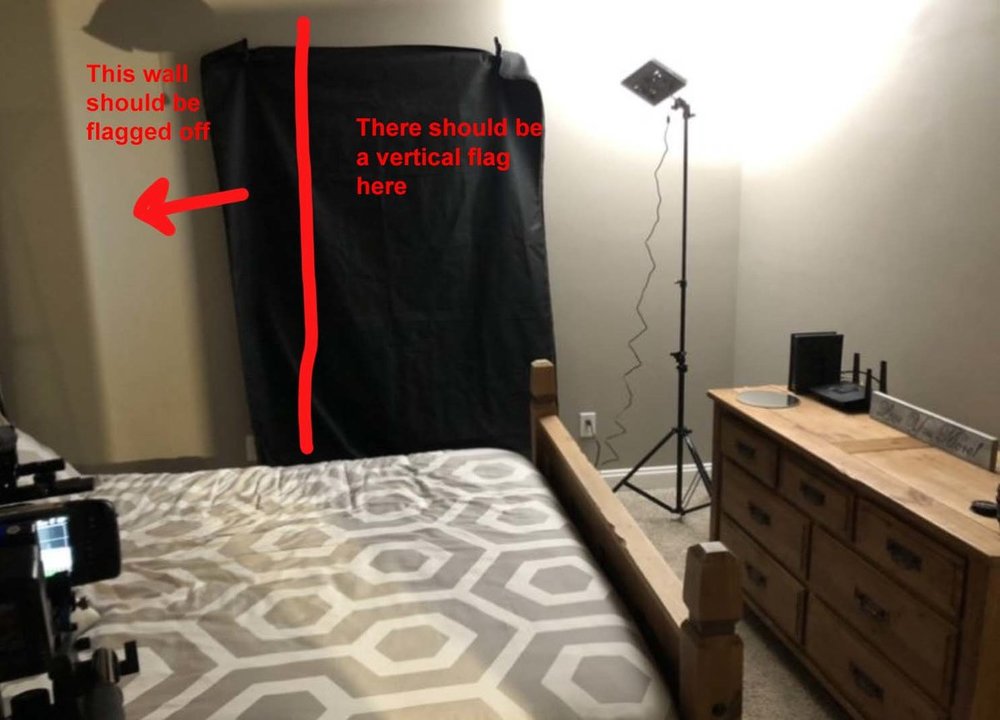
-
6 hours ago, David Mullen ASC said:
Generally I wouldn't shoot a night scene during the day if the source of light in the scene had to come from the window -- unless I could build a pretty big tent outside the window. I suppose you could make a leaning tent against the window and let daylight leak in from underneath and uplight the blinds as if there were a lower source and the room was on a higher floor.
If you are using an ISO setting and gamma setting that gives you a good noise and black level, then there is no real reason to over-light and darken in post, besides, just dropping the ISO setting a little is the same thing.
The biggest problem I see here is just that it is very hard to do dark scenes in a white or off-white room, the degree of underexposure that looks right for the walls is too much for the people or action unless you want that stuff to be almost silhouette. Which means that if you can't paint the walls, you need to work more on flagging your light, another reason to light through the windows at night so that the window frame acts as a natural flag, plus it is always nice to see where the light is coming from.
Even in your lighting set-up, if you had a 4'x4' floppy flag (or something more like 3'x6' vertical) to cut the bounce light off of the wall to the left of the window so that it only hit the bed and the wall behind the headboard, that would have been better.
Awesome advice. Thanks so much for this. I’ve got a couple flags. I think the only other issue may be space. It’s not a massive room. By the time I sneak a stand and flags in, it will most likely decrease my “wide” shot.
Also, that (warmer) light next to the window is the shaft of hallway light that I created with the 120d though. Should I still flag that you think? Or were you talking about the rest of the wall?
-
Thanks guys.
I did previously do some tests, but I can’t help but feel that I did it all wrong. It still looks...off.
The scene is a father lying in bed while his son is knifing him in the chest.
In this particular set up I stuck some black fabric over the window in our guest bedroom...since it was broad daylight. I warmed up the 120d and stuck it in the hallway, then I kind of flagged the light off a little bit with the door to create a shaft of light coming into the room. I initially decided to do this, not for stylistic reasons or the purpose of story, but to simply get more light on the scene.
I then blasted the amaran into a corner of the room.
since we’ll be shooting this during the day, I’m wondering if I should black out the window from the outside or crack the blinds a little bit and let the natural light leak in through the slats. Maybe cool the temp down in camera?
I want it to look “natural”. And as someone mentioned here, I don’t “naturally” sleep with the curtains pulled back. And even if I do, there is almost never a lot of ambient light coming in...and it certainly isn’t blue.
It still seems like there’s not enough light. Is it common practice to light it really well and bright, and then take it down in post?


-
I know there are industry pros here, so I hope I’m not out of line. I’m just kind of throwing myself to the wolves because YouTube university only gets you so far.
But I’m wondering if I could trouble you guys for some advice on lighting a “simple” interior.
Theres one scene in particular that kind of intimidates me, which is probably pretty basic for a number of folks here. And that’s “int. Bedroom - night”.
I’m trying to figure out how to do this for a short I wrote, and I’m currently making (kind of in a holding pattern due to COVID).
I’m self-taught and self funded, so what I have essentially a small hodgepodge of lights: (1) Aputure 120DII, (1) dracast 2k fresnel—LED, (1) Aputure amaran, (1) Aputure MC. I also have some mods—flags, reflectors, muslin, etc.
Using these lights, how would you set up a bedroom night scene? Like sleepy time night scene—no practical lamps or anything. Shoot one light through a window with 1/2 CTB? Bounce some light of a corner of the ceiling? Should I mess with the temp in camera? I just want to do it right and not be all lazy and ‘blue’ everything all to hell with day for night.
As always, any insight is greatly appreciated.
Thanks!
-
Thanks for the feedback guys. I really appreciate it.
I would’ve gone to the camera assistance section, but I didn’t want to post the question there. I’m self taught, and pretty new, so I wanted to kind of stay in my lane here.
So my take away here is1) It’s pretty much the norm (to the dismay of purists maybe?) to use monitors. Which I get. Either way, when the subject is moving it still seems like you’d be chasing focus—as I mentioned in the original post...handheld kinetic shots, aperture wide open, etc. where pre marked spots don’t really mean much when the dof is more shallow.
2) it’s ok if the focus isn’t tack sharp with every move. As long as it’s on point when they land.
3) 1917 was, in fact, a cinematic and technical masterpiece and the focus pullers have balls of steel. I couldn’t shut up about that movie for like a week. I watched it twice, pretty much back to back. I don’t care if critics call it gimmicky.
-
 1
1
-
-
When watching videos of focus-pullers/1st ACs work, a lot of the time their eyes are often not on any monitor. They are on the action—which is technically the “correct” way? (Taking measurements and whatnot). With a camera on sticks and pre-measured marks it’s simple enough I suppose. Guy stands here, talks to some other dude. He moves to his 2nd mark, and you get there with the focus.
But where I get a little confused, and what I would like to get a glimpse into, is how they do this with more kinetic shots...lots of movement, handheld, some whipping around, etc. And especially with a wider aperture, where it’s not necessarily gauging a distance of one or two feet, but maybe inches.
Even if they’re pulling using a monitor. Is there a groove or specific nuanced technique to this?
Any good videos/tutorials/demos on this? YouTube only yields quick how-tos like measuring distance, marking the disk, and the ‘basics’.
Also, somewhat related, I was shooting some stuff yesterday, operating and pulling focus (shouldered). I was at 2.8, I believe. And the subject was in the middle of a circle of people, preaching. As he moved and shifted around (not too animated but like one would if they were telling a really cool story) I could see the focus going a little soft here and there. So I would pull and sometimes over-throw it a tad...then back.
I know a lot of it comes with experience and muscle memory, but I just want to see the actual method...if there is one.
Thanks guys
-
7 hours ago, Bruce Greene said:
I think you mean change the ISO to 1600...
But that said, you are correct about the shutter speed and F stop. And lowering the ISO to 1/2 should add one stop more exposure. But with some digital cameras this will not always be the case. For example, shooting stills with my Canon 5d, when I change the ISO setting, the camera also changes the gain of the signal before recording the frame. So, when I simply lower the ISO by 1/2, such as from 800 to 400, the needed F stop will change from f16 to f11 for example. Here, changing to f11 will double the amount of light reaching the sensor, but the change from ISO 800 to 400 will darken the image by the same amount, and the result is that the image is not "over exposed" but, seems to be exposed exactly the same.
Other cameras such as the RED cinema cameras don't change the brightness of the recording with a change of ISO. The recording is the same, only the meta data, or instructions for how to view the image change. And in this case lowering the ISO actually shows an increase in exposure. But in the end, it does change the instructions for the RAW conversion, and if you convert at the ISO settings from the camera capture, the exposures will look the same. But you could, if you chose, change the ISO setting in the RAW conversion software to get a different exposure. With my Canon camera, the ISO setting is not changeable in the RAW processing and the recording has this change baked in. One can still change the "exposure" in RAW processing, but any gains or losses of highlight details will have already been lost.
Yup, all this will be too confusing to you, I suspect. So, let's leave the ISO part out of the equation. Let's define "over exposure" or "under exposure" as relative to the chosen ISO setting. And this means to "over expose" by one stop, one would open the iris by one stop from the recommended or metered exposure at a particular ISO. Or to increase the exposure time by one stop, as from 1/60th sec to 1/30th sec. And in this way, you will get the desired result. Under exposure would be just the opposite.
Be warned that a lot of what you read in articles etc. about over and under exposure is kind of BS. I remember reading in American Cinematographer about a movie many many years ago that "quoted" the DP as saying that he "under exposed" all the night exterior shots by 2 or 3 stops. But, in reality, he had exposed his film exactly correctly. Much of the scene was 2 stops under "full" exposure or a little more, but also, in the scenes were highlights that were "fully" exposed or even blown out. He had exposed correctly for the final image and any poor beginner who read the article would likely be disappointed when viewing their own movie actually under exposed by 3 stops!
I think a good way to get a "feel" of what a "stop" change looks like would be to shoot a test in a still film camera using slide film. I'm choosing slide film here as the development is standardized, taking away a lot of variables for your test.
I would try placing your camera on a tripod and setting a white towel on the wall. Light the towel as evenly as you can with the light coming slightly from the side to show the texture of the towel. Set your light meter to the recommended ISO on the film box. Put your camera in manual mode and measure the exposure using a reflective meter (not incident). This exposure will be your "middle gray". Then increase the exposure by 1/2 stop increments until you've exposed 5 stops over and decrease your exposures until you've exposed 5 stops under. (it is best to slate each exposure to avoid any confusion). Then get the film developed and view all the slides on a light table arranged from darkest to lightest. Examine each slide through a loupe to see where you begin to loose details in the towel.
This test will show you how much difference in "look" each stop of change results in and you should begin to get a "feel" for how much is "one stop" ?
Wow, thanks for this! It’s cool that you took the time to respond with such a thorough explanation. Yes, ISO 1600...that’s what I meant.
I think I understand most of what you wrote. That chart almost made sense but I got a little confused as to what information it was trying to convey.
I shoot with the new pocket 4K from Blackmagic and recently started cranking away at a short I wrote. I filmed in Blackmagic RAW and I’m familiar with being able to change the iso and all that. This is my first time working with any flavor of RAW (I guess “technically” it’s not true RAW, but whatever. Another conversation that is out of my scope).
I don’t have a light meter so I can’t really do what you had suggested...but I do get the gist.
Again, I thought I kind of knew how stops worked. But I would see a camera test, or a test of the highlight recovery feature in Resolve for example, and there would be some remark like “I over exposed by 2 stops”...and I just kind of wondered how did he know exactly how many stops? Aside from the aperture ring on the lens I don’t really know how somebody would determine this.
And of course, adding something like a variable ND filter like I use, I have NO idea how many stops up or down I am shooting at...as there are no markings or anything.
Again, thanks for schooling me here. I’ve been trying to figure out how to form this question and you’ve helped me out a bit.
-
7 hours ago, Max Field said:
This image might help a bit:

Actually, it doesn’t. Not completely anyway.
The halves, whole, and thirds columns represent stops of light?
So if I’m shooting shutter: 1/30 - Fstop: 16 - ISO: 3200...that image is “properly” exposed? And if one wants to overexposed one stop, they either change shutter to 1/15, fstop to 11, or ISO to 3200?
-
I’m sure this is probably a novice question, but I’m asking anyway.
So when talking about exposure there are multiple factors to take into account—aperture, shutter, ISO, any other accessories you may be using, etc.
I think I have an ok grasp of WHAT stops are. But I’m still a little confused as to how people know how many stops up or down they are shooting at? Like how do they quantify it?
For example when they say “I brought it down three stops” are they referring to the marks on the aperture ring? Or are they just really good at “feeling” it or what? What if you’re changing the exposure of a shot without messing with the aperture?
Like using a variable ND filter, for instance. “I under exposed the shot by like 3 1/2 stops using the variable ND”.
I hope this question makes sense
-
Yeah...
I know. I figured it was a long shot. I just had one question. This is the only place I come to, filmmaking wise. Aside from various Facebook groups of course.
-
Can we post or discuss questions regarding acting and other misc regarding film and television?
I just had a (hopefully) quick question but I don’t want to get booted.
-
14 hours ago, Ian Tilson said:Hey Justin,You are correct, A slate is just a title screen that precedes the spot.This can be an animated logo that then resolves to the needed info or just plainly a text screen that has info like:Client NameTitle of SpotDateLength of SpotISCI codeetc.The ISCI code is made up of letters and numbers and is between 8 - (and I think 16 characters)? I usually shoot for between 8 and 12.When we create them for our spots, we try to have the ISCI contain parts of the clients name and title of spot.Also if the spot is an HD spot, the ISCI code should end in HFor example I just uploaded a completed spot to NBC Sports Net this morning with this info:Client: Abby’sTitle: Abby’s Offer Two 2019Date: 3.11.19Length: 30ISCI: ABBYTWO2019HHope that helps!Ian
It does!
Thanks a lot!
-
Hello, I am shooting a 32nd commercial for a friend of mine who owns a business. His secretary sent me the requirements and submission information for the TV station.
I have two questions
1) what is a “slate”, in the context of commercial submission? I know what a slate is, and I have one...the kind most filmmakers are familiar with. But I’m pretty sure this a different kind of slate. On the form I have it says the slate must include name, ISCI code, and length. I’m just wondering what they are looking for exactly. Do I just create something like a title with this information and stick it before the two seconds of black at the beginning of the commercial? Is “slate” just another name for a title page?
2) I looked up ISCI code (because I had no idea what it was), and from what I understand this is something that I would create personally…a unique, alphanumerical identifier for the commercial. In my Google search, I saw it described as having four letters and four numbers. But the example provided in the email was just 5 numbers.
If anybody has personal experience with this, a little insight would be GREATLY appreciated.
Thanks guys!
-
Personally, I love Film Convert. If you have a good calibrated monitor and you audition different stocks, you will no doubt see the difference between the various Fuji and Kodak stocks and you can see what is appropriate based on the look you're after.
It's a matter of taste and after you try it out and get used to it and cross check with your waveform, you will start to develop an eye and see the differences a bit more. But get a decent monitor or you won't have a good benchmark.
What's important is getting the basic signal correction right on that tool so you have a starting point when you want to add finishing LUT's I usually combine film convert with a Vision Color Lut at a low opacity and that combo is a pretty nice look.
Do you use their color tools as well or just the stock conversion?

Interior bedroom—lighting
in Lighting for Film & Video
Posted
Here’s the overhead.
ghetto rigged