


Chris MacDonald
-
Posts
13 -
Joined
-
Last visited
-
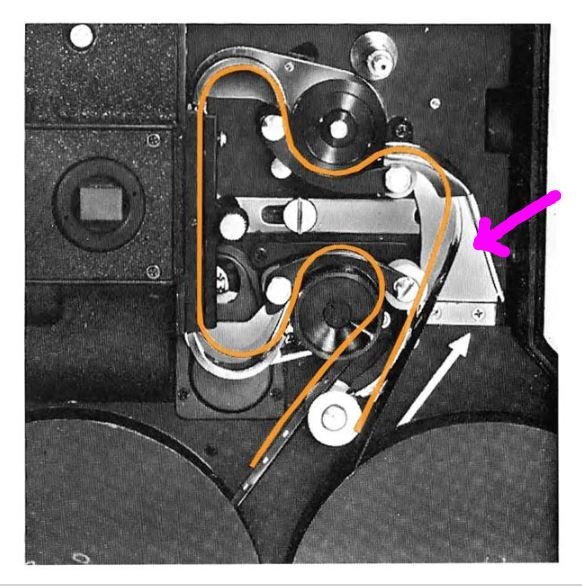
Does anyone have a film guide for a Canon Scoopic M/MS that they would be willing to part with? It's the guide that feeds the upper sprocket when loading film (see picture). I have an MS that is in good shape otherwise but is missing the guide. I have tried Du-All and a couple of local places, but no luck so far. I know it's probably a long-shot, but any help appreciated! Thanks!
-
Arri 16SRI Eyepiece Monitor
Chris MacDonald replied to Phil Rirsch's topic in Camera Operating & Gear
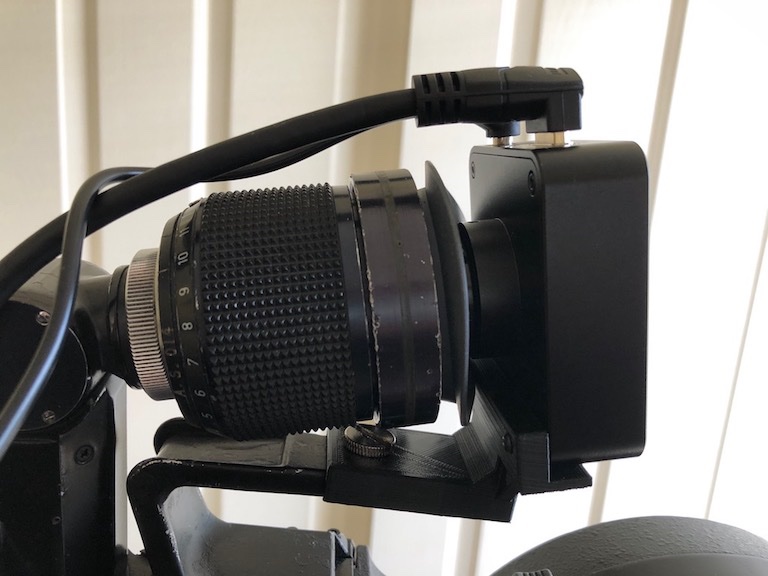
Here are some pics of an eyepiece camera project I did a while back for the SR. The video camera is a "Hayear 1080P 60FPS 2K Full HD 16MP HDMI" microscope camera. Video lens is 12mm. The camera is attached to the SR with a 3D-printed bracket, and is powered by the monitor battery from the monitor's accessory output. The eyepiece can be swung away from the camera for direct viewing. Aligning the eyepiece to capture the view is a bit fiddly but workable. The view on the monitor is decently sharp (not so great at the edges.) Dicey to pull focus on I'd say. Maybe in controlled and favorable conditions. The color is not very good in low light (picture shows view at T2, Elite 20mm.)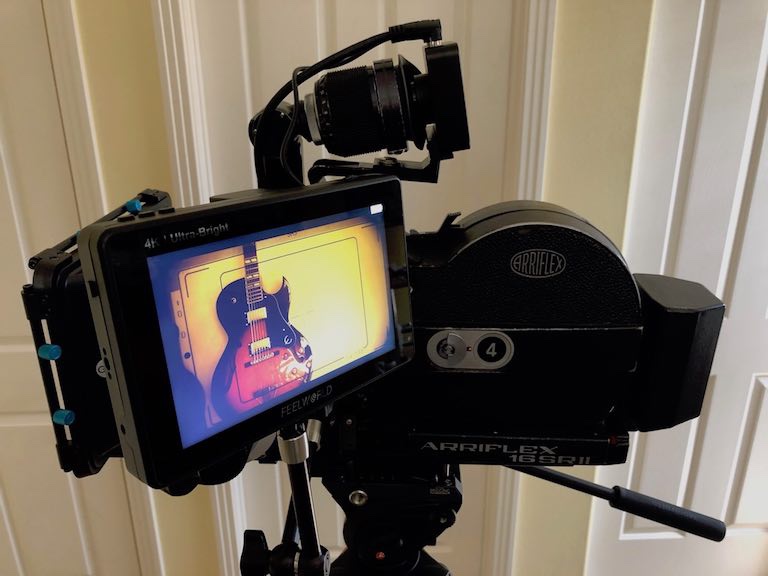
-
I believe that is a timecode input.
-
Hi All, I put a 3d-printable 16mm film core holder up on Thingiverse in case anyone would like to print their own. Link: https://www.thingiverse.com/thing:4761279 -Chris
-
Another 3D-printed spiral developing tank
Chris MacDonald replied to Chris MacDonald's topic in Film Stocks & Processing
Yes that's the way I did it. Good luck with the print! Let me know if you have issues, happy to help if I can. Optical printing, sounds intriguing! Did you acquire a printer or are you trying your own process? In any case I could see where developing your own tests could be helpful there. I'm curious to see how the ECN-2 works out as well! -
Another 3D-printed spiral developing tank
Chris MacDonald replied to Chris MacDonald's topic in Film Stocks & Processing
Thanks! I found that I had to print the spiral object upside-down, with the top surface of the spiral touching the build plate. I could not get a good print rightside-up with the spiral being put down over the support bars underneath. Even so it was a challenging print. It was difficult to get the spiral to stay adhered to the plate for the many hours required until the support bars start getting put down on top. I eventually figured out that I needed to clean my build plate with alcohol every time before I printed, and had to check my bed-leveling and ensure that I had the nozzle very close to the plate (lots of friction when pulling a sheet of paper between them.) A couple of times I would get a pretty good spiral printed, but it had a few small segments where it had gone a bit off (usually straight instead of curved.) I could usually repair the print by gently applying heat with a heat gun and then adjusting the plastic while it was soft. I used Cura as well, and adjusted the settings to try to make sure that it would print each layer of the spiral as a single path, rather than having the print head jump around to various parts of the spiral within a single layer, which tended to knock it loose from the plate. I just posted my Cura profiles on Thingiverse in case they are useful. Regarding supports, the center hub of the spiral model has a support piece built in. I didn't add any other support and had pretty good success. Sometimes the very outside of the spiral support rim can get slightly ratty in spots, with a bit of filament drooping or loose, but it didn't affect functionality and I was able to trim away any bits. -
Another 3D-printed spiral developing tank
Chris MacDonald replied to Chris MacDonald's topic in Film Stocks & Processing
Thanks! I found that I had to print the spiral object upside-down, with the top surface of the spiral touching the build plate. I could not get a good print rightside-up with the spiral being put down over the support bars underneath. Even so it was a challenging print. It was difficult to get the spiral to stay adhered to the plate for the many hours required until the support bars start getting put down on top. I eventually figured out that I needed to clean my build plate with alcohol every time before I printed, and had to check my bed-leveling and ensure that I had the nozzle very close to the plate (lots of friction when pulling a sheet of paper between them.) A couple of times I would get a pretty good spiral printed, but it had a few small segments where it had gone a bit off (usually straight instead of curved.) I could usually repair the print by gently applying heat with a heat gun and then adjusting the plastic while it was soft. I used Cura as well, and adjusted the settings to try to make sure that it would print each layer of the spiral as a single path, rather than having the print head jump around to various parts of the spiral within a single layer, which tended to knock it loose from the plate. I just posted my Cura profiles on Thingiverse in case they are useful. -
Another 3D-printed spiral developing tank
Chris MacDonald replied to Chris MacDonald's topic in Film Stocks & Processing
I had requests for a 35mm version so I posted a hub, bolt, and taller tank models to support 35. They are untested but hopefully someone finds them useful. -
Another 3D-printed spiral developing tank
Chris MacDonald replied to Chris MacDonald's topic in Film Stocks & Processing
Awesome, I hope it comes out well! I've only tried a 0.4mm nozzle. The main challenge I had with the spiral print was getting the thin spiral bar to adhere over the entire plate surface and then remain in-place for the long print. I had success after adjusting the initial nozzle height, doing a bed-leveling, and cleaning the build plate with alcohol right before printing. -
Another 3D-printed spiral developing tank
Chris MacDonald replied to Chris MacDonald's topic in Film Stocks & Processing
So far I've only tried the Arista rapid E-6 developing kit with Ektachrome 100D and had no issues, but probably a good idea to test first. Another issue I was thinking might be possible is if liquids could somehow become absorbed into the plastic layers over time, possibly causing contamination. I haven't seen this yet, just wondering if it's possible. I was also thinking about transparent filament for processes with a light-exposing step. The clear filament I've tried is fairly cloudy after printing so I'm not sure how that might work out. Fortunately the Arista kit has a chemical reversal. -
Another 3D-printed spiral developing tank
Chris MacDonald replied to Chris MacDonald's topic in Film Stocks & Processing
I used a Creality CR-10 V2 for this build. I like the printer in general. It has a 300x300mm build plate, just big enough for the larger tank. A smaller 220x220 model (Ender 3?) should be able to print the smaller tank. There are a lot of brands, but I haven't tried any others out. 3D printing is great, but a bit fiddly, it definitely took me a while to get good prints. All part of the fun though I guess! -
Another 3D-printed spiral developing tank
Chris MacDonald replied to Chris MacDonald's topic in Film Stocks & Processing
Thanks! The smaller tank should fit on a 220x220 build plate. -
Another 3D-printed spiral developing tank
Chris MacDonald posted a topic in Film Stocks & Processing
Hi All, I put the files for a spiral developing tank I designed on Thingiverse. It has options for 8/16mm and for 15/30m length. I hope it's useful for someone. -Chris

