Beau House
-
Posts
16 -
Joined
-
Last visited
-
@Graeme I ended up sending the double perf / regular 16mm gate in the picture above to Bernie at Super 16 Inc to have a registration and take down pin removed. I suspect you’re right about only the super 16mm gates being single perf. There’s a fully functional Oxberry optical printer, as well as a couple non-functional animation cameras (originally built for the NFB) along with several gates and a couple film transports in the inventory of the group this animation stand belongs to (Cineworks Independent Filmmakers Society). I’ll take a careful look at what’s on hand in the next few days and if I’m able to identity a redundant regular 16mm gate I’ll let you know.
-
It’s good to know that there are still full-blown Oxberry Pros out there (assembled or not). A road trip to Ohio would be quite the adventure. If I had the resources to make the journey I’d seriously consider it. In the meantime I’ll keep working to resurrect this one. Hopefully I can find someone willing to take on modifying the shuttle.
-
Thanks for the reply Frank. It’s good to know those are both likely from Oxberry. I tried reaching out to them directly to inquire about the shuttles on their price list. Unfortunately I haven’t heard back. Your assumption is correct. The intent is to shoot standard 16mm, not Super 16mm footage. I’m trying to find a single perf shuttle or modify the double perf one I have to open up more film stock options. It’s looking like finding a camera tech to have the registration pin and take down pin removed from the gate is the best way forward. This animation stand is definitely somewhat of a Frankenstein’s monster built from pieces of different machines. A couple different stands have passed through the space where this is located over the years, leading to some mismatching. Some pieces came from the NFB, others from a studio in Montreal or elsewhere. Their exact provenance is a mystery. I have another animation camera (Acme) that appears capable of taking 16mm and 35mm movements. A collection of magazines, two shuttles for 16mm double perf, an Acme 35mm film transport mechanism, and other parts if anyone comes across this thread and is interested in trading to get their system (and this one) working.
-
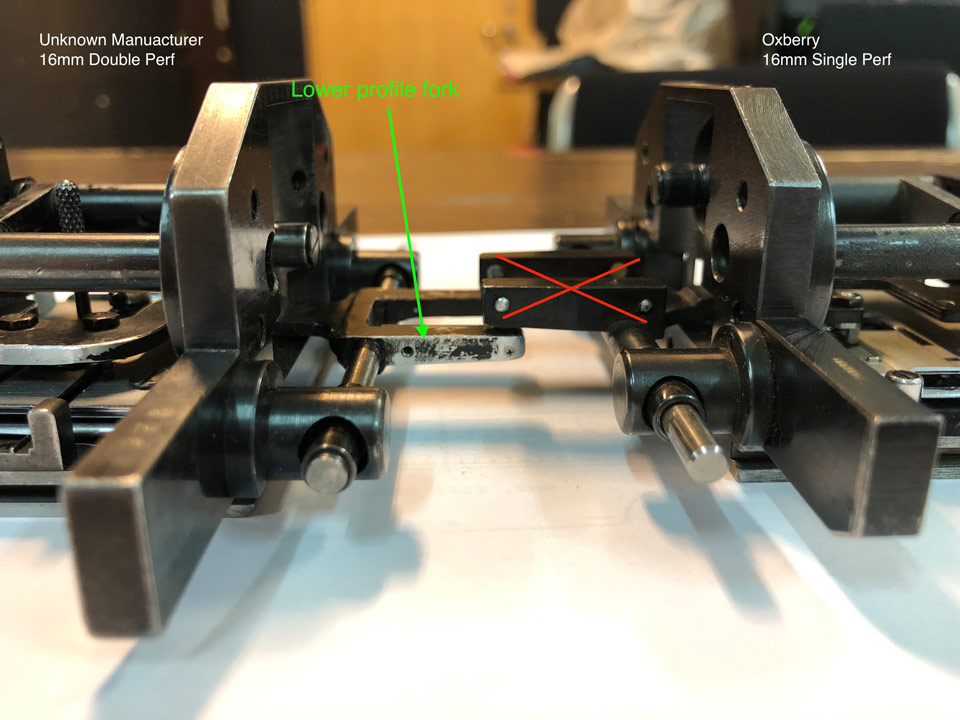
I’m trying to solve an issue with an animation stand camera, and I’m hoping some forum members might have insights that could help. I have a 16mm single perf shuttle from an Oxberry optical printer, and a 16mm double perf shuttle from an Oxberry animation stand + camera that I’m trying to restore. I’d assumed the optical printer’s movement would be compatible with the animation camera, but it turns out that’s not the case. There’s a slight difference in the height of the “fork” on the Oxberry movement that prevents it from fitting into the camera fully (shown in the first picture below). Has anyone seen differences in movements like this? Perhaps the unmarked movement was produced by a different manufacturer like Bell & Howell? Unfortunately the camera and shuttle have no identifying markings. Does the idea of sending the double perf movement to a camera tech to be modified sound crazy? An album with more images of the animation stand + camera is posted here. Any tips on where to find parts, or insight into the different types of shuttles and their makers would be appreciated. Ultimately I'm hoping to get my hands on a 16mm, single perf movement that’s compatible with this camera.


-

Looking for 16mm registration plate for Metric film splicer
Beau House replied to Beau House's topic in Cine Marketplace
Thanks Tyler. I've tried contacting Kirby a couple times and unfortunately gotten no response. I'm hoping somebody out there has a used 16mm plate they'd be willing to part with. It seems like a fairly esoteric item these days so that might be a long shot. -
I'm looking for a 16mm registration plate for a Metric 3001 ultrasonic film splicer. I recently acquired one of these splicers in good working order that's set up for 35mm, and I'm trying to find a registration plate for 16mm. Metric's website is still live, but attempts to contact them have been fruitless. Anyone know where I might find one? Thanks
-
That’s the one. I was introduced to it during a workshop back in November and have been mildly obsessed with it ever since. I sent you a Dropbox link to those files in a direct message. Let me know if you have any trouble retrieving them.
-
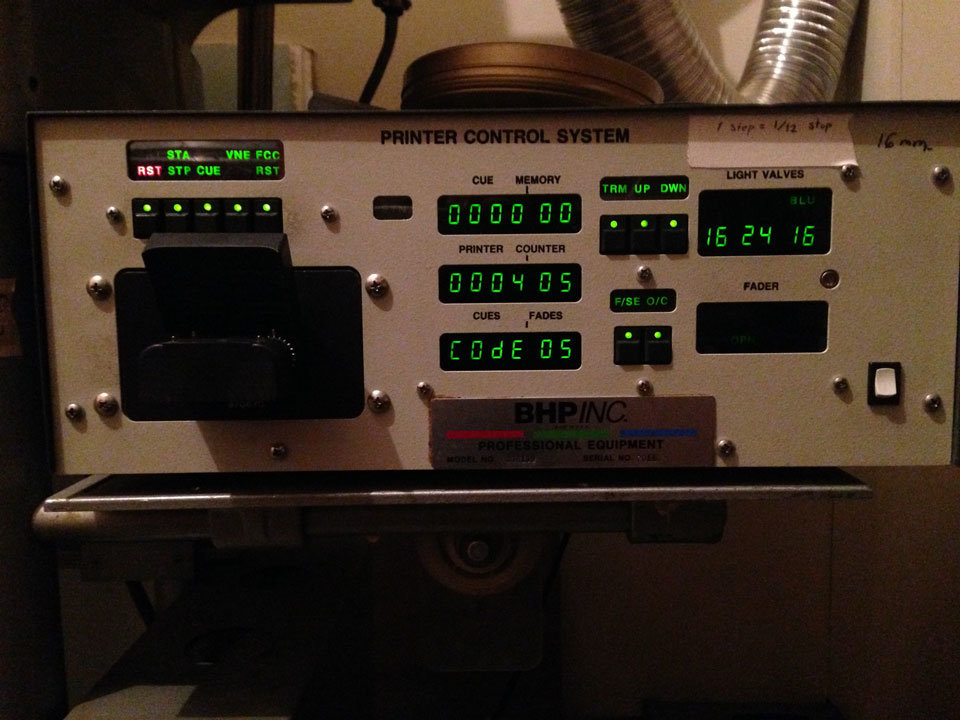
I considered manually punching tapes as well. When looking for tools I came across this paper-tape repair kit that looked promising, but I wasn’t able to find one (or anything similar) for sale. Looking back on it now I think the process of punching tapes manually would be too tedious. You’d also have to find tape with pre-punched transport holes. You’re right: the digital controller uses LEDs and sensors to read the tape instead of pins like the electromechanical one does. It has more memory too so it reads the tape all at once instead of progressing through it one scene at a time. I have a PDF of misc. Model C schematics that I’ll DM you a link to because it may contain some useful info for your original micro controller idea. Page 8 shows signal flows from between the reader, light vanes, and fader assembly. I highly recommend keeping an eye on eBay for a GNT, Facit, or DSI punch / reader. The one I found was ~$150 USD plus shipping. WNC Supply in Arizona sells supplies and readers, but theirs are quite expensive. I’ll DM you a link to download the resources I’ve been putting together for people who’d like to use the Model C here in Vancouver. Here’s a rundown of the files I’m talking about for anyone else who might be interested: BH-printer-control-tape.pdf This file illustrates the anatomy of RBG, FCC and composite tapes. It includes blank templates for practicing how to fill in and read data from tapes. Note: I haven’t been able to get the controller above to read composite tapes successfully. Timing-report.pdf This is a blank form for filling out scene frame cue and printer light values when timing a print. Bell & Howell punch tape conversion.xlsx This spreadsheet shows the translations for RGB and FCC values from decimal to hexadecimal for punching. An example: to punch one space (just a transport hole) you send the hex value “00” to the punch. A printer light value of 25 = the hex value A4. So a string for a scene that is “normal” tape 25-25-25 = 00A4A4A4. Hopefully this will male more sense once you look at everything. Hex-string-alphabet-characters-BH.rtf A compilation of strings that will punch out alphanumeric characters. Handy if you want to put your name on a tape, label it as “RGB” or “FCC” to reduce confusion in the future, etc. Example report and data compiled This is an example timing report and compiled data for a short "cinex test strip" that will print 3 feet and 30 frames in 10 frame increments at different light values for gauging exposure. I don't have a colour analyzer so this is the next best thing. I still need to make versions for colour printing. I can mail you the tapes for this to mess around with loading and running the program if you DM me your address. Punch Tape vs. Bell & Howell tape comparison.xlsx If you really want to geek out and understand how Bell & Howells "pseudo binary" is different, and what's up with the tapes being oriented differently than ordinary data tapes.
-
It ought to be straightforward, or at least I thought it would be when I started down this road. There's not much information out there about how the various control systems interact with the printers though. In my case the easier problem to overcome was the lack of a tape punch. From what I can tell about the micro controller setup Video&Film solutions built, they've replaced the need for paper tapes but the control module still tells the machine what to do. Replacing the control module altogether would be ideal, but would require more information about the printer/controller theory of operation, and some real software development skills. If anyone manages to do that I'd love to hear more about it. I know of at least a couple other model C printers out there that could use upgrades.
-
Hi Richard, I’ve been working on a similar problem recently (trying to control a Bell & Howell Model C printer) but have been coming at it from a different direction. I wasn’t able to find enough information about the controller itself (pictured below) so I focused on finding a way to make program tapes. What type of tape readers / control modules do you have? I’ve managed to make (and successfully load and run) RGB and FCC program tapes on the printer. Here’s a brief rundown of how things work. Equipment wise the setup consists of: A Santec GNT-4606 paper tape reader / punch found on eBay. A USB to RS-232 adapter for connecting the punch to a Mac. A freeware application called CoolTerm to send the compiled FCC and RGB data to the punch. The process of compiling scene RBG and FCC values to be punched on tape is somewhat laborious at the moment. It requires a step of manual translation from decimal to Bell & Howell’s “pseudo binary”. I’m working on a web app to take the manual labor out of the process and make it simpler to teach other people, but it's slow going. If you’re interested I can go into greater detail and share the info I use to convert RGB and frame cue values into data the reader can understand. I’ll also echo Robert’s suggestion to contact Tom at Film&Video Solutions. Finding a scan of the B&H tape specs on their site was key to figuring out how to get the machine I’ve been working with going. Best, Beau
-
Favorite Film Developing Lab and Scanning Services
Beau House replied to Suzanne Friesen's topic in General Discussion
I'm not sure about the scope of your project, but since you're in Vancouver it might be worth looking into Niagara Custom Lab + Frame Discreet in Toronto. The added cost of shipping across the border and the .72 CAD/USD exchange rate are factors to consider. -
16mm Film Processing: Blue-tone/tint/cyanotype
Beau House replied to Jessica Johnson's topic in Film Stocks & Processing
Hi Jessica, Check out the results Process Reversal posted on their site from a 2013 tinting & toning workshop: http://processreversal.org/images-from-tinting-toning/ Based on their samples and some experience I've had toning black and white stills, I'd say that iron toning is the best way to achieve the blue you're looking for. Photographer's Formulary makes a powdered kit that's not too expensive. You might even be able to find it locally. Mono No Aware has some cyanotype workshop results on their site you might also find interesting. The big difference to point out though is that the process involves coating clear leader with cyanotype chemistry and contact printing with a UV light source, rather than using a camera. http://mononoawarefilm.com/workshop/2016/04/16mm-cyanotype-filmmaking/ For general info Tim Rudman's Toning Book is an excellent resource (even though it's still photography oriented). It's out of print but worth grabbing if you find a copy secondhand. -
I came across this teaser for a documentary by Alexandre Favre called Bolex: The Last Employee and thought the readers of this forum might appreciate it. https://vimeo.com/150185992 The contemporary footage was shot using a Bolex modified for super 16, and the audio was recorded on a Nagra. The historical footage and commentary is interesting. Particularly the bit about small camera assembly lines being staffed by women, who were presumed to be more agile than men. The level of precision and craftsmanship that went into these machines is pretty inspiring. I'm looking forward to seeing the full length documentary when it's released.
-
There are quite a few film options available from Kodak, Adox, Foma, and Wittner. Maybe take a look at some Super 8 film samples on Vimeo and decide what kind of look you're interested in. Personally I'd recommend starting with Kodak's Vision 3 50D for daylight and 500T for low light interiors. Both can be ordered directly from Kodak. Pro8mm also sells these films repackaged with prepaid mailers for processing and transfer. I've never used their services, but it seems like a convenient way for beginners to get started with Super 8. Keep in mind that the 2143 XL's internal light meter was designed for use with ASA 40, 160, and 400 films. Depending which film you choose, you may have to use the camera's "contrast control" feature (exposure compensation) to expose it correctly.
-
Thanks for the advice everyone. I considered running it without the screw and just being careful when loading to make sure the bottom loop looks right. Ultimately I’d like to get it back into top form though. It’s great to hear about a reliable tech like Jean-Louis / aka “Mr Bolex” . It’s even better for me that he’s in Canada. @Robert, I’ll definitely PM you about that screw. Thanks again everyone.