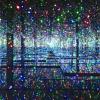
Salomon Fries Posted September 13, 2013 Share Posted September 13, 2013 Hi All, Im a newbie here please be kind. Id like know this look is done or what would be your take on this. Im after that blue cyan glowing light. Cheers Link to comment Share on other sites More sharing options...
Salomon Fries Posted September 13, 2013 Author Share Posted September 13, 2013 (edited) Or this look: Edited September 13, 2013 by Salomon Fries Link to comment Share on other sites More sharing options...
Premium Member Phil Rhodes Posted September 13, 2013 Premium Member Share Posted September 13, 2013 At risk of sounding a bit redundant, put a cyan light in the background and aim it toward the camera! Of course there are a few subtleties. Depending on the circumstances, you could simply use a daylight-balanced light while shooting mainly under tungsten. Or, you could actively gel the light blue. Depending on the lenses you're using, it will glow and flare in different ways. You may want to consider filters to enhance flare or glow, although subtlety is key. P Link to comment Share on other sites More sharing options...
Salomon Fries Posted September 13, 2013 Author Share Posted September 13, 2013 I just realized ive been a bit vague on the question. I was indeed wondering the type of lights that could be used to achieve that look. I read somewhere you could shoot HMI and balance the kelvin to 3200? My knowl3dge on lights being quite short could you be more specific about the cyan light type ? Do u mean a par or LED or else ? Link to comment Share on other sites More sharing options...
Salomon Fries Posted September 13, 2013 Author Share Posted September 13, 2013 Ive also read that some type of films can enhance some greens or blues, also that you could underexpose so the blues would saturate. Which is a bit irrelevant cause I would shoot digital, on RED to be specific. Link to comment Share on other sites More sharing options...
Premium Member Adrian Sierkowski Posted September 13, 2013 Premium Member Share Posted September 13, 2013 Generally I would start with a Daylight balanced light, which will go blueish by itself, and I would then either leave it as is or add on a cyan colored gel on top of that-- density is a matter of taste. Then I would balance tungsten (or maybe split the difference and shoot 4500K or 4800K) and key with a tungsten unit. On Red and other digital cameras which shoot "raw," it doesn't really matter where you balance as that is just meta-data. The sensor itself is still roughly daylight balanced in it's "raw" mode but it's nice to monitor on set to see how it looks. On the tungsten unit, if i was to be shooting tungsten balance I would add on some CTO maybe 1/4 or maybe even less to warm it up. However, the cyan and orange look which is super popular is also a sum of really specific color correction. I believe there are youtube tutorials on this subject-- I seem to recall seeing one-- in any case, the idea is to rough it in on the day and fine tune it in post. As for the lens flares, the top photo being from Star Trek Into Darkness is either a result of their anamorphic lenses and/or post effects (Videocopilot offers a lens-flare pugin for after effects which in fact has a JJ Abrams setting). The bottom is also either an anamorphic effect or a simple flare due to some diffusion on the lens-- I can't tell from that particular grab. Link to comment Share on other sites More sharing options...
Salomon Fries Posted September 14, 2013 Author Share Posted September 14, 2013 Yes I was suspecting there was quite some post work on it. Just I was wondering how would u set it up when shooting. Thanks Adrian for these awesome infos. Cheers. Link to comment Share on other sites More sharing options...
Tim Hodgson Posted September 19, 2013 Share Posted September 19, 2013 Hi SalomonFollowing Adrian's comment I found this video a while back from nofilmschool, hope it helps :)Adding cool blues and teals to everything but keeping the skin and hair colours natural.http://vimeo.com/65617394 1 Link to comment Share on other sites More sharing options...
Salomon Fries Posted September 30, 2013 Author Share Posted September 30, 2013 Omg!!! Thank you so much Tim. Youve just made my whole week! I cant thank you enough for this. 1 Link to comment Share on other sites More sharing options...
Premium Member Phil Rhodes Posted September 30, 2013 Premium Member Share Posted September 30, 2013 Did anyone not see the guy's knee and the baby's shoulder in that last example? Link to comment Share on other sites More sharing options...
Stephen Selby Posted December 11, 2013 Share Posted December 11, 2013 You'll need a hardlight such as a pepper or dedo and then gel it with a blue gel from ROSCO or LEE Link to comment Share on other sites More sharing options...


Recommended Posts
Create an account or sign in to comment
You need to be a member in order to leave a comment
Create an account
Sign up for a new account in our community. It's easy!
Register a new accountSign in
Already have an account? Sign in here.
Sign In Now