Matt Read
-
Posts
121 -
Joined
-
Last visited
Everything posted by Matt Read
-
It's been a while since I've shot with the HVX, but I'm fairly certain that you can't do speed ramps with it. Also, I don't think that it shoots any higher than 60 fps. If you really want to avoid post work, the only thing I can think of is to put the two cameras as close together as possible. Put the same focal length lens (I think this will work better the wider the lenses are) on each camera and match their framing as best as possible. Then set one camera to shoot 30/24/25 fps (whatever you are using as normal) and set the other camera to 60 fps. Shoot the action with both cameras simultaneously. In editing you should be able to cut from one camera to the next with only a small jump in perspective; add in a frame of white and you might get away with it. It's sort of a poor-man's version of what was done in 300 (they used a prism so that several cameras with different frame rates could all shoot through the same lens at once). The other options for you involve some post work. You could shoot the whole shot with one camera at 60 fps and then in post speed up part of the shot so that movement will appear to be at a normal speed, while leaving the other part of the shot alone so it will be in slow-mo. This won't be perfect though, you'll end up not having the correct amount of motion blur on the part of the footage you "normalize." The other option would be to shoot the whole shot at 30/24/25 fps and then slow part of the shot down in post. The normal part of your footage will look good, but then the slow-mo part will have that stuttering effect that you get when you slow down footage shot at a normal speed. There are some programs that can help alleviate this effect to some degree, but they can often create weird artifacts, especially with faces. Whatever you do, I would suggest going out and doing some tests before you start principle photography.
-
Vincenzo, What effect in the Zombieland trailer are you referring to? The only thing I saw were a few speed ramps (going from normal speed to slow-motion in the same shot), which would have been done in camera, using a variable speed motor. However, this is in no way similar to the effect in the Rolling Stones' "Like a Rolling Stone" video directed by Michel Gondry. I could only find some low-res examples of the video, but it looks like it is a combination of stills taken with a SLR camera and a morphing effect in post. If you're more specific about which effect you are curious about, other people in this forum and I can give you a better answer.
-
Isidore Mankofsky is the neighbor with the hedge-clippers in "Better Off Dead."
-
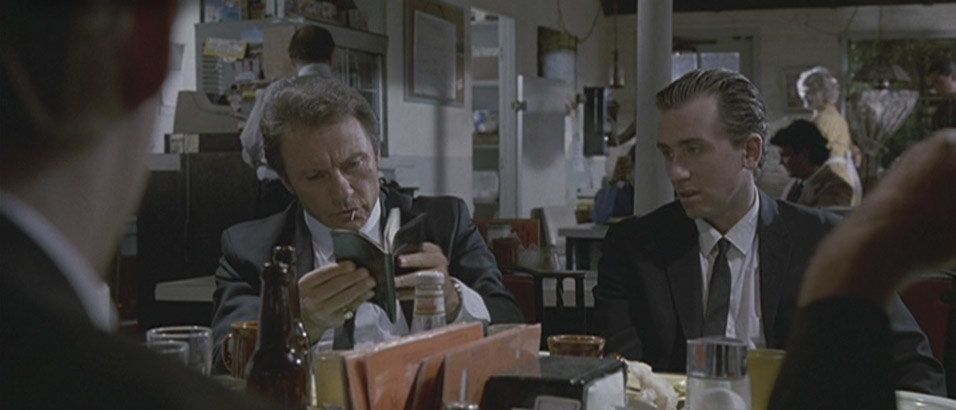
I'm not interested in debating the faults or merits of Tarantino or his films. The questions in my original post neither asked for, nor warranted a personal opinion of "Reservoir Dogs," "Inglorious Basterds" or other Tarantino films. The only reason I brought these films up in the first place is because it provides a good basis for a comparison of cinematographic styles. The above image is a frame grab from a DVD of "Reservoir Dogs." I feel it's a fair representation of the look of the film as an entirety. It also contains both shadows and highlights, but neither even begin to approach what I consider to be high contrast. The deepest blacks in the frame are found in the hair of the man to the right of Tim Roth's head, but they are fairly washed out. Additionally, the highlights in Tim Roth's hair and Harvey Keitel's face are a shade of gray rather than true white. I've never seen a print of "Reservoir Dogs," so I only have this DVD version to go off of, but to me it looks low contrast and low saturation. I don't think that the differences between S35 and anamorphic would account for the differences in saturation between the two films. I can also understand there being some difference in contrast, but it would not create such a significant difference as I feel there is between these two films. So again, I ask: what can one do to achieve a look more similar to "Inglorious Basterds" than "Reservoir Dogs?"
-
I just saw "Inglorious Basterds" yesterday and while watching it, it occurred to me how much better it looks than Tarantino's earlier films, especially "Reservoir Dogs." Robert Richardson's work looks glossy and bold, almost like a comic book, with saturated colors and deep blacks, while Andrzej Sekula's work in "Reservoir Dogs" is lower contrast and lower saturation. I feel that Richardson's look is more expensive looking than Sekula's and I'm not sure how that expensive look is achieved. Aside from the obvious differences in how they were lit, what has Richardson done in "Inglorious Basterds" that Sekula did not do in "Reservoir Dogs?" How does he get the saturated colors and deep blacks? Is it something in the color timing/DI? Is Richardson rating his film over or under what it's labeled as, while Sekula uses the suggested ASA? Is it that Richardson is shooting on a newer stock? Or is it more a matter of the production design? I'm sure to some extent, all of these things are involved in creating Richardson's high-budget look, but to what extent is each involved, what specifically is done and how does it affect the final look of the film?
-
The other thing you can do is to do an aperture pull. The thing that's really nice about this is that it doesn't require any extra equipment (except perhaps for a remote follow-focus). There's a really slick looking one in "Shaun of the Dead" at 8:09 when Shaun walks into the shop. It's the reverse of the shot you had difficulty with (this one goes from bright outside to darker inside), but the principle is the same. They do a really nice job of timing the pull, so that you barely see it. I've also seen less subtle examples in other things, like the TV show "The Shield." That show has a grittier aesthetic, and not hiding the pull fits into it. Depending on the look you're going for, that could work, too.
-
29.97 v. 23.98
Matt Read replied to Jerry Doran's topic in Students, New Filmmakers, Film Schools and Programs
Shooting 23.98 will give you a slight film-look over 29.97, in that you'll be shooting at (about) the same frame rate as film. That's the only difference. Your images will still look like they originated on video, because they did. If you know what you're shooting will end up on broadcast TV, you'll want to shoot 29.97, because that is the frame rate it will be played at when broadcast. With web video, it doesn't really matter what time base you use, because the video you shoot will be heavily compressed before being put on the web. Any differences between the time bases would most likely be imperceptible. There is no such thing as 24 or 30 fps, unless you are shooting on film or live in the 1950s. Back when television was all black and white, it did broadcast in true 30 fps. However, when color was introduced, there was no way to keep the 30 fps frame rate and add color while keeping the same signal size. So, to keep the same signal size and prevent everyone from having to buy new TVs, part of the signal was devoted to color and thus the frame rate had to be slowed to 29.97 to accommodate the new color information and now we're stuck with these silly frame rates. Whenever you see 24 or 30 fps, it really means 23.98 or 29.97 respectively. -
That might be right. The last time I shot on the HVX I used a 35mm adapter, so my AC wasn't pulling focus on the actual camera. That was 6 months ago. It was at least a year before that that I shot anything using the HVX's stock lens. If that's the case, then an AC would be stuck looking at the LCD focus reading, which could be a problem if there's any crazy camera movement.
-
My suggestion is to find a good AC. Have him or her pull out some measuring tape and measure out focus for each move (having already set the camera to display focus in feet or meters depending on your preference). Then knowing the distances make start and end marks for each move on the barrel with camera tape and do a few camera rehearsals to get the move down before rolling (though on the HVX you're not burning film, so if you roll on rehearsal and know it's bad you can just delete it). Another thing that would help is getting a follow-focus, but good ones are spendy and since you are shooting "no budget" that might be out of the question for you. Lucky for you, even wide open, the HVX has fairly deep depth of field, so even if your AC is off his or her mark, you might still be okay. If you can, have an HD monitor on set so you can check focus after each take. And don't worry if you can't find one that reproduces colors accurately, you can use the camera for that; as long as it produces a sharp image, you're in business.
-
hot lo get that vintage 60's look???
Matt Read replied to David Lucio's topic in Visual Effects Cinematography
You're really just going to have to play around in Color until you find a look that you like. Find lots of examples of the look you want so you have many references in different types of situations. Then study them and try to find out what makes them look the way they do. You might also consider shooting some tests with the HVX and comparing the results to your examples and see what makes them different and what makes them the same. Look at contrast, latitude, color saturation, etc. If possible try to recreate one of your example images on the HVX and then import the original and your version into Color and compare their histogram, waveform and vectorscope readings. Here's a starting point: The whites in both images are a little warm and the blues have a slight yellowish-green hue. It's not apparent in these shots, but older films often had slightly magenta blacks. Also, try to limit your contrast levels. Let the blacks be a little washed out and the whites not fully blown out. Another thing you'll want to do is subtly add some grain to the image, as the footage you get from the HVX (if you shoot right) shouldn't have any grain or noise. -
Nice. Very weird. It was very well made. The cinematography was simple, but effective and had a very specific style that it kept to. The editing and sound design were effective as well. Normally, I hate opening credits in short films, but I felt yours were short and sweet and fit in with your use of intertitles through the rest of the film. My only complaint is that it wasn't really about anything. There was no story or development. It was just, "Here's some weird stuff revolving around a mounted fox head." I think it would make an interesting opening for a longer film, rather than a film in its own right.
-
To subtitle or not ? your thoughts ...
Matt Read replied to Chris Millar's topic in Please Critique My Work
Definitely subtitle it. If I listen really intently, I can understand about 50% of what is being said, but I'm trying so hard to understand the words that I can't relax and just watch the video. I wouldn't feel bad about putting English subtitles on a native English speaker. These people talked to you because they have something to say, so what good is it to use their words if the vast majority of the audience can't understand them? I think your interviewees would understand and your audience would understand, and appreciate it, if you subtitled these speakers. -
editing gear
Matt Read replied to Steven Adams's topic in Students, New Filmmakers, Film Schools and Programs
Definitely wait until you become eligible for the student discount. If your school has a bookstore or other "official" school store that sells Macs, try buying from there. They might give you a larger discount than you would get buying from Apple directly. Also, look into buying a refurbished Mac from Apple. Apple guarantees them same as a new Mac and I believe they are eligible for the Apple Care protection plan (look into that to make sure I'm correct in that). Also, if there is a store that sells Macs in your town, ask to see if they are selling, or will be selling soon, their display Mac. My Mac Pro used to be the display model that my school's bookstore used. I got it for significantly less than if I had bought it from Apple, even with their student discount. They also gave me an extra $100 off the student discount price for Final Cut Studio 2. I would also suggest getting a 24" Dell monitor rather than the 22". Last time I checked, the 22" wasn't quite a full 1080p monitor, but the 24" was. You'll appreciate being able to watch your films at their full resolution. I would also pass on the 8GB of RAM. I have 2GB and I have no problem editing or doing effects work on 1080p video. If you do feel the need to get more RAM, check crucial.com. They have the cheapest prices on Mac RAM I've found. Also consider buying your 1TB drive from a 3rd party as well. -
Any TV or computer monitor with calibration controls will work fairly well. If properly calibrated, it will give you a general idea of color values and luminance and as accurate an idea of framing as any professional monitor. I think BNC cables will give you the most accurate picture. Maybe someone else can confirm that.
-
I completely disagree with Rhys. I think you should upgrade to HD as soon as possible. First and foremost, if you are even considering getting any of your docs onto broadcast TV, you need to shoot HD. Most stations won't even look at SD footage anymore, no matter how good of a doc it is. You should also consider HD if you are planning on exhibiting on the web. There are plenty of websites that support HD, including Vimeo and YouTube. Even if you decide to upload your doc to a website that will compress your video, compressed video that started as HD will always result in a higher quality image than compressed video that started as SD. Most web users are willing to wait the extra time to watch an HD video rather than an SD video, so I wouldn't let download time affect your decision, either. If that really is something you are worried about, you can always compress your video down to SD and upload that as well, so your viewers will have a choice. If you are planning on exhibiting via home video (i.e. DVD or Blu-ray), you should also consider HD, even if you don't have access to a Blu-ray burner or player. Shooting in HD will give you the option of making Blu-rays in the future as well as DVDs in the present. Most of the time when you compress HD video down to SD, it will look better than video shot directly in SD, as well. Upgrading to an HD camera will give you more options now and future-proof your videos for later. Canon's HV10, HV20 and HV30 are all cameras in the ballpark of your $1000 budget and when in the hands of a talented cinematographer, can create very nice images.
-
Preserving Quality in Post Workflow
Matt Read replied to a topic in Students, New Filmmakers, Film Schools and Programs
Why did you even bother replying to this post? Nothing you said even remotely applies to what Evan was asking about, nor could it be helpful to him. The kid is in high school. FCP on a Mac is the best option for his situation. In fact, it's the best option for many situations. I know several professional editors who cut wide-release features on FCP on Macs. Learning FCP in high school will give this kid a huge jump start if he decides to pursue a career as a professional editor. The next time you don't have anything helpful or nice to say, don't bother saying anything at all. It just makes you look like a jerk. -
"Sampling" without obtaining a license is illegal. Somehow the rumor has circulated the country, that if you use less than 30 seconds of a piece of music, you can legally use it without acquiring rights. This is just that, a rumor, a complete fallacy. The only way you can possibly get away with using unlicensed music is to not make a profit from it. However, even this is dubious and one would do well to acquire a license before using copyrighted music for anything. Not that it matters, but the song in your video has not been "chopped" at all. There are no apparent alterations to it at all, with the exception of the beat. In the case of your examples, MC Hammer licensed "Superfreak" before using it, Vanilla Ice was universally criticized as a thief and was sued (though it never went to trial and is generally assumed that he settled out of court) and current hip-hop artists almost certainly obtain licenses before sampling songs. In truth, I could care less if you paid for a license or not, because Mr. Morricone probably doesn't own the copyright to his scores, some record label or movie studio does. The main thing that concerns me is not that you didn't license the music, but that you didn't credit the original artist who created it and instead credited someone else entirely. To me, that is where the real theft occurred. Maybe it's that you truthfully didn't know it was by Ennio Morricone, maybe your friend honestly didn't think it was illegal, maybe your friend knew exactly what he was doing but didn't bother to tell you the song was almost entirely created by someone else. I don't know and don't I care. But now that you know, you need to ensure that proper credit is given. And giving a "featuring Ennio Morricone" credit is not enough, his name needs to be first and you can give your friend a "featuring" credit or "remixed by" credit, because, honestly, your friend did very little in creating how that song sounds as it is in your video. Also, you really should go out and rent "The Good, the Bad and the Ugly." Segio Leone is a visual genius with an amazing sense of pacing. No filmmaking education would be complete without a viewing of it.
-
Your chroma key falls apart really badly at about 1:53 when the boys are pushing the girl around. It looks like it was caused by her shadow falling on your green screen. This could have been avoided if you had blocked your actors further from the screen. You've also got some "floating" people at around 3:03 caused by the camera reframing and the background not tracking that movement. This can be easily solved by using tape to make some white or black crosses on your green screen. You can then use these as reference marks when you make your key and match the background to any camera movement. Another thing I noticed is that all your keyed in backgrounds with walls are created so that the walls are perpendicular to the camera's angle of view. It really limits the depth and perspective of your images. It just looks like your actors are standing 6 feet in front of a wall (the green screen, which they are), rather than creating the illusion that they are in a real environment. You've got a few nice shots. Overall, there's too many white shirts and hats blowing out and not enough highlights on the actors' faces. Other shots have shadows that are too dark and hide a lot of detail that I would like to see. The combination of the hats and top-lighting is a major cause of this. You either need to put your key in at a lower angle or get some fill on the actors' faces. The few color shots at the end are okay, but look kind of like they are just lit with the room's ceiling lamp. The final shot of the mom looks flat in color and underexposed in B&W. The sound is pretty bad throughout. Some of it is due to bad recording and some is due to a bad mix. The opening scene is a good example. At one point the detective kid talks from off camera and it sounds like he wasn't mic'd and his voice was just picked up from the mic of the kid on screen. Through that whole scene the music was noticeably louder than the actors' voices and at points made it difficult to hear what was being said. In the color scene, there is a very noticeable hum. It sounds like it might be room tone being played too loudly. The scenes in between aren't much better. A final note, your opening credit music is "The Ecstasy of Gold" by Ennio Morricone from "The Good, the Bad and the Ugly" with a beat laid under it, however, you don't credit Ennio Morricone anywhere. In fact you give credit for the score to two other people. What you are doing is STEALING. As long as you're not making any money from this video you probably don't need to get rights from the copyright holder (though, if you want to be fully protected and completely legit about it, you should). However, you MUST credit Ennio Morricone or the creator of any piece of original work if you use their work in a video. To do otherwise is completely disrespectful.
-
Usually, I don't like experimental films at all. I find them to be exercises without any real meaning. However, I very much enjoyed this. I don't know exactly what it means, but it is clearly purposeful. Your control of bokeh is masterful. Some of the images you created are beautiful and at once abstract and familiar. The way you edited them together and used sound in conjunction with them only furthered their effect. I appreciated that there was a clear arc to the video as well. I wasn't forced to sit through the basically the same thing for 80 seconds, it felt as if it changed and developed. The brief glimpse of the New York skyline at the end was great as well. It not only broke up the shots of the bokeh, but it was showed what you had used to create all these bokeh in the first place. Amazing. This is something truly excellent. You should be quite proud.
-
Alex, Right away, the opening shot has too much head room. This continues through the rest of the "documentary interview" and into the meeting with the Williams character (though all of the shots of Williams seem to have fine headroom). However, this is really the only major problem I saw. One other thing was the lighting when Williams was modeling the brightly colored soccer (football) jersey. He was lit with hard light and cast a huge shadow on the wall. Had he been blocked 6 feet further from the wall or the light had been softer, this wouldn't have been a problem. Besides that, I didn't care for the zoom in on Williams. I think a dolly in would have looked much nicer. The camera had a nice arc. It started out fairly locked down and generally wide. By the end, it was handheld and tight. It complemented the story arc nicely. The lighting was very nice as well, with the already mention exception. It was soft and expressed all tones from highlights to shadow nicely. Outside of the cinematography, both actors were good and the location felt authentic and appropriate. I did notice that the consultant's suit was slightly ill-fitting, especially when he put his hands behind his head. This could have been a deliberate choice, but I feel that there wasn't enough else ill-fitting (not necessarily his clothes) in the production design to make it work. The story was interesting and not too cliche.
-
Shooting Cell Phone Screen?
Matt Read replied to Scott Lovejoy's topic in Students, New Filmmakers, Film Schools and Programs
You didn't describe the shot in too much detail, but I'm assuming if you're concerned about proper exposure then you want to be able to read what's on the screen, which means you'll be shooting an extreme close-up. If that's the case, my advice is to shoot it twice. Do it once using the actual screen of the cell phone showing what you want to appear on screen. Then do another take with the screen off and small reference marks (like plus signs) near the screen's corners. Doing it twice shouldn't cost you too much extra film and you'll be sure to have something usable. If you want to get even fancier (and shoot a bit of extra film) try shooting bracketed exposures on the shot of the actual cell phone screen. If you don't know what they are, bracketed exposures are where you find a base exposure, usually what an incident light meter tells you is correct, shoot that and then shoot several other takes at constant incremental increases and decreases in exposure from that. What that increment is and how many times you choose to apply it to your base exposure is up to you, but between a 1/2 stop to 1 stop and between 3 and 5 times over and under is a good range. So, say that your light meter gives you a reading of a 5.6, then using 1/2 stop increments applied three times, you would shoot 2.8 1/2, 4, 4 1/2, 5.6, 5.6 1/2, 8 and 8 1/2. The idea is that one of these apertures will give you an acceptable exposure. As for Brad's suggestion of a green screen, I don't think that would be necessary. I think it would take a lot of extra effort to paint a cell phone screen an even green, rather than just turning it off and in post placing an image over it directly, using your reference marks (as I suggested earlier) for motion tracking (you could then get fancy again and turn the black screen into a luma key and preserve reflections off the screen for a more realistic effect). Hope that helps. Good luck. -
Paulo, Right off the bat, I can see that there are two distinct shadows on the sombrero hanging on the wall. For my taste, the lighting is too high-key. The actors do have some nice deep shadows, but the background, specifically the kitchen area and wall behind the bar, is lit too brightly. Also, when the owner is at the bar talking to the boy, his rimlight is coming in from too high up and the highlight on his shoulder and arm extends too far forward. It's also causing a dark, hard shadow on the bar counter. It looks very lit, as opposed to just being. The lighting on the boy and the background behind him is better, but he needs a rimlight to help him pop out from the background a little. The lighting on his face is a little flat, but not too bad. The camera movement feels unmotivated and the moves are too slow and too long. As previously noted, the camera crosses the line for most of their conversation, without it really being needed.
-
.... Orbital Ballet ....
Matt Read replied to Laurent DELAROZIERE's topic in Please Critique My Work
It's fairly well lit. I can't say I find the video that entertaining or very purposeful, though. It's runtime is far too long and nothing really happens. -
Preserving Quality in Post Workflow
Matt Read replied to a topic in Students, New Filmmakers, Film Schools and Programs
Evan, At the level you're working at, this work flow is pretty standard. What will affect your image quality the most are the codecs you use. When capturing your footage into FCP make sure you are using the same codec that your XL-2 records with. This information can be found either in a user's manual or online. In addition to using the same codec, make sure the aspect ratio, resolution, frame rate and bit rate are the same in FCP as on your XL-2. If you have any effects shots that will require you to use Motion and/or AfterEffects, I would suggest that you export the shots from FCP using the Animation codec at a high resolution (while maintaining the same frame rate and aspect ratio from your FCP timeline) and work with this codec and resolution in Motion/AfterEffects as well. This will help you to create your effects with more detail and you will end up with fewer rough edges when you compress back to the codec and resolution you are editing with. When you are ready to make a DVD, export from FCP using compressor. Select DVD Best Quality 90 minutes (unless your video is longer than 90 minutes or you will have additional videos, etc. on your DVD. In that case, choose either 120 minutes or 150 minutes). Be sure to export both an MPEG-2 and Dolby Digital Professional file so that you have both video and audio. These are the codecs you want to use because any video you import into DVD Studio will eventually be converted into an MPEG-2 and Dolby Digital file anyway. By exporting with these codecs in the first place, you avoid your video being compressed an additional time and thus avoid any potential image degradation that may occur. In addition to these steps, set you XL-2 to record at the best quality it's capable of. Other than that, there's not really much else you can do.