

Nathan Blair
-
Posts
62 -
Joined
-
Last visited
Everything posted by Nathan Blair
-

Talent squinting at reflectors
Nathan Blair replied to Nathan Blair's topic in Lighting for Film & Video
So true man... sooo true. Along with shadows on walls... why are cinematographers the only people who accept these facts of life!? The entire crew was squinting even away from the reflectors... and we were trying the little tricks to make them less squinty but it was just simply uncomfortable. Anyway, thanks again. David your advice is always great. I think what I've taken from this discussion is I really just need to invest in a collapsable silk and bring along some stands. I think I'll also try using an ND grad filter to knock down some of the background exposure when possible... maybe then I can get away with a white bounce, if the bounce is large enough... The problem with scheduling is they're really squeezing a lot into each day. We're scheduled to shoot two "how-to" style webisodes a day. We'll be shooting close-ups and our master 3-shot simultaneously because of timing and continuity issues, so this kills any possibility to shoot close-ups at specific times unless we take a 5-hour break each day in between segments. So I think having a more controlled environment with silks and softer bounces is going to be necessary moving forward. Any other suggestions are more than welcome! -
Talent squinting at reflectors
Nathan Blair replied to Nathan Blair's topic in Lighting for Film & Video
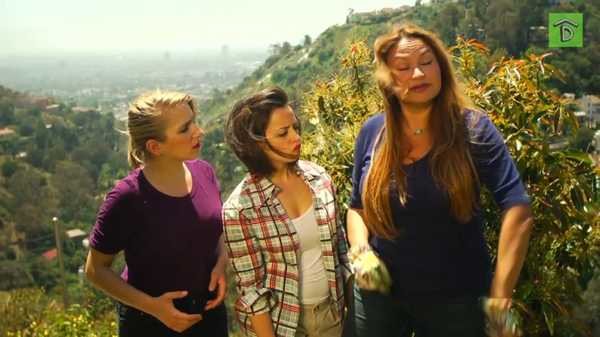
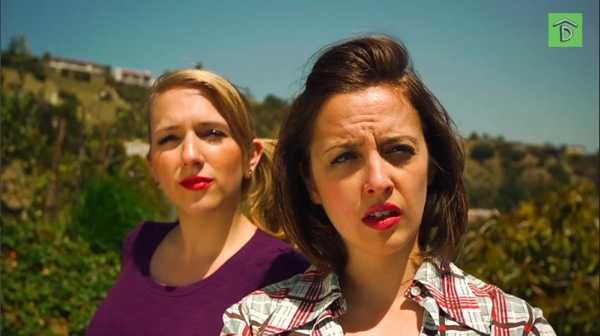
Thanks for the replies. I've attached some stills of the particular project I'm trying to improve. Most times the issue arrises when I am trying to get a 2-shot or wider. Singles, of course, can be lit with a white bounce. However, in my experience white bounce tends to fall of very quickly, once placed too far away. The first photo attached is probably the worst scenario... because of timing, we just had to shoot through the harsh sun of 12:00-1:00pm, and because of the geography of the garden, we were staged facing the sun. Of course there were really hard shadows cast down on the actress' faces so we had to use some bounce to fill them in, but white was just not enough to make a difference. The second photo is an instance where we needed a 3-shot, and white bounce seemed to fall off before creating any effect. This was filled with the gold-silver side (the side of the reflector that has little slits of gold and silver). This was barely enough to compete with the broad landscape in the background... The last photo is an example of a time I could finally use a white bounce from underneath. It was only possible to achieve enough fill when the bounce was literally right under the camera (up to the actress' chests here. What do you think? I would love to know how you would light these scenes? Always looking to learn new techniques and improve. Thanks again!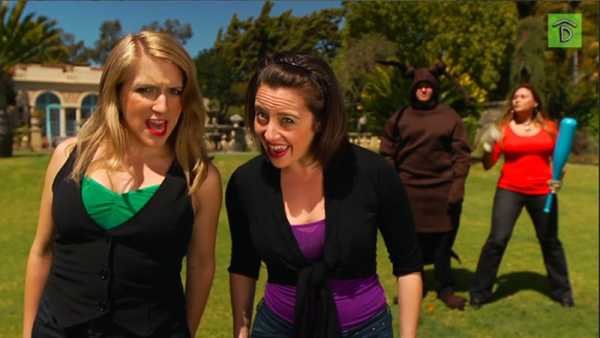
-
Hey all, Maybe this is a dumb question... I'm just wondering if anyone knows a way to use reflectors without blinding actors? I ask because I've often been in situations when the sun is so bright that actors can hardly keep their eyes open with the reflector in their face. I'm afraid that shining it through a silk would cut down on exposure too much, and white bounce would not produce enough light... although I haven't tried either of these yet. The particular project which I'm trying to remedy unfortunately does not have a very large budget at all, but of course they want these large shots of sunny gardens behind their talent.... For lack of G&E support I just use a 42 inch 5-in-1 flexible reflector, usually the gold-silver side, and I keep the sun to their backs. It looks okay so far except for the squinting problem, the actors just can't seem to get used to the glare. Any insight on this?
-
Thanks guys, it may be the card... I was using a PNY 32GB 30MB/s SDHC, I've been using it for about half a year now so I don't know if maybe these have a short shelf-life? What's strange to me is that we did two other interviews afterward on the same card, and dumped our media after each interview, and none of the other clips had this issue. Unfortunately there's no way of telling whether it was a bad data transfer since we didn't do a mirror backup on set... (a cardinal sin with digital, I know!!) I did tell the editor to re-transfer the clip in FCP to see if it was a transcoding error, but he says it came out the same. And by the way Saul LOL to your comment, thanks for the support. In his defense, he was very cool about cutting around it... still not an excuse for these things to happen in the future!
-
Ugh... I just received that dreadful complaint e-mail from an editor with a screenshot attached. There are several frames in my footage with really nasty lines of artifacts!!! [see image attached] The room we were shooting in was hot... so hot that the 7D we were using was overheating constantly. Could this have been it? What else might be the cause? Just curious if anyone else has seen this or heard about it. Thanks!
-
Well said James! There was a professor like this at my film school... I pretty much just avoided him but I wish I had the balls to change things for everyone else suffering his temper.
-
Low Budget lighting - CFL - Anyone?
Nathan Blair replied to Martin Hong's topic in Lighting for Film & Video
Another con is that there is a "green spike" in the color spectrum. I recently shot a short using CFL's in a scene that I wanted to look gritty anyway so I wasn't too concerned about this. The slight green is very subtle, but noticeable when placed in juxtaposition with tungsten, or properly balanced sources. Because of this I would advise implementing some minus green to your CFL light rigs whenever possible. -
I know it's not the best quality follow focus, but for only $100 it's done me wonders for the past year... I think they bumped it up to $150 now but still a great deal! Check out the one at indisystem: http://www.indisystem.com/follow-focus/
-
You're also going to have a bit of exposure difference between black skin and white skin, fortunately he's medium complexion so that helps. Nonetheless, I recommend bringing some reflectors to add some rim-light and fill to your darker subject when needed.
-
It's not a website, but the book New Cinematographers shows floor plans for some great films along with a very detailed analysis of how they achieved things on set and in pre-pro. I highly recommend it! I am curious if there's a website like that out there, would be cool to browse!
-
Does anyone have any experience with FloLights?
Nathan Blair replied to tom doran's topic in Lighting for Film & Video
I'm still curious about FloLights myself... I have a litepanel 1x1 which is very nice but I've been curious how they all compare. -
Thanks Cody, I actually had never thought about the difference between using openface and fresnel lights with softboxes. Both are definitely power hogs. The first lights I purchased were Arri 650w Fresnels and they're always great for throwing a controlled light from a distance. I've never owned any softboxes, although I wish I did. If I don't have money to rent soft sources I just use one of the many methods to soften my fresnels via diffusion, bounce, silks, etc... I feel that they're pretty versatile lights in that respect. Like everyone's said, there are probably 100 ways to achieve lighting in a given scene, it just depends on your taste as the artist. My tip for you, Marc, is to think about shadows on a scale of 0-10, 0 being pure black and 10 being pure white, and use this full range within your shots. Remember that with any visual art, your most basic tools are the elements and principles of design, such as Line, Shape, Color, Texture, Balance, Contrast, etc... Learn how to use these well and you'll master cinematography.
-
I've found fresnels to be very useful in most situations. If you're going to start with any lighting gear, I recommend a good fresnel kit with a softbox.
-
No worries, Jared. Sensors only apply to digital cameras. They are essentially the instrument that interprets light into digital information, and your low-light capabilities heavily depend on the sensitivity of this instrument. As there is less light to record, you will introduce more artificial pixels known as "gain". For more information on this, check out the Great Camera Shootout: http://www.zacuto.com/the-great-camera-shootout-2011 Since you're shooting on 16mm film, you don't have a sensor. What matters in your case is your film speed - the speed at which your film exposes light. ISO, in a nutshell, means "film speed". 400 ISO film will be much more sensitive to low light than 200 ISO. If you plan on being a DP for many films in the future, I recommend purchasing the ASC Cinematographer's Manual. It contains charts that you can use to calculate what exposure you need for different film speeds. For now, you can simply look at your light meter. Set your meter to the film speed you're using, and it will tell you what exposure you'll be getting using the lights you have. Try to expose things brighter more than darker with film, especially with lower speeds. The darks tend to fall apart quicker than the lights. You'll be surprised to see that you can bring the highlights down by at least 5 or 6 stops in film. In fact they show this in the Zacuto camera shootout posted above. Good luck! Most importanly: play with these tools, and experiment. That's the entire purpose of these exercises in film school. Nate
-
Ah, yes that's a challenge. Since smoke is transluscent, it can be lit from either the front or the back, but the absolute most important thing, if you want to see thick smoke, is that the background has to be as dark as possible, and the smoke needs to be lit brightly. This contrast is the only way to really accentuate the smoke, otherwise it will be lost in your background. The problem with lighting it from the front, or other angles, is that there will always be spill onto surfaces behind the smoke, which will kill your contrast. I would try to position your light snug against that wall, aimed down at the smoke, and flag the wall off with some of that blackwrap. Having a gobo-arm would help for this, but possibly you could try and figure out a rig with your c-clamp? If you're working with darker walls, or if you can hang a piece of dark set decoration on that wall, it will help you a lot.
-
Those videos are decent for starters, but they are pretty basic in the grand scheme of things. Some of the shots could use a little more detailed assessment. I would consider hanging the chinese lanterns close to your subjects as a soft key light. Your home made softbox sounds like it's perfect for a large source fill. None of the lights you've mentioned would be very ideal as backlights. The best backlights can be hidden off shot, and shoot a very controlled, narrow source toward your subject from further distances. I would consider investing in a Lowel light of some sort. They're very cheap. For more dynamic lighting, make sure you're not placing your lights too close to the camera. Also, try shooting the shadow-side of your subjects. For instance, in the second video you've posted, the restaurant scene is a good example of this. Good luck!
-
Also, remember to backlight your smoke!
-
Jared, There are many ways to achieve this scene, since noir really gives you a lot of freedom for creativity and the low-key atmosphere involves very little amount of lighting. Your biggest problem will be shading off areas that should be dark when you're in such a tiny space. What I would recommend is lighting through as many windows as you can (if you are on or near ground level). You can motivate the light by street lamps or moonlight. If you can't light through windows, or it doesn't work for your scene, try mapping out your shots in the apartment, and see if there's a corner that's safe for your lights to live. If there is, consider lighting from there, as it will be much easier and consistent to keep lights setup rather than moving them each shot. Try to keep the lights controlled in hard shapes and patterns by using your barn doors and blackwrap foil. The key is to aim for as much tonal contrast as possible, and to play with light as a design element. You can use one pool of light to illuminate your subject, and another to illuminate any props or set design involved (to create your mise en scene). I would not recommend using the umbrella for anything unless you absolutely need some fill... but generally soft light is not consistent with the noir style. For the hallway, consider using the hallway light as a "practical" which lights the scene. You can replace the bulb to your liking. When doing this, I usually replace bulbs with higher intensities to get better exposure, but if the light is in the shot, you may run into flare issues unless there's some type of lamp shade involved. I hope this helps a bit. Like I said, there are a ton of ways to achieve this, you should have fun with it.
-
Lighting with daylight bulbs is fine, and yes you MUST match your subject's lighting to your background plate lighting. You can use green bulbs for you the greenscreen if the screen is completely separate from your subject, but if it's a full body cyc then you'll need to mix your lighting a bit. I've had success with even doing greenscreen outdoors, lit by actual sunlight, when compositing a subject into an outdoor environment. Good luck!
-
My apologies, I misinterpreted your post. I use the Canon 7D, but I haven't used Nikons before. I still recommend checking your ISO settings, not the picture style.
-
I've worked a lot with in-camera flares of this sort in music videos. Here's one of my videos, all the flares done in camera: http://vimeo.com/23251398 You would think that a normal household bulb would create a more specular flare, but Benjamin was right in his post. To create washes over the frame, I always place a simple clamp-on work lamp just outside of the field of view, very close to the camera. I just rig it to a light stand and move it around as needed. I have been searching for a better method because incandescent bulbs tend to heat up the camera quite a bit... it's probably a very inefficient way to do this! Anyone have other techniques?
-
What type of budget are you working with? Litepanels 1x1 series might be a good option for you. You can connect them together to form larger squares. www.litepanels.com. Either that, or maybe some Kinos? If you need large soft lights you could consider Flatheads or Parabeams gelled with diffusion?
-
Your ISO is what directly effects the noise of your image. What ISO are you shooting at? I've found that anything shot over 640 ISO begins to have noticeable noise. As for picture styles, I use Faithful, others use Natural. I think either one is fine, depending on personal preference.
-
Time Magazine Portrait Lighting Style
Nathan Blair replied to Brian Rose's topic in Lighting for Film & Video
This is just speculation, but it looks to me like they may have used a sharpening effect in addition to HDR -
How can I hang a Kino Flo from the ceiling?
Nathan Blair replied to Jonas Fischer's topic in Lighting for Film & Video
Drop ceiling scissor clamp is probably your best approach. When short on scissor clamps, I've also used Cartolini and Maffers claps to achieve the same effect. If you need it to be higher and there are removable ceiling tiles, you can even hide the light above the ceiling. There's usually quite a lot of space to rig up there unless its taken up by an AC vent or pipe or something. With any overhead rigging, be sure to use safety cable!