

Guy Holt
-
Posts
680 -
Joined
-
Last visited
Everything posted by Guy Holt
-
 Its time to resurrect this thread with another Indie trick-of-the-trade: lumber grids. One of the hardest looks to accomplish on location is “motivated reverse key lighting". Reverse key lighting is when the quality (color temperature and hard/softness) and placement of a light is motivated by a source (practical or window) in the scene that is upstage of the talent. In this approach, the camera shoots into the shadowed side of the talent creating contrast and a low-key effect. The reverse key position also creates a third dimension to what is essentially a two dimensional medium by means of subtle graduations of light and dark in the scene. On real locations some rigging is invariably involved in getting the key light in the right place. As can be seen in the pictures below this can be accomplished easily and cheaply with “wall busters,” 2x4s, and inexpensive deck framing hardware. Dramatic motivated reverse key lighting for a Bose spot. For example, while not a night interior per say, we created a similar low key dramatic lighting effect for the Bose spot above, transforming a flatly illuminated woodshop into a scene with warmth and contrast, with nothing more than 2x4s and deck framing hardware. A grid constructed of 2x4 lumber will enable you rig a light in the optimum position for motivated reverse key lighting A baby spud on a 2x4 joist bracket will enable you to inexpensively rig a light to lumber. 2x4 joist brackets will enable you to quickly construct a lumber grid capable of rigging a light anywhere overhead. We used the “big budget” approach of Speed-Rail Wall-Busters, Speed Cs, and Speed-Rail Pipe to create low-key reverse key lighting for a party scene on another Bose spot. With the right equipment, time, and a little ingenuity there is nowhere that a good grip can’t put a light. Guy Holt, Gaffer, ScreenLight & Grip, Lighting Rental & Sales in Boston.
 -
Is there a beginner stage to using a generator?
Guy Holt replied to Joshua Hesami's topic in Lighting for Film & Video
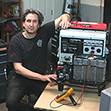
As camera sensors require less light, that is starting to change gradually. For example, a milestone of sorts was set on the north shore of Boston recently. The feature film “The Last Poker Game” starring Martin Landau (Mission Impossible) and Paul Sorvino (Good Fellas) shot its’ principle photography with nothing more than a Honda EU6500is. Martin Landau and Paul Sorvino in a scene from “The Last Poker Game” It is a milestone because “The Last Poker Game” is no low budget indie. It was produced by Peter Pastorelli, Marshall Johnson and Eddie Rubin. Peter Pastorelli’s credits include the Netflix film Beasts Of No Nation, which he produced alongside Johnson, and The Disappearance Of Eleanor Rigby, which stared James McAvoy and Jessica Chastain. Johnson’s other credits include Blue Valentine and The Place Beyond The Pines with Ryan Gosling; Rubin’s credits include Love And Honor. Left: Honda EU6500is modified for 60A output. Center: 300ft cable run through the assisted living complex. Right: ARRIMAX M40 head creating sunny look on a rainy day. “Last Poker Game” follows Dr. Abe Mandelbaum (Landau), who has just moved into a luxuriant assisted living facility with his ailing wife. After forming an unlikely friendship with a womanizing gambler (Sorvino), their relationship is tested when they each try to convince a mysterious nurse, played by Maria Dizzia (Orange Is The New Black), that he is her long-lost father. 60A HD Plug-n-Play Transformer/Distro powering ARRIMAX M40 and M18 on the set of the “Last Poker Game” The principle location for the movie was a sprawling new assisted living facility in Newburyport Ma. At only 60% occupancy, the production was able to secure a whole wing of the facility, which was ideal except that the loading dock, where they could operate a generator, was on the other side of the complex. Paul Sorvino in a scene from the “Last Poker Game” Given the light sensitivity of the Red that they were shooting on, the production was able to get away with nothing more than one of our modified Honda EU6500is generators. To compensate for the drop in voltage over the long cable run, the production used one of our proprietary HD Plug-n-Play Transformer/Distros that enable you to step up voltage in 5% increments. This feature enabled them to maintain full line level even after running out 300’ of cable between the generator and set. From the Transformer/Distro on set the crew then ran out 60A Bates extensions through out the wing, breaking out to 20A pockets wherever they needed. Martin Landau and Paul Sorvino in a bar scene from the “Last Poker Game” This way they could run up to three 1.8kw Arri M80s, or a 4kw M40 when they needed a bigger source, without having to worry about tripping breakers. With ARRIMAX reflectors, these heads were plenty big enough to light scenes in the day room, dinning area, and lounge of the residence wing, everything else they could plug into the wall. ARRIMAX M40 powered by modified Honda EU6500 and 60A HD Plug-n-Play Transformer/Distro lights bar scene from the “Last Poker Game” Using a small portable generator also enabled the production to save money by building out rental box trucks to serve as their electric and grip trucks since the trucks didn’t have to tow a diesel tow plant. This proved to be advantageous when the production went out on location in the streets of Newburyport. An old port city on the north shore of Boston, Newburyport is a warren of narrow streets through which it would have been difficult to tow a diesel generator. “The Last Poker Game” is, as far as we know, the first major film to take advantage of the combination of improved camera imaging, more efficient light sources, and Honda generators customized for motion picture production. Guy Holt, Gaffer ScreenLight & Grip Lighting Rental & Sales in Boston -
Is there a beginner stage to using a generator?
Guy Holt replied to Joshua Hesami's topic in Lighting for Film & Video
I am even prouder now that Honda has discontinued their paralleling box for the EU7000s. Last man standing. Guy Holt, Gaffer ScreenLight & Grip, Lighting Rental & Sales in Boston -
Is there a beginner stage to using a generator?
Guy Holt replied to Joshua Hesami's topic in Lighting for Film & Video
To power an Arrisun 60, or an HMI up to a 12kw, we have developed a means of paralleling two Honda EU6500s or EU7000s to generate 120 Amps of power. A complete system consists of two modified generators, a Paralleling Control Box, and one of our Transformer/Distros (either 60-, 84-, or 100 Amps.) Parallel operation of two Honda EU6500 generators made possible by our new Paralleling Control Box) The generators require a slight modification to interface with the Paralleling Control Box, which syncs the frequency and equalizes the load between the generators. Our proprietary paralleling control circuitry uses the Pulse Width Modulation (PWM) of the generator's inverters to control the load sharing. The phase angles of the two generators are synchronized using open loop architecture. The final function of our control box is to switch the outputs of the inverters to a common bus after their frequencies are locked in step (same phase angle and time base.) (As demonstrated here, our new HD Plug-n-Play Paralleling System can power a 6K HMI as well as 2-2k and 2-1k Fresnels) To provide power that is readily accessible in industry standard outlets, our Paralleling Control Box is outfitted with a 240V Bates receptacle. The 240V Bates pocket is there to power larger HMIs than has ever been possible before on Hondas (4k - 9k ARRIMAXs.) and/or one of our 60-, 84-, or 100A Transformer/Distros. The Transformer/Distro serves several important functions in this system that enables two generators to be paralleled (use this link for details), but its' primary function is to step-down the combined 240V output of the two generators into a single large 120V circuit (either 60-, 84-, or 100 Amps) that is capable of powering more small lights or a larger 120V light like a 10kw Quartz. Each of our Transformer/Distros is likewise outfitted with an industry standard 120V Bates receptacle so that you can use standard distro equipment, like Bates Siameses, Extensions, and Break-Out boxes to distribute power around your set, breaking out to U-Ground Edison Outlets where ever needed. Our 60A Transformer/Distro provides 120V power to smaller lights while a 6K HMI operates at 240V) An added benefit to using a Transformer/Distro to distribute the combined power of the two generators is that, no matter where you plug into the Transformer/Distro on its' secondary side, it automatically balances the load on the generator's two legs (which is critical for successful paralleling of two machines – use this link for details.) Our 120A Paralleling Control Box combining the output of two modified Honda EU6500s to power a Mole 12/18K Par head with 12kw globe. But, the most important benefit to be gained by using a Transformer/Distro, the one that makes it possible to parallel two EU6500s in the first place, is that it isolates the generators from high neutral return currents that can lead to dangerous neutral “cross-current” between the two generators that can overheat their inverters (use this link for more details.) By reducing the dangerous neutral “cross-current” created by two generators operating in parallel, our Transformer/Distros make it possible to operate more lights, or larger lights, on portable Hondas than has ever been possible before. Given the high sensitivity of HD camera systems these days, just about all the light you will need to obtain good production values can now be operated on Honda generators. Use this link for more details. Guy Holt, Gaffer ScreenLight & Grip, Lighting Rental & Sales in Boston -
Is there a beginner stage to using a generator?
Guy Holt replied to Joshua Hesami's topic in Lighting for Film & Video
That's because distributing power from a generator, even a putt-putt, can be complicated and requires a basic knowledge of electricity. Using a step-down transformer can greatly simply things. For example, you have to carefully balance your lighting load over the two legs of a portable generator. With our system you don’t have to worry about balancing loads, because our 60A Full Power Transformer/Distro automatically splits the load of whatever you plug into it evenly over the two legs of the 240V circuit of the generator. As long as you plug all your load in through our 60A Full Power Transformer/Distro you don’t have to carefully balance the load over the generator's two 120V circuit/legs because the transformer does it for you automatically. Our 60A Transformer/Distro greatly simplifies electrical distribution because it enables you to use standard film-style distro equipment, like 60A Bates extension cables, 60-to-60 Siamese (splitters), and fused 60A Bates-to-Edison Breakouts (snack boxes), to run power around your set - breaking out to 20A Edison outlets or 60A Bates pockets at convenient points. But no matter how complicated your distro system becomes, with our Transformer/Disto you simply plug in lights until the load wattage displayed on the iMonitor of the generator control panel reaches 7500Watts because no matter where you plug into the distro system the Transformer/Distro automatically balances the additional load, so that you don't have to. An overload alarm on the iMonitor display will tell you if you inadvertently overload the 60A Transformer/Distro. Another advantage to our 60A Full Power Transformer/Distro is that you don’t have to worry about voltage drop over a long cable run from the generator to set. The Honda EU6500 and EU7000 generators are quiet relative other putt-putts, but you still need to get them far off set to record sound without picking up generator noise. Over long stinger runs the voltage can drop to the point where HMI ballast won’t strike or will shut off unexpectedly. To assure full line level (120V) on set, our 60A Transformer/Distro is designed to compensate for the slight line loss you will have over an extended cable run. That is, it is designed to slightly boost the voltage on the load side (secondary). For instance, if you were to plug the Transformer/Distro directly into the generator and feed the supply side (primary) of the transformer with 240 volts from the generator, 127 volts would come out on the secondary side where you plug in the lights. This slight boost compensates for the slight line loss that is unavoidable over a long cable run and enables you to place the generator further from set where you won't hear it, yet assures that the supply voltage on the secondary side of the transformer does not drop too low. Finally, one of the greatest benefits to using our 60A Transformer/Distro with the Honda EU6500 or EU7000 Generator has got to be the ability to meet OSHA requirements for the use of these generators on job-sites. Since Transformers bond the Neutral to Ground on the secondary load side, they meet that OSHA requirement that the EU6500 and EU7000 generators alone do not. For the same reason GFCIs will also operate reliably when used on a step-down Transformer/Distro, even when the power is being generated by a Floating Neutral generator like the EU6500is. So, to bring the Honda EU6500is generator into full OSHA compliance, you only have to use a GFCI, like a 60A Shock Stop, with our 60A Full Power Transformer/Distro (use this link for a detailed explanation of OSHA requirements and why almost all portable generators do not meet them.) Guy Holt, Gaffer ScreenLight & Grip, Lighting Rental & Sales in Boston -
Is there a beginner stage to using a generator?
Guy Holt replied to Joshua Hesami's topic in Lighting for Film & Video
Go ahead and rub it in while you can. Your spec of an island is soon to be an outcast from the union of Europeans. Guy Holt, Gaffer ScreenLight & Grip, Lighting Rental & Sales in Boston -
Is there a beginner stage to using a generator?
Guy Holt replied to Joshua Hesami's topic in Lighting for Film & Video
Besides eliminating the possibility of over-volting 120V loads by mistake (yes it does happen) there are benefits to be gained by powering the M40 at 120V through a 240V-to-120V step-down transformer, like our Full Power Transformer/Distros, rather than directly into the 240V twist-lock receptacle on the generator or from the 60A Bates built into the generators of some rental houses. The 60A Bates receptacles built into rental house generators provide only the 45A for which the power output panel of the North American models of these generators are rated for continuous loads. Our Transformer/Distros will provide a true 60A/120V circuit when used with one of our modified EU6500 or EU7000 generators. It accomplishes this by converting the 240-volt output of a Honda EU6500 or EU7000 to 120 volts in a single circuit that is the sum of the two single-phase legs of the generator. If the generator is one of our modified Honda EU6500 or EU7000, the Transformer/Distro will provide a true 60A/120V circuit from their enhanced 7500W output. Now that you have access to the full power of the generator in one circuit, you can load the generator more fully than you could without a Transformer/Distro. Without a transformer you can never fully utilize the available power of a portable generator because the load of a light has to go on one circuit/leg of the generator or the other. For example, when plugging lights into the power outlet panel of a Honda EU6500is, you reach a point where you can't power an additional 1kw light because there is not 8.4 amps available on either one of the factory installed 20A outlets/leg of the generator. With a Transformer/Distro you can still add that 1kw light because the Transformer/Distro not only accesses power through a higher rated circuit (the enhanced 30A/240V Twistlock), but it also splits the load evenly over the two legs (4.2A/leg) of the generator on that circuit. What's nice about M40 ballasts is that they are auto-sensing multi-volt ballasts. At 120V the same ballast will operate an M40 and draw 37 Amps, leaving room on the Transformer/Distro derived 120V circuit to power additional lights. Given the enhanced 7500W power output of our modified EU6500 and EU7000 generators, you will have 23 Amps left over after powering the M40 to power additional lights. And, if you use only HMI and Kino Flo ballasts with Power Factor Correction you can load our modified Honda EU6500 or EU7000 generators to their full 7500W capacity. Which means that you can effectively power a PFC 1200W HMI (13A) and a PFC 800W Joker (8A) in addition to the 4k because the Transformer/Distro splits the additional load evenly over the two legs of the generator. And, because the Transformer/Distro perfectly balances the load of what ever you plug into it, the generator is capable of handling the larger load more easily because it is perfectly balanced. Guy Holt, Gaffer ScreenLight & Grip, Lighting Rental & Sales in Boston -
Is there a beginner stage to using a generator?
Guy Holt replied to Joshua Hesami's topic in Lighting for Film & Video
If you want to power non-linear light sources like HMIs, Fluorescents, & LED lights, it matters not only what type of generator you use but also what type of ballasts powers the light. The harmonic noise that non-Power Factor Corrected electronic ballasts draw can have a severe adverse effect on the power waveform of some generators but not others. I will provide short answers to your questions and for more details on what type of generator to use with HMIs and fluorescent lights use this link for an article I wrote on the use of portable generators in motion picture production. Harry Box, author of “The Set Lighting Technician’s Handbook” has cited my article in the Fourth Edition of the handbook. Here is what he has to say about the article: "Great work!... this is the kind of thing I think very few technician's ever get to see, and as a result many people have absolutely no idea why things stop working." "Following the prescriptions contained in this article enables the operation of bigger lights, or more smaller lights, on portable generators than has ever been possible before." There are a number of 240 volt outlets in a typical house, office, or industrial plant in this country. The most common are air conditioner outlets, dryer outlets, range outlets, outlets for large copy machines in offices, and the outlets for motorized equipment in industrial plants. A full proof way to power large luminaries like 4k HMIs from these circuits is to run them through a 240v-to-120v step down transformer like the 60A Full Power Transformer/Distro we make for the Honda EU6500is and EU7000is generators. Like it does with the 240V output of the Honda Generators, our 60A Transformer/Distro converts the 240 volts supplied by these industrial and household receptacles back to 120 volts in a single circuit that is the sum of the two single phase legs of 30/50 amps each. That is how our 60A Transformer/Distro makes a 60A/120v circuit out of a “30A/240v” and our 100A Transformer/Distro makes 100A/120V circuit out of a “50A/240v” circuit. Our Transformer/Distros can also be used to power multiple 120V luminaries off of 240 Volt circuits because our Transformer/Distro automatically splits the load of whatever you plug into it evenly over the two legs of the 240V circuit so there is no neutral return. This is a very complicated topic and there is a lot of confusion out there so I suggest you read the article I mention above. M40s and Arrisun 60s use power factor corrected (PFC) electronic ballasts. PFC electronic ballasts do not power surge when striking. They rather “ramp up” gradually during the striking phase, so you don’t have to leave head room as you would with a magnetic ballast. You don’t need to use flicker free ballasts on the Honda EU6500 or EU7000 generators because they pass the power they generate through an inverter. These generators are rock solid with frequency variances of only hundreths of a cycle. I won’t address the issue of flicker and frame rate/shutter angles because it is well established elsewhere in this forum that there are safe windows that are “flicker free” as long as the power supply is stable. As long as you shoot at one of the many safe frame rates, magnetic ballasts are “flicker free” on the Honda EU6500 or EU7000 generators. Guy Holt, Gaffer ScreenLight & Grip, Lighting Rental & Sales in Boston -
Power for mole Richardson 5k fresnel and 2k fresnel
Guy Holt replied to Matthew Glover's topic in Lighting for Film & Video
There is a lot of good information in this thread, but I don’t agree with the premise that a professional electrician is required to run a 5k off of a standard household outlet. This statement is not completely accurate. There are a number 240-volt wall outlets in a typical house, office, or industrial plant that you can safely and legally use to power a 5k. The most common are air conditioner outlets, dryer outlets, range outlets, outlets for large copy machines in offices, and the outlets for motorized equipment and compressors in industrial plants. If you look at the breaker of these circuits on the building service panel you will notice that they use two pole breakers - either 30A or 50A. Each pole of the breaker is in a sense an independent 30A or 50A 120 volt circuit. That is, if you measure the voltage from each pole of the breaker to ground it will be 120 volts, and if you measure the voltage between the two poles of the breaker you will notice that it is 240 volts. The 120 volts of the two poles adds up to 240V because the 120V circuits are on opposing legs (and are therefore additive) of either a single-phase electrical service of a house, or a single phase secondary step down transformer of a office or industrial plant. In residential settings, this is how higher voltages are supplied to household appliances like Dryers, Electric Ranges, Air Conditioners, Motors, etc. that require more power than can be reasonably supplied by a single 120V circuit. Many of these household and industrial 240V receptacles use a three wire system (no neutral) because they are designed to power single phase motors or heating elements that draw a perfectly balanced load and return no current because the single phase service legs are 180 degrees out of phase and cancel each other out. You have two options when it comes to running 5ks on these common residential 240V circuits. The first is to use a 5k with a 240V bulb. The 5k head has to be specifically designed to operate at 240V with a double throw switch (switches both hot and neutral simultaneously. So before you throw a 240V 5k globe in that Mole 5k, you need to confirm that it has a double throw switch. If not you will have a hazardous situation where the lamp is energized without a return. You don’t want to become the return path to ground. If it does have a double throw switch you will also probably need an adapter to plug into the 240V outlet because most 5ks are wired with a 60 Bates plug. The second and safer option is to use a 240v-to-120v step-down transformer to power a standard 120V bulb. A transformer will convert the 240 volts supplied by the 240V receptacle to 120 volts in a single circuit that is the sum of the two single phase legs. A transformer can convert a 30A/240V Dryer Receptacle into 60A/120V Amp circuit which will be sufficient to power a 5k 120V globe since it draws 42 Amps. I regularly use transformers to power not only 5ks, but also big HMIs (2.5-4Kw) in situations where a tie-in is not an option and the budget doesn’t permit for a tow generator. For example, I have used this approach repeatedly at a historical mansion in Easton MA called the Ames Estate. Scene from "Unsolved History" powered from 50A/240V range outlet through step-down transformer/distro at the Ames Estate. A popular state fee free location, the Ames Estate, like many historical house/museums, does not permit tie-ins and the electrical wiring in the house is so antiquated that it is unusable. Fortunately, they have a 50A/240 volt circuit in the carriage house for a welder they use to repair the mowers they use at the park. Our standard mode of operation when shooting there is to run 250V extension cable from the welding receptacle to our 60A Full Power Transformer/Distro placed in the entry hall of the house. Using a 60A Siamese at the Transformer/Distro, we then run 60A 6/3 Bates extensions, down to the library, to the second floor, and back to the maid’s pantry. At the end of each run we put another 60A Siamese. A 60A snackbox on one side of the Siamese gives us 20A branch circuits. The other side we leave open for a large HMI or Quartz Light. Now we can safely plug 1200 & 2500W HMIs, or even a 5k Quartz, into our own distribution anywhere in the house. Typhoid Mary in quarantine on an island in New York's East River. Note the view out the window of the East River shoreline at the turn of the century. To maintain continuity between shots on these dramatic historical recreations, we usually bring a 4kw HMI Par or 5k Tungsten Fresnel (depending on the effect we are after) in a window on one side of the room as a sun source and a 1200 par through a window on the other side as a northern light source. Lights positioned outside, we power off of our modified Honda EU6500is through a Transformer/Distro. We are able to power both lights off our modified EU6500is because our 60A Full Power Transformer/Distro steps down the enhanced 7500W output of the generator to a single 60A/120V circuit (for more details on how this is accomplished I suggest you read my newsletter article on the use of portable generators in motion picture production available on our website.) And, since the Honda EU6500is can be placed right on the lawn, we are saved from running hundreds of feet of feeder back to a tow generator in the drive. The exterior of the actual location used for the quarantine island. A 30' blowup of a picture of the East River at the turn of the century was rigged outside the windows of a house in Arlington MA. We have been able to use this same basic distribution package (two Transformer Distros, 1- modified EU6500is) at numerous museums and historical houses throughout New England including Sturbridge Village. Fortunately for us, to make ends meet, many historical houses rent themselves out for events and weddings. For that reason, they usually have at least one updated service with 30 or 50 Amp 240 volt circuit for the warming ovens of caterers. I have included in this post several production stills from these shows. For those who would like to see samples of what can be accomplished with this basic package, I have attached these links to production stills of the PBS and History Channel historical documentaries shot entirely, or in part, with just a couple of transformers and a Honda generator. The History Channel’s “Unsolved History” episode “Presidential Assassins” American Experienes Typhoid Mary Biography “The Most Dangerous Women in America" PBS’s Ben Franklin Biography “Franklin" Or, use this link for more details about using step-down transformers on set. By giving you safe and legal plug-in access to more house power through common 240V house outlets, a transformer can quite often eliminate the need for tie-ins or generators. Guy Holt, Gaffer, ScreenLight & Grip, Lighting Rental and Sales in Boston -
I agree, a meter that reads foot-candles is indispensible because it enables you to set levels and balance your fixtures in advance. Like a game of 3-D chess, a DP can light an entire scene in his head using his mind’s eye. As a starting you need to choose the exposure of the key tone at the outset - say T5.6 for deep focus. Having chosen the exposure you can then calculate how many Foot Candles (FC) you need on different elements of the scene. To figure out how many FC you need for exposure, all you need to know is that it takes 100 FC to get an exposure of 2.8 with an ISO 100 film with a 180 degree shutter at 24 FPS (1/50th of a second shutter speed.) If your digital camera is 2 stops faster than an ISO 100 film, you will need 100 FC to get a stop of 5.6. Once you know how many FC you need for exposure you can simply calculate how many FC will give you the effect you see in your mind’s eye. Of course, it helps to have done a lighting test of what effect over and underexposing a subject will give. A camera test we conducted for a digital camera for a large promotional campaign for Bose Such a lighting test for talent (you may also want to do one for key props or sets) would consist of testing in a systematic fashion the effect of Key, Fill, Back Light, Kickers, Hair Lights, and Liners that are over and under exposure. For example, to test the effect of your key light on flesh tones, set your exposure with two doubles and a single in your key light. Then remove them a half stop at a time (without changing your camera exposure setting or exposure of the chip chart), and systematically note on a slate in the frame what you are doing. Once you have removed all the scrims, your flesh tone will be two and a half stops over exposed (since you have not changed the camera setting.) Put all the scrims back in and now, using single and double nets, systematically under expose the flesh tone in half stop increments (remember rotating a net relative to the light source will make it "fatter" or "thinner", which will enable you to "dial in" the exact level you want from the light.) If you want to play on the lower register continue to under expose the flesh tone until it becomes a pure silhouette. Do the same for Fill, Back Light, Kickers, Hair Lights, and Liners in isolation and in specific combinations that you plan to use them. Having systematically tested each light, you can now see the effect that different ratios of each has on the scene and can even use the test as a reference on set when lighting the scene. An example of this type of pre-visualization would be say you are shooting a couple conversing at a bar. After working through in your minds eye that you want a low-key look with selective (shallow) focus you might settle on a stop of 2.8. Say the script calls for the guy to be somewhat mysterious and distant and the women to be very open and receptive, then you may choose to keep him in deep shadow with just enough of a liner to separate him from the subdued background of the bar. This type of lighting on him could be motivated by a practical fixture you establish behind him, which would be consistent with the more frontal key you want for her, since you would want to light her more frontally so that her character is clearly apparent, but not him to retain some mystery to his character. Having roughed out your style and light placement you can begin to set your levels and balance your lights based on lighting tests you have shot over the years. For instance, if your camera is two stops faster than an ISO 100 film, you will need 24 FC to properly expose your key tone (mid gray) at a T Stop of 2.8. 24 FC would then give you a “properly” exposed flesh tone on her. But this is a bar with subdued lighting, so you don’t want full exposure on her. You liked the feel of a half key (1 stop under) in your lighting tests so you would light her with 12 FC from a high frontal key. Again, because the scene takes place in the subdued lighting of a bar, you don’t want to over fill her. Going back to your lighting tests you like the look and feel of an 4:1 key to fill ratio so you would give no more than 3FC of fill light. You need to separate her from the dark background of the bar and so you might give her a backlight of 6 FC because that's what looked appropriate in the lighting tests to separate her hair color from a dark background without looking over-lit. You would want to make sure you flag her back-light off him since you want to play him in near silhouette and so have to keep any frontal light on him to under 1 FC because four stops under exposure was a near silhouette with just the right amount of detail in the lighting test. For the liner to separate him from the dark background of the bar you will need a fairly strong fixture capable of delivering 48FC from directly behind him since your lighting tests established you need to be at least a stop over exposure for the liner to read. Once you have figured out how many FC you need for the effect (a liner in this case) you can figure out which lights will give you that using the photo-metrics that manufacturers provide on their websites, or you can download Arri’s handy photometric calculator (be wary of the photo-metrics given for LED lights.) With a little experience you begin to develop a feel what light will give you what you need in different situations. You wouldn’t want to try to use the practical fixture that you are flying in behind him to motivate this lighting scheme as the source for the liner on him because, first of all it’s placement in the shot may not be far enough around his back to serve as a liner. But, also to deliver 48 FC on him, it would be screaming hot in the shot. For this reason it is better to use a separate light to light your talent and treat the practical so that it looks realistic in the shot. I find that practical lamps never look convincing unless one treats the lampshade as well as boost the bulb wattage. Unless it is completely opaque, you typically need to treat the shade to keep it from burning out (remember stopping down to keep it from blowing out will throw off the balance you have set with your other lights) You can put a lower wattage lamp in it, but then the output of the practical on the bar will look rather anemic. I find you get a more realistic look if you boost the wattage of the bulb and line the inside of the shade with ND gel. It is a delicate balance to achieve. You can achieve this balance without a monitor, by using the old school method with incident and spot meters and a selection of practical bulbs including PH 211, 212, and 213 bulbs. Years ago Walter Lassaley, BSC, instructed me to balance practical’s such that an incident reading of the direct output one foot away from the bulb is one stop over exposure which in this case would be 48 FC. I have found that rule of thumb gives a realistic output to the practical. After establishing the practical’s output using an incident meter, you then use a spot meter to determine how dense an ND gel is needed to line the inside of the glass shade. You can do all of this pre-visualization, setting of levels, and balancing based upon a location scout, blocking with stand-ins, and your lighting tests. In other words, almost everything can be worked out ahead of time so that when you arrive on set you know exactly what you need to do. This is especially helpful on low budget projects since, generally the time spent with minimal crew in scouting and blocking with stand-ins, is considerably less than the time wasted working these things out on set with a large crew and principle talent. Guy Holt, Gaffer, ScreenLight & Grip, Lighting Rental & Sales in Boston
-
Keying From Outside A Window
Guy Holt replied to Jonathan Taylor's topic in Lighting for Film & Video
It is no longer true that Honda EU6500s make too much noise to record clean audio. With the right equipment and planning it is possible to get clean audio tracks. Even the super quiet Honda Inverter generators have the problem that by the time you move them far enough off set that you don't hear them you have significant line loss. To the problem of line loss, you have the added problem that as you add load, the voltage drops on portable generators (it is not uncommon for a generator to drop 5-10 volts under full load.) The combination of voltage drop on the generator and line loss on a long cable run can cause voltage to drop to the point where HMI and Kino ballasts cut out unexpectedly or won't strike at all. For these reasons, portable gas generators are typically operated too close to set where they are picked up on audio tracks. The trick to recording clean audio with a Honda EU6500is is to use a 240V-to-120V step down transformer, like our 60A Full Power Transformer/Distro, that has a slight voltage boost built into it, which enables you to operate the generator at a distance without suffering from voltage drop. Our 60A Full Power Transformer/Distro provides 7500 Watts of power in a single 120v circuit from the Honda EU6500is Generator or the new Honda EU7000is Generator To record sync sound without picking up any generator noise, all you need is 200'- 300' of extension cable between the generator and set. This is usually enough cable to place the generator around the corner of a building, or to run it out of a van or truck - which is usually all the additional blimping you need with these generators. A heavy-duty 250V twist-lock cable runs between the generator and the Transformer/Distro, which eliminates multiple long cable runs to the generator and eliminates the severe voltage drop you would have using standard electrical cords. And, to assure full line level (120V) on set, our Full Power Transformer/Distros are designed to compensate for the unavoidable line loss you will have over an extended cable run. "Select" Models allow you to adjust for line-loss to maintain 120V on set Our standard Transformer/Distro is designed to boost the voltage on the load side (secondary) of the transformer by 5 percent. For instance, if you were to plug the Transformer/Distro directly into a generator running with no load and feed the supply side (primary) of the transformer with the generator's 240V output, you will get 126 Volts out on the secondary side where you would plug in lights. We have designed this slight boost into our standard Transformer/Distro to compensate for the line loss that is unavoidable over a long cable run, and the voltage drop on the generator under load. Our "Select" model of Transformer/Distros, enables you to adjust the amount of voltage boost in two 5% steps. This enables you to maintain full line level (120Vs) regardless if the supply voltage has dropped to 228V, or even 216V, from line loss and load running on the generator. A good example of how our Transformer/Distro makes it possible to record clean audio tracks even under the worst of conditions is the indie short "Toothbrush." In this story of mistaken identity produced by Guymanly Productions, a pivotal scene takes place in the middle of a near vacant parking lot of an all night convenience store. With no building or other sound barrier within a reasonable distance to block the sound of the generator, Gaffer Aaron MacLaughlin had no recourse but to put it behind their grip truck as far from set as possible. As you can see from the photos below, he ran 300' of twist-lock extension cable from the generator to our Transformer/Distro hidden behind a newspaper box. From the Transformer/Distro he then ran 200' of 6/3 Bates Extension to set where he broke out to 20A Edison receptacles using a 60A snack box. While running the generator near full capacity with a lighting package that consisted of three 1200W HMI Pars and two 1k Baby Quartz Fresnels, he experienced no appreciable voltage drop on set even after a 500' cable run because our Select Transformer/Distro was able to compensate for both the line loss of the cable and voltage drop of the generator under near full load. Left: Scene in parking lot. Center: Transformer/Distro hidden behind newspaper box (set 200' in distance.) Right: Generator baffled by truck (Transformer/Distro 300' in distance.) This example shows how the variable boost of our Select Transformer/Distros, not only enables you to place the generator further from set where you won't hear it, but also assures that the supply voltage on the secondary side of the transformer does not drop too low. By comparison, had Aaron run 500' of standard 14 Awg electrical cord he would have experienced a line loss alone of 24.5V. With that severe a voltage drop, his HMI ballasts would probably have cut out from low voltage as he added additional loads on the generator. Without the line-loss compensation of our Transformer/Distros, he would have had to move the generator closer to set where it would be picked up on the audio tracks. For more detailed information on line loss, I would suggest you read an article I wrote on the use of portable generators in motion picture production. The article is available at www.screenlightandgrip.com/html/emailnewsletter_generators.html. Guy Holt, Gaffer, ScreenLight & Grip, Lighting Rental & Sales in Boston -
You definitely want to stay within the NEC recommendation. Low voltage because of "line loss" can cause problems such as reduced efficiency and excessive heat in equipment, unnecessary additional load on the circuit, and a dramatic shift in the color temperature and in the output of lights. For example, the effect of line loss on tungsten lights can be dramatic because their output falls off geometrically as the voltage decreases. For example a 1k lamp operating at 90% rated voltage (108V) produces about 68% of its normal light output – a 1kw lamp is now a 650w lamp. But, that is not all, as the light intensity decreases, so does the Kelvin color temperature of the emitted light. In the case of fluorescents, HMIs, and LEDs, because their power supplies are typically of a “constant power” type, they will draw more current as the line voltage decreases in order to maintain constant power to the lamp which may lead to breakers tripping. In the case of generator output, voltage loss translates into an exponential loss in power. That is because, if you double the ampere load on the cable, the voltage drop also doubles, but the power loss increases fourfold. What this means is that when a distribution system has a large voltage drop, the performance of the generator (its maximum effective load) is reduced. Which is not nearly enough to not pick up the sound of the generator on your audio tracks. A common problem with portable generators, even the super quiet Honda Inverter generators, is that by the time you move them far enough off set that you don't hear them you have significant line loss. To the problem of line loss, you have the added problem that as you add load, the voltage drops on portable generators (it is not uncommon for a generator to drop 5-10 volts under full load.) The combination of voltage drop on the generator and line loss on a long cable run can cause voltage to drop to the point where HMI and Kino ballasts cut out unexpectedly or won't strike at all. For these reasons, portable gas generators are typically operated too close to set where they are picked up on audio tracks. The trick to recording clean audio with a Honda EU6500is is to use a 240V-to-120V step down transformer, like our 60A Full Power Transformer/Distro, that has a slight voltage boost built into it, which enables you to operate the generator at a distance without suffering from voltage drop. Our 60A Full Power Transformer/Distro provides 7500 Watts of power in a single 120v circuit from the Honda EU6500is Generator or the new Honda EU7000is Generator To record sync sound without picking up any generator noise, you need to add 200'- 300' of extension cable between the generator and set. This is usually enough cable to place the generator around the corner of a building, or to run it out of a van or truck - which is usually all the additional blimping you need with these generators. A heavy-duty 250V twist-lock cable runs between the generator and the Transformer/Distro, which eliminates multiple long cable runs to the generator and eliminates the severe voltage drop you would have using standard electrical cords. And, to assure full line level (120V) on set, our Full Power Transformer/Distros are designed to compensate for the unavoidable line loss you will have over an extended cable run. Our standard Transformer/Distro is designed to boost the voltage on the load side (secondary) of the transformer by 5 percent. For instance, if you were to plug the Transformer/Distro directly into a generator running with no load and feed the supply side (primary) of the transformer with the generator's 240V output, you will get 126 Volts out on the secondary side where you would plug in lights. We have designed this slight boost into our standard Transformer/Distro to compensate for the line loss that is unavoidable over a long cable run, and the voltage drop on the generator under load. Our "Select" model of Transformer/Distros, enables you to adjust the amount of voltage boost in two 5% steps. This enables you to maintain full line level (120Vs) regardless if the supply voltage has dropped to 228V, or even 216V, from line loss and load running on the generator. To find the optimum switch setting, our "Select" Transformer/Distros have a built-in volt/amp/kva meter that tells you if the line level is too low or too high. A good example of how our Transformer/Distro makes it possible to record clean audio tracks even under the worst of conditions is the indie short "Toothbrush." In this story of mistaken identity produced by Guymanly Productions, a pivotal scene takes place in the middle of a near vacant parking lot of an all night convenience store. With no building or other sound barrier within a reasonable distance to block the sound of the generator, Gaffer Aaron MacLaughlin had no recourse but to put it behind their grip truck as far from set as possible. As you can see from the photos below, he ran 300' of twist-lock extension cable from the generator to our Transformer/Distro hidden behind a newspaper box. From the Transformer/Distro he then ran 200' of 6/3 Bates Extension to set where he broke out to 20A Edison receptacles using a 60A snack box. While running the generator near full capacity with a lighting package that consisted of three 1200W HMI Pars and two 1k Baby Quartz Fresnels, he experienced no appreciable voltage drop on set even after a 500' cable run because our Select Transformer/Distro was able to compensate for both the line loss of the cable and voltage drop of the generator under near full load. Left: Scene in parking lot. Center: Transformer/Distro hidden behind newspaper box (set 200' in distance.) Right: Generator baffled by truck (Transformer/Distro 300' in distance.) This example shows how the variable boost of our Select Transformer/Distros, not only enables you to place the generator further from set where you won't hear it, but also assures that the supply voltage on the secondary side of the transformer does not drop too low. By comparison, had Aaron run 500' of standard 14 Awg electrical cord he would have experienced a line loss alone of 24.5V. With that severe a voltage drop, his HMI ballasts would probably have cut out from low voltage as he added additional loads on the generator. Without the line-loss compensation of our Transformer/Distros, he would have had to move the generator closer to set where it would be picked up on the audio tracks. For more detailed information on line loss, I would suggest you read an article I wrote on the use of portable generators in motion picture production. The article is available at www.screenlightandgrip.com/html/emailnewsletter_generators.html. Guy Holt, Gaffer, ScreenLight & Grip, Lighting Rental & Sales in Boston
-
HMI and Generator - advice and general knowledge
Guy Holt replied to Maximilian Neumann's topic in Lighting for Film & Video
Unless you want your talent to play as silhouettes against the windows, you will likely need the 2.5kw HMIs inside for keying and filling your actors - tungsten heads gelled with CTB will not be enough. Since there are more windows than you could possibly cover with just two 2.5kw HMIs, I would use only available daylight through the windows and push the 2.5s through diffusion frames to key and fill your talent. A new power option, which might be ideal in this situation, is to parallel the two Honda EU6500is. A complete system would consist of two Honda EU6500s (or modified EU7000s) and a Paralleling Control Box. The paralleling box will give you a combined output of 120A at 240V(60A/leg), which is enough to run up to a 12kw HMI – so you will certainly be able to run your package consisting of two 2.5k HMI and have power left over for smaller HMIs and Kinos. (Our 120A Paralleling Control Box combining the output of two modified Honda EU6500s to power a Mole 12/18K Par head with 12kw globe) The Paralleling Control Box syncs the frequency and equalizes the load between the generators. It uses the Pulse Width Modulation (PWM) and droop voltage regulation of the generator's microprocessors to control the load sharing. The phase angles of the two generators are synchronized using open loop architecture. The final function of the paralleling control box is to switch the outputs of the inverters to a common bus after their frequencies are locked in step (same phase angle and time base.) Use this link for more details about paralleling Honda EU6500s and EU7000s. Guy Holt, Gaffer, ScreenLight & Grip, Lighting Rental & Sales in Boston -
Without the glass the safety switch will not allow the head to be struck. I really doubt appreciable lumens are being lost to the glass. Wether the filtration occurs in the quartz envelope of the globe or protective glass of the head, the light loss of that part of the spectrum remains the same. Guy Holt, Gaffer ScreenLight & Grip Lighting Rental & Sales in Boston
-
On every ballast there should be listed its’ electrical specifications, which if you know how to read it, will tell you if the ballast is power factor corrected. Below is the nameplate from an Arri 575/1200 Electronic Ballast with DMX Control. Manufacturer’s nameplate from an Arri 575/1200 Electronic Ballast specifying its’ electrical characteristics (learn how to read it.) As indicated on the nameplate, the ballast has an Apparent Power of 2290VA, which means it draws nearly twice the load of its’ 1200W output – a clear indication that it is not power factor corrected. Which explains why, according to the nameplate it will draw 18A of current ("I") at 125 Volts ("U") (2290VA/125V = 18.32A.) That translates to 19A at 120V. You will also notice that it states that the ballast has a cos@=.6 which means that the Power Factor is .6. It is important to understand that this greater Apparent Power consists not only of high amplitude short pulses of current drawn by the ballast (the lower waveform in the power quality reading in my post above), but also harmonic currents that the ballast introduces to the distribution system (see below for the FFT graph for the same 4k ballast mentioned above.) I won’t go into detail here how the harmonics generated by non-PFC electronic HMI ballasts can adversely effect equipment operating on it, but anyone operating HMI, Kino, and even LEDs should make themselves acquainted with harmonics (use this link for more details.) Given the wide variety of generators manufactured for different markets, it is important to understand the benefits and drawbacks to each when it comes to their use in motion picture production. Especially, given that the increasing use of personal computers and microprocessor-controlled recording equipment in HD production has created an unprecedented demand for clean, reliable power on set at a time when the trend in lighting is toward light sources that generate dirty power. The adverse effects of the 55% total harmonic distortion exhibited in the power quality meter readings posted here, can take the form of overheating and failing equipment, efficiency losses, circuit breaker trips, excessive current on the neutral wire, and instability of the generator voltage and frequency. Harmonic noise of this magnitude can also damage HD digital cinema production equipment, create ground loops, and possibly create radio frequency (RF) interference. Why is harmonic distortion suddenly an issue in motion picture electrical distribution systems? First, one must appreciate that the power generation and electrical distribution systems developed for motion picture production were never designed to deal with an abundance of non-linear loads like the HMI, Fluorescent, and LED lights prevalent today. In the past, when the only lights available were tungsten, attention was given to portable generator features such as automatic voltage regulation and speed regulation. But, given the increasing prevalence of harmonic currents and the problems they cause, an increasingly more important feature today is the quality of the generated power waveform and how well it interacts with today's light sources. As production gets more electronically sophisticated, a thorough understanding of the demands placed on portable generators by such production equipment is necessary in order to generate power that is clean and reliable. To generate power safely, it is important to understand the grounding requirements of the different types of portable generators. It is the intent of the article mentioned in my previous post to establish a foundation of knowledge that will enable us to build a new production system that generates the clean stable set power capable of operating larger lights, or more smaller lights, off of portable gas generators like the Honda EU6500s or EU7000s than has ever been possible before. With this knowledge we will be able to also parallel two Honda EU6500 or EU7000 generators for an unprecedented 100A or 120A output from putt-putts. Guy Holt ScreenLight & Grip Lighting Rental and Sales in Boston
-
To put things in perspective, no generator puts out a sinusoidal voltage waveform. A pure sinusoidal voltage, like the one represented below, is a conceptual quantity produced by an ideal AC generator built with finely distributed stator and field windings that operate in a uniform magnetic field. Since in reality neither the winding distribution nor the magnetic field can be uniform in a working AC generator (not even power plant generators), voltage waveform distortions exist, and the voltage-time relationship deviates from a pure sine function. Typically, the distortion of grid power is very small (less than 3%), but nonetheless it exists. It is an altogether different situation when it comes to generators. Since, there is a direct trade off between generator cost and quality of the power waveform, voltage distortion in the original power waveform varies greatly between types of generators. While these distortions are generally very small relative to the distortion that can be caused by non-linear loads, they may still be significant because the harmonics both sources generate will sum together in the neutral and promote high and therefore, potentially troublesome, neutral currents in distribution system conductors. One design factor that generator manufacturers use to control the magnitude and orders of harmonics produced in a generator is the “pitch factor” of the stator. For example, the graph below illustrates the line-to-neutral voltages of two dissimilarly pitched generators. As can be seen here, a 5/6th pitch winding (the black line) generates a voltage with a slightly higher peak, while a 2/3rd pitch winding (the red line) generates a somewhat flat-topped voltage waveform. The imperfect voltage waveform created by a generator may be described in terms of its fundamental frequency and the magnitude of the harmonic voltages that make it up. The pitch of a generator is a design parameter that can therefore be used to optimize the generator waveform shape, but unfortunately at the expense of generator cost. That is because shorter pitch (lower fractional pitch ratios) use the alternator stator less effectively and require the use of more copper for the same kW output than higher pitch machines. For example, the voltage waveform generated by a full pitch stator is fairly distorted and rich in 3rd harmonics, as can be seen in the illustration above. The waveform can be improved by making the coil pitch less (as in the illustration of a 5/6th pitch coil below), but the emf induced in the shorter pitch coil is less than that of a full pitch coil and so requires the use of more copper for the same kW output. For applications that involve non-linear loads, a 2/3 pitch winding can offer significant benefit – but again at a cost. As illustrated below, a 2/3 pitch winding will not generate 3rd harmonic currents. However, the use of even more copper is required for the same output of the 5/6th or full pitch machine. In addition, the 5th and 7th harmonics generated by these machines are approximately double those generated by a standard machine. Pitch factor is an important design factor because, it can be used to reduce or eliminate specific harmonic frequencies in the generated voltage waveform, and thereby tailor the generator to specific loads. The “Crawford” generators we use in film production are 2/3 pitch and are considered a specialty pitch winding. We use them because they dampen the generation of third harmonics and therefore are the best choice for three phase, four wire systems, powering non-linear single phase loads. A 5/6 pitch generator, by comparison, will output a voltage with triplen harmonics. When used to power non-linear loads that generate triplen harmonics, the triplen harmonics from both sources will sum together in the neutral and promote high and therefore, potentially troublesome, neutral currents in distribution system conductors. In addition, the current harmonics they contribute create more severe voltage distortion throughout the distribution system. A 2/3rd pitch winding on the other hand will minimize the triplen harmonic contribution from the generator, reduce voltage waveform distortion, and will not encourage an increase in the overall triplen harmonics content in the distribution system. The reason that 2/3 pitch machines are not used in industrial applications is that the higher Fifth-order harmonics (and their multiples) cause abnormal heating in rotating load devices, such as motors, because they are “negative sequence” currents. In addition, 2/3rd pitch wound machines generally have lower zero sequence reactances that can increase the single-phase fault current. From what I saw on their website, it is likely that the Jakpower generator you will be using has a full pitch or 5/6 pitch stator. Given that likelihood, it is important that the electronic ballasts for the HMIs you use be power factor corrected (PFC). PFC ballasts will not draw 3rd harmonic currents that will be additive with the 3rd harmonics generated by the generator’s stator, resulting in lower voltage waveform distortion and return current on the neutral conductor of your distribution system. The top waveform in the power quality meter reading above shows voltage distortion caused by just one 4k HMI operating on a 60kVA 5/6th pitched generator. The “flat topping” you see here can cause sophisticated electronic equipment, like that used in a DIT station, to malfunction. Add a second non-PFC 4k ballasts, a couple of non-PFC 1.2k, and the non-PFC Kino ballasts, and the flat topping will be more severe. The Arrisun heads you will be renting are of the generation that they could either be power factor corrected or not, so it is worth finding out and not using them if they are not power factor corrected. For more details on what type of generator to use with HMIs use this link for an article I wrote on the use of portable generators in motion picture production. Harry Box, author of “The Set Lighting Technician’s Handbook” has cited my article in the Fourth Edition of the handbook. Here is what he has to say about the article: "Great work!... this is the kind of thing I think very few technician's ever get to see, and as a result many people have absolutely no idea why things stop working." "Following the prescriptions contained in this article enables the operation of bigger lights, or more smaller lights, on portable generators than has ever been possible before. Guy Holt, Gaffer ScreenLight & Grip, Lighting Rental & Sales in Boston
-
To get keep this thread rolling here is a repost from another thread called "Diffusing sunlight" This is one of those situations where scouting, choosing the right location, and planning your production day is worth more than all the grip trucks, tow generators, and large HMIs in the world. In these situations, the approach that I find works best is to choose a location that puts the sun in the backlight position for the establishing master shot and then wait until the optimum time to shoot that shot. Up to and after that point in time, shoot the close coverage under a full silk. Shooting the coverage under a silk offers a number of advantages. If the sun is in the wrong place for scene continuity with the master shot, the silk takes the directionality out of the sun and knocks down its’ level by two and half stops. Now a smaller HMI light will have more of a modeling effect. Shooting into talents' down side under a silk, I find that a 4k Par through a diffusion frame is a sufficient key source for a medium two shot and it can easily be positioned where it needs to be to match the establishing wide shot when you eventually shoot it. A good example of this approach is a scene I lit for a low budget feature that took place around a campfire in a small clearing surrounded by woods. Surrounded on all sides by woods, we knew that we would lose direct sunlight in the clearing early in the day and would need lights. We also knew that the scene was going to take all day to shoot because of its’ extensive dialogue, so we figured out where the sun was going to be throughout the day and where it would look best for our establishing wide shot. Where it was a two shot, mostly over the shoulder of one character talking to the second character that was standing with his back to the campfire with the woods behind him, we decided to wait until the sun had moved into a near back light position to shoot the establishing shot. So we shot our close coverage first with nothing more than a 4k Par and 1.2k Par under a 20x light soft frost on top of which we threw leaves. The 4k was heavily diffused and positioned so that it gave the talent the reverse key modeling that would be consistent with the wide shot but still attractive. The 1.2kw was used bare and was positioned as a backlight where the sun would be when we would eventually shoot the wide - this way there was always an edge in every shot for continuity. When the time came to shoot the establishing shot, the shadow of the overhead frame and stands were thrown forward and did not interfere with the wider framing. Since we were still shooting under the silk, we were wider open on the iris and so our exposure dug into the dark woods and brought out more detail. The smoke from the campfire drifted into the woods, creating shafts of light where the sun broke through the tree canopy. What would have been a high contrast scene without lights, turned into a beautifully lit scene, and was accomplished without a lot of amps. The whole scene was lit with nothing more than a 4k and 1.2k Par and powered by nothing more than a 60A/120 circuit from a modified 7500W Honda EU6500is with a 60A Transformer/Distro. Guy Holt, Gaffer, Screenlight and Grip, Lighting rental and sales in Boston.
-
This is one of those situations where scouting, choosing the right location, and planning your production day is worth more than all the grip trucks, tow generators, and large HMIs in the world. In these situations, the approach that I find works best is to choose a location that puts the sun in the backlight position for the establishing master shot and then wait until the optimum time to shoot that shot. Up to and after that point in time, shoot the close coverage under a full silk. Shooting the coverage under a silk offers a number of advantages. If the sun is in the wrong place for scene continuity with the master shot, the silk takes the directionality out of the sun and knocks down its’ level by two and half stops. Now a smaller HMI light will have more of a modeling effect. Shooting into talents' down side under a silk, I find that a 4k Par through a diffusion frame is a sufficient key source for a medium two shot and it can easily be positioned where it needs to be to match the establishing wide shot when you eventually shoot it. A good example of this approach is a scene I lit for a low budget feature that took place around a campfire in a small clearing surrounded by woods. Surrounded on all sides by woods, we knew that we would lose direct sunlight in the clearing early in the day and would need lights. We also knew that the scene was going to take all day to shoot because of its’ extensive dialogue, so we figured out where the sun was going to be throughout the day and where it would look best for our establishing wide shot. Where it was a two shot, mostly over the shoulder of one character talking to the second character that was standing with his back to the campfire with the woods behind him, we decided to wait until the sun had moved into a near back light position to shoot the establishing shot. So we shot our close coverage first with nothing more than a 4k Par and 1.2k Par under a 20x light soft frost on top of which we threw leaves. The 4k was heavily diffused and positioned so that it gave the talent the reverse key modeling that would be consistent with the wide shot but still attractive. The 1.2kw was used bare and was positioned as a backlight where the sun would be when we would eventually shoot the wide - this way there was always an edge in every shot for continuity. When the time came to shoot the establishing shot, the shadow of the overhead frame and stands were thrown forward and did not interfere with the wider framing. Since we were still shooting under the silk, we were wider open on the iris and so our exposure dug into the dark woods and brought out more detail. The smoke from the campfire drifted into the woods, creating shafts of light where the sun broke through the tree canopy. What would have been a high contrast scene without lights, turned into a beautifully lit scene, and was accomplished without a lot of amps. The whole scene was lit with nothing more than a 4k and 1.2k Par and powered by nothing more than a 60A/120 circuit from a modified 7500W Honda EU6500is with a 60A Transformer/Distro. Guy Holt, Gaffer, Screenlight and Grip, Lighting rental and sales in Boston.
-
To get keep this thread rolling here is a repost from another thread "Getting A Similar Look to This Scene from Grand Budapest Hotel." Gareth Daklin-Wren, on 08 May 2016 - 01:06 AM, said: Any thoughts on keeping that look consistent with changing color temp and weather over multiple days? A couple of tungsten 1Ks and an open face 650 won’t be enough to establish continuity between shots over several days unless you can gel the sliding glass doors with an 85/ND9 gel and tent the outside of the doors with a large 12x12 solid. When shooting interiors with windows you have two basic problems: color temperature and the extreme contrast between the interior and exterior. Without either gelling the windows or substantially boosting the light levels inside, when you expose for your talent, your white curtains, which are being backlit by the exterior light, will blow out. If you expose for your white curtains to hold detail, your talent will be underexposed and become a near silhouette and those dark wood kitchen cabinets will become a black hole. Without gelling the windows to 3200K, using 3200K balanced lights doesn’t make a lot of sense. Balancing tungsten to 5500K is not very efficient because full color temperature blue correction gel (Full CTB) cuts the output of the light by 70% in converting it to 5500K. A 1k light becomes a 300W 5500K light when you put Full CTB on it. The output you get after correction will not be enough to light your talent with the windows uncorrected. Covering the windows with a combination 85/ND9 gel will convert the daylight coming in the windows to 3200K so that you can use your tungsten lights at full strength, and it will knock down the level of your white curtains by three stops, so that your tungsten lights will be more effective at reducing the extreme contrast between the windows and the interior. But, where a roll of 85/ND9 gel will set you back $140.00, it will be expensive and time consuming to gel sliding class doors of that size. Since it is a long scene that will be shot over several days, you will also need to control the daylight hitting the glass doors from the outside. That’s where the 12x12 tent outside the doors comes in. It will keep direct sun from hitting the doors so that only the “sky shine”, which is pretty consistent throughout a day, will be lighting the backside of the white curtains. But, since there is always the possibility that you will get a mix of sunny and overcast days, I would recommend that you use an HMI outside to throw your own consistent light on the white curtains from outside. The alternative approach is to use daylight balanced fluorescent or LED fixtures inside. A good example of this approach is an American Experience program titled “The Most Dangerous Women in America” about Typhoid Mary that I lit for PBS. For part of her life Typhoid Mary was quarantined on an island in New York's East River. Typhoid Mary in quarantine on an island in New York's East River. Note the view out the window of the East River shoreline at the turn of the century. Because New York’s East River today looks nothing like it did when she was in quarantine, we used a 30' blowup of a picture of the East River at the turn of the century rigged outside the windows of a house in Arlington MA. We wanted to overexpose the exterior by one stop so that it would look realistic and hide the fact that the exterior was a blow-up. As you can see in the production still of the exterior of the actual location used for the quarantine island, we rigged a solid over the porch windows and the blow-up to keep the sun off both. That way we could light the blow-up and interior so that it remained consistent even though the sun moved on and off the porch in the course of the day. To take the edge off the blow-up, we used a single scrim outside the window to help throw it out of focus. The actual exterior of Mary’s cottage was the backyard of a house in Arlington Ma with a 30’ blow up of a picture of New York’s East River shoreline at the turn of the century. To maintain continuity between shots, we brought a 4kw HMI Par in a window on one side of the room as a sun source and a 1200 par through a window on the other side as a northern light source. We powered both heads off a dryer plug in the laundry room of the house using a 60A transformer/distro. The two 2.5k Par lights used outside to light the blow-up were powered by a modified Honda EU6500is through a second 60A transformer/distro. Since the Honda EU6500is could be placed right on the lawn, we were saved from running hundreds of feet of feeder back to a tow generator. Use this link for more production stills of PBS and History Channel historical documentaries where I took a similar approach. Guy Holt, Gaffer, SreenLight & Grip, Lighting Rental & Sales in Boston
-
A couple of tungsten 1Ks and an open face 650 won’t be enough to establish continuity between shots over several days unless you can gel the sliding glass doors with an 85/ND9 gel and tent the outside of the doors with a large 12x12 solid. When shooting interiors with windows you have two basic problems: color temperature and the extreme contrast between the interior and exterior. Without either gelling the windows or substantially boosting the light levels inside, when you expose for your talent, your white curtains, which are being backlit by the exterior light, will blow out. If you expose for your white curtains to hold detail, your talent will be underexposed and become a near silhouette and those dark wood kitchen cabinets will become a black hole. Without gelling the windows to 3200K, using 3200K balanced lights doesn’t make a lot of sense. Balancing tungsten to 5500K is not very efficient because full color temperature blue correction gel (Full CTB) cuts the output of the light by 70% in converting it to 5500K. A 1k light becomes a 300W 5500K light when you put Full CTB on it. The output you get after correction will not be enough to light your talent with the windows uncorrected. Covering the windows with a combination 85/ND9 gel will convert the daylight coming in the windows to 3200K so that you can use your tungsten lights at full strength, and it will knock down the level of your white curtains by three stops, so that your tungsten lights will be more effective at reducing the extreme contrast between the windows and the interior. But, where a roll of 85/ND9 gel will set you back $140.00, it will be expensive and time consuming to gel sliding class doors of that size. Since it is a long scene that will be shot over several days, you will also need to control the daylight hitting the glass doors from the outside. That’s where the 12x12 tent outside the doors comes in. It will keep direct sun from hitting the doors so that only the “sky shine”, which is pretty consistent throughout a day, will be lighting the backside of the white curtains. But, since there is always the possibility that you will get a mix of sunny and overcast days, I would recommend that you use an HMI outside to throw your own consistent light on the white curtains from outside. The alternative approach is to use daylight balanced fluorescent or LED fixtures inside. A good example of this approach is an American Experience program titled “The Most Dangerous Women in America” about Typhoid Mary that I lit for PBS. For part of her life Typhoid Mary was quarantined on an island in New York's East River. Typhoid Mary in quarantine on an island in New York's East River. Note the view out the window of the East River shoreline at the turn of the century. Because New York’s East River today looks nothing like it did when she was in quarantine, we used a 30' blowup of a picture of the East River at the turn of the century rigged outside the windows of a house in Arlington MA. We wanted to overexpose the exterior by one stop so that it would look realistic and hide the fact that the exterior was a blow-up. As you can see in the production still of the exterior of the actual location used for the quarantine island, we rigged a solid over the porch windows and the blow-up to keep the sun off both. That way we could light the blow-up and interior so that it remained consistent even though the sun moved on and off the porch in the course of the day. To take the edge off the blow-up, we used a single scrim outside the window to help throw it out of focus. The actual exterior of Mary’s cottage was the backyard of a house in Arlington Ma with a 30’ blow up of a picture of New York’s East River shoreline at the turn of the century. To maintain continuity between shots, we brought a 4kw HMI Par in a window on one side of the room as a sun source and a 1200 par through a window on the other side as a northern light source. We powered both heads off a dryer plug in the laundry room of the house using a 60A transformer/distro. The two 2.5k Par lights used outside to light the blow-up were powered by a modified Honda EU6500is through a second 60A transformer/distro. Since the Honda EU6500is could be placed right on the lawn, we were saved from running hundreds of feet of feeder back to a tow generator. Use this link for more production stills of PBS and History Channel historical documentaries where I took a similar approach. Guy Holt, Gaffer, SreenLight & Grip, Lighting Rental & Sales in Boston
- 7 replies
-
- 2
-

-

-
- lighting
- robert yeoman
- (and 2 more)
-
Don’t try to light your talent with only practicals. After exposing for the light they throw on the talent several feet away, the practicals themselves will blow out. Not only is supplemental lighting required to light your talent, but practicals must be treated to make them look realistic. I find that practical lamps never look convincing unless one treats the lampshade as well as boost the bulb wattage. That is because if you stop down to keep the shade from burning out, the output of the practical, on the table it sits on or the wall its on, looks rather anemic. I find you get a more realistic look if you boost the wattage of the bulb and line the inside of the shade with ND gel. It is a delicate balance to obtain. You can obtain this delicate balance without a monitor, by using the old school method with incident and spot meters and a selection of practical bulbs including PH 211, 212, and 213 bulbs. Years ago Walter Lassaley, BSC, instructed me to balance practical’s such that an incident reading of the direct output one foot away from the bulb is one stop over exposure. I have found that rule of thumb gives a realistic output to the practical - the light emitted downward onto the table top and upward onto the wall or ceiling is realistic. After establishing the practical’s output using an incident meter, you then use a spot meter to determine how dense an ND gel is needed to line the inside of the shade so that the shade does not become too hot. The scene above from “Millers Crossing” lit by Barry Sonnenfeld is a good example. The table practical appears to be the only source of light in the scene, but clearly it takes more than just the table practical to light the room realistically. For a good explanation see David Mullen’s analysis at http://www.cinematography.com/index.php?showtopic=55891 is a good example. Guy Holt, Gaffer, ScreenLight & Grip, Lighting Sales and Rentals in Boston.
-
New 1000w Plasma Lights from Hive.
Guy Holt replied to Mark Kenfield's topic in Lighting for Film & Video
I do think the Hive fixtures offer enough advantages over comparable sized HMIs and LEDs that they will find a place in production and on the shelves of rental. Here’s my thinking: Plasma emitters use solid state, hardened components that improve their reliability under harsh location production. Plasma bulbs are rugged and vibration resistant, and so will not break the way HMIs bulbs do. Since the LEP emitter is extremely compact the emitter, driver, and power supply can all fit in the lamp head eliminating the need for a separate ballast connected by header cables (the acknowledged Achilles heel of HMI systems.) Finally, with much lower UV emissions, LEPs do not require elaborate and ultimately finicky safety switches. In total, LEPs have an order of magnitude better reliability than conventional HMI lamp heads while offering the same full color spectrum needed for motion picture production. Since their light output is not a function of the AC line frequency as it is with HMIs, LEP lamps are flicker free at all shutter angles and all frame rates (even extreme high speed frame rates.) Finally, Power Factor Correction (PFC) is standard in LEP lamp heads where it is not in HMI ballasts. As a result, it uses power more efficiently than the less expensive non-PFC HMIs (the K5600 Jokers) and they generate virtually no line noise. Where, it is as much the Harmonic Noise that non-PFC electronic HMI ballasts kick back into the power stream, as it is the higher Apparent Power of non-PFC electronic HMI ballasts, that limits the total number of them that can be reliably operated on conventional portable generators; the efficiency and near unity Power Factor of LEP heads means that you can operate more of them on portable gas generators (use this link for details.) For instance, you can only safely operate four 575W HMIs with non-PFC electronic ballasts on a 6500W portable AVR generator, where you should be able to operate 23 of the Hive Wasp LEP heads (each with an output comparable to a 575W HMI) on the enhanced 7500W output of our modified Honda EU6500is. That is a major increase in production capability with portable gas generators that is possible with LEP heads that is not possible with electronic HMI ballasts. To put that in perspective, to not have to rent a movie blimped tow generator in order to obtain decent production values with High Def cameras is a much bigger cost savings than just the difference in the rental price of the equipment. Until recently, to power HMI lights over 1.2kw or Quartz lights over 2kw required a large diesel movie generator. Movie generators are not only expensive to rent, but they come with hidden costs that usually break the budget of independently funded movie productions or regional commercial spot productions. Movie generators require special tow equipment not found on Ryder or Penske rental trucks. For that reason, movie generators require that you rent a more expensive grip truck from a rental house in order to tow them. Rental companies will not send out a grip truck without a company driver - further adding to the expense of renting a movie generator (driver rates typically run about $400/10hrs with overtime after 10hr). Though you will probably have to pay a higher rate for the Hive fixtures than comparable sized HMIs, the ability to operate them on small portable generators and common wall outlets translates into a net savings compared to the cost of a diesel tow plant, a truck to tow it, the feeder cable, and the man power to set it all up. Set of Chevy Volt Spot powered by nothing more than a Honda EU6500 In fact, something of a milestone was recently set when a commercial for the Chevy Volt was shot with nothing more than Hive Plasma lights operating on batteries and a 60A generator. Normally, sets for car spots are cluttered with diesel generators, large feeder cables and the multiphase distribution boxes required to power big lights, cameras, and basecamp trailers. A proof of concept spot for Hive, the spot was the first car commercial ever made where everything was powered by batteries and a 60A Honda EU6500is generator. Use this link to see the commercial and the behind-the-scenes “making of” video. Where LEP is a radically new technology, there is a lot for the end user to get their head around. But the benefits are real and so it is just a matter of time before they will catch on. For more details about the benefits to using LEPs verses LEDs or HMIs, see a newsletter article I wrote the use of portable generators in motion picture production. It is available at http://www.screenlightandgrip.com/html/emailnewsletter_generators.html#anchorHigh%20Output%20LEPs. Guy Holt, Gaffer ScreenLight & Grip Lighting Rentals & Sales in Boston -
HMI to Tungsten Lumen Efficiency
Guy Holt replied to Mark Kenfield's topic in Lighting for Film & Video
There is factor not yet discussed that may attribute to this phenomena. The HMI spectrum consists of a large ultra-violet component that can be dangerous if exposed to for an extended period of time. For this reason HMI fixtures incorporate UV filtration. On the open face ARRIMAX fixtures and Par fixtures, it consists of a thin perfectly clear sheet of glass. On Fresnel fixtures the UV filtration is in the Fresnel lens itself. You can see this clearly if you hold up a Fresnel lens from an HMI next to a Fresnel lens from a quartz head – they are not the same glass. The spectrum generated by tungsten lamps, by comparison, don’t include dangerous wavelengths and so the lens doesn’t have to filter out part of the spectrum. For this reason, the tungsten lamp/lens combination is more efficient, since it doesn’t filter out part of the spectrum generated by the lamp. This would also account for why, as Mark has noticed, the efficiency of HMI Fresnels get worse with the bigger lights. The bigger lights require bigger lens that also have to be thicker to maintain structural integrity under the higher heat generated by the bigger lamps. Guy Holt, Gaffer, ScreenLight & Grip, Lighting Rental and Sales in Boston -
To get this thread rolling here is a repost from another thread "Lighting setups on moving car" (http://www.cinematography.com/index.php?showtopic=70910) I’m afraid your LED 1x1 Panels are not going to be enough to light the interior of the car on day scenes. On car setups like this you face an extreme contrast problem during the day. If you were to expose for your talent, even with the LED panels on, the exterior as seen through the back and side windows will blow out. If you expose to hold detail in what you see outside the car, your talent is under lit and will be underexposed. The problem is that you are shooting into a black hole. To the contrast problem a second problem is that when the windshield glass is backed by black it becomes a mirror and will reflect the sky above. The challenge of these set-ups is that you need to both pick-up the levels inside the car (not easily done with 1x1 LED panels on a bright sunny day) as well as eliminate whatever it is (usually a bright sky) that reflects in the wind shield. Below is a picture of how a big budget movie approaches these problem. Note that they have rigged an 8x8 solid "eyebrow" out over the windshield so that only black will reflect into it. They are also using an Arri M40 4k HMI (equivalent output to a 6k HMI Par) to pick up the interior of the car. Because all this gear obstructs the view of the driver, but also because it is quite often too much for an actor to act and drive at the same time without getting into an accident, the big movies tow the picture car behind a camera truck with an onboard generator to power the lights. If a process trailer like that pictured above is not in your budget. A less expensive alternative is to rent a “car carrier” to tow behind a pick-up truck. A number of low budget indie productions I have worked on have done this with great success. A partially built car process trailer. Rosco Scrim still to be applied to windows and a 8x8 solid tobe still rigged to roof rack. To reduce reflections in the front windshield, you should likewise rig a large solid on top of the car. To also reduce the contrast range inside the vehicle the solid should extend several feet out on all sides as well. This way you will not have to deal with any direct sun on your talent and can light them through the front windshield for better modeling and continuity. To reduce the size of HMI that you need to light your talent, you can reduce the contrast between the interior and exterior of the car as seen through the back and side windows by putting Rosco Srim #3421 over them (any window that will appear in a shot.) This scrim will act like a Neutral Density gel and reduce the intensity of what is seen through the window by allowing a specific amount of light (two stops) through fine holes in the material. When it is slightly over exposed you don’t see the scrim itself but just what is on the other side. It is better than Neutral Density Gels in this situation because it is more pliable and less likely to wrinkle and shimmer as the car is traveling down the road. Even after this contrast control, you will still need a light that is larger than what you can power with an onboard battery or through the car lighter socket. Car lighter sockets are only capable of handling a couple of hundred Watts at most and you usually require at least a 400-575W HMI to light your talent during a day scene. To power a small HMI on the hood of the car you can use a "Battverter" - which is a Battery/Inverter system. A "Battverter" system consists of a 12V DC power source (usually large Marine Cells), a DC-to–AC True Sine Wave Power Inverter, and a Battery Charger. Wire these components into a Road Case or milk crate and you can put it on the floor in the back of the car. Here are some production stills that show you two Battverter systems I built to run lights in vehicles at various times. The first is a 750W "Battverter" rig wired into in Calzone case. To maximize the running time on the batteries, I made up a "jumper cable" that we attached to the leads of the pickup truck's battery. That way the engine alternator charged the batteries as they were being discharged by the light. Tie–ing the Battverter into a vehicle engine will extend the running time on your Battverter batteries so much that they may never run out of power. The production stills below show a more elaborate 1800W Battverter system that I built to run 16 - 4’ kinos tubes inside an airport shuttle bus. Use this link - http://www.screenlightandgrip.com/html/shuttlemailintro.html - for details on how we wired it into the shuttle bus. Kino Flo 4x4s rigged to an exo-skeletal frame of a Shuttle Bus and powered by an 1800W Battverter Custom 1800W BattVerter powers 16 - 4' Kino Flo single tubes rigged in the interior and on the exterior of an Airport Shuttle When building these rigs, keep in mind that when voltage goes down, amperage goes up. Wire that carries 12V DC has to be much larger than that which carries the same load at 120V AC. For instance to supply 12 volts to the 1800W inverter used on the shuttle bus required that we run 2 Ought feeder to the bus' alternator. Also be sure that the alternator is large enough to take the load without burning out. Finally, You have to be really careful when choosing a DC-to-AC inverter for film production because there are three basic types of inverters and not all of them are suitable for all types of motion picture lights. For more information on what type of inverters to use with different type of lights I would suggest you read an article I wrote about portable generators that is available online (use this link.) Since inverter generators use the same three types of inverters, the information in the article is applicable to stand alone DC-to-AC inverters designed for use with batteries as well. If you don’t want to tie batteries into the car’s alternator, you should consider using a small portable generator. But, you don’t want to use a generator, like the Honda 2000, whose fuel is gravity fed to the engine. The size head it can power is limited and the fuel will slosh around and cause the generator to run erratically. I suggest you instead use a generator that has an electric fuel pump like the new fuel-injected EU7000. The fuel pump assures that the engine receives a continuous feed of gas. When used with a 60A transformer/distro, the EU7000 is capable of powering HMIs up to 4k and it is so quiet that you will not hear it in the car with the windows closed. As you can see from the picture below of another rig, a generator this size with a 60A transformer/distro is cable of powering even a couple of 2.5 HMIs for daylight fill. A 7500W modified Honda EU6500 powering a couple of 2.5HMI Pars on a car rig. If you have any questions about using inverters or generators, I would suggest you read the article I wrote on the use of portable generators in motion picture production mentioned above. Use this link to read it on-line for free. Guy Holt, Gaffer, SceenLight & Grip, Lighting and Grip Rental & Sales in Boston.
-
Lighting setups on a moving car
Guy Holt replied to Bradley Stearn's topic in Lighting for Film & Video
I’m afraid your LED 1x1 Panels are not going to be enough to light the interior of the car on day scenes. On car setups like this you face an extreme contrast problem during the day. If you were to expose for your talent, even with the LED panels on, the exterior as seen through the back and side windows will blow out. If you expose to hold detail in what you see outside the car, your talent is under lit and will be underexposed. The problem is that you are shooting into a black hole. To the contrast problem a second problem is that when the windshield glass is backed by black it becomes a mirror and will reflect the sky above. The challenge of these set-ups is that you need to both pick-up the levels inside the car (not easily done with 1x1 LED panels on a bright sunny day) as well as eliminate whatever it is (usually a bright sky) that reflects in the wind shield. Below is a picture of how a big budget movie approaches these problem. Note that they have rigged an 8x8 solid out over the windshield so that only black will reflect into it. They are also using an Arri M40 4k HMI (equivalent output to a 6k HMI Par) to pick up the interior of the car. Because all this gear obstructs the view of the driver, but also because it is quite often too much for an actor to act and drive at the same time without getting into an accident, the big movies tow the picture car behind a camera truck with an onboard generator to power the lights. If a process trailer like that pictured above is not in your budget. A less expensive alternative is to rent a “car carrier” to tow behind a pick-up truck. A number of low budget indie productions I have worked on have done this with great success. A partially built car process trailer. Rosco Scrim still needs to be applied to windows and a 8x8 solid still needs to be rigged to the roof rack. To reduce reflections in the front windshield, you should likewise rig a large solid on top of the car. To also reduce the contrast range inside the vehicle the solid should extend several feet out on all sides as well. This way you will not have to deal with any direct sun on your talent and can light them through the front windshield for better modeling and continuity. To reduce the size of HMI that you need to light your talent, you can reduce the contrast between the interior and exterior of the car as seen through the back and side windows by putting Rosco Srim #3421 over them (any window that will appear in a shot.) This scrim will act like a Neutral Density gel and reduce the intensity of what is seen through the window by allowing a specific amount of light (two stops) through fine holes in the material. When it is slightly over exposed you don’t see the scrim itself but just what is on the other side. It is better than Neutral Density Gels in this situation because it is more pliable and less likely to wrinkle and shimmer as the car is traveling down the road. Even after this contrast control, you will still need a light that is larger than what you can power with an onboard battery or through the car lighter socket. Car lighter sockets are only capable of handling a couple of hundred Watts at most and you usually require at least a 400-575W HMI to light your talent during a day scene. To power a small HMI on the hood of the car you can use a "Battverter" - which is a Battery/Inverter system. A "Battverter" system consists of a 12V DC power source (usually large Marine Cells), a DC-to–AC True Sine Wave Power Inverter, and a Battery Charger. Wire these components into a Road Case or milk crate and you can put it on the floor in the back of the car. Here are some production stills that show you two Battverter systems I built to run lights in vehicles at various times. The first is a 750W "Battverter" rig wired into in Calzone case. To maximize the running time on the batteries, I made up a "jumper cable" that we attached to the leads of the pickup truck's battery. That way the engine alternator charged the batteries as they were being discharged by the light. Tie–ing the Battverter into a vehicle engine will extend the running time on your Battverter batteries so much that they may never run out of power. The production stills below show a more elaborate 1800W Battverter system that I built to run 16 - 4’ kinos tubes inside an airport shuttle bus. Use this link - http://www.screenlightandgrip.com/html/shuttlemailintro.html - for details on how we wired it into the shuttle bus. Kino Flo 4x4s rigged to an exo-skeletal frame of a Shuttle Bus and powered by an 1800W Battverter Custom 1800W BattVerter powers 16 - 4' Kino Flo single tubes rigged in the interior and on the exterior of an Airport Shuttle When building these rigs, keep in mind that when voltage goes down, amperage goes up. Wire that carries 12V DC has to be much larger than that which carries the same load at 120V AC. For instance to supply 12 volts to the 1800W inverter used on the shuttle bus required that we run 2 Ought feeder to the bus' alternator. Also be sure that the alternator is large enough to take the load without burning out. Finally, You have to be really careful when choosing a DC-to-AC inverter for film production because there are three basic types of inverters and not all of them are suitable for all types of motion picture lights. For more information on what type of inverters to use with different type of lights I would suggest you read an article I wrote about portable generators that is available online (use this link.) Since inverter generators use the same three types of inverters, the information in the article is applicable to stand alone DC-to-AC inverters designed for use with batteries as well. If you don’t want to tie batteries into the car’s alternator, you should consider using a small portable generator. But, you don’t want to use a generator, like the Honda 2000, whose fuel is gravity fed to the engine. The size head it can power is limited and the fuel will slosh around and cause the generator to run erratically. I suggest you instead use a generator that has an electric fuel pump like the new fuel-injected EU7000. The fuel pump assures that the engine receives a continuous feed of gas. When used with a 60A transformer/distro, the EU7000 is capable of powering HMIs up to 4k and it is so quiet that you will not hear it in the car with the windows closed. As you can see from the picture below of another rig, a generator this size with a 60A transformer/distro is cable of powering even a couple of 2.5 HMIs for daylight fill. A 7500W modified Honda EU6500 powering a couple of 2.5HMI Pars on a car rig. If you have any questions about using inverters or generators, I would suggest you read the article I wrote on the use of portable generators in motion picture production mentioned above. Use this link to read it on-line for free. Guy Holt, Gaffer, SceenLight & Grip, Lighting Rental & Sales in Boston.