Gregg MacPherson
-
Posts
2,638 -
Joined
-
Last visited
Everything posted by Gregg MacPherson
-
Eclair ACL 1.5 newbie questions (with pictures!)
Gregg MacPherson replied to Duncan Brown's topic in Eclair
For the Jaeger, did you try Jean Louis Seguin? He may have some old stock or some ideas. The original plastic cannon 9 pin, with tails, I have got from VP before, was $25 then, they probably still have. But if the metal body ones are interchangeable it's worth the money. Gregg. -
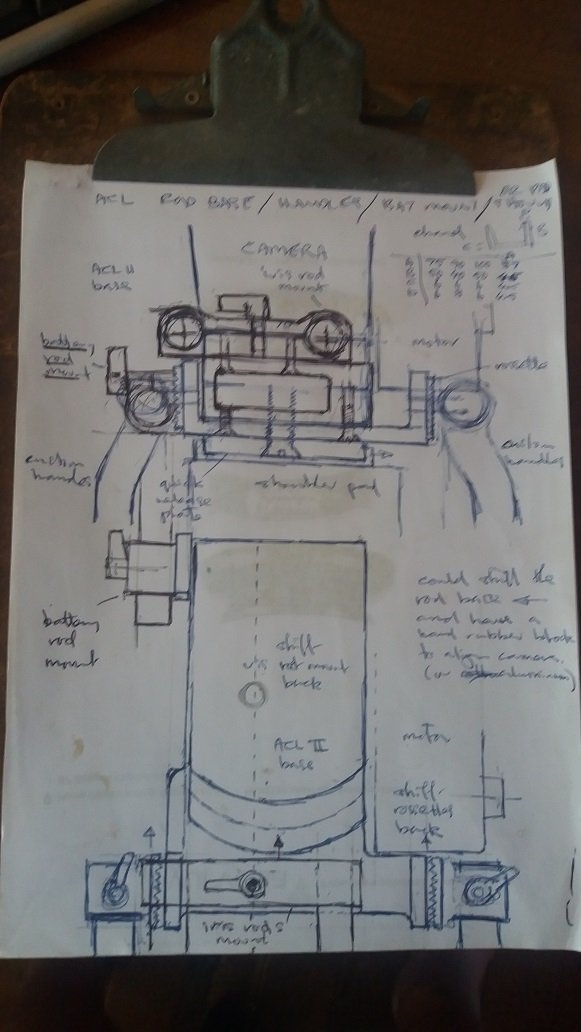
In the idea in my sketch the camera base can snug right into the corner of the C section aluminum. Just need to mill or file out the corner radius. The vertical for the RH rossette is forward of that so the corner radius remains there. Battery rod mount should be less stressed so a had corner may be ok there. With the battery rod mount, sofar all I was doing was trying to improve the mass distribution of the camera, shifting the batt to the rear. It could go all the way to the back of the mag. I never used any of the modern battery systems so I don't know what they require, but one could design a small generalised mounting fitting or plate that clamped onto the battery rod, and tucked around the back of the mag. Then whatever generic or ad hoc battery mounts required could screw to that. If the battery rod/mount idea can be a single rod and cope ok with the torque on the rod due to the offset battery position, good. Other battery positions possible, like beside the mag, but as far back as pos. In that case the mass distribution, L R wise, is same as with the normal onboard battery.
-
Second thoughts, the rod mount won't hide the cannon 9 pin connector. No problem, it will just have a protective cover screwed to the camera body.. The sketch shows a rod base made from a 100x40x6mm C section. A smaller than 100mm width is possible. Just saw some 80x40x6mm rect section in the catalogue. When one looks at the side elevation (can show later) there is room to shift the rosettes and iris rod clamp rearward. The LH rossette sneaks under the motor a bit. Gregg.
-
Duncan's ACL 1.5 "show and tell" reminded me of ideas percolating on an integrated iris rod, handles, battery and shoulder pad mount system for ACL. I had a fun idea a while ago that was conceived with a casting with 19mm rod mounts giving the handle mounts. But that's a lot of work unless one has skills and a mill to machine the casting. So the current idea is just conceived as being cut from an aluminum angle section or C section. Single handle version... An aluminum angle with a vertical face on the RH side. Chinese rossette for a side handle. 9 pin cannon connection safely hidden behind vertical face. Chinese 15mm iris rod clamps screwed to a riser at the front of the horizontal face. The two handle version... An aluminum C section so you have vertical faces on left and right sides of camera, rossettes each side for handles. Same 15mm iris rod clamp idea. A single rod clamp at the right rear for battery mount options. The ideas that I thought about before beginning the exercise. - All load taken through the 3/8" mount under the camera base. - The hand held rig will fit straight onto a tripod. - Maybe a shoulder pad can fit to the quick release plate. - Need good access to the original switch even if switching with the 9 pin cannon on the RH side. - Rod mount must be close enough to the body so that follow focus can reach prime lenses. - Develop some extension to the rear that allows battery position to the rear. Maybe a single rod offset from the mag. The sketch below shows the ACL II version. If I get a chance I will make an an AUTOCAD drawing so these are easy to make Cheers, Gregg.

-
Eclair ACL 1.5 newbie questions (with pictures!)
Gregg MacPherson replied to Duncan Brown's topic in Eclair
Just thought how easy it would be to make up a rod base with handle mount(s) for your 1.5. All load taken through the 3/8" mount under the camera base. I prefer to do my thinking with drawings rather than thinking out loud but.... An aluminum angle with a vertical face on the RH side. Chinese rossette for a side handle. 9 pin cannon connection safely hidden behind vertical face. Chinese15mm rod clamps screwed to the front of the horizontal face. The two handle version. An aluminum C section so you have vertical faces on left and right sides of camera, so a rossette each side. Same 15mm rod clamp idea. One needs to look carefully at the drawings or model first, but some people just do, fiddle, play, refine... The ideas that I thought about before on this type exercise. - The hand held rig will fit straight onto a tripod. - Maybe a shoulder pad can fit to the quick release plate. - Need good access to the original switch even if switching with the 9 pin cannon on the RH side. - Rod mount must be close enough to the body so that follow focus can reach prime lenses. - Develop some extension to the rear that allows battery position to the rear. Maybe a single rod offset from the mag. Cheers, Gregg. -
Eclair ACL 1.5 newbie questions (with pictures!)
Gregg MacPherson replied to Duncan Brown's topic in Eclair
I'm thinking the tape spacers offset the motor a tiny bit, allowing motor mounting screws to adjust the motor/camera alignment for noise. The tape may have lost it's thickness dimension and elasticity so the exercise might have to be repeated. The differences in thickness of the various original spacer offsets may have been very small, hard to measure, but I would be curious and lay a rule between spacers and vernier down to the motor mount plate. Without carefully measuring, roughly how thick are the spacers? There is a faint chance that someone offset the motor to make it easier to press the drive pins into the rubber rather than align to the holes. Quelle horreur..! Or maybe the rubber block was non standard dimension. Probably you will just remove the spacers and see what the natural motor alignment feels like. Maybe someone can measure a rubber block for you if you want to check yours. When mounting motors be really careful and gentle. The drive pins and holes in the rubber block you can align just by eye to some arbitrary axis and they will slot in. The original plastic 9 pin cannon connectors need care when fitting the motor. You hold the motor offset in correct position and gently wiggle till the connector and drive pins slot into place. Were you able to test the rotary speed selector switch? Gregg -
Eclair ACL 1.5 newbie questions (with pictures!)
Gregg MacPherson replied to Duncan Brown's topic in Eclair
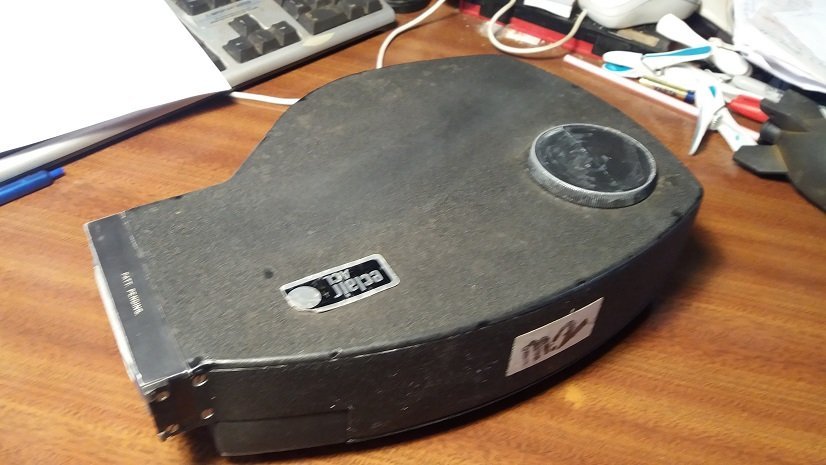
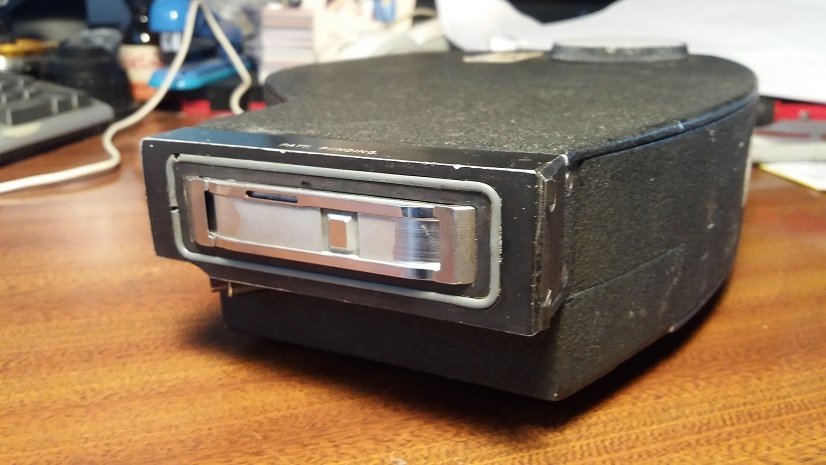
Duncan, Show and tell time, that's what they called it at my son's kindergarten (pre school). I wonder what the weight is down to with the small base and the orientable Ang viewfinder. The ACLII with big base, big motor, big Kinoptik viewfinder, video tap, ergonomic handle and battery gets heavy, like an SR, even without a zoom. The ACL I with small motor, early Ang viewfinder, zoom with battery on your belt was really light on your shoulder and nimble. If you have separate battery and are plugging/unplugging a lot with hand holding then the XLR-4 would be better at that. I'm not a fan of on board batteries, not at the weight of NiCad/NiMhi. Maybe a Lithium Ion batt is light enough. The other issue is the fore and aft mass distribution of the camera on your shoulder. Even with a prime, it's a bit front heavy, and I always dream up ways to shift the battery to the rear. So a design opportunity I think, maybe integrating rod base, handle, battery support, shoulder pad. I tried to read everything and make some notes... - I didn't understand your observation that "..the film loop comes back into the feed side of the magazine, and passes through to the takeup side internally..". It just takes an oblique path through the dividing wall, from feed to take up....Moving on. If it's a while since CLA, it doesn't hurt to take the light traps off and check for dust etc. While there check that all the rollers feel super light and free. - The Jaeger connectors on the camera get a lot of wear and tear and stress (this is less important if you aren't using it a lot). The Jaeger connector on the cable, even worse. Having the Cannon (XLR-4) on the camera like on the ACL II is a better idea (the II has the camera and battery connectors switched). On the ACLI there didn't look like there was enough depth in the base castings to do it. If the 1.5 is maybe deeper and you can do it..? Generic XLR-4 connectors are quite cheap. I gather you are good with small fiddley soldering etc. Soldering/fitting the Jaeger I found trickey, but my skills in that department are meagre. Cannon (XLR-4) is pretty easy. - The sliding run switch does feel odd at first, you get used to it. On my ACL I I had a custom double handle casting pointing to the front and it was easy to start the camera with my thumb while hand holding. The original bottom handle I don't like much. The factory ergonomic handle is really nice but give not enough position options for good hand holding. So there's some freedom to explore useful options for design of front/side handle/rods...I've seen pics of a custom made handle that fixed near the end of a rod that extended forwards, downwards 400mm at about 45deg. If using a ready made two handle set that fits to a 15mm rod set, I think some rod base designs may not be strong enough for the weight of the ACL at the rod, base connection. The little handle mounting module on the RH side that you are missing has a rossette that is a good mount for handles. It's attached to the camera with two small screws. I think the engineers think like aero engineers, applying load cases to find critical loads, and allowing for limit loads and failure loads. The result is very small screws, that may not be big enough for the modifications, adaptions and accessories that third parties apply. - The availability of components (motors, viewfinders etc) maybe comes in waves. Five or ten years ago there were quite a few components on eBay. If the weird prices from camera brokers make it hard to know what things are worth. - What's with the custom tape spacers on the motor to body connection? Was someone trying to adjust the noise level that way. Some people do it by making tiny adjustments to the motor mounting screws. Also, I see some extra holes drilled in the rubber drive block (see it at the centre of the motor mounting plate on the camera) Re these drive blocks. On a thread about flicker, Dirk DeJonghe jumped in with the comment that back in the day when ACLs were numerous and busy, a flicker problem was often traced to the rubber drive block, easy to replace. I quizzed him on what it was about, had it lost it's mechanical properties, were the holes worn, was there some untoward resonance between motor and camera, but he didn't know. Cheers, Gregg -
More pics...


-
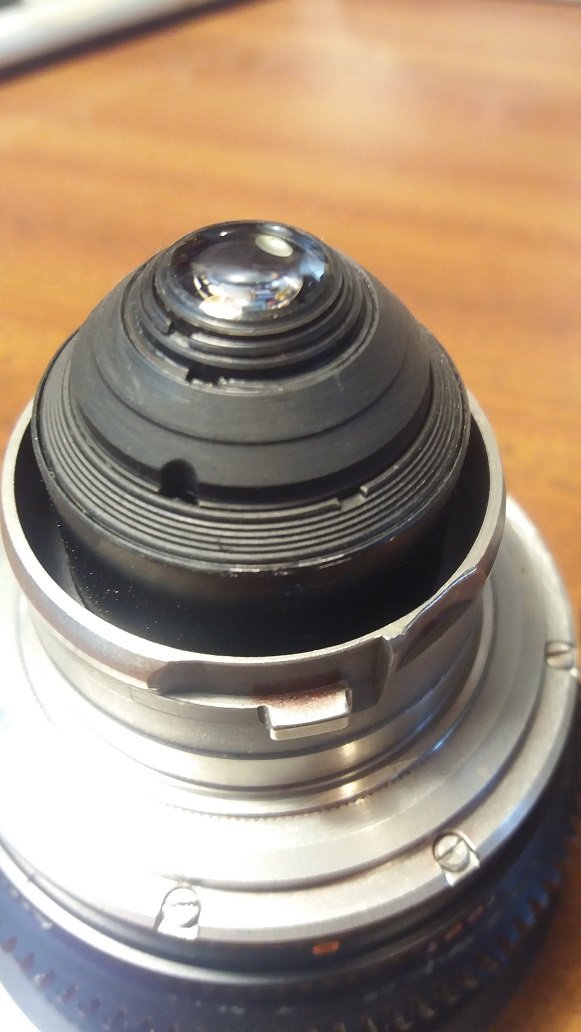
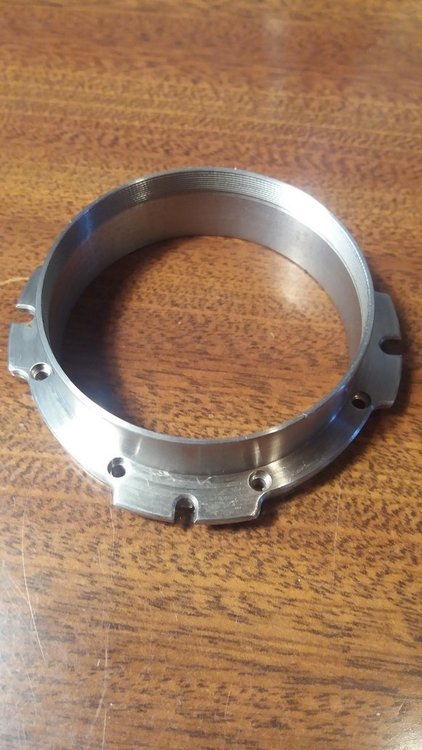
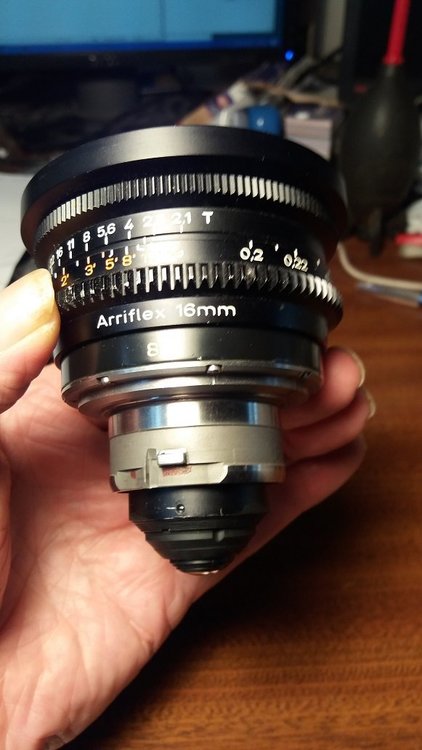
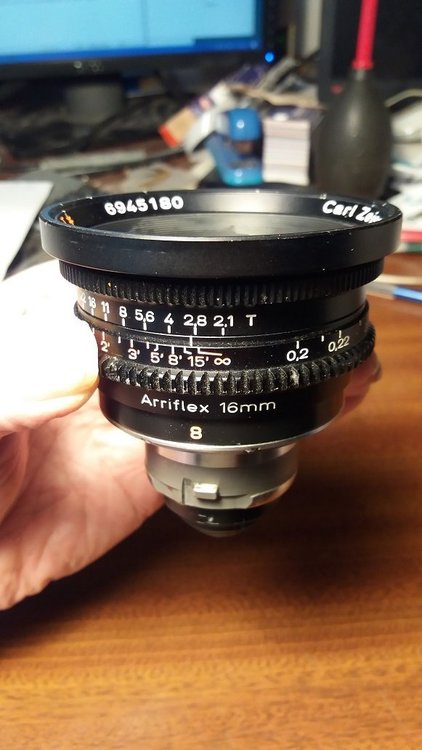
Zeiss 8mm, T2.1, Arri-B mount, with PL mount. For 16mm. These were designed for standard 16 and have a very small vignette on S16. Often used for digital with a lttle crop. Very sharp, it looked as good as the S16 format superspeeds, which resolve 200 lp/mm. It looked a good match to them. No marks, haze, fungus etc. Focus is smooth, with nice viscous damping. No bumps or defects. Iris is smooth and light. This generation of the 8mm has the same body design as a MK II superspeed but with slightly shorter barrel length. Integral focus gear and 80mm front. Focus throw is about 180deg. Focus marks in m and ft. The mount is fixed with eight screws. Comes with a stainless PL mount to replace the Arri-B mount. A lens technician will normally need to adjust collimation with shims after swapping mounts. Techs who collimate a lot with access to a lens projector are quite quick. Edit: PL mount comes without rear light baffle, but I think it has the standard thread to receive one. Some guys use them without baffles. You could 3D print one. PRICE..$1200; SHIPPING Was quoted 2-6 business days, but may be a bit longer. USA...$51.00 UK and Europe...$44.00 Other destinations just ask. No returns unless item is not as described. Any questions please ask. May have to space the pics over more posts.
-
Eclair ACL English 400'magazines (two).
Gregg MacPherson replied to Gregg MacPherson's topic in Cine Marketplace
The mint looking take up door that can go with mag2...It is missing it's light seal. It's the same diameter rubber as the throat light seal. Gregg. -
Eclair ACL English 400'magazines (two).
Gregg MacPherson replied to Gregg MacPherson's topic in Cine Marketplace
Having trouble re-activating my eBay account so I haven't listed these yet. Can sell these separately now. I have cleaned them a bit more on the outside. I have a mint looking take up door that can go with mag2. Also, Paul at VP found hollow 2mm rubber tube available on eBay very cheap, so if you wanted to replace the light seal on mag3 that's easy. New price $300/each. Shipping single mag... USA...$75 UK, Europe...$67. Any questions, or for more pics send me a PM. Gregg. EDIT: There is a guy on eBay selling 3D printed mag throat covers. -
Got a reply from Paul re the interchangeability of ACL ground glass (gg). Brings up a couple of interesting facts. Not sure why he's not on this thread himself. He often does. Maybe busy... "...The big difference in the ACL ground glasses is between the ACL-1 and ACL-2 in that the (2) has the exposure meter scale to the one side that the (1) does not... In my experience the internal light meter is of little value and if it were me prepping a camera would disconnect & discard. There is some differences between the two models in relation to the way the prisms with ground glasses mount that I am not remembering clearly at this moment but do remember that I have done work arounds in years past to allow the swap. Bernie Odoherty (Super-16 Inc. here in the states who started out at Sammy's in the late 60's) had done conversions on ACL's utilizing NPR ground glasses with a 1st-surface mirror however it is best to keep ACL ground glasses with their prisms in those cameras if at all possible.Best, Paul Scaglione..."
-
Where did you learn that from Heikki? Email from Paul S. sounds like he would happily gather ggs from dead Eclairs and have them re-etched for S16. I just asked him on that explicitly on that point so we'll see. I'm pasting most of his email below... From Paul Scaglione's email to Gregg 26/03/22 ".....what would really assure good conversions going forward for a start would be if the Eclair community as a collective could dig in their heels and find that elusive parts source overseas (the Arts Media parts) and see if and how many ground glasses are available for both the NPR's and ACL's. If there are some there, that would be a good source for sending (some) off to Shurco for conversion. Paul (Shurco) has some good stock S-16 patterns to choose from (his S-16 pattern selection attached). Custom patterns can be authored... ... As an alternative, any parts cameras that can be found (I would think there to be hundreds globally) would be a great find for a collective effort... Am I seeing a crowd-funding campaign emerging??? Once parts could be sourced to start a pipeline, I could certainly share what info I have to other capable sources out there with the will to learn and technical + machining capabilities and the future of these little engines that could can be carried forward... Best, Paul Scaglione. ....."
-
Re the idea of ordering the ground glass (gg) re-etch yourself from SHURCO. I immediately thought that unless there were spare gg in circulation, you would have to remove it yourself or use someone local, both hazardous if lacking familiarity or skill. This was to avoid having the camera sit for an extra 3 months at VP while the GG went to SHURCO. But, even if that had to happen, customer could still precommit by paying for the gg etch at the start. Are there any spare ggs out there? If all those wanting conversions could let Paul at VP know, that would affect what happens. Gregg.
-
ACL SERVICING AND S16 CONVERSION at VISUAL PRODUCTS. Summary of email from Paul Scaglione I just got a long email from Paul explaining everything. I hope it's ok if I give a short summary of facts... - The business needs him to spend more time on prepping Arri and Aatons for resale, which is more profitable. - People are unwilling to spend as much to buy or upgrade ACL compared to Arri or Aaton. - Arri and Aaton are the most common cameras in need, so VP's parts inventory and supply sources favor those. - ACL electronics are a "huge issue". There's only one guy in the States fully versed, Andrew at AZSpectrum. He has the same issue with Arri, Aaton being more profitable, so turnaround on Eclair jobs is often slow. - Ground glass re-etch has a 3 month turnaround. Only one guy can do it right. They aren't holding stock at VP. They're worth $500 each. - Quoting Paul.."Both myself and Andrzej at AZ-Spectrum will work on Eclair bits up to & including conversions however (it will) always come behind equipment sales and can unfortunately sit on the shelf for months before completion." So the two important ideas arising are... Need to be very patient and plan ahead. Parts don't seem to be a problem, just a supply time and stock cost issue for the ground glass. Maybe people could precommit to that cost, or order it themselves, maybe as a group. (VP have the IP on the etch design so it's only for jobs at VP) Paul would like to take on a trainee but the business doesn't agree yet. (if you are young and keen, go there and try to persuade them). Gregg.
-
I just emailed Paul asking the questions and inviting him to look in on this thread. Gregg.
-
I forgot about the shifting of the view finder mount. Thanks. If VP were short of a part for the conversion maybe that might change things. Paul Scaglione is the one to ask there, and it would be useful to know exactly what they are short of. I'm sure VP are able to make or get parts made if they want to. Just got email from Paul re an ACL part so he's still active. For the record, I like VP's conversions best. To be fair, Les seems like a wizard in the machine shop. Does anyone know if he does all his design and machining himself. Maybe his son works with him. I keep wondering if there are older ACL techs in Europe that we are missing. Someone could be out of circulation, in semi retirement but very useful. But the leads provoking this feeling are about 10 or more years old.
-
I was just thinking that it may save money, depending on the costs for converting the camera body. Can you let us all know what VP's price is for the conversion? Conversion of the body alone? If you have a really clean late model ACL II and can afford the conversion, maybe that is the way.
-
Hey Travis, Paul Scaglione at Visual Products is still there I think. VP have the reutation for the most thorough and high quality conversions. Les B. will be cheaper but there are less elements to his conversion. There may yet be one or two techs in Europe that are able. Trying to remember all the elements for a full ACL conversion by VP (someone let me know if I miss something)....gate, shutter mod, not sure if the mirror is moded, mirror linkage, lens re centred, magnifying block sometimes removed from the ground glass, ground glass re etched by SURCO with VP S16 design, mag rollers machined on S16 edge. The VP S16 ground glass is very nice to use. Many converted ground glass are crude, not a complete re etch, some do almost nothing at all. I don't think any ACL conversions ever had machining of the pressure plate, loop formers, guide shoes or drive sprocket. So it seems sensible to think that the later mags with the separate centre pressure plate will be better for S16. Only a very small area is actually under pressure, just like an SR. Bruce at Aranda once told me that some people just used unmodified mags for S16, with no problems. Another option. I have a bare S16 body, no motor, view finder or side handle module, converted by Paul at VP...that I was going to sell. I needs service, it was making a tick, tick, tick noise like the shutter was just touching the body casting. Paul thought it might take only 2-3 hours and would be a CLA. If interested, PM me and I can forward Pauls comments. I noticed it also needs a new 9 pin canon socket, so that will add cost. I have the part already. I don't know how to price this body, so maybe it has to go to eBay.... It used to be the only sane advice was to not convert, just wait and buy an already converted S16 version, save money. But cameras are either super scarce or priced too high by brokers... PM me if I can help. Gregg
-
Name of this connector?
Gregg MacPherson replied to Raymond Zrike's topic in Camera Operating & Gear
Daniel may be right suggesting a re-cell due to age, but if only running 24fps you may be fine for a while. Some short notes on charging rates and cell behaviour here... https://www.powerstream.com/NiMH.htm#:~:text=Fastest Charging,-hours for 1.5 hours). -
Name of this connector?
Gregg MacPherson replied to Raymond Zrike's topic in Camera Operating & Gear
If you lift the end of the battery pack up a bit and spread the opening in the plastic cover you may see the Ah spec on a cell. can do at both ends. -
Name of this connector?
Gregg MacPherson replied to Raymond Zrike's topic in Camera Operating & Gear
Reverse polarity meaning positive and negative are reversed at the camera. If all you are doing is replacing a Tamiya conector just make sure that it's black to black and red to red (assuming that the original wiring is correct). If it's not clear then get a friend who does electronics to do it for you. The two Jaeger connectors on the battery...use either. ACLs don't like the V getting low. So I would be cautious of adding more load to the battery with accessories. You need to know what the Ah is of the NiMhi cells. Ah can be a lot higher than 1.2. It will be written on the cells. Normally if you recell you note it on the case. Ask the prev owner, or just open the box. For higher fps you need the V up and the biggest Ah you can. I don't know what A for the charger, but your 900mA doesn't sound slow to me. Google it, there will be something. There is some basic electronics in my battery cases that I think is for the original Charger to read the NiCad battery behaviour. Not sure what one does with that when switching to NiMhi, maybe just ignore it. I'm not an electronics guy either, so can only guess that you have an in line voltage regulator in that pic. Last pic looks like a canon XLR-4 -
Name of this connector?
Gregg MacPherson replied to Raymond Zrike's topic in Camera Operating & Gear
Those are both Jaeger. The Canon is an XLR 4, easy to find images online. Not hard to solder but if your soldering is bad maybe the Tamiya idea is better. Be careful with battery polarity. Check the wiring diags in the manuals if you need. If just replacing one of the Tamiya connectors just keep positive to positive and neg to neg. ACLII has a fuse visible at the back of the camera base that I think protects it, ACL I does not. Reverse polarity is bad for ACLI. Does the 1.5 have a visible fuse? You could ask the prev owner whether he recelled with NiCad or NiMhi. Or open the case and see. NiCad are much harder to look after, especially if not used for months. NiMhi are much better -
Name of this connector?
Gregg MacPherson replied to Raymond Zrike's topic in Camera Operating & Gear
What connector is on your camera? 4 pin Jaeger or Canon? Are your batteries original ACL plastic cases with jaeger connector? If you have Jaeger on camera and Jaeger on battery it would explain your two cables. The connector you show is non standard, so it doesn't matter what connector is used there. But it might be useful to veer to the standard and use 4 pin Canon there. The standard ACL cable has Jaeger at one end and Canon at the other. ACLI has Jaeger on the camera and mine had Canon on the battery. ACLII has Canon on the camera and Jaeger on the battery. If you have a standard plastic battery case with Nicad cells, which are a real pain, you could switch to NiMhi cells and have less trouble if you are handy with solder. Get cells with tabs, high Ah. Need to buy a charger on eBay. Other guys have stitched together non standard battery setups for the ACL. Search the forum. Some other replies as I write. Hope this is still usefull. -
Eclair ACL English 400'magazines (two).
Gregg MacPherson replied to Gregg MacPherson's topic in Cine Marketplace
Uploading the pics was tricky. Send me your email if you want a full set of pics.