


Gregg MacPherson
-
Posts
2,638 -
Joined
-
Last visited
3 Followers

About Gregg MacPherson

- Birthday 08/20/1957
Recent Profile Visitors


-min.thumb.jpg.a19d22b59c19969f10fd8b109c0f4588.jpg)

-
Thinking of the tolerance of the Aaton base, as built. My eccentric engineer friend (EEF) and I both think, looking at the Aaton mags, that the Aaton alloy body parts were investment castings ("lost wax" at art school), that then had localised machining just at critical places. Google (AI) says that CNC "machines began appearing in small manufacturing industries in the late 1970s and 1980s". My EEF says the sixties... So the local machining to the castings could be CNC, but could also be pre CNC tech. Pre CNC can still be quite accurate, using jigs, fixtures, end stops....the positioning of the 3/8" screw hole should look almost perfect. A 1.4mm shift would be either deliberate or a big blunder. and there is no way that
-
I think the connector for that is in the base just under the XLR-4 connector. I've read somewhere that ACL II did have external controllers, both factory and 3rd party (Tobin).
-
So I mounted LTR to the Proaim 15/19mm bridge pate. There are no obvious means of alignment, so I just put a rule across the front of the bridge plate and set it parallel to the lens front.There is actually about a mm of wiggle room with the cap screws fixing the 15mm rod clamp to the bridge plate, so I could shift the 15mm rods to the right. The MB was centred well.
-
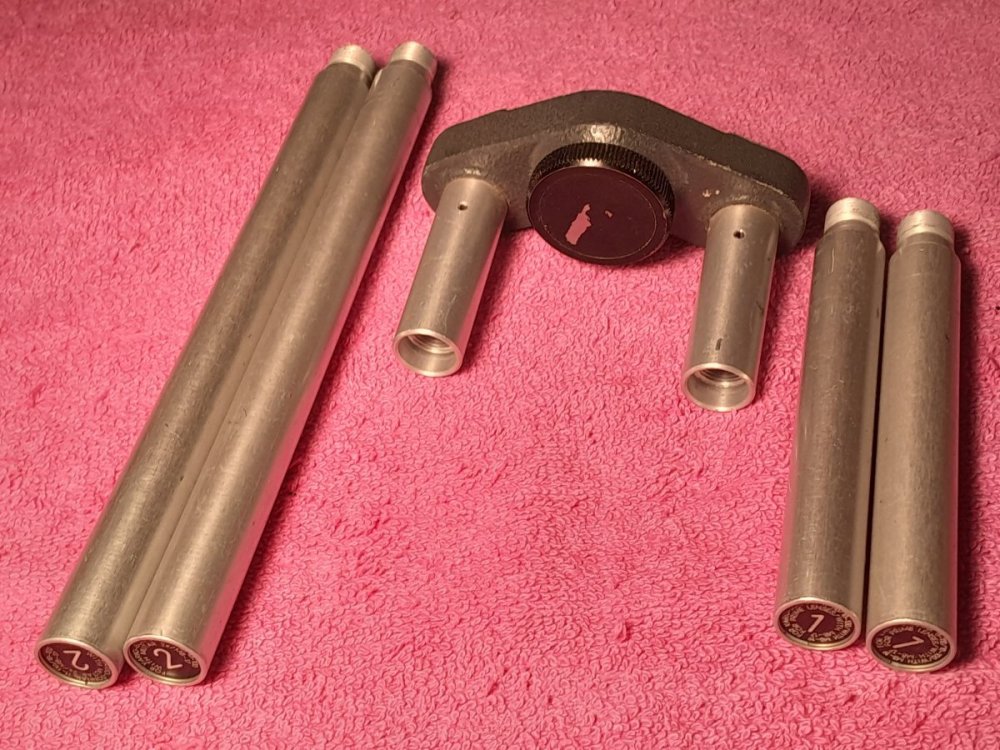
Arri-LWS-3...Light weight 15mm support rod set made for the SR3, but I think it fits the earlier SRs too. Standard 16 / S16 switchable. Rod length 44mm, plus 98mm and 170mm extensions. Fair to good overal cosmetic condition, some fine scratches on the rod surfaces. Everything fits, the 15mm clamps on the follow focus or matte box slide on easily. USD360

-
I have asked for a pic that would show it. He doesn't know what it is.
-
I had a go at measuring the offset. I was not super rigorous and I think accuracy may be +, - 1mm. The offset I got was 1.4mm to camera left. So given my estimation of the accuracy, it may not be a meaningful measurement at all. I have a Proaim bridge plate here that has, I think, the 3/8" screw centred on the optical axis. That also will need confirmation, measurement. So I'll just mount everything and see if the MB looks centred. Verifying accurate mounting is another issue. Some mods needed to help with that. Gregg. Aapo, I sent you a message. I'm having difficulty with posting on the Aaton Anonymous group.
-
Update 10/07/25)... The seller is not signed up to the forum, so I will help by trying to itemise in an orderly way... Kit contents... ACL II body, standard 16, #2843 Kinoptic orientable VF, #....... Mag 1 #..... Nag 2 #..... Battery... Charger... Power cable spiral... Power cable short... Magic little box (to be advised)... TS/Arri-S lens port adapter TS/.....something I'm not sure of lens port adapter. (Nikon F...?) Ang. 15-150 zoom, Arr-S mount, #1432895... Zeiss distagon 8mm, f2, Arri-S mount, #5272243.... Rubber sunshade with bad memory bend... Pentax (sort of digital) spot meter)... A tray with some gel filter holders and glass filters..... If I missed something I'll fix later..... Notes: The gate looks quite good, no sign of high mileage. It's not clean, he will upload a better photo. I also asked for a sharp macro pic of the mirror The lens mounts aren't shown but assumed as Arri-S (pics of the mounted zoom). The other camera port adapter in the pics I can't tell what it is. Any ideas? A better pic should be coming. Is it Nikon F...? The video of the camera running (empty), with the camera about 30cm from the body, a few reflective elements in the environment...sounds reasonable. I'm assuming that it hasn't had CLA for a while. Noise will go down after that, even if just lubrication. Bear in mind that it's not a controlled test. The Ang 15-150 zooms are undervalued on Ebay at the moment. They cover S16 and can be quite sharp (I'm told). The magazine I saw ((didn't see detail of both)) is a late model type with a separate centre pressure plate. It's like an Arri SR mag, the overall pressure plate leaves a thin gap and only the little pressure plate over the aperture is applying pressure to the film. Good mag(s) for S16. Those little Pentax spot meters are great. I have one. New Price strategy if selling outside of eBay Price: NZD6000 (USD3614) Shipping: NZD500 (USD301) to NZD800 (USD482)..includes insurance. Money transfer by Wise..... If it just needs lubrication I think that is a really good deal...
-
Thanks for your ideas Aapo. The LTR camera arrived so I could measure that. It should be possible to manually draft lines to get the optical centre projected onto the camera base, within about, almost 0.5mm. A plane orthogonal to the lens axis can be shown with a piece of laminate board contacting the lens front. A line equidistant from the sides of the lens front will intersect the optical centre, and project down to the reference surface that the camera base is sitting on. A line orthogonal to the laminate board can now be drawn under the lens axis. The rear of the camera body may need a temporary surface glued on (protected by masking tape) to make marking easier. The camera is lifted back in to place against the reference marks on the board. The line under the optical axis can now be marked at the front and rear of the base. Should be possible to find the centre of the 3/8" threaded hole, maybe a turned centre point on a piece of 3/8" thread. So we nave the offset, the tolerance is down to our fine lines and drafting skill.
-
The 3/8" screw thread in the camera base for fixing to release plate etc. Does anyone know the precise horizontal offset between that (centre) and the optical centre? If you have a dimension, is it from common knowledge, or a factory spec, or was it measured. If measured, what sort of accuracy? Do all the Aaton cameras have the same offset? Thanks for any thoughts, Gregg
-
The 3/8" screw thread in the camera base for fixing to release plate etc. Does anyone know the precise horizontal offset between that (centre) and the optical centre? If you have a dimension, is it from common knowledge, or a factory spec, or was it measured. If measured, what sort of accuracy? Are all the Arri cameras the same offset? Have other manufacturers copied that for their designs? If they are not all the same, I'm wondering what the offsets are for Movicam, Aaton and Eclair (NPR/ACL). Another way to approach the question is to ask whether bridge plates made for Arri cameras will have the matte box aligned with the optical axis when fitted to other cameras. Was the offset idea carried over to some digital cameras or all? Thanks for any thoughts, Gregg
-
Update... The seller is unfamiliar with film cameras. On a video call I tried to help test and assess..I saw that it is standard 16. The gate looked good. Not a heavily used camera. The 400' mag I saw was late model with centre pressure plate. There is a second 400' mag. He uploaded a video of it running (without film) to eBay. He will update that page with a complete list of components in the kit. Seller is offering 20% discount if sold privately (not through eBay). And free shipping worldwide via Fedex.
-
Do you have pics of the lenses ot test footage we can look at stashed somewhere, dropbox etc? When was the set last serviced? By who? Thanks. Gregg.
-
Posted 1 minute ago (edited) I saw a promising ACL 2 kit on eBay. The seller bought it at action here in NZ. I'm trying to help him get it basically tested. USD6K buy now. eBay link.. https://www.ebay.com/itm/257001653238?_skw=eclair+acl&itmmeta=01JZBRQT3GBGZZMMJ75G0EA9FY&hash=item3bd67e03f6:g:cFIAAeSwn6doZzBH&itmprp=enc%3AAQAKAAAA0FkggFvd1GGDu0w3yXCmi1cd8G86BOp38L9y2kOLnA9JEzaLY%2FNyPJ56daSF0wr8kfbm5YqylzGiqQQ7MfSCaxXDNckbFe3iWhCkQckqW3e9%2FsIphp9BKEvjTSlAevHKPOQDQJuCEcGHNXCvsbR49A08CtA448z2NS8FdiB91vJnrY5Fr8VXG8A5vJ02HEp9KFnsGkegnSEdCrWS7F5ZAboqZdnaH0UwhVPQbje6ffJwaNKS4I2EAxBVICqpMsl%2FDknJUqPFmoel0wM9LkSVOoU%3D|tkp%3ABk9SR-yh3_j6ZQ You can contact the seller directly... Will Wallace<fiveonefive(at)gmail.com> Comment from Gregg: If I help examine and test the camera (video call) I may get to see if it is standard 16/ S16. If not S16 then the 15-150 Ang is a bit wasted. Including lenses in a sale can often confuse the value issue. The 15-150 has a couple of listings under USD700, which seems undervalued to me. If the camera kit is pulled off eBay then he may sell the lenses separately. Update 10/07/25)...I deleted the earlier update The seller is not signed up to the forum, so I will help by trying to itemise in an orderly way... Kit contents... ACL II body, standard 16, #2843 Kinoptic orientable VF, #....... Mag 1 #..... Nag 2 #..... Battery (BAKEL)... Charger (CIBRE..?)... Power cable spiral... Power cable short... Magic little box (to be advised)... TS/Arri-S lens port adapter TS/.....something I'm not sure of lens port adapter. (Nikon F...?) Ang. 15-150 zoom, Arr-S mount, #1432895... Zeiss distagon 8mm, f2, Arri-S mount, #5272243.... Rubber sunshade with bad memory bend... Pentax (sort of digital) spot meter)... A tray with some gel filter holders and glass filters..... If I missed something I'll fix later..... Notes: The gate looks quite good, no sign of high mileage. It's not clean, he will upload a better photo. I also asked for a sharp macro pic of the mirror The lens mounts aren't shown but assumed as Arri-S (pics of the mounted zoom). The other camera port adapter in the pics I can't tell what it is. Any ideas? A better pic should be coming. Is it Nikon F...? The video of the camera running (empty), with the camera about 30cm from the body, a few reflective elements in the environment...sounds reasonable. I'm assuming that it hasn't had CLA for a while. Noise will go down after that, even if just lubrication. Bear in mind that it's not a controlled test. The Ang 15-150 zooms are undervalued on Ebay at the moment. They cover S16 and can be quite sharp (I'm told). The magazine I saw ((didn't see detail of both)) is a late model type with a separate centre pressure plate. It's like an Arri SR mag, the overall pressure plate leaves a thin gap and only the little pressure plate over the aperture is applying pressure to the film. Good mag(s) for S16. Those little Pentax spot meters are great. I have one. New Price strategy if selling outside of eBay Price: NZD6000 (USD3614) Shipping: NZD500 (USD301) to NZD800 (USD482)..includes insurance. Money transfer by Wise..... If it just needs lubrication I think that is a really good deal...
-
I saw a promising ACL 2 kit on eBay. The seller bought at auction in NZ. I'm trying to help him get it basically tested. USD6K buy now. eBay link.. https://www.ebay.com/itm/257001653238?_skw=eclair+acl&itmmeta=01JZBRQT3GBGZZMMJ75G0EA9FY&hash=item3bd67e03f6:g:cFIAAeSwn6doZzBH&itmprp=enc%3AAQAKAAAA0FkggFvd1GGDu0w3yXCmi1cd8G86BOp38L9y2kOLnA9JEzaLY%2FNyPJ56daSF0wr8kfbm5YqylzGiqQQ7MfSCaxXDNckbFe3iWhCkQckqW3e9%2FsIphp9BKEvjTSlAevHKPOQDQJuCEcGHNXCvsbR49A08CtA448z2NS8FdiB91vJnrY5Fr8VXG8A5vJ02HEp9KFnsGkegnSEdCrWS7F5ZAboqZdnaH0UwhVPQbje6ffJwaNKS4I2EAxBVICqpMsl%2FDknJUqPFmoel0wM9LkSVOoU%3D|tkp%3ABk9SR-yh3_j6ZQ You can contact the seller directly... Will Wallace<fiveonefive@gmail.com>
-
Tim, or any regular moderator, Sorry, I didn't realise the position of the Eclair Fleamarket had been shifted to this sub forum. Can someone delete this post. My endless edit powers are only effective in the Eclair forum. Thanks, Gregg.


