
Satsuki Murashige
-
Posts
4,560 -
Joined
-
Last visited
Everything posted by Satsuki Murashige
-
 Wow, didn't know that. Thanks Brian! William, whatever post path you choose to make 35mm prints will be expensive, I thought you were finishing on HD? You should call your lab for more specific info on going to 35mm and for price quotes.
 -
That's unnecessarily harsh, IMO. Most experienced filmmakers use the term "master shot" loosely to mean the main angle for a scene, not implying that they want textbook coverage of two overs and two singles immediately after. If you look at Steven Spielberg's method of coverage for example, he tends to use a very fluid master shot that comprises the bulk of the scene combined with a few cutaways than can be inserted into the master. Same with Orson Welles. In fact, a director who takes the time to stage a scene to camera and allows it play out in a master as opposed to cutting in for no good reason has to have great command of the medium in order to hold the audience's attention.
-
You should be able to manually reset edge code to match the hour to card number after formatting, so hour 01 is card 01, hour 02 is card 02, etc. That works fine if you're running single system sound and just need to be able to locate media in post quickly. I don't think there is a "record run" timecode option in the Red, their "timecode" is just free run time of day. You should be able to jam sync with a timecode slate though if you're running double system sound. Don't know much about that, but others here should be able to help you with that.
-
"Gweilo" 35mm, short
Satsuki Murashige replied to Satsuki Murashige's topic in In Production / Behind the Scenes
Still waiting on dailies. We had initially wanted to get print dailies first, before we did the telecine. But Deluxe mentioned to us that they would have to cut the negative to print circled takes, so they recommended that we do an offline telecine first. We didn't budget for that, so the producers are trying to raise money for that now. Sigh. At least the negative has been processed... :ph34r: -
I agree with Dickson, that looks like chromatic aberration which is probably an artifact of the lens you were using. Also, the HPX500's lens shading menus are not as sophisticated as an F900 or Varicam type camera, so any additional in-camera compensating that was done to get a neutral response from the lens might not be adequate.
-
The Crime of Impersonating a Cinematographer
Satsuki Murashige replied to Chris Durham's topic in General Discussion
Good definition Karl! Yikes! I sometimes pull focus for a young DP whose gaffer likes to write "ASC" after the DP's name on the slate when I'm not looking. They both think it's hilarious. It just makes me cringe. -
The Crime of Impersonating a Cinematographer
Satsuki Murashige replied to Chris Durham's topic in General Discussion
Yeah, but director is an entry level position - anybody can do it! :rolleyes: -
big fogged out flares
Satsuki Murashige replied to Ian Coad's topic in Students, New Filmmakers, Film Schools and Programs
:lol: Phil, you're too much... * isn't Cooke a British company? -
I broke the family set when I was a toddler, I liked to twist the channel knob a little too much. I guess that happened in a lot of homes in the early 80's. :)
-
The Crime of Impersonating a Cinematographer
Satsuki Murashige replied to Chris Durham's topic in General Discussion
I honestly wouldn't worry about it. When you work with a DP, you'll know their experience level within the first 15 minutes of shooting. If the experience level is appropriate to the project (student film, low-budget short, etc.) then it shouldn't be a problem. We all have to start from someplace anyway - it's nothing to be embarrassed about. The worst thing is to pretend to know more than you do, or to have an ego about what little you do know - only then do you deserve to be called out. Like Storaro says, he was "Vittorio Storaro: Cinematographer" on his first film - he was hired for his ideas and skills at the time so he should have been allowed to express them without fear of being judged inadequate. In fact, he threatened to walk after his first day because he thought the director did not respect his input but only wanted someone to point the camera and record the scene. An experienced DP has the ability to see problems and nuances in the frame that a less-experienced shooter would only catch 10 minutes later. I've had the humbling experience of mentioning to an older DP that I saw a problem with something in his frame only to have him snap back at me that he knew what he was doing. Sure enough, he had two grips working on it already. So I learned to keep my mouth shut on set until I knew what was going on. Now I speak up and give my opinion to the DP only when I've been asked to specifically or when I work with a peer that I know well. Anyway, I think the term cinematographer is more inclusive of different type of shooters. For example, I think most people would agree that Stan Brakage was a cinematographer but not a director of photography, since he never directed a crew of grips, electrics, and ACs on his films. The same might be said of Stanley Kubrick, Nathaniel Dorsky, Ridley Scott, etc. So if you want, call yourself a cinematographer - no one is going to challenge you or even care. If you make a living shooting, then I don't see the conflict. -
Hi William, Whether you shot reg. 16 or Super 16, you would not get sound on the workprint itself. Workprint is picture only these days. If you were cutting on film, you would transfer your sound media to 16mm mag film, sync the picture and sound of each take on a flatbed, then hang picture and mag together in a trim bin. You should then be able to edit in sync on the flatbed. The real issue is that there are no Super 16 flatbeds, at least to my knowledge. Very few projectors also. So you would only be able to see the reg. 16 portion of the frame, which could be a serious problem. Super 16 was designed originally for optical blow-up to 35mm and not meant to be edited or projected. Today it's used exclusively as an origination medium - it's usually either telecined for a video finish or scanned for DI (digital intermediate = film>digital>film). So you might find it easier to telecine the footage and edit on a computer, since that is the most common Super 16 workflow today. Hacking your own path through the jungle of post production usually costs you more time, sweat and money than following the well-traveled road. Grading means color correcting, BTW. *EDIT: If you want to save money, don't sync footage during dailies. Just have the transfer facility telecine the picture and sync at home in your NLE (non-linear editor = Final Cut Pro or whatever program you use).
-
big fogged out flares
Satsuki Murashige replied to Ian Coad's topic in Students, New Filmmakers, Film Schools and Programs
*EDIT: Filters should increase the likelihood of flares because there is now an additional layer of glass in between the subject and the image plane, thus increasing the chance of additional reflections. Flares are really reflections off of glass elements in the lens (or in front of it). The lens coatings help to suppress those reflections by absorbing light, thus rendering a more contrasty image. Of course, if you're using filters then you're probably using a matte box which shades the lens from stray light and negates a lot of the reflections creating the flare in the first place, so unless you need the ND to shoot at wider apertures, it's probably better to just shoot without the matte box at all. -
big fogged out flares
Satsuki Murashige replied to Ian Coad's topic in Students, New Filmmakers, Film Schools and Programs
I've noticed veiling glare mostly with older 35mm SLR lenses, 70's vintage Nikkors and Pentax. You could try to find old cine primes like the Cooke Speed Panchros or B&L Super Baltars. Or even older zoom lenses like the Cooke 18-100 and Angenieux 25-250. Now that you bring it up Phil, I've noticed that a lot of the newer Zeiss lenses like the Digiprimes and Ultra 16's will flare green around a point source. I find it really ugly and prefer the red halo that you get around point sources with the older Superspeeds. Strangely, I've noticed that the Master Primes have the same red halo flare as the Superspeeds, although they presumably share the same coatings as the Digis and Ultra 16s. I wonder if they were designed that way? I remember reading in American Cinematographer that Dan Sasaki (former lens guru at Panavision) was able to make custom 'scope lenses for "The Prestige" that flared in a very precise way by tweaking the coatings of various lens elements. -
What time? Can we do it in the afternoon? No filmspeak? What the hell are we going to talk about then? ;)
-
big fogged out flares
Satsuki Murashige replied to Ian Coad's topic in Students, New Filmmakers, Film Schools and Programs
That type of flare is called veiling glare. It's caused by a combination of a strong backlight source just out of frame and the use of older lenses with less efficient coatings. It's been my experience that a longer lens is more likely to exhibit veiling glare than a wide angle, don't know why though. Maybe it has something to do with the design? Try shooting wide open as well, since those older lenses sharpen up and get more contrasty when stopped down. You can even find cine lenses that have been stripped of their coatings at certain rental houses (Panavision has a set called "flare" lenses). -
Can anyone tell me how this is done?
Satsuki Murashige replied to Shawn Fields's topic in Visual Effects Cinematography
It looks to me like some of the soft focus shots may have been done with vaseline or KY Jelly smeared on a clear filter in the matte box. You can get very distinct edges between soft and sharp using this technique, depending on how thick you smear the jelly and where. It doesn't take much at all to make the image completely soft. -
"Gweilo" 35mm, short
Satsuki Murashige replied to Satsuki Murashige's topic in In Production / Behind the Scenes
Yeah, I see your point. Being responsible isn't always sexy, but producers will remember you for it. Of course, if you get them awesome footage then they'll remember you too and conveniently forget how painful it was to get! I tend to agree with you unless I feel I have the crew and the gear to pull it off in the time allotted; this is the first time I've had the luxury of not compromising the photography of a film to the extent that it was no longer recognizable as what I envisioned when we started because of a lack of resources, which I must say is gratifying. I also realize that this is a pretty rare opportunity in one's career as a cinematographer regardless of budget, so I'm very grateful for that... Jon, sorry I didn't realize you were doing both things simultaneously, much props to you sir! The footage was sent in to Deluxe yesterday, so I hope we'll get dailies back sometime next week. -
"Gweilo" 35mm, short
Satsuki Murashige replied to Satsuki Murashige's topic in In Production / Behind the Scenes
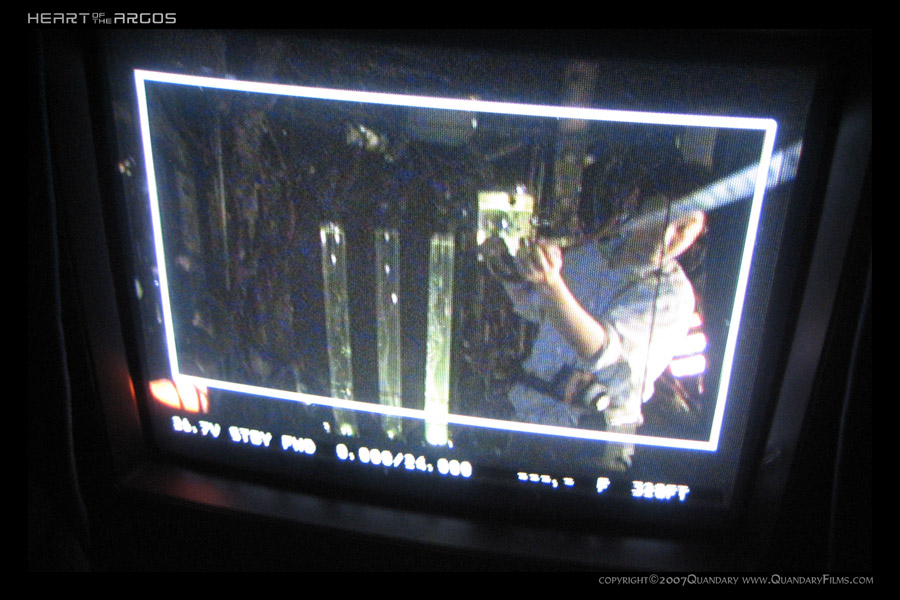
So, we wrapped the "Gweilo" market scenes last week after shooting Wednesday, Thursday, and Friday. It was an interesting experience - alternately frustrating and exhilarating. Production finally found a location less than a week before shooting began, a 3,000 sq. ft vacant storefront in a mall in Alameda, CA: http://flickr.com/photos/15005161@N06/3224...57608661642321/. We did not get a generator due to the shrinking budget, and we ended up with only three 20A circuits. So we relied only on our kinos (bare single tubes and two Divas), photofloods in china balls and desk lamps, MR-16s, Dedos, and small fresnels. We skipped the "sodium vapor" and "mercury vapor" work lights because of the amperage shortage. This could have been a major issue if we had committed to shooting anamorphic as we had originally wanted - we went from lighting to 80fc to 12fc, so getting enough stop for our high speed shots (48-96fps) would have been a problem. We ended up shooting with T1.3 Super Speeds, but I wanted to use them at T2.8 for more contrast and sharpness since we were already using a net in front of the lens and smoking the set. I also wanted to keep my focus puller Alex Worster happy, since we had so many tough dolly, handheld, and long lens shots (turns out he didn't need the extra stop anyway). I think we ended up shooting one shot at T2, but never had to go WFO. In order to get a T2.8, I decided to rate the 5229 stock at 800ASA (literally 10 minutes before we rolled our first shot). I felt comfortable doing this because our over/under stock test of the '29 showed that a one stop underexposure combined with printing up looked nearly indistinguishable from exposing and printing normally; exposing 2/3 stop under still gave me a very slight safety margin of 1/3 stop. Still, I'm nervous to see film dailies because we lit so contrasty and low-key, and also because our use of net diffusion and smoke lowered the overall contrast - I hope it all comes together in a beautiful way and doesn't turn into a dark mush! I requested Fuji 3531 print stock, basically their version of Kodak's Premier stock, to get contrast and blacks back somewhat. The earliest our crew was able to get into the space was Monday morning, which meant art had only two days to build and dress the set. The set unfortunately had a lot of rough edges which were never smoothed over for lack of time, so that meant I had to light fairly low-key to hide some of the seams between flats, etc. There was also a minor disaster - our head carpenter miscounted the number of flats needed for the set so there was some reshuffling of the design at the last minute: http://www.flickr.com/photos/17986251@N05/...57613036202093/. I was not available to check out the construction and give input during the build because I had to drive to LA on Monday with the director to help pick up and prep the camera package, which was a mistake that I won't repeat again. Although we really had no other choice on this shoot, in the future I'll definitely make sure that I'm there for a build like this because so many permanent decisions get made that affect the photography - certain angles that we wanted to get were not possible or did not work as well as we wanted because of the placement of key flats. Also, my gaffer Phill Matarrese had roughed in and set most of the practicals by the time I got back to the Bay Area on Tuesday night, so that my job became mostly tweaking and supplementing, moreso than I would have liked. By the time I walked into the space on Tuesday night, Phill had already rigged two 4' 3200K tubes in most of the stalls so that one hung on each wall horizontally. I'm grateful that he did such a great job based on our discussions and choices in prep, but I would have liked to have had more input on lighting the set during the build. Mainly, I would have taken an inventory of our lighting gear as we started lighting each space and concluded that we needed more units - Dedos, single kino tubes, medium base sockets, MR-16s, china balls. I also could have spent more time tweaking each space - I still see little areas in the stills that could use an accent light or three. PRE-LIGHTING. Here are some set stills showing the final lighting in each stall: http://flickr.com/photos/15005161@N06/sets...detail/?page=22 http://www.flickr.com/photos/17986251@N05/...detail/?page=21 http://gweilofilm.blogspot.com CALL SHOP. The call shop was an important space in the story - it consisted of four or five booths separated by folding closet dividers with built-in venetian blinds and fronted with semi-sheer shower curtains: http://www.flickr.com/photos/17986251@N05/...57613036202093/ The flats were painted off-white to allow colored light to render their proper colors. I noticed on arriving at the set that the space would play better if art dept. had flipped the set so that the stall owner's desk, the cabinet, and all the art behind him was on the right side instead of the left - otherwise, with our planned coverage we'd only see all that stuff in one shot, if that. Unfortunately, it was too late at this point so the best we could do was cheat the desk out toward camera. I asked Phill to pull the kinos off the walls and rig the tubes above the set instead to make the ambience more toppy, less intense, and to help take the white walls down. We gelled the tubes with Lee Fluorescent 5700K gel to make them a pale cyan and added 2' kino tubes gelled with Yellow 101 taped against the hidden side of each divider to create the soft warm glowing effect: http://flickr.com/photos/15005161@N06/3224...57608661642321/ And here's what the color balance should look like (only brighter, of course): http://flickr.com/photos/15005161@N06/3224...57608661642321/ I asked art to add a tungsten desk lamp; I think we used a 60w household bulb inside (I probably should have gone with something stronger like a PH212 150w or PH213 250w since I wanted it to key the actor's face). Phill also used two Rosco Litepads taped to the screen of a prop portable CRT TV to do a flicker gag - we simply left the 3"x6" on and turned the 3"x3" on and off: http://www.flickr.com/photos/17986251@N05/...57613036202093/ TAILOR SHOP. This was a simple corner set that consisted of two yellow-painted flats, a small table with a sewing machine, and a chair, as well as a few baskets of material and some decor on the walls: http://www.flickr.com/photos/17986251@N05/...57613036202093/. Phill had lit it with two 4' kino tubes, one hung horizontally on the right wall, and the other tied vertically to a wooden pole on frame left: http://www.flickr.com/photos/17986251@N05/...57613036202093/. I asked him to take the horizontal tube and place it vertically into the basket of fabric rolls on frame right to give the actress a sidey key. We wrapped a bit of fabric around the top of the tube to flag a bit of light off of the wall above her head: http://www.flickr.com/photos/17986251@N05/...57613036202093/. BUTCHER SHOP. My favorite set: http://flickr.com/photos/15005161@N06/3224...57608661642321/ Art did an awesome job creating all the hanging sausages and meats from paper mache. They even made a bunch of what looked like severed human fingers, in a nod to "Indiana Jones and the Temple of Doom": http://www.flickr.com/photos/17986251@N05/...57613036202093/. All I had Phill do was put some full Plus Green on the kino and make a topper out of blackwrap (we pretty much did the same with all the bare kino tubes, adding siders, toppers, or bottomers to control the spill). Adding smoke made it look like something out of "Delicatessen." Most of the sets are being featured in slow motion tracking shots for the title sequence - we shot the butcher shop at 96 fps. Most of the other sets were shot at 60 fps or 48 fps. WOK SHOP. Another simple corner set with a wire-mesh wall: http://www.flickr.com/photos/17986251@N05/...57613036202093/ Phill hung a vertical 2' kino tube in the mesh and I had him add a Dedo on a baby plate spotted on the containers against the back wall which also slashed across our stall owner's shoulder and gave her face a slight fill. We only had three Dedos and one ladder, so once they were up it was a real hassle to keep adjusting them. LIQUOR SHOP. My least favorite set: http://www.flickr.com/photos/17986251@N05/...57613036202093/ As you can see, compared to the other sets it lacks texture and depth: http://www.flickr.com/photos/17986251@N05/...57613036202093/ So I just tried to keep it dark and used the Dedos to pick out the stuffed owl on frame left and the liquor bottles against the back wall. At first I tried spotlighting the big antlers on the wall but it didn't make sense to feature that and not the liquor so I kept them dark. I also used a Diva on the ground behind the counter to uplight the wall a bit and give some separation. I really needed more small fresnels and fluoros to pick out little spots but we just ran out of time and lights. Also it's one of the least important sets, so I just let it go. FRUIT & VEG. STAND. Another simple set, but tricky to shoot: http://flickr.com/photos/15005161@N06/3224...57608661642321/ We had a couple of 2 1/2 page dialogue scenes to shoot here. We had originally planned to do a lot of coverage, two shot profile, profile singles, overs. It was tricky to get the profiles because of the placement of the flats and the plastic tarp that acts as a third wall. Also, in profile the set appears very flat, whereas shooting into the set looked better because I could flag light off of the back wall: http://www.flickr.com/photos/17986251@N05/...57613036202093/ We adjusted for the 2nd scene by shooting from the other side, toward the tarp. That helped us get a nice 3/4 keylight from the practical kino which wrapped around our actors' faces in a more flattering way. We also shot some nice tight overs of our leads which I was pretty happy with. I just placed the actors where the existing practical worked best for their faces, added a 4x4 floppy for negative fill, and and used a 300w thru silk to give a little sidey texture on the foreground subject: http://www.flickr.com/photos/17986251@N05/...57613036202093/ ELECTRONICS SHOP. This was a rather dark set, which had me a bit worried: http://flickr.com/photos/15005161@N06/3224...57608661642321/ Phill had taped a 2' kino tube under the counter with a flap of 216 over it and put up a 1' cool white above and to the right of the red "Tech" sign to highlight some of the hanging merchandise. I knew we needed more fill above the set, but at this point this was one of the least featured sets and I had more important things to concentrate on so I kinda just let this one go and hoped that the filmstock would be able to render some detail in the dark wall. SNACK SHOP. This was a dense set consisting of two small counter/showcases with 1' cool white tubes underneath, shelve-lined walls holding a variety of props, and a little table with a cash register. Art had also strung up a bunch of small colored china balls: http://flickr.com/photos/15005161@N06/3223...57608661642321/ I had Phill replace the overhead kino with a medium china ball and a PH212 150w bulb for a warmer, more toppy ambience. The walls were painted a dark eggplant color so I probably could have used a large china ball and a 250w bulb instead. Since I liked how the fluoro under the counter was keying the shopkeeper at the register from a slightly low angle, I had Phill add another 1' cool white behind counter to augment and softened with 216. We ended up wrapping our prep day around 10:30pm since our call time the next day was 7am. A lot of set elements still needed to be finished and a lot of lighting needed to be rigged, so I was quite worried. Luckily, we had planned the schedule so that we only had only four shots before lunch and then opening montage footage after. THE SHOOT. The next morning in the snack shop, I had Phill hang 5 MR-16 bulbs skirted with blackwrap to spot light the countertops, the register, and a few shelves. I would have loved to have been able to add more accent lights (like a 1' fluoro taped underneath the top shelf on the back wall), but we ran out of fixtures and time. Here's the final lighting: http://www.flickr.com/photos/17986251@N05/...57613036202093/. Art still had a lot of work to do on the elevator that takes up the center of the set, aging and dressing the exterior, painting the interior, building and fitting the doors, and making sure they could slide open from the inside. There was still a lot of lighting to be done, mainly in the snack shop. Only having one ladder really boned us, timewise. We got our first shot off five hours into the day, and only got two shots before lunch! Thankfully, we rallied and only ended up owing a handful of opening montage shots after a 12 hour day. We only went over on day three, by 1.5 hours (the .5 was just me and Alex, plus our two interns grabbing four opening montage inserts that they came up with). What really killed us was our huge problem getting appropriate extras - we had originally wanted only non-Caucasian actors, the rationale being that the main character was supposed to be completely lost in a foreign land and visibly out of place; if he were to see a fellow "Gweilo" in the market, he would probably make a beeline for them and the whole premise of the film would be ruined. Unfortunately, our casting director totally dropped the ball by not following up on the large list of extras we'd compiled from auditions months before so that we were literally scrambling to get bodies into the film on the day of the shoot (I had several cameos as a sketchy call shop customer and a john, as well as just being a random body). This meant we would not have enough extras to shoot the first scheduled scenes which included a long tracking master shot that revealed the entire marketplace, so we were forced to reorder the shooting schedule several times a day to accommodate the extras' availability. Ultimately, I think we only missed one or two shots from the body of the film and a smattering of title sequence inserts. We got progressively faster each day, which was impressive considering that the shots kept getting harder and more complex everyday. I operated on the first day, which was a lot of fun but ultimately counterproductive. Luckily, we had a fantastic camera technician, Zakk Eginton, come up with the cameras from LA who was a highly seasoned camera operator, so I had him operate on days two and three. Zakk worked out the blocking of many complicated dolly and handheld shots, solved a lot of framing issues, and figured out how to do a complicated ramping shot with the Arri III C.E. Base, which was not designed to do what we wanted it to do. Our ridiculously talented directing intern David Larsen directed this shot: http://www.flickr.com/photos/17986251@N05/...57613036202093/. (Just to give you an idea: Alex had to pull focus from a ECU of a handwritten note in the actor's hands 12" from the focal plane to a crowd of extras 18' away as the paper dropped out of frame, then rack back to follow the actor as he stepped into frame, hit a mark, and walked away into the crowd; Zakk had to flip the C.E. Base dial from 48fps crystal to 24fps on cue; Jon had to pull iris from the barrel on the same cue; the actor had to hold the paper to the close focus mark, drop the paper, and hit his mark on cue; Nick the electric had to handhold a 4' kino tube to light the paper at the right mark next to camera, then get the hell out of the way; the extras had to hit their marks; oh, and the camera was in a tiny corner top floor on the standard sticks, with Zakk operating from the ladder; it was nuts). Zakk was also a huge help with one MOS scene where we wanted a simple series of wide, medium, and closeup shots of our hero Jerome trapped against the elevator doors as a flood of natives rush by: http://www.flickr.com/photos/17986251@N05/...57613036202093/. I started to get a little too creative with the framing and got really lost on how to shoot the scene - the initial idea was that the audience would not notice Jerome in the wide shot, so I wanted to place him way off to the edge of frame and cropped at the neck. It was a neat idea but Zakk quickly pointed out that it would be difficult to cut into a medium and CU from that angle. We'd have to radically shift the angle for each setup to get a cuttable sequence and we only had about 20 minutes get it all done. He suggested instead that we go the opposite route, framing Jerome centered and then punching in with progressively longer lenses. While I agreed, I was also still searching for a way to convey the sense of an unbalanced, out-of-place mental state. I had the idea to shoot undercranked, 6fps for the wide, 9fps for the mid, 12 fps for the CU. Our actor had to stay perfectly still. We also were losing extras by this point so the technique helped us maintain the illusion of a throng of bodies. Zakk also did some 2nd unit shooting for us, grabbing some title sequence inserts with our director and cinematographer interns while Phill and I were lighting some other part of the set. Having a top-notch operator was such a luxury for a crazy shoot like this, I never want to leave home without one again! Big props to the rest of the camera crew as well: Alex, Jon B., our loader/carpenter Greg, you guys were amazing - I hope I get to have all of you on board when we finish the rest of "Gweilo" in a few months. Thanks for reading! -
How big of a jib is it? If it's something smallish like a stinger jib arm or a portajib then you certainly can pull focus with a whip if you're not in a confined space. If it's more like a crane, then you'll need the remote focus for sure. Make sure you have enough prep time with the device so you're not fumbling with it on set. Jon's suggestion is a good one - cover the french flag with white camera tape, laser tape measures don't read off of matte black or reflective surfaces very well. Borrow or have production rent a laser tape measure (rangefinder) with a viewfinder like a Disto A5 or a Hilti PD32 if you don't already have one. Find out what focal lengths they want to do these jib shots with, since knowing your hyperfocal distances will help tremendously. If you think you blew a take, make sure you speak up right away and ask for another one. *Also, remember to take into account the arc of the jib movement when you take your measurements. For example, a straight boom up with a static subject will result in the subject being closest the the focal plane in the center of the jib's arc and further away at either the top or the bottom of the move. Measure this distance when you get some downtime in the morning so you'll be ready.
-
35mm Adapter Properties
Satsuki Murashige replied to Anna Uio's topic in Students, New Filmmakers, Film Schools and Programs
The geometric properties of a wide angle rectilinear lens, whether it's a 24mm Nikkor still lens or an 18mm Zeiss Superspeed, are impossible image characteristics to get with most 1/3" chip cameras without the use of a 35mm adapter. This is because most of the lenses that come with those cameras require a wide angle lens adapter or converter to get anywhere near the same field of view as a 35mm lens in the 18-24mm range, and the adapter is non-rectilinear so the image always has some barrel distortion to it. The ability to get a rectilinear wide field of view makes a big difference in look - I've always felt that this effect of a 35mm adapter was more important than shallow depth in creating the "film look." Of course, you can also get wide angle rectilinear lenses in 16mm and 2/3" formats, just with more depth of field. -
Effects of Differently Rating Stock
Satsuki Murashige replied to Chris D Walker's topic in Film Stocks & Processing
Steve, I think with the stops you want to work at, you should consider pushing the film stock by one stop. Just to give you an idea, lighting to a f/5.6 at 400ASA would require 100 footcandles to get a normal exposure. It's a lot, but doable if you have large lighting package or don't mind a hard lit look. Shooting at f/4 and 800ASA would let you use only 25fc. I suspect you'll probably end up working close to wide open with those lenses. Plus pushing the film should increase contrast and saturation versus just underrating the stock by one stop and processing normally. Pulling the film is a bad idea if you are already struggling to get enough light since you'll have to pump twice as much light into the scene to get the same density on the neg after processing. But you should shoot a test with these options on the stocks you want to use to get a real idea of what it's going to look like. Carpenter probably used Panavision C-Series lenses on "Halloween." Those generally open up to around T2.8, some are faster. -
Dreading Simulacrum & Caretaker of Vision
Satsuki Murashige replied to fabio pirovano's topic in Cinematographers
Thanks for the articles, I enjoyed both! :) Edit: Any idea who rents the JDC scope lenses today? I understand Panavision bought the company last year, would love to shoot with them someday. -
"Gweilo" 35mm, short
Satsuki Murashige replied to Satsuki Murashige's topic in In Production / Behind the Scenes
Thanks Chris. We're only shooting a bit less than half of the film right now. It's the more expensive half with an ambitious set to build and lots of extras so we figured we'd get that out of the way first. We're then going to raise money for the rest of the film by showing potential investors cut scenes and hopefully impressing them with the quality of the work so far. So it may be quite a while before there's a finished film in the can. We also want to take a little MOS camera to Hong Kong to shoot B-roll and title sequence footage at some point. The sodium gel pack was less saturated on the '29 than the digital still, so we will probably end up doubling it. I definitely prefer the yellow to a more orange or even magenta coloring. I thought about trying CalColor cyan for the test as well, but I was worried we'd run out of film and time so we only ended up testing the two gels. But we will use the Fluoro 57 gel on some cool white tubes in one of the stalls to get a cyan toplit look. It's a call shop, with little private booths that have translucent shower curtain-type material. I want to put warm-gelled tungsten inside so that they seem to glow, referencing the warm, womb-like feel of the hallway scenes. I think it'll contrast with the cool cyan nicely. Art is doing an off-white matte paint finish on the shop walls, so they should pick up the colors pretty well. -
"Gweilo" 35mm, short
Satsuki Murashige replied to Satsuki Murashige's topic in In Production / Behind the Scenes
Just got back from screening the film tests so I wanted to give my impressions: Fuji vs. Kodak. The Fuji stocks were noticeably grainier, less sharp, and had less latitude than the Kodak Expression stock. But they also had a softer, richer, more pleasing color palette than the Kodak, which seemed slightly more heavy in the reds and missing something in the yellow/green spectrum. All the stocks performed great one stop under and printed up, I couldn't really tell the difference. Two under started to get noticeably grainy with weaker blacks and three under was very grainy with very little shadow detail. One stop overexposed and printed back also did not make much of a difference to the grain structure to my eyes. So I would probably rate the stocks at their recommended EI or 1/3 stop lower, but no more than that. As stated before, we're getting a good deal on the Kodak stock, so we're going with the 5229. Note: both of my ACs, Jon B. and Alex Worster liked the Fuji one stop underexposed. I recommend that they post their impressions also, would love to hear more from you guys. Lenses. I was disappointed with how soft the Cookes looked, they never seemed to get tack sharp at all. The 50mm especially seemed a lot sharper in the viewfinder than on the print (the lens aperture was varied from T2 to T16). We had the film projected twice to make sure it was in focus. I expected a contact print to be a lot sharper than that - I've had 16mm prints made that look way sharper (I've never seen them on a 30' screen though). Diffusion. The front-mounted net looked fantastic, it was much more subtle than I though it would be and it halated nicely on the rim light at 4 stops over. It also did not flare point sources much at all. The director didn't like the halation on the actor's white shirt (6 stops over - spot reading). We figured out that he liked halation on medium and dark tones but not on white, so art is tea-staining the white shirts in wardrobe. We'll use it judiciously and not go all Bob Richardson. The black promist was not as interesting of a look, and 1/2 was even stronger than the net, to an unusable degree. The 1/8 and 1/4 didn't really do much for me, not much character. -
"Gweilo" 35mm, short
Satsuki Murashige replied to Satsuki Murashige's topic in In Production / Behind the Scenes
I can only give you a rough idea, but basically the pushed footage would have more density and thus would print higher on the printer scale than the underexposed footage, so the blacks would be darker. You would see about the same amount of shadow detail in both shots but the midtones in the pushed shots would be brighter. Overall, the pushed image would be more contrasty, more saturated, and grainier. In telecine, the difference would probably be more subtle since you have the ability to move shadows, midtones, and highlights up and down independently as well as changing saturation and adding grain reduction independently. But Jon's right, testing yourself is the only way to know for sure. Jon, I don't know if you got the message - we're screening the camera tests at the Kabuki at 9am Saturday morning. You're not on the the list for some reason, but if you get this and show up tomorrow at 9am, I'll get you in. Call or text me.