Sean Charlesworth
-
Posts
21 -
Joined
-
Last visited
1 Follower

About Sean Charlesworth

Recent Profile Visitors


-
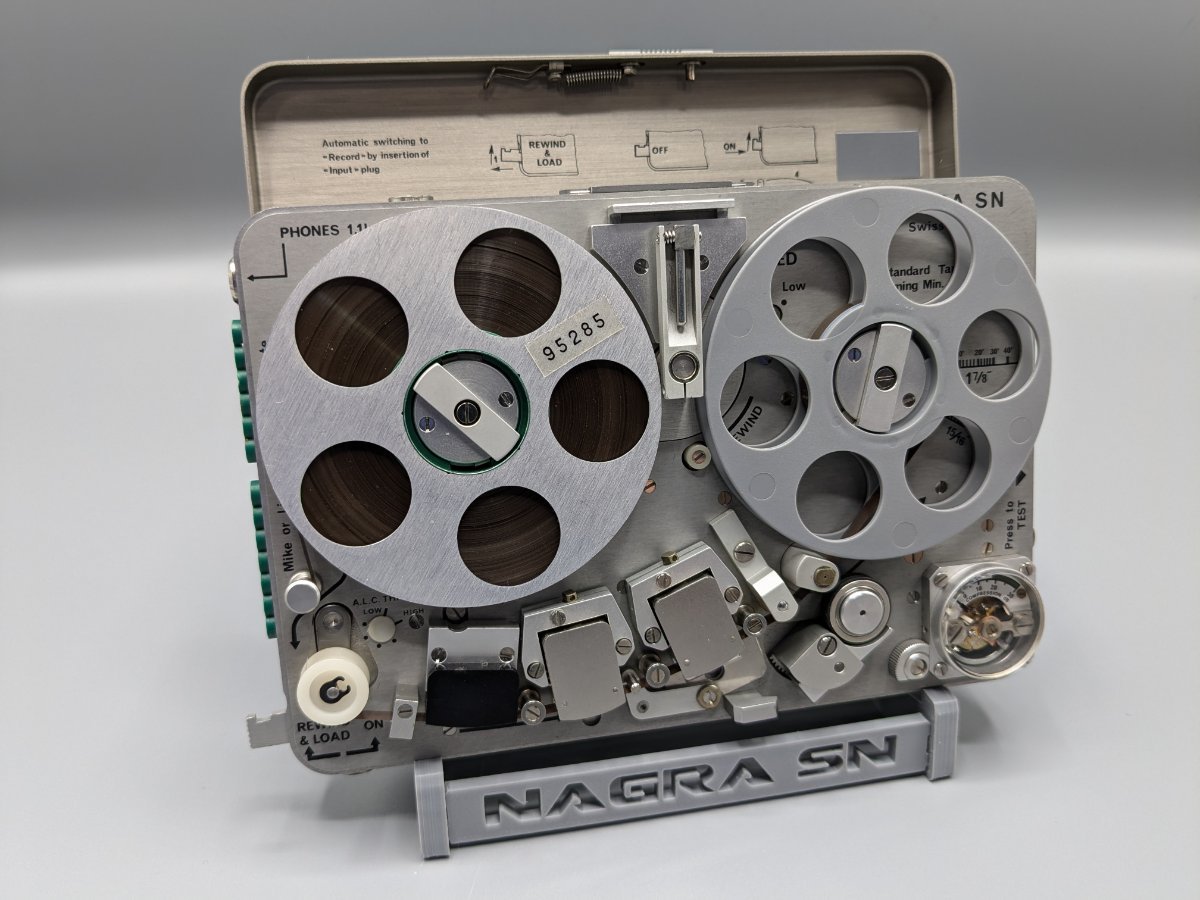
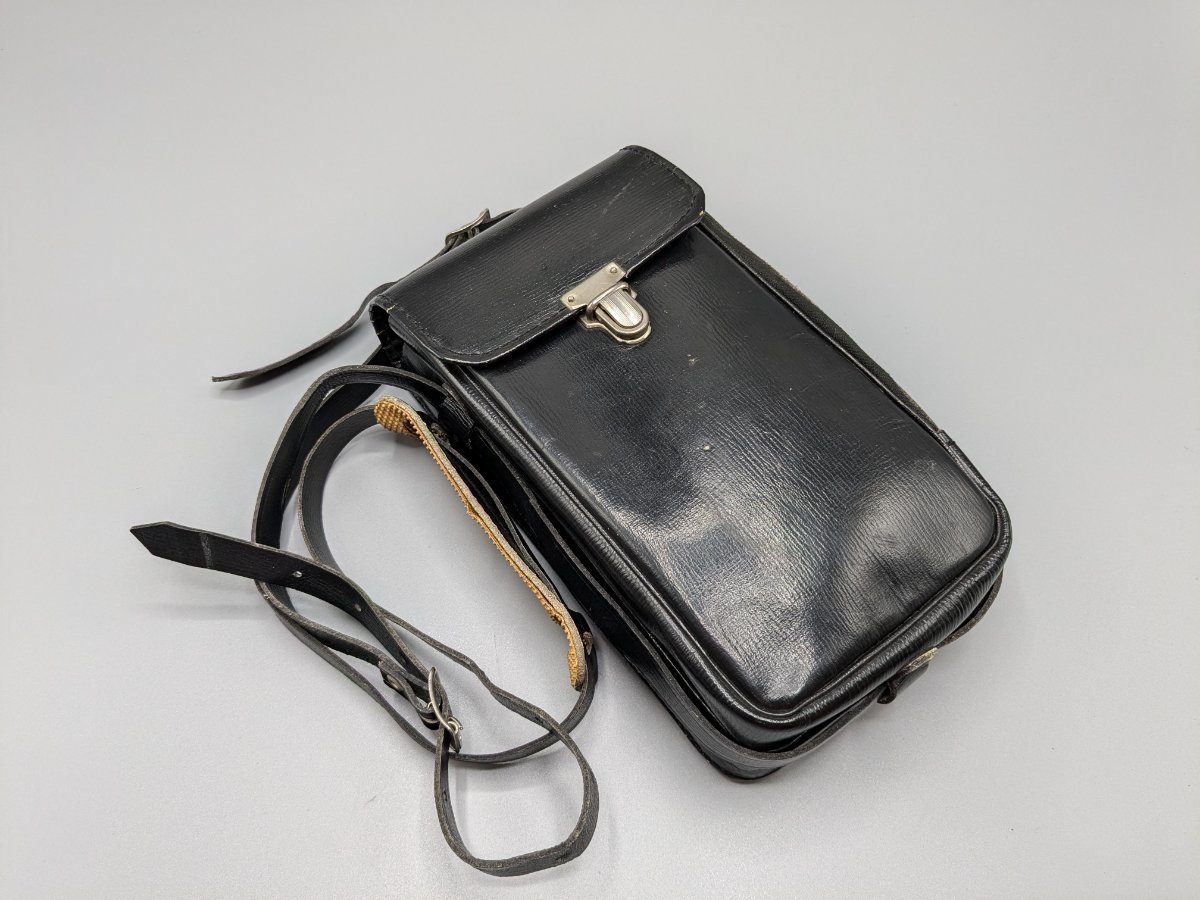
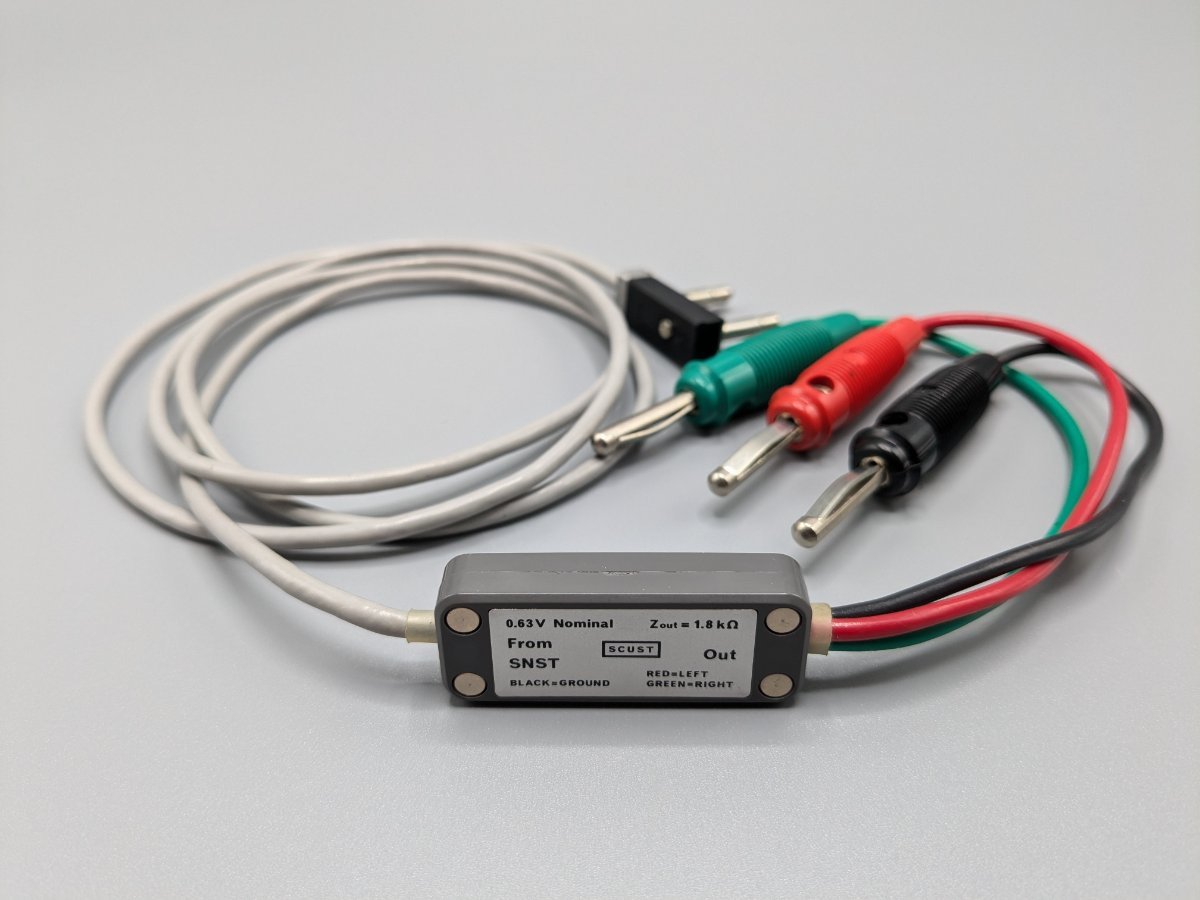
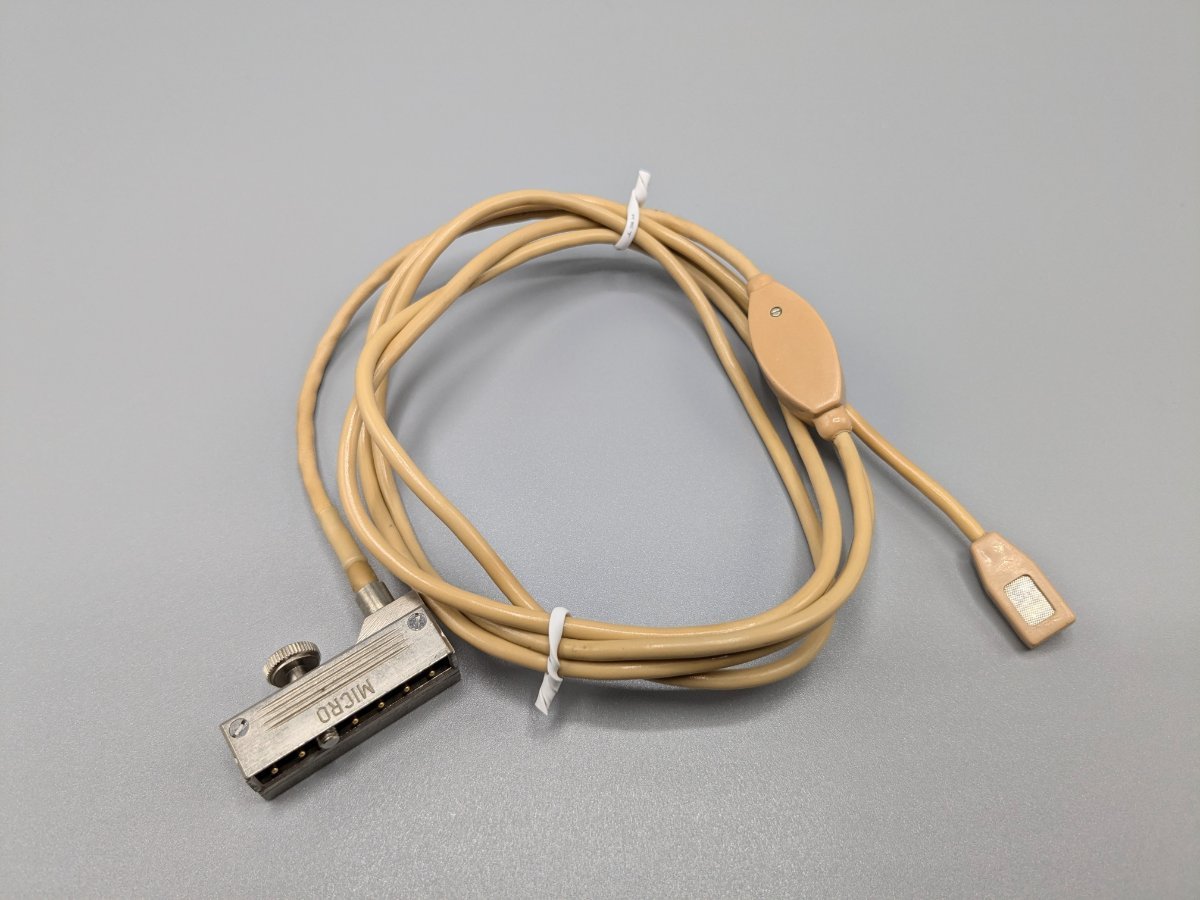
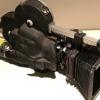
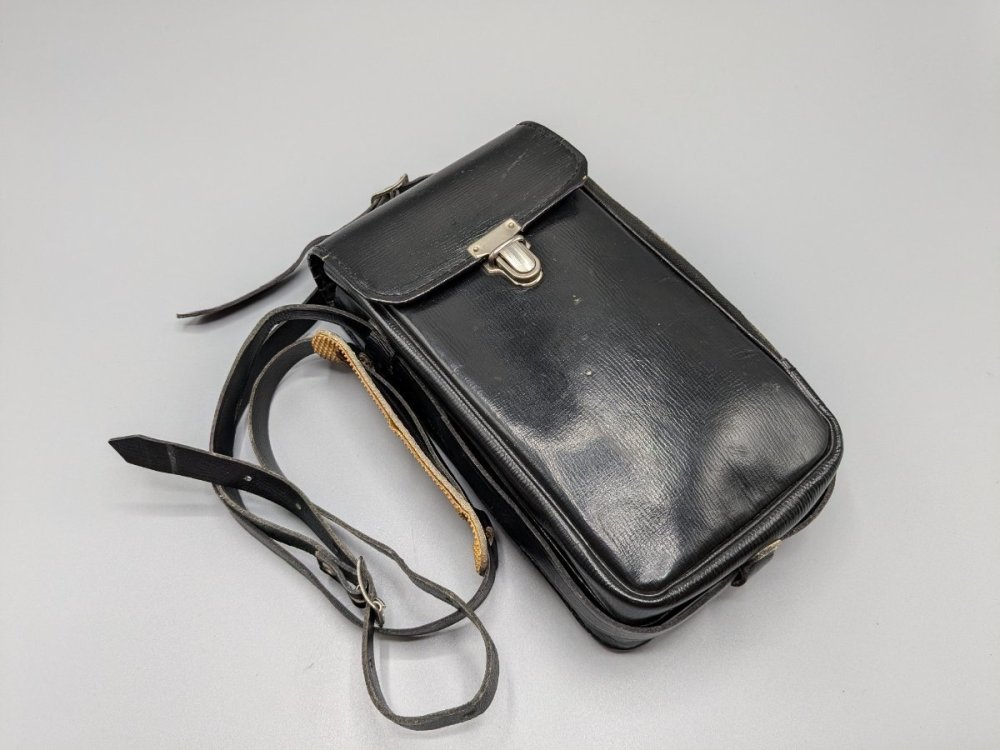
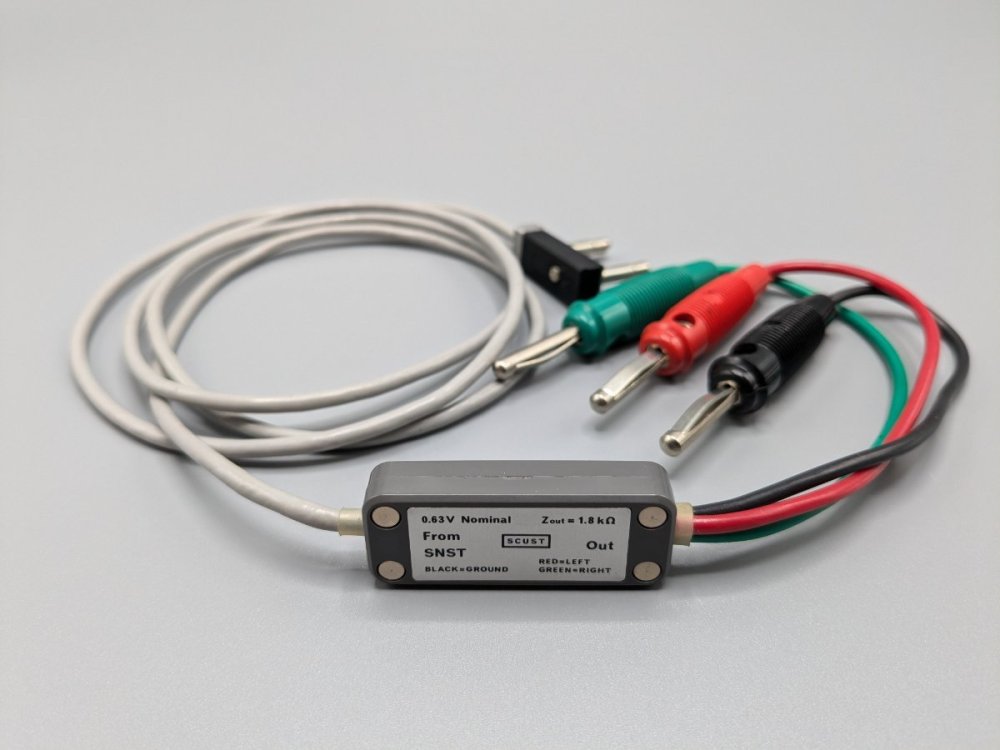
 Hi all, I have a very nice Nagra SNS half track recorder for sale as well as many other SN items on eBay. There's lots of pictures and a demo video of the recorder working. If you are interested in any of the non-auction items I am open to direct purchase via PayPal. You can see items via my eBay profile. Sean Items include: Nagra SNS SN tape reels Manual Mic Remote trigger Cases SNST line cable SN line cable Replacement SN batt labels

-
FS: Misc 2x2 Glass Filters
Sean Charlesworth replied to Sean Charlesworth's topic in Cine Marketplace
Yep - whatever is still shown in listings -
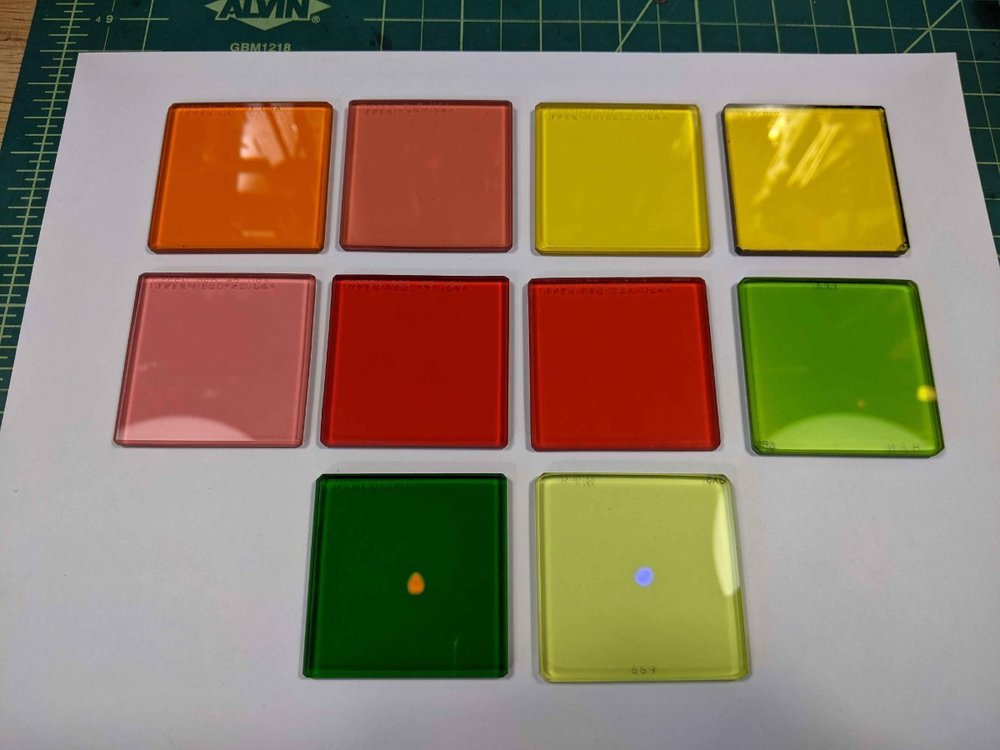
Hi all, I have posted quite a few 2x2 glass filters on eBay if interested. Open to offers - feel free to purchase thru eBay or contact me directly. All come with used Tiffen pouches. See listing for more info and pictures. I have a few other listing for special filters as well. https://www.ebay.com/itm/275024016257 https://www.ebay.com/itm/275024033618 https://www.ebay.com/itm/275024036978 Sean Variety of used 2" x 2" glass Wratten filters in good shape. Each comes with a soft filter case. Fit ARRI S / M mattebox filter slides. - Most are Tiffen - a few H&H or other brands. - May have minor edge chipping or edge layer separation. Useable area of filters are in good shape. - May need cleaned. - Cases are in various states - overall good but may have tape or marker label (some are mislabeled on outside).
-
I was the repair tech for NYU Film & TV for many years and I've slowly been thinning out my parts collection and have some stuff up on eBay right now - https://www.ebay.com/usr/megafern Check it out on eBay or PM me for direct PayPal sale. I have many S parts so feel free to reach out. Some of the items I have up so far: New TCS TM-23 Motors for ARRI S or M - $400 ARRI S Switch Fork - I designed a replacement switch fork for the S - $35 (not currently on eBay) SR Mag Scales - I designed replacement scales that fit the SR - SR2 - SR3 and 416 mags - $18 16mm Collapsible Cores - $48 Variety of 2x2 Glass Filters - prices varies
-
Do you still have Arri 16 s parts?? I have a question about an arri motor control unit which came with a constant 24fps motor. The unit had power, when I plug it into 110 voltage. It has a switch for 'forward/reverse'. When I install the camera motor in the arri 16 s, and activate the run switch on the camera, nothing happens. I purchase this unit on ebay and was quite aware it might not work,
have you any knowledge with this. if you need pictures, I will send
thanks
Mike Leake
-
Yes - the red arrow should be a spring loaded port for Chronosynth I/8 - it's probably better to just disassemble the gear so the shaft can be cleaned as well. I have never seen a mag with the gears greased. I would remove each gear, clean the shafts and lightly oil.
-
Here's the original manual: https://drive.google.com/file/d/1nOPDo63VvwE9dk9zVXQ1mvPxIYpz54mh/view?usp=sharing
-
If the motor is truly seized, it's either the bearings or it was dropped and the inching knob and/or shaft is bent. If the barrel won't turn, it was probably dropped and damaged the housing. If the motor runs but the camera doesn't it's probably the rubber coupling which tends to deform and dry rot - I have replacement kits for those. If anyone needs any parts, I have just about everything. Sean
-
I stumbled upon this today and thought it was pretty cool. An Arri 16S prototype. Even has a letter from Arriflex as verification. I know Tim will enjoy this: Sean
-
I have two, new Tobin TM-23 variable speed motors for the Arri S or M for sale. I was buying these when I could because I was rebuilding some Arri S's but have no need for them now. For those of you not familiar, they are designed to run forward and reverse on 12V for 0-50fps. They can also be used at 8V for about 35fps. Be aware that if you are using mags with the Arri S, you cannot use them at 12V without modification. So, if you were to use this motor with an unmodified mag, you must use it at 8V for a max of 35fps. Price is $360, which includes shipping via USPS priority. Will take payment via PayPal. Feel free to check out my eBay feedback.
-
I have had pretty good success with repainting cameras here at NYU. We have a sandblaster which makes getting the old paint off pretty easy but you could probably use some type of stripper. Anyway I have been using Krylon Wrinkle Finish (#3370) which is used a lot on cars and motorcycles. It's pretty much identical to the Arri S finish. You have to spray it on really thick and it wrinkles as it dries. Heating it helps the wrinkle process but since I don't have a way to truly bake the parts, I 'baked' them under two 1K lights for most of the day and that worked well. It's not as good as the Arri paint job but has held up surprisingly well under student use. The only problem I ran into is where they engraved the camera after painting. I chose to mask those areas and paint them with standard paint, not perfect but as good as it gets. Hope that helps, Sean
-
After collecting used/broken camera parts for 4+ years I decided to do something with them. Currently only have earrings, but may start doing other stuff as well. Have some stuff made from SR2 & SR3 parts, but mainly from 35mm SLR parts. Check it: Sprocket Holes Shop Sean
-
Arri S repair kits for sale
Sean Charlesworth replied to Sean Charlesworth's topic in Cine Marketplace
I still have some kits available and will make more if anyone is interested. Sean -
These are repair kits for the Arri S that I have developed during my 3 years as camera repair tech at New York University. We have 90+ Arri S cameras that I maintain and rebuild. Since Arri has discontinued most of the parts, I am constantly trying to figure out how to keep the cameras running. The kits are the result of lots of research, trial and error and have been proven to work in the field under the most punishing of conditions: at the hands of our beginning film students. I would not offer these for sale if I was not 100% sure that they work. When I was a student, I bought an Arri S because they are built like a tank, versatile and, most importantly, cheap. But I ran into problems when I needed maintenance or repair and couldn't afford it. I designed these kits to specifically help out students and beginners to keep their cameras running at a reasonable price. I love the Arri S and want to see them around for a long time and hope these kits help. If these do well, I plan on making more kits and how-to's. I made the instructions as clear and down-to-earth as possible so that anyone with halfway decent mechanical skills should be able to handle it. Each kit comes with full-color step-by-step illustrations and some come with special tools. Motor Coupler Replacement Kit $50 Replacement kit for the rubber coupler which connects the motor to the movement. Over time they stretch out or get dry rot and start slipping. If yours look like any of these it probably needs replaced: Kit includes: coupler, retaining clips, rubber pad for protection during assembly, modified spanner bit for coupler nut, and full-color instructions. Tools needed are: small slotted screwdriver, channel locks or large pliers, small needle nose pliers, 1/4" bit driver, preferably t-handle style. Disassembly is minimal and installation is pretty straight forward. The instructions are for cameras that have the coupler unit attached directly to the gear plate, usually serial numbers under 12,001. If unsure, remove the motor and look in the port to confirm if the coupler unit is attached to the back of the gear plate. For those of you with repair experience, this kit also works for units above 12,000, with the coupler unit attached to the movement. For the novices out there, the newer style coupler is a more involved repair requiring removal of the movement and is not currently covered by the instructions, thus I don't recommend this kit for you. Brake Pad Replacement Kit $10 This is a replacement for the brake pad on the feed side that prevents the film from unspooling when the camera is stopped. If yours looks like this, it should be replaced or your film might snap or bunch up. Kit includes: replacement pad, full color instructions Tools needed: small slotted screwdriver, x-acto knife, super glue Very easy installation. Eyecup Upgrade Kit - $15 washer only - $25 washer and modified spanner This is for the old style diopter with the lever locks, works with those with a door as well: This diopter is perfectly fine and way easier to maintain than the new-style but the eyecups are no longer available. The new-style eyecup used on the SR II, etc. won't fit right with the existing hardware and this kit addresses that. I currently don't have any eyecups but you can get them from Arri for $28, part # K5.24498.0. Kit includes: fiber washer that allows new-style eyecup to be used on old-style diopter, rubber pad for protection during disassembly (not pictured), modified adjustable spanner (style used for removing watch backs - optional item), full color instructions If you don't have a slotted spanner, I highly recommend purchasing the optional tool. Using the wrong tool makes it pretty easy to slip and scratch the rear element or mess up the nut. If retaining nut for eyecup comes off easily this is a breeze. If it's stubborn, it gets a little more involved but not too bad. Free shipping on all kits in the U.S.. Shipping rates outside the country will vary. I except payment by PayPal or money order. Email arri.sos@gmail.com with your order or questions. If paying by PayPal make sure to give me that email address if different from your forum address. Finally, some background on myself, so you know I'm not a shmoe. I have been the Camera Repair Tech at NYU for the last 3 years, before that I worked in the NYU Production Center for 2 years, overseeing check in/out of rigs and providing training on all the equipment. Before that I ran the equipment room and taught introductory film production for 3 years at Penn State University. I never had a lot of cash, like helping people out and still love old equipment, which are all reasons why I started making these kits. Disclaimer: I cannot be held responsible for any damage you may do while attempting a repair. While the instructions are clear and most of these repairs are fairly simple, undertake them at your own risk. If you are not completely satisfied with a repair kit, return complete kit within 30 days and I will refund your money.
-
Arri S motor with large silver cylinder on back
Sean Charlesworth replied to Sean Charlesworth's topic in 16mm
This would be Arridocs.zip which has: '59 S catalog '75 S/M catalog '81 S price list APEC tech sheet Mag instructions Time lapse manual Universal motor blue print