


David Regan
-
Posts
217 -
Joined
-
Last visited
Everything posted by David Regan
-
Just got back from seeing this film, thought the story wasn't too bad, but was very impressed visually. Going in, I had just read the recent ASC article on it, and was excited, perhaps more so on a technical interest than anything else. I thought it was going to be hyper-stylized and showy, but felt just the opposite, while the film's visual style was a sort of hyperbole, I thought it did it in a subtle enough way so as not to be jarring. The different color schemes and production design of each world was spot on, really great attention to detail, in how subtle things could change, such as the shape and architecture of minute details in the house. Reminded me a lot of Pans Labyrinth actually, these alternating worlds expressly told through differing visuals, yet blended well enough to allow them to overlap. The 3D was well done too, again it didn't hit you over the head, only a couple of 'woah' moments, but for the most part just added a really nice effect of depth into the frame (as opposed to the overused 'popping out')
-
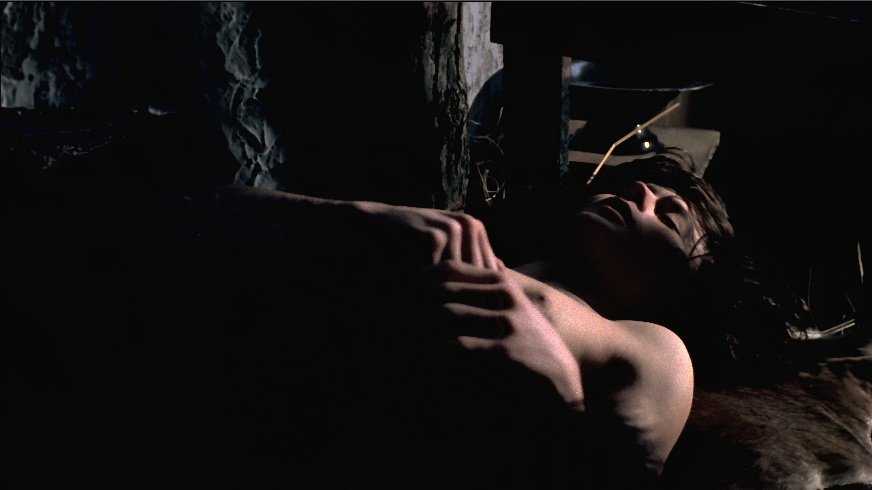
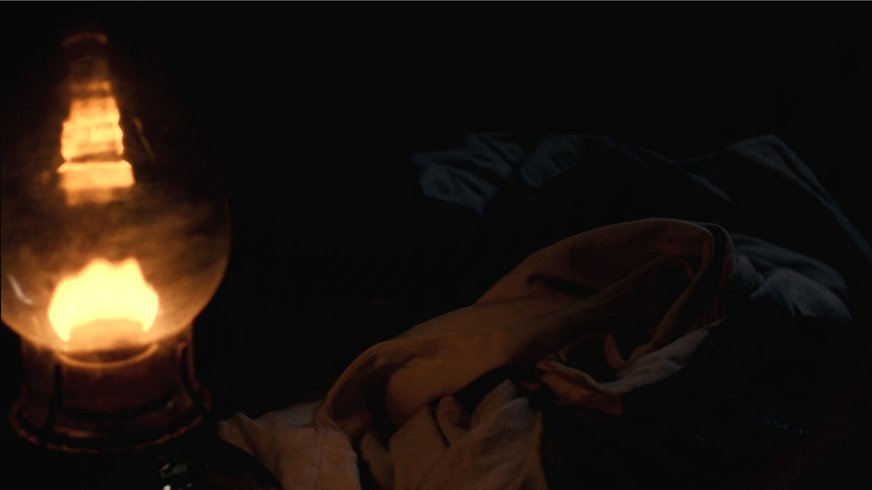
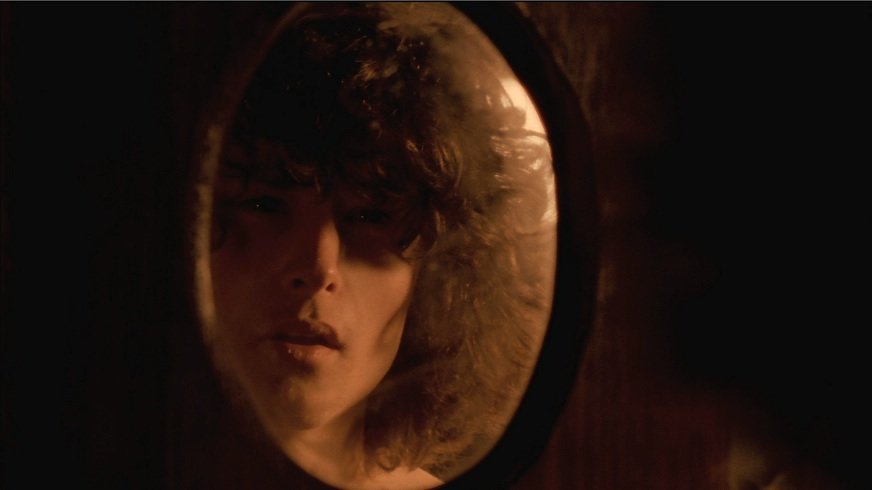
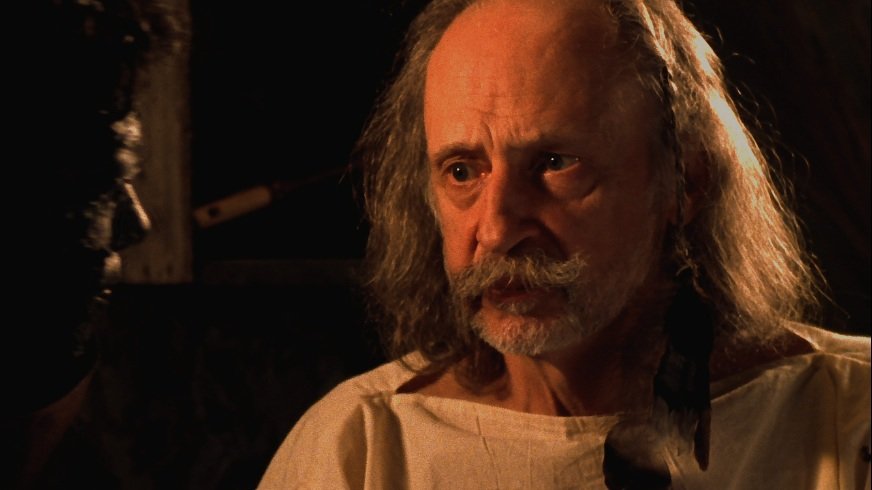
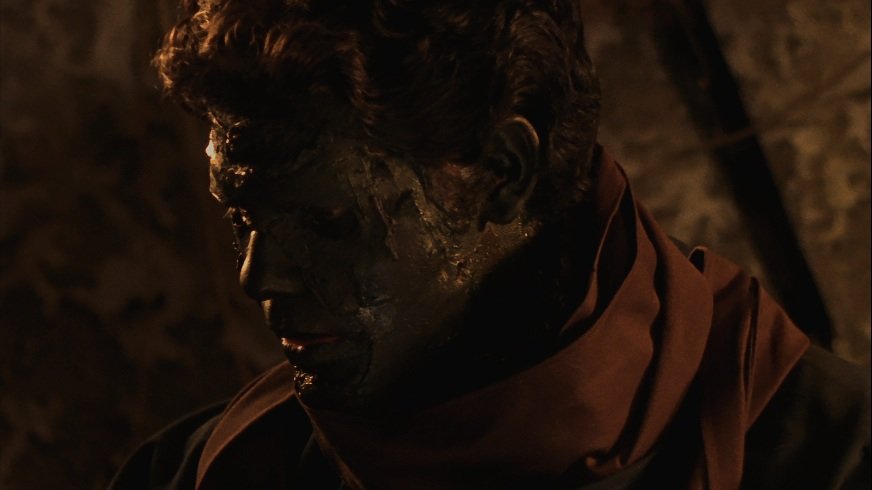
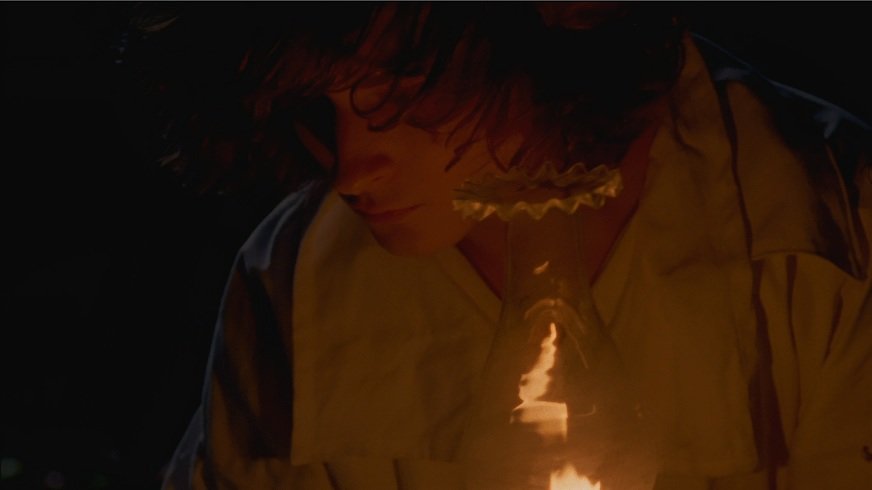
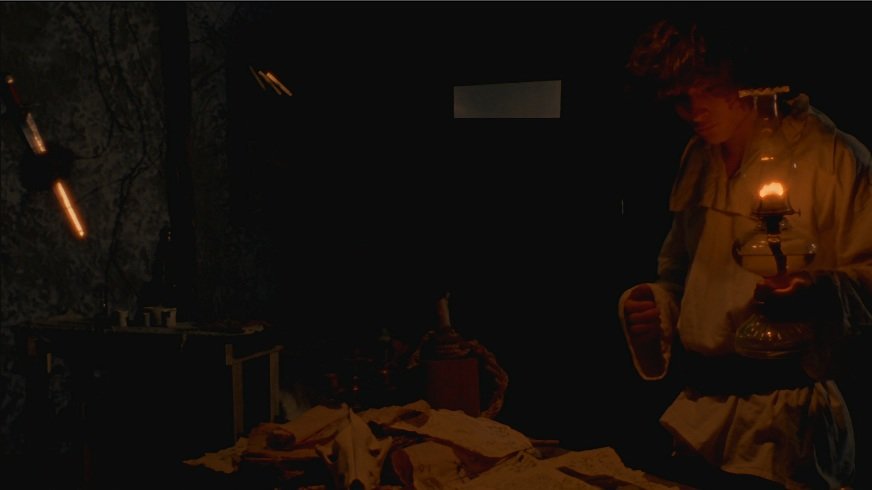
Thanks guys, glad to hear you like it. Gus: It's tricky for me to say exactly how much color correction was done for those lamps, as I didn't oversee the telecine. I had asked the colorist to desaturate the image somewhat, because I didn't want my moonlight to end up garishly blue, I was going for something more silvery, and I can definitely see my warm lamp suffering from the desaturation in the footage, it looked pale and yellow. So I tweaked it a little on my computer with saturation and warmth but it wasn't anything too difficult. You can see the results below. Overall I was pretty pleased with the look. All the follow images are grabs from the HD transfer, once again, through Kodak NY. Color correction is minimal on my part just messed with saturation a bit where there was too much/little. A CU of the Grandfather. Not thrilled with some of this footage. The white shirts worn by the two main characters were quite grainy for my taste, a mistake on my part with the lighting, in that the shirts were fine in mindtones, but when the harder window light hit them, (which should have been softened up) the 2+ stops over got really grainy. The hot spot on the hair really bothers me. I wish I'd put some diffusion between the backlight and his hair. The darker prosthetic looked better in the harder light, and it works better here I think, even though the lighting didn't have to change much. The lamp keying the character's face. Probably could have been amplified a tad, feels a bit too underexposed on the face. The wide of the room. The hot spot on the sword on the left is annoying. It looks like a light saber. Once again should have been softened. The foreground works however I think. Insert of the table. You can see the simulated lamplight coming in frame left. That was the 250w photoflood bulb, blackwrapped, and on a dimmer. Moonlight is a 1200 HMI into an ultrabounce. The bedroom at night. Works fairly well I think, at least on wall texture. Actors skin tone seems a bit iffy, I'll mess around to see if I can adjust it. Some more lamp illumination, this time on some clothing. Again, same type of setup, but entirely keyed by lamp, no bulb this time. Some of my favorite stuff came from this bedroom, supposed to take place at sunrise. A very soft light. I think it was helped immensly and looks much better than the first stuff because I dimmed down the 2ks outside the windows about 30%. Just helped the light fall off enough to not create any of the annoying or blinding hot spots I had in my earlier footage. I was originally dimming just to introduce some more warmth into the light, but it had this added bonus of correctly exposing my scene lol. Oh well lesson learned for next time. A random insert I liked. Again very soft light. Could do with a tad more fill on the camera side. The main actors CU. Maybe my favorite shot. The mirror was slightly dirty which was a nice happy accident, really softened his face, acted as a diffusion filter really, I think it just had a slight coating of dust from the set. Whatever it was I think it works perfectly. So that pretty much wraps up this project. I certainly learned a lot, especially from this footage. I'd be curious to explore more, why the dimming of the lights created exactly the effect it did in the bedroom, because there is an undeniable softness to that scene, that the earlier scene in the kitchen didn't posses. It seems odd that just dimming the lights could do this, as that was truly the only difference in the lighting set-ups. I also realized the importance of keeping the highlights under control, especially on wispy hair and white objects, 16mm grain can really bite you if you let it get away from you in the exposure. Hope you enjoy, comments and/or criticism appreciated.
-
Is the white cyc you are shooting on in a studio, i.e. is it pre-lit with cyc or space lights? If so, shouldn't be too hard, just tweak those lights to ensure the white is lit evenly and without shadows. Assuming not however, and all you have is your lights, you need something that can just be a large broad source to light your cyc. A 2k just aimed at the wall is going to create hotspots, so you need some way of diffusing the light to get it to spread evenly over the white.
-
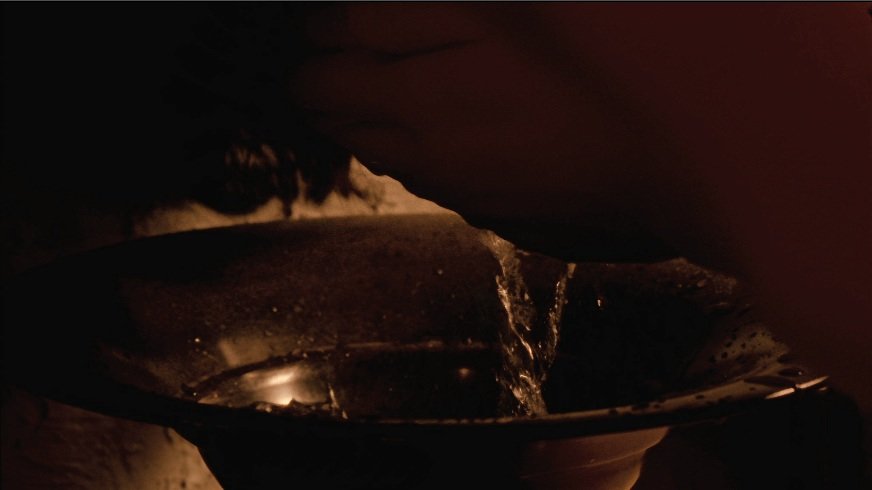
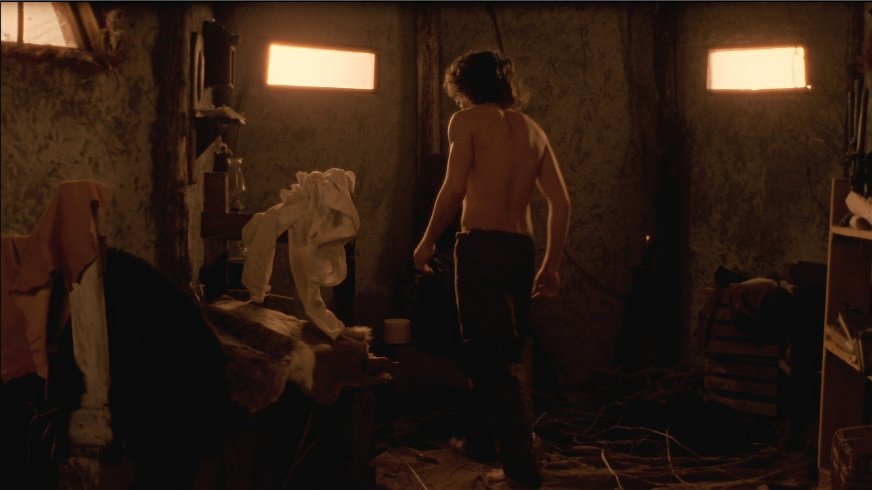
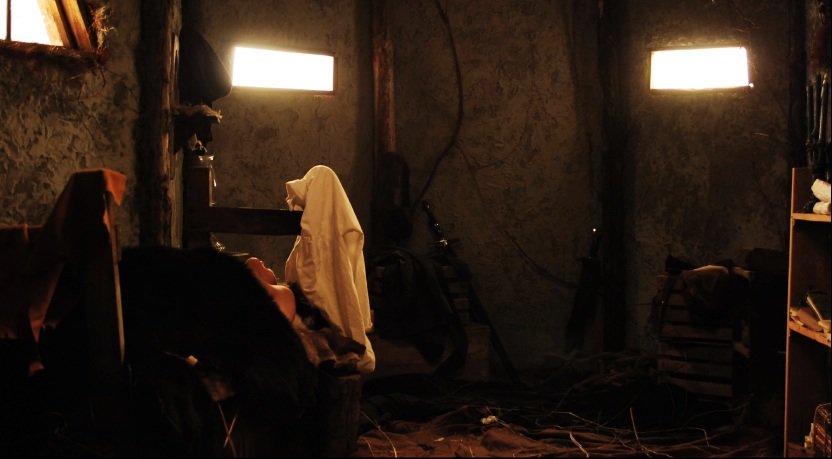
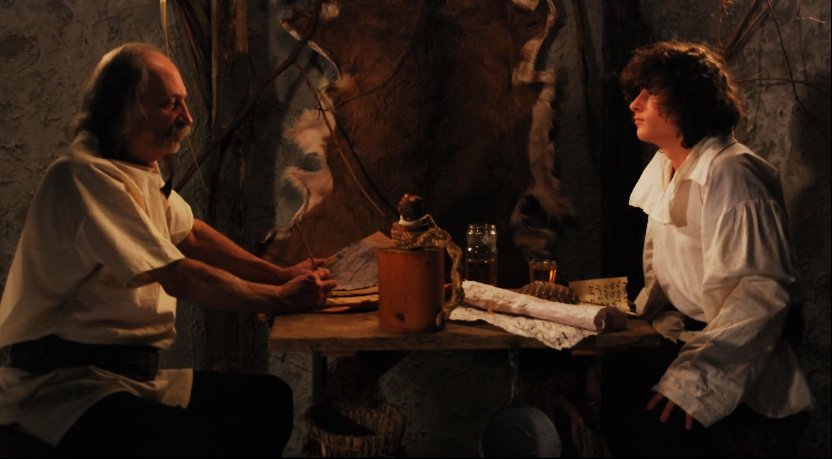
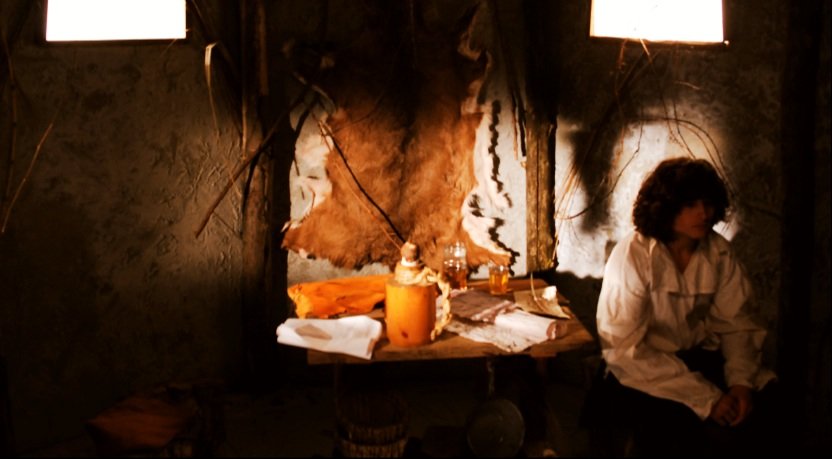
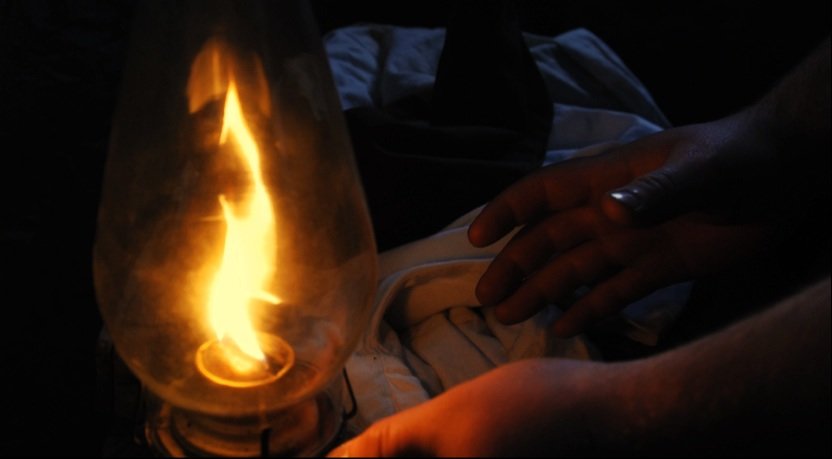
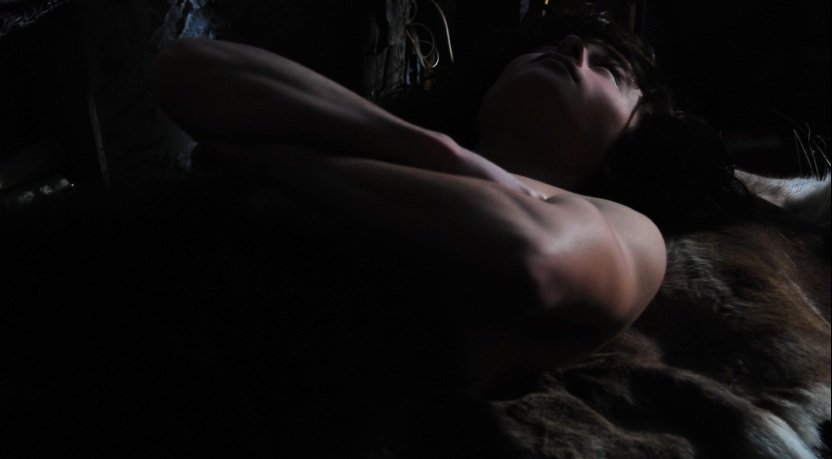
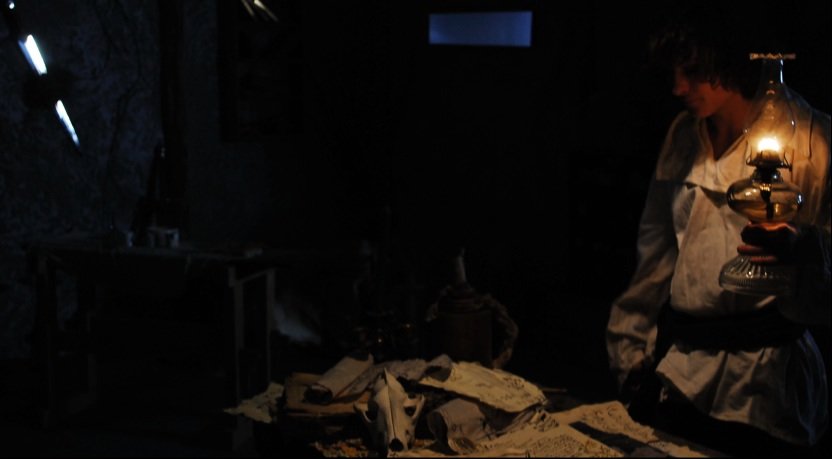
Well it's been quite a while, but after some time spend building our studio set, we finally wrapped principal photography on this film. It was a great set to end in, a lot of work went into building it and the production design on the part of the director, and I think it really paid off. It's wonderful to have a nice space to photograph. Again, this story being a children's coming of age story, the set was meant to look medieval, from a non-specific time and location. When I read the script for this and it had all these scenes, I knew I wanted to establish a certain warmth and familiarity with it, as it is the home of our main character. However I feel that such a look can often become to overbearing and saturated, so I got the idea that the location could actually be somewhat cool and dingy, yet the light itself would bring the warmth in from outside. As such, the set was constructed using quick-crete and mortar spackled on wood, which, when dried, gave a very nice rough texture. All of the light is motivated during the day scenes through window slits. We didn't want to have to rely on compositing in backgrounds through the windows, so I just opted to blow them out. To vary between afternoon feels and morning/evening, I put straw on the lights for the early or late day scenes, and brought the fill level down. During the day, when the sun bounces around alot more, I just brought that fill level back up a small amount, using hanging spider-lights (a cheap 1k knock off of a space light) skirted with duve and through diffusion. It was nice to be able to work with the director to design the set, as I could place the windows at advantageous points, which allowed the characters to be lit with relative ease. The windows were simply fitted with Plexiglas, then covered with 250 diffusion and I sent a 2k through from outside, adjusting the angle to be more or less direct on my subjects. It was quite flexible and allowed me to work around a T4 for most of the day, on a set of Cooke S2. The following are some stills I took with my digital camera on the day, still waiting for the film to come back. The photos are mostly uncorrected, I just added a bit of warmth to a couple. The moonlight shots were pretty simple, I sent a 1.2k HMI into Ultrabounce up high over the set, aimed for backlight. Then I brought a 575 HMI through one of the windows that best suited my purpose, the window still be fitted with diffusion. Finally I would typically keep some of the light off one or two of the walls with 4x flops. For scenes with a candle that was all practical, except the shot with the table, where I had a 250w photoflood bulb dimmed down over the table, with someone riding the dimmer slightly to motivate the lamplight. The HMI's were running around 4800k, so I didn't correct them, as I was shooting on '19, I just let them go blue, and will have that saturation taken down in transfer, as seen in the following stills, to get a much silver/cold feel. So thats pretty much it, aside from waiting on the film. We have a couple pickups to shoot when the weather improves, but otherwise it's finished. We are planning on going in for a final transfer, which has been done beautifully now on a Spirit from Kodak in Rochester, NY. I learned a huge amount and it was a great experience all around. A big thanks to my crew, several of which are members from this site. Enjoy, comments/criticism appreciated. Cheers
-
"What's the Kitsch?"
David Regan replied to David Regan's topic in In Production / Behind the Scenes
Thanks Daniel. I agree the points of light are distracting, and in hindsight, taping them off would have been a quick and good idea. If our compositor has time I might check if he can paint them out, since it's just black behind them. And yeah the flashlight isn't as bright as I'd hoped. It was the sort of thing that got forgotten about in pre-prod. until the night before, so we just went out and bought the biggest mag-light home-depot had to offer. Again, valuable lessons learned. -
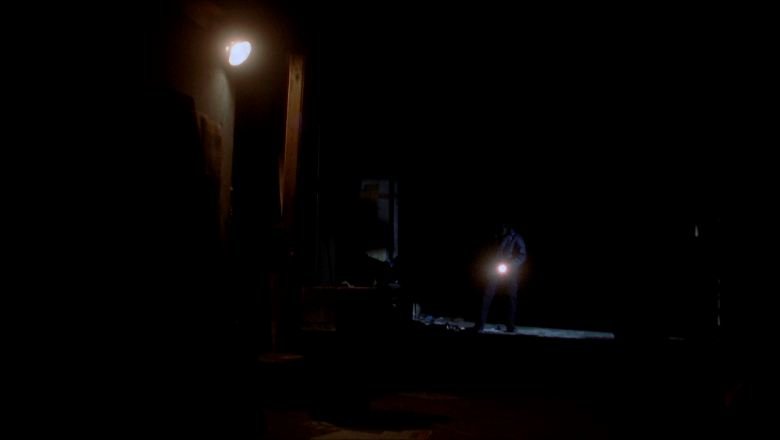
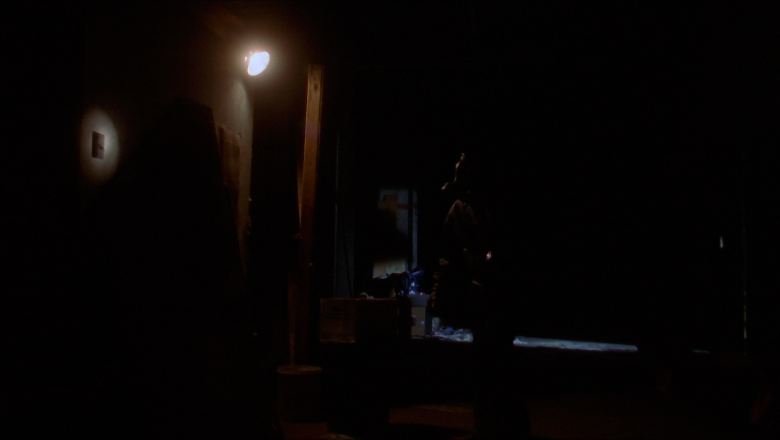
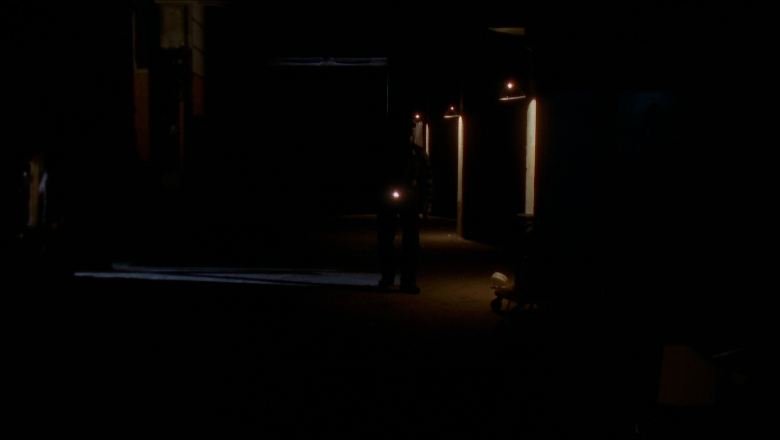
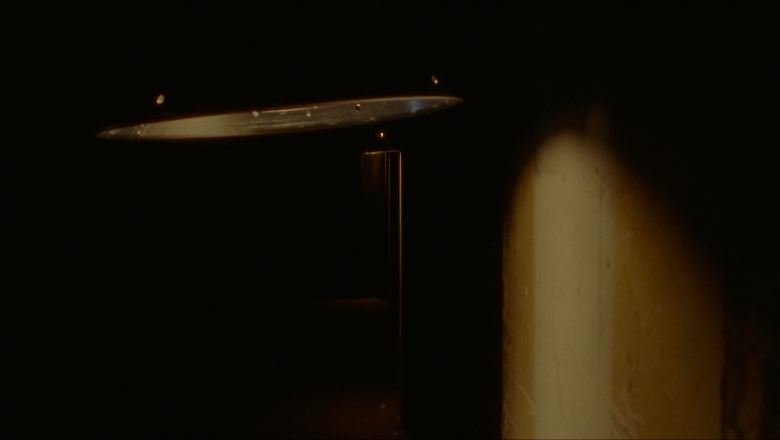
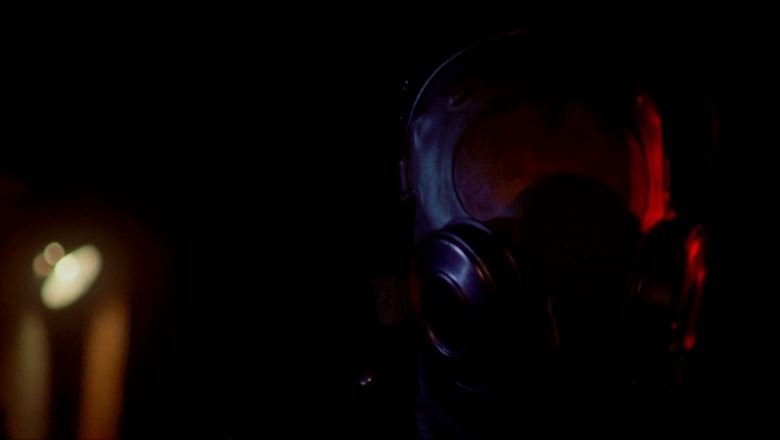
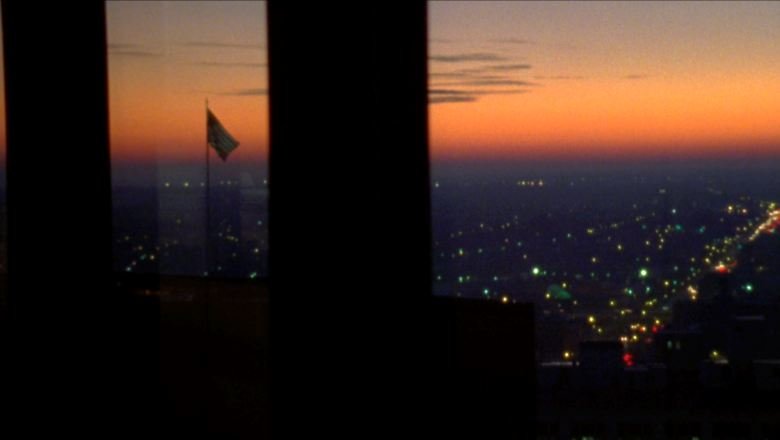
So I just started getting footage back from my most recent project, entitled 'What's the Kitsch?' a semi-parody in the style of 70's B-movie and exploitation films. The director is a great guy to work with and has a lot of good stylistic ideas that have been fun and challenging for me as a young DP to explore. All the following are grabs from the HD transfer, done at Kodak in Rochester NY, off a Spirit scan. Stock is 7219 500T Our first main shoot was also the most difficult, a scene that will ultimately involve a fight with an oversize 12' stop motion ant. (I had this posted in the VFX thread a while ago) The stop motion has yet to be shot, we shot all of our plates and live action on this shoot, before we take it into the studio. I have never forayed into Special effects like this before, so it has been quite a learning and fun experience for both myself and the director. This particular scene takes place in an abandoned warehouse, where this giant ant is being hidden by a mad scientist of sorts. The warehouse was quite large, and very unlit, with the exception of a few windows on the side, which we ultimately blacked out for this was a night scene. This is a student/low budget short, so renting lights was not an option. My package was small, 2x 575 HMI, a couple small Kinos, and some small Arri Tungsten units. Thus the style of shooting this scene evolved both from story but also out of necessity, in that I new I couldn't be throwing up any 9-lights through grid, or filling in the entire warehouse. So I decided to play to my strengths of what I had, and keep it very dark, with small pin-points of light dotting the frame. To top it all off, my subject was black, and wearing black leather, and a black gas mask. My initial DP insticts told me to protest the wardrobe, but I decided to go really gutsy with the shadows and let it play out. And on the whole I was happy with the decision. Black leather looked quite nice I thought under a side/back light and it just popped out nicely against the rest of the black frame. It made for a very mysterious feel, as if we couldn't really be sure where our subject was, which in context of the story worked quite well. At the start of the scene, the subject enters with only a flashlight. In the script the character is suffering from delusions of what his perceived world really is, so I wanted to set that by not establishing this world very well, or creating a single light source. So at the head of the scene, we have a practical on in the FG, and the BG lit by some other artificial source, as if our world really hasn't settled on any sort of solid visual. Then I just let him walk through a lot of darkness, with only his flashlight giving away his presence, sometimes flaring into the lens. It's a lot of black in the frame, and I almost chickened out. But I felt it was better to favor one extreme over going halfway and having a mixed bag. I definitely feel it could use something to break up the black a little more, but the effect is getting where I wanted it. Then as the character approaches the camera, his flashlight, just your everyday heavy duty maglight, illuminates the light switch, as he steps into the work light, and the left edge of the leather shines nicely. When he hits the switch, of course with the obligatory lighting cue, the the once dark warehouse becomes a still dark warehouse with a couple of illuminated pillars. This was done with simple home depot reflector lamps, and 100w bulbs, all wired back to a single dimmer. A closeup of the worklights: Another little gag in this was another character, a 'militant' who's actual existance is somewhat skewed int he mind of the main character. The director wanted the feel that this militant was a remnant of former police brutality and riots, so he wanted police lights to be involved. Ultimately I just simply swung my small fresnel units in backlight on and off him, gelled red and blue, and the effect came out quite well, almost as if this character is creating the light himself. As for close ups, while the wides were quite dark, I found myself taking a fair amount of liberty. My primary light was motived as if it were bounced off the pillars from the work lights, and were hitting the character. Obviously this wouldn't be enough so I just used my Kinos in closeups, and the edged them with a diffused 650w fresnel from far away. Sometimes I would even sneak in a light to hit the leather even if it wasn't entirely motivated, but the leather had a nice shine to it that reflected the light well, and made for a nice effect. Overall I was pleased with most of the footage. It's definitely darker than anything I've ever done, so on the one hand I'm glad I was able to go that dark, and now have a good feel of what's 'too much' and when to pull it back. I certainly think I could have used a few more wisely placed back lights, and fill on the actors costume, but at the same time, the effect of him disappearing is not altogether out of place in the script. Now the challenge is shooting the stop motion ant of course, and getting that placed in. Oh and now that I think of it, we got some great time-lapse from the top of a building in downtown Rochester. It was a tad grainy in the sky for my taste but nonetheless...still cool. More to come, comments and/or criticism always appreciated. Cheers for now!

-
Well it's pretty much as Mr. Mullen previously stated, that subjects don't have to always be lit. Think about lighting your environment. I.e. if you character walks down a long hallway, you don't necessarily have to kill yourself lighting the whole hallway. It might look nice to just light a room at the end of the hall and have your character walk in silhouette for much of the way. It really just depends on the look you want, if it's supposed to be really bright, like a house with all the lights turned on, look into lightweight fixtures that can be rigged out of shot. Roger Deakins makes extensive mention of his technique of wiring a bunch of bulbs onto strips or circles of wood, it's lightweight and easy to place. And wall spreaders couldn't hurt either. Good luck
-
http://www.theworkshops.com/catalog/course...1&CatID=295 Doug Hart's workshop is pretty well known and well thought of. If it isn't in your area however, I'm sure there are other similar workshops on the West Coast others might know about.
-
Sounds like you've pretty much got it. I let my shadows go under by 2 stops, I've even gone 3 at times on 7205 with good results. 2 Stops over in your highlights should be no worry. And yeah big budgets can do a lot, either fill up shadows, or tent large areas of an ext. with silk or nets to soften up the direct sunlight. The quickest solution without a budget, if you find yourself with contrast ranges beyond what you want, is plan your shooting in a location, and at a time of day when the sun is in a more favorable position. This might mean the whole sidewalk is in shade, or the characters are backlit etc...Earlier/later in the day is less harsh too, the sun isn't as toppy and direct. So I think you should be ok. Cheers
-
Practicals: using household flashlights in a scene
David Regan replied to Reinis Traidas's topic in Lighting for Film & Video
Depending on the flashlight, you should definitely be able to have exposure in the areas illuminated by the flashlight. Those larger Mag-lights are pretty bright, in the area they hit you shouldn't have a problem. If you need more light, I suppose you could always try something like using a Leko for the shots where the flashlight beam is illuminating things, then cut back the practical as you suggest. If you really want to know however, just go into a dark room with no other light, shine your flashlight across the room, and use you light meter to gauge what sort of workable stop you'll have at various distances. From there you can figure out if you need a more powerful source or not. -
It can be defined, more or less if I remember correctly, as being derived from the color a black body radiator would turn when heated. As this is heated, it turns from black to red, to yellow, to blue. Thus the higher the temperature, the cooler it is. So 3200K tungsten lamps have the equivalent color output that we would see if we heated this black body radiator to 3200 degrees Kelvin. Likewise if we heated it to 5600 degrees kelvin, it would be theoretically the approx. color of typical daylight sources. As for the second part of your question, color temperature remains the same (theoretically) regardless of the number of sources. If you throw up 30 tungsten units and aim them at something, and then turn 29 of them off, you should still have the same color temp. Bear in mind, color temperature is not always exact. In tungsten units variations in voltage can alter the exact color output of a light. Likewise HMI and Kinoflo bulbs can deviate from 5600K, which can change as the bulbs age.
-
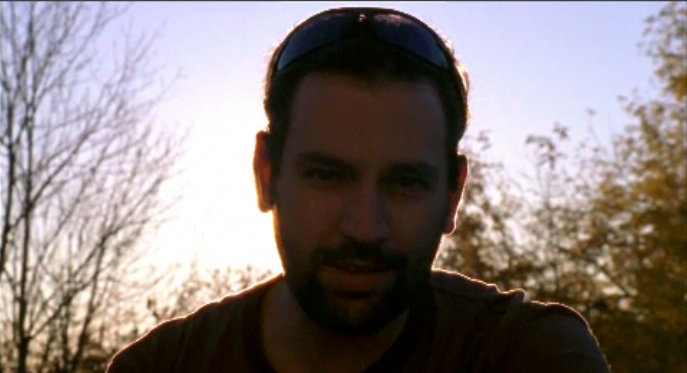
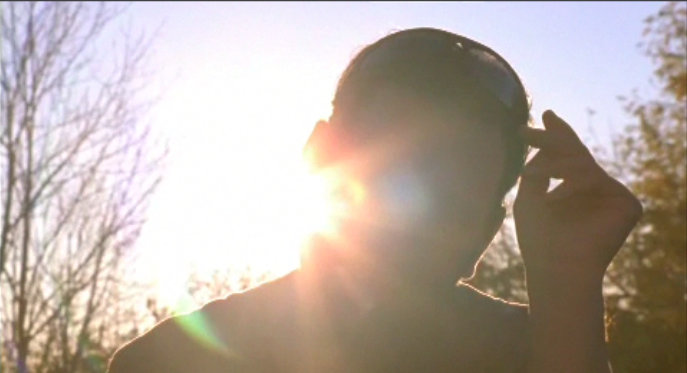
Did a shot very similar to this recently, where we wanted the character to be framed in front of the sun, but then move his head to one side, as if he were blinding the character who is looking at him. We shot on 7205, and I felt it held up quite well. I don't remember what my stop was, but I seem to recall the subjects face facing camera was between 2-3 stops underexposed, and I think the effect works. You can see the example below, where the sun totally blows out the frame, and then when he pulls his head back.
-
Shooting Reverses
David Regan replied to Chris Durham's topic in Students, New Filmmakers, Film Schools and Programs
When you introduce a third character, you are establishing a new line, so don't think of yourself necessarily breaking the 180 degree rule by turning around to look at the waitress. You could cross the table directly, or have a couple separate lines of action for each person at the booth. i.e. when the waitress asks one person what they want, be in a OTS of the person at the booth looking at the waitress, and when she turns to the other, have an OTS from that person. Generally speaking, I feel if you establish your space well, when you do turn around the audience will still understand where we are. And assuming you have to cheat your table out to get the camera in these positions, you really can get away with a foot or two, as long as your careful. -
For a lot of situations, another approach is to do digital matte paintings, for which I am sure there is a wide array of software.
-
This might be better off in the film stocks section... But to answer your question in an off topic sort of way, I've incidentally heard Fuji 500D is really good at handling florescent lights in locations where you can't alter lighting much. And if your going DI in the end I feel like you'd probably end up with a pretty flexible negative to deal with the light color etc...others with more experience could probably have more insight.
-
Stop Motion with Live action Plates
David Regan replied to David Regan's topic in Visual Effects Cinematography
Haha, possibly true Chris, but I'm gonna think optimistically. 18ks.....somedaaay....lol (Not that tools have anything to do with good cinematography) Yeah John, I guess you sort of hit the main crux of the issue, weather or not it looks *real.* The director and myself both recognize that stop motion won't mesh perfectly, it will have a different aesthetic, and given our both being newcomers to the technique, we will have our problems, and we realize that. But I think we both feel that in either case, have a real, photographed element, even if it isn't perfectly meshed, is still going to be better than a fully CG model where not only is it not going to be perfect, but it's going to be CG to boot. So we will go ahead with stop-motion, learn along the way and have fun. I'll be sure to post results, I'm gonna keep researching and planning, thanks for the tips, I really appreciate it going into this unknown. -
Stop Motion with Live action Plates
David Regan replied to David Regan's topic in Visual Effects Cinematography
Haha, in an ideal world, probably not, given the creative possibilities it offers it would be nice but there are restrictions. The film is for a student project, meaning it has a pretty strict deadline, 10 weeks. If we had a full VFX team, and a bunch of people experienced enough to model/rig/animate/texture/track camera moves/light/render etc...in that time I would say go for it. While I don't doubt my peers abilities, I just don't think we have the manpower or time at this stage to set about that. Not that stop motion is any 'easier' but it's something we can get done, and fits more naturally into the aesthetic, think the stop motion of the robot in robo-cop, or the snake in beetlejuice. So yeah I totally see where you coming from, but at the same time I'm excited to explore the possibilities of stop motion, and getting to light and shoot physical objects, as well as learn from all the challenges it presents. -
Stop Motion with Live action Plates
David Regan replied to David Regan's topic in Visual Effects Cinematography
Also just did a quick focal length conversion, I think this is right. Say I shoot the stop-motion with a D200. The sensor size is 23.6mm wide, as opposed to the 12.52 width of a s16 frame. Hence the lens must be 1.88 times longer on the dSLR to have an equivalent lens length. Does this seem right? -
Stop Motion with Live action Plates
David Regan replied to David Regan's topic in Visual Effects Cinematography
Thanks for the tips. I'll definitely be stopping down, thanks for reminding me John, I noticed in Dennis Muren's Article in the ASC manual he notes that for stop-mo 1/4 sec exposures are a good place to start. Also in said article, and going off what you guys were saying regarding speed, I just want to make sure I understand the concept clearly. For moving miniature objects, you typically want to run the camera at a higher speed, again with Muren's example, a driving car going 60mph, obviously it can't move 60mph on a miniature set, so you film it moving slower at a higher frame right? Is this correct in essence? However I assume this doesn't translate extremely well into my situation, which is stop motion, where the ant doesn't do a hell of a lot, mostly rearing up and swiping with its lets. So for this would I be safe in shooting it traditionally stop motion, or should I actually take more frames to slow down the action? Finally, I was considering running the camera for the live action stuff at 90 degree shutter, add a bit more pop to the character's movements. Obviously the stop motion will have a different feel, but perhaps this will help it mesh a wee bit better. Just a thought. Once again I appreciate the thoughts. This is all new territory for myself, so it's sort of learn-as-you-go experience. Cheers -
Just got this outta the handy ASC manual: Distance from film plane squared, divided by the focal length squared = the exposure factor. So if you are using a 75mm lens and say a 50mm extension tube that would be [(75mm + 50mm)^2]/75^2 Which yields 15625/5625 = 2.78. Which is your exposure factor, which yields an exposure increase of between 1+1/3 - 1+2/3 stops.
-
Best comprehensive book for ACing
David Regan replied to Patrick Kaplin's topic in Camera Assistant / DIT & Gear
Doug Hart's book should cover you pretty well. And the ASC manual is something anyone should probably have. -
Stop Motion with Live action Plates
David Regan replied to David Regan's topic in Visual Effects Cinematography
Thanks for the tips guys Regarding matching lighting/movement and such, yeah I will definitely be taking detailed notes. We are planning to do a full blocking of the scene next week, so we can really lock down all the movements, framing, compositions etc...to plan for the best. As far as keying, the way the shots work out, I was looking over our storyboards, we really only have to key stuff off the stop motion from the dSLR frames, which will be significantly easier than keying from S16 as you mentioned Scott. If this film had the time/budget/resources, there are many different things I would 'like' to do with this sequence, but due to our restrictions we have to limit the options. So for that reason, as I mentioned we won't be doing a lot of human/ant interaction, and as far as seeing the two layered in the frame, it will be easiest if the ant is in the FG. For example we have a shot where the ant stands up and towers over the human character. So I'll shoot the wide down angle on the human first, then use a transparency to trace out the frame on the monitor. Then when we go shoot our stills, I'd like to bring up the image on the montior, overlay the transparency so the frame can be matched. This will be over greenscreen. Obviously lighting continuity will be huge as you guys mentioned, as well as camera angle, focal length, etc... But I think it can sell. Camera movement is my biggest regret, rather that we won't be able to do it. On the one hand, doing this CG would make for the possibility of being able to track the camera movement in the computer, which would make moving camera shots a bit more feasible. However, Paul, I would say my biggest reason for not doing CG, although I agree it does have a lot of perks, and we do have Maya, is just how it would ultimately look. I did smaller HD project last year, where we thought it would be a good idea to have a CG character, and even with about 10+ weeks of work, it really didn't mesh or sell at all, and just look reeeaaalllly CG. The amount of work required to animate, texture, render, light etc...I think would just be beyond our resources and manpower. The one element I think will be CG, is the physical interaction between the ant and human. At the end the human stabs the ant with a long pole, so I think for that shot, where I see both and and human in the same shot, I will go with a CG pole. Not that stop motion is going to be loads more realistic, but it's something the director and myself both want to try, and do like the aesthetic, this film is supposed to be in the campy style of old B-movies, with outrageous events, as I'm sure you can guess from the concept of an ant fighting a human. But regardless it should be fun and a learning experience. -
So I've got an project coming up with an interesting sequence involving a man fighting a large robotic ant. Fun stuff. We are going to do the sequence in two sections, one being the live action elements of the man, some in front of green screen, and the other being a stop motion of an ant puppet. It's not the most complex of sequences, as our budget/rescources are limited, we have confined much of the shots to singles, but there are a few shots which will combine both of the characters in the same frame, to really sell the effect. We are shooting on film, I'm looking at shooting 7217 and 7219, mostly the '17 for the spfx work. Firstly, has anyone ever done much with matching live action with stop motion elements? I know I'll have things to watch out for, mostly matching camera angles, focus, lens, etc...to get the elements to match. And I know camera movement with both objects is pretty much restricted, since we don't have motion control capabilities. Secondly, for the stop motion section, we are going to be shooting hi-res digital stills for it, as opposed to straight on film. Our output is HD, no print unfortunately. So, would it be worth taking our digital stop motion sequences, getting that scanned to film, then transferred back to HD? Given we are ending digitally, would it just make more sense to stay digital and try to futz with it a bit in post to try and match? Somehow I have a feeling even with digital grain and such it's going to stick out, which is why I'd like to have it get back on film, albeit it will be conformed to HD in the end. Anyway, it's a sorta unique area of VFX I haven't delved into before, so if anyone has any tips or thoughts it would be much appreciated. Cheers
-
Others have brought up this stock on this site before, David Mullen gave some good opinions about it when the stock was first released, if you do a search you can find it. From personal experience, the stock holds up quite well to my taste, although I know a lot of people still find 500T on 16mm a bit grainy. I did a series of over/underexposure tests with the stock, and still was getting good results 3 stops under. It's a warm stock to my eyes, the red's and brown's in scenes often seem more saturated to me. This is from a pull process test I did, which I felt did a nice job tightening up the grain. (Rated the film at 250 ASA) This is 7219 Pulled 1 Stop at Key: Now here is the same roll Pulled 1 Stop but 3 stops underexposed: Compressed JPGs on a forum are not a great way to analyze film stock, I wish I had a better method to upload the test footage, but you can see, even 3 stops under, the stocks holding up well considering. Of course the best solution to your question is test test test, it's the only way to really understand how a stock performs. Good Luck
-
In that particular setup, I'm afraid not. The link to the full spec. is here: http://www.vimeo.com/1060081 There are some similar lighting setups throughout, we used the same few lights, it was usually a combination of 575 with a couple small Tungsten units, so you can get a basic idea.