

robert duke
-
Posts
448 -
Joined
-
Last visited
Everything posted by robert duke
-
Any suggestions for making homemade frames for nets and flags?
robert duke replied to Tim O'Connor's topic in Grip & Rigging
think of it in the cost/benefit ratio. Building it- cost of materials, cost of tools, cost of time, impression of producers and clients when you show up with a home made flag. Buying it- cost of purchase, cost of shipping, impression of producers and clients when you show up with a professional flag/ net. I have made some specialty size flags using 3/8 stainless steel tube and solid rod. It took about an hour to weld up. ( getting tools out, cutting steel, welding, bending, grinding, and cleaning up.) It took about an hour to sew it. ( getting the sewing machine set up, cutting the fabric, sewing it, cleaning it all up) I feel I am worth easily $25/hr easy. 2 hrs x $25=$50 not including the cost of materials. stainless steel is pricey but it doesnt rust and get funky like cold steel. aluminum is difficult to weld. 3/8 tube is roughly $14 for 20 ft. so a 2x3 uses 8 ft roughly. so we will add $7. net is about $3 a yard. so now its $60 for 1 2x3 single net. not including the piping around the edges. Modern studio sells their 2x3 singles for about $45. shipping is about $10. so for $55 you get a pro 2x3 delivered to your door, impress your client and producer with your professional gear. think about it. DIY is great and I am not bashing the concept of DIY gear. I have made gear but I am a welder and machinist. as well as a grip. i have the tools to do it. I still buy my rags and flags, b/c it makes sense in the long run not to reinvent that wheel. look to your DIY sense for those things that are out of reach. -
Thanks all. I talked to my regular best and he seemed to agree with my assesments. I tried to talk to him(mr728), but it seemed to fall on deaf ears. I have a day off and will begin looking for his replacement. I appreciate everyones replies. It just bothers me that he came highly reccomended. Even from an old best, but when I get complaints from the other guys I think its an issue and I am. Beel whats up? how is the bama? drop me a line. tell bambi hey for me. Duke
-
I am two weeks into a 10 week shoot. One of my guys had to bow out after one week due to personal reasons. He found a guy to replace himself, not my usual fare but we are far out of town. The show has three more weeks out of town and then we come back to LA and finish in LA. The replacement is on day two and is not getting into the "groove" with me nor the other guys. He also has issues of not really knowing his duties as a grip. I have explained what I expect from him and his work ethic. I have explained my working style and how things are to be done. He has resisted to do things our way. I would like to think I do things professionally. color frames square to the ground. Conscious of gel bounce angle. high hat package etc. He told me tonight he is not a grip. I am asking all of you for your opinions. I could release and replace him. I could grin and bear it until I got back to LA. I could try to have a private sit down with him. I have fired people before mostly for drugs, stealing, or tardiness. I need a working grip not a gripe. I have a couple guys in the wings waiting. What should I do? Robert Duke Key grip
-
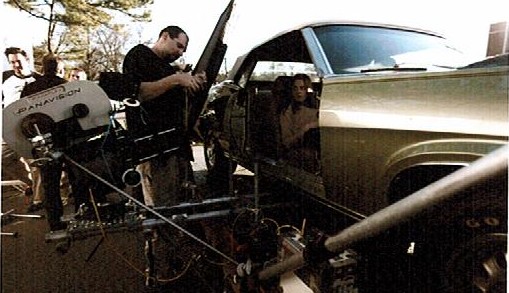
I am pretty sure there wont be any instructions. Do you have a grip? if not get one that has used this kind of gear. this has the potential to cause death or serious harm. The rig is pretty easy. put a furniture pad down on the hood. set the mount on the hood where you want it trying to align the feet along a body seam. Lower or raise it to suit your shot. use 2-4 ratchet straps and strap it down tightly making sure the ratchets are not hooked on body panels, plastic, not caught up it the tire as the car steers, etc. bolt leveling head on, bolt camera or quickrelease to leveling head. put a safety on the camera should something go wrong. I like to bite the camera mag with a cardalini or something to reduce vibrations. Be Safe. think things through. I would suggest you hire or find a grip with experience with these rigs. Safety is no accident. think about your ability to pay for any damages caused by misuse of the equipment. everything must be secured to prevent an accident. go slow it looks a lot faster on film. I once had a camera body crack from the shock forces on the camera. granted we were in the desert going 45mph armed out from a hummer. the sony camera (brand new hd-900) split in half right at the dip switches when we hit a gully at 45. Insurance is a great thing. sony also ponied up on the warranty.
-
Check out the Hydroflex website. some really cool sh***T
-
I think I saw the setup for this. I believe they used 6 underwater pars (1200's) from underneath. It was shot at ?fantasea? stage pool in LA. Check out the sea par web sites.
-
you might also try to bounce the light off of just the floor, natural light bounces the colors of the room/floor/tablecloth, etc. I worked with one DP who had art dept paint 4x4 luan sheets the color of the walls to use as bounce to bring those colors into his lighting. It looks beautiful. I love the source four bounced off of a table for an intimate moment betwix two people.
-
on the kino ballast you will find a placard that tells you the amperage, same for the 1200 hmi. 4x4 kino draws 5.5amps, hmi's draw more power than the w/v=a formula and it differs with magnetic vs electronic. 1200 hmi draws roughly 13.5 amps. most electronic say on a small placard the amperage draw.
-
Light lost through bounce
robert duke replied to Jimmy Browning's topic in Lighting for Film & Video
I dont think there is an imperical way to calculate light loss from a bounce. Distance from reflector, angle of light, beam spread on the light, condition of the reflector, size of the reflector, size of the light all affect the light output. larger=softer, smaller =sharper for the bounce. The best way is to guesstimate the loss, if you want hard or soft bounce, directional or diffused. -
Hanging a small light from the ceiling
robert duke replied to Natalie Saito's topic in Grip & Rigging
suction cups only work on smooth glass like surfaces of cars, boats, and windows. Even primer pain is too rough for them to hold. I have had problems with the command adhesive sticking to ceilings. the pop corn ceilings interfere with the surface area required to hold anything. -
Hanging a small light from the ceiling
robert duke replied to Natalie Saito's topic in Grip & Rigging
that header is perfect for a c-clamp with baby pins, a furniture clamp, a bar clamp, or a speed c. I would bet that it is too wide for a cardelini. This is where you as a grip get creative. There is no one absolute right way. Use what tools you got, the object is to make it work. if it is just a bare bulb, you could just tie the cord to the clamp, tape it to a clamp, use sash to tie it to the clamp, use a spring clamp, and many other ways. Have fun engineer it and be creative. -
Hanging a small light from the ceiling
robert duke replied to Natalie Saito's topic in Grip & Rigging
I usually shoot in real locations and found that for china balls and small cord hanging bulbs laying painters tape over the cord and then back that up with some thumbtacks. the thumb tacks are small enough that a home owner doesnt mind. Failing that a wall spreader is the next zero damage with 360' viewing. If 360' is not an absolute must then a menace arm or boom does the job. -
Practically anything can be used as a bounce. I have worked with some DP's that have the art guys paint a 4x4 the same color as the walls to use as a close up bounce. I even worked with one DP that had a Grip take off his shirt and bounced a light off his belly for a closeup. I like ultrabounce or claycoat covered with a silk for a nice soft bounce. The silk has a nice high reflectance that when backed by ultra, claycoat or griff keeps the light that would have gone through it. Silver lame is nice. Gold lame is nice for people of color. but my fav. lame is the lisa marie gold/silver checkerboard. I think the idea is HMI's let you help deal with time a little easier. large bounces are great for the huge source but are only usable in sunlight for day ext. they tend to sandbag you as the sun sets. The bigger the area of the source the softer the light. The bigger the bounce the wider the shot can be. HMI's produce a point of light unless going through or bouncing into a frame. things to think about anyway.
-
Kaye lights sells a lightweight plastic flag box, I built a flag box that hold four of them on wheels. When a break off unit is needed or when I want to have several close at hand (closer than the flag box) I pull the small plastic part out for a "on set" flag box. It protects them and keeps them handy. I can also keep them in two "sandwiched" ( solid single double silk solid) per smaller flag box. It works great protecting them and keeping them organized. They arent too expensive. also alternate the single and double with the frame out so that one frame protects the open side of the other. you could probably use your cardboard sleeve with a wood flag box. Flag and nets are delicate. They always seem to be the first to get wounded on a set. hit me up for a great local 80 guy who sews repairs and recovers cheap. DUKE key grip SE usa
-
Try using an elllipsiodial spot. I think you will find it easier to project a pattern. try the Scource four ellipsiodal, you get get a joker bug adapter to use as an HMI. Or an ALtman Leko.
-
the bag should go on the Leg at the joint of the brace. the bag should be laid with a nice little wrap around the leg so that it grips the leg. The braces are done sometimes but truth is they are not meant for that kind of weight. Dont throw the bag on the stand. only hang the bag on the knuckle as a last resort. the knuckle can be bent by a bag dropped on it. never put the bag on the very ends of the leg, it is too easy to slide or wiggle off in a wind. make yourself look good when not using bags stack them crisscross five high. it makes staging look neat and keeps the set looking clean. stacking more than five high is asking for a broken ankle. also some manufacturers only put a handle on one side. try to keep that side up at all times either on a stand or in a stack. If you need more than two bags be sensible and use a muscle cart. Bags are one of the first things people hurt themselves trying to carry. Its not cool to hurt yourself by trying to carry to many bags.
-
remember they are called a century stand b/c it takes a century to master them. hahaha duke
-
EZFX JIB for sale check it out at www.ezfx.com for sale is an older model jib with the ability to short to 3' from the 5' length. also the jib handle and a shorter weight bar. make an offer, I am asking $1000. the jib retails for $1200 , the handle is $279 and the additional weight bar is $175. the jib is in good shape. reply
-
Costly is my ownly beef with it. look at the travato's and seven jib. or even the EZFX jib.
-
The bed roll, this seems simple but it took me months to get right. there are some simple but easily overlloked tricks to this. 1. fold the furni in thirds 2. start the roll very tightly. 3 when you get 2 ft from the end pause and fold open the folds in a V shape 4 continue rolling tightly all the way to the end. 5 tuck your outfolded edges into the center of the furni roll. I see people waste tape taping this up but if you do it right no tape is needed. do it repeatedly and it will get easier and tighter. practice makes perfect. as to the tie down rule. always tighten after removing from the stand and loosen as you go to put it on the stand. On a long show out away from a rental house it looks bad to have to jerry rig a light because you lost a tiedown. make it a practice to do a once over and loosen/tighten that knuckle. it doesnt matter who owns the light. Take care of your tools and your tools will take care of you. Rental houses notice the L/D list and sometimes will not recommend or rent to people with a bad history of L/D. Duke
-
Linear Beds/Camera Sliders - Tips?
robert duke replied to Barry Cheong's topic in Camera Assistant / DIT & Gear
Micheal, As a manufacturer, what would you want to see or how do you feel they could be better? I am curious as I make them and want to make a better product. -
how would you do this effect?
robert duke replied to Delorme Jean-Marie's topic in Lighting for Film & Video
I did a similar effect using a 12k par and a shiny baord. I pointed the 12k away from set a had a grip man the shiny. by quickly flipping the board and panning wildly we were able to get a crazy flash that would dance around like electricity arcing around an object. some selective flagging also helped break up the directional movement of the shiny board. -
Linear Beds/Camera Sliders - Tips?
robert duke replied to Barry Cheong's topic in Camera Assistant / DIT & Gear
It sounds like you might have also had a bad bearing or two. Sliders from Panavision have bearing races with a dust collecting shield on either side of each bearing set. On rental sliders sometimes the rail is not cleaned between the bearings under the camera platform. this causes a buildup of gunk on the rails and can cause the dust sheilds to loosen and stick. this also allows gunk to penetrate the bearing races. I like the panavision sliders but they need to be maintained even on short jobs. I have a 4ft copy of the panavision slider. It works great but I find that every other day I have to dismantle the sled and clean the dust shields. I have built a couple sliders that use a bearing free design. Sliders take a couple days/weeks to get to know when you are first introduced. I have a couple DP's that took to them like ducks to water and others that wouldnt even consider them again. I think practice really helps. Dont avoid them they are great tools. just make sure they are properly maintained even in the field. -
first correct you name as per forum rules. second hire a grip with experience at this sort of thing. If you can imagine the angle we as grips can make it happen. you dont say what kind of camera and what kind of cycle. there is a lot of difference between a 3lb dv cam and a 40lb arri 35mm. as is a sport motorcylce and a ten speed. define all your parameters including budget. then we will see what we can do. DUKE
-
If you are shooting from a car you should have a police escort to control traffic. the police are very helpful when doing shots on the roadways. contact your local film office for assistance. or if you dont have a film office contact the local PD directly and they will more than likely be very helpful. either way you should contact the police for the safety of your actors, and your own sanity of trying to do a shot on an uncontrolled roadway. duke