Aapo Lettinen
-
Posts
3,336 -
Joined
-
Last visited
Everything posted by Aapo Lettinen
-
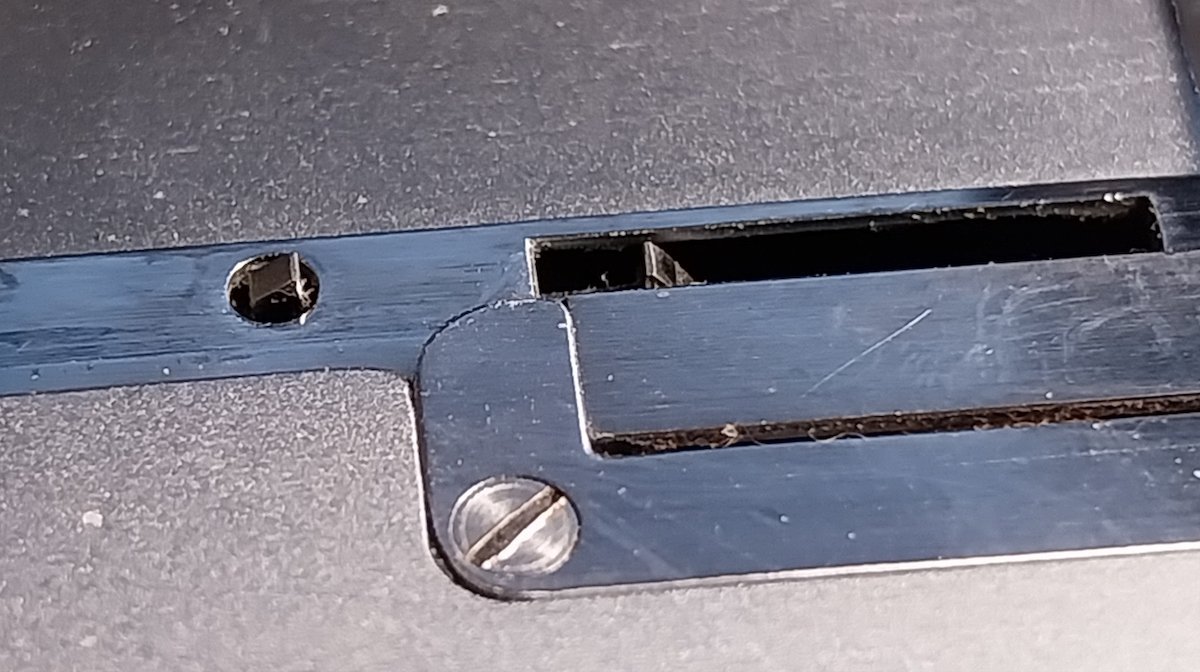
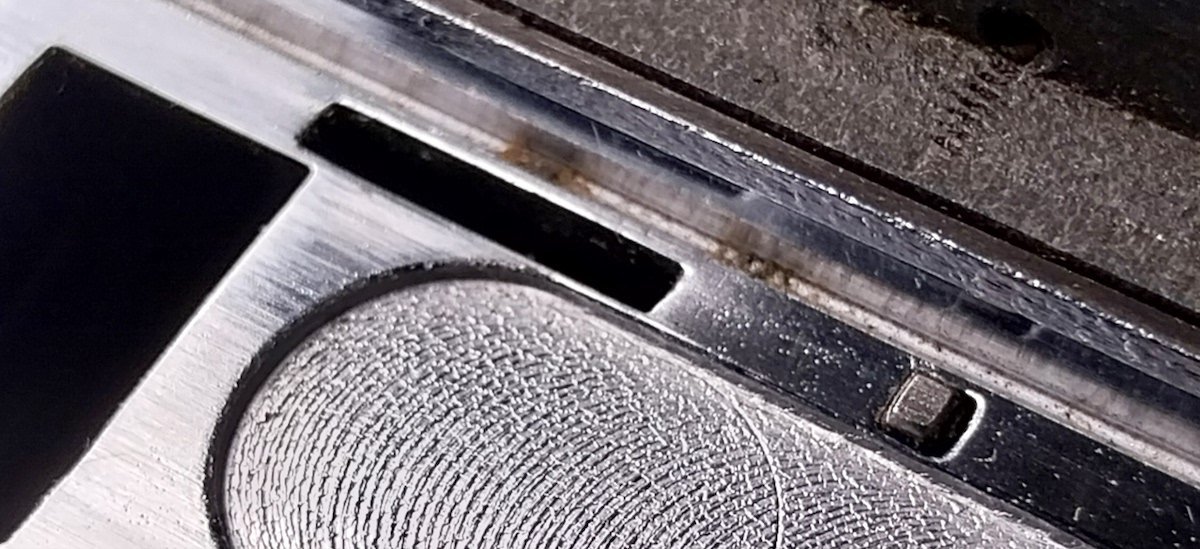
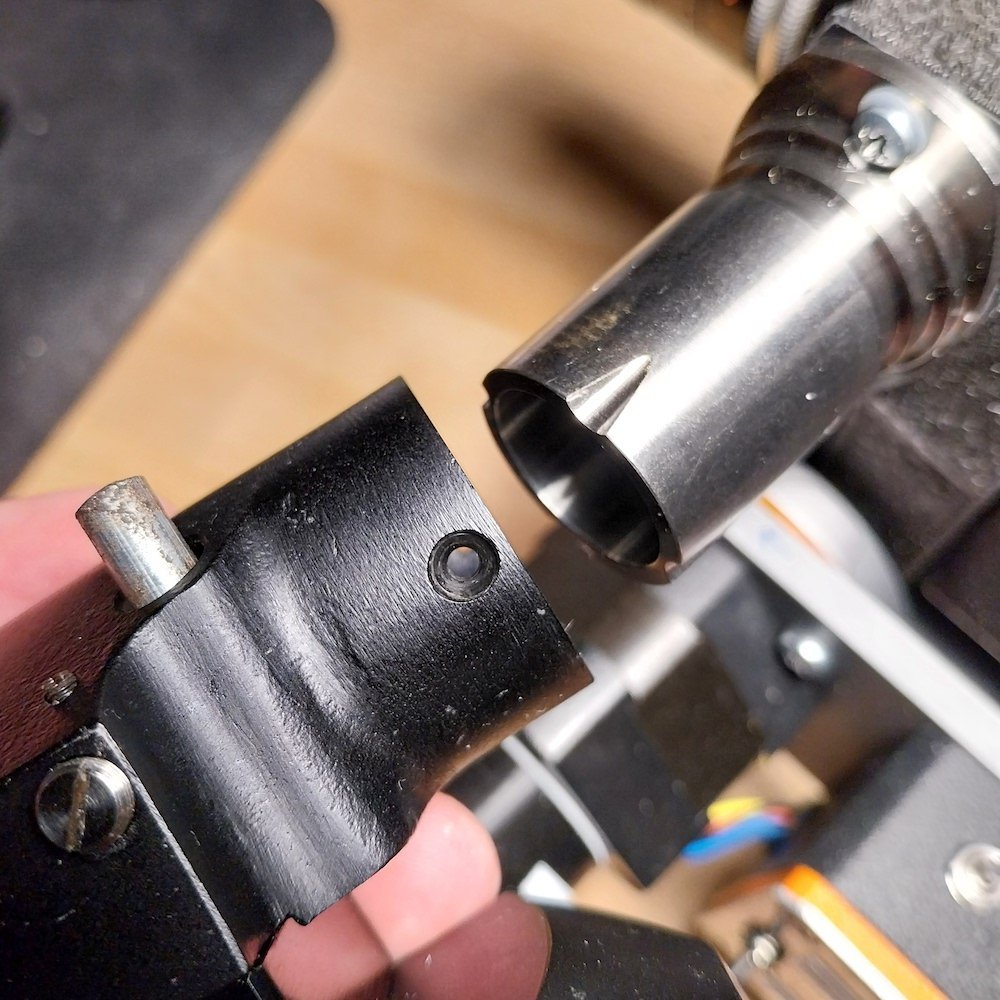
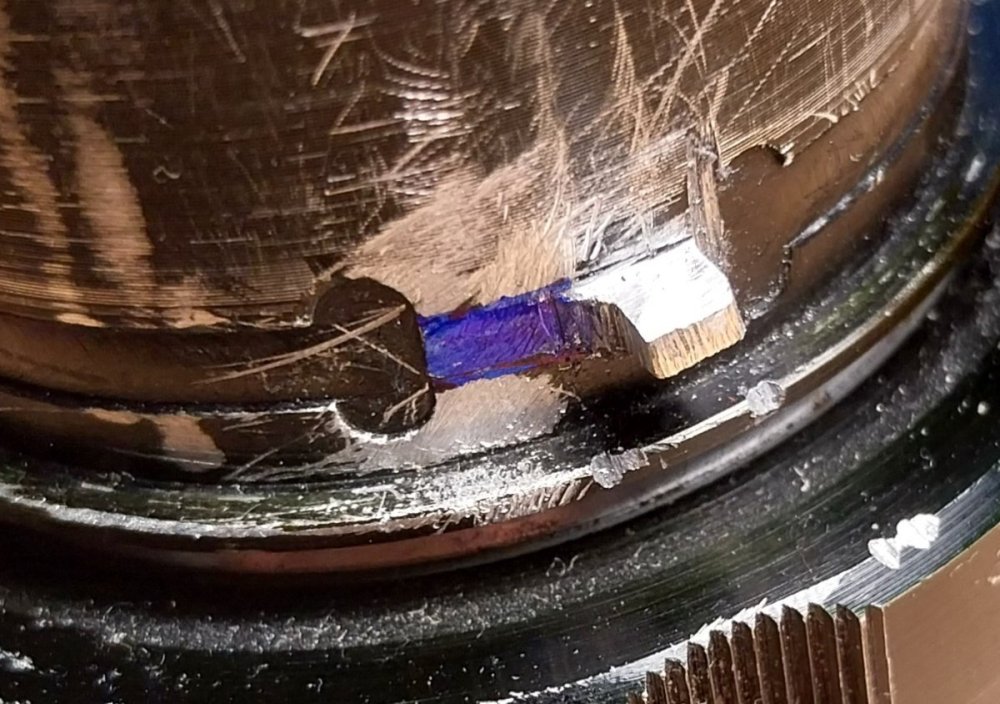
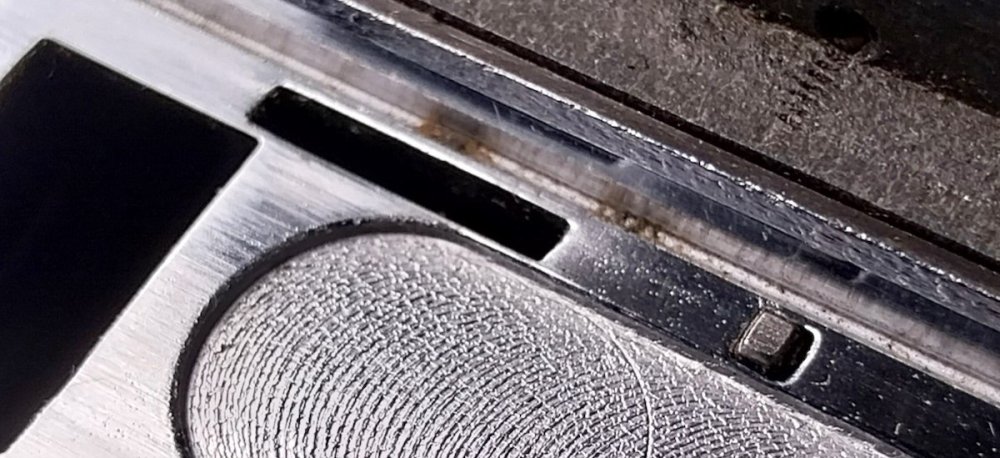
 Here is the SP16 lens I diy modified to work on the Krasnogorsk, just filed off material from the flanges until it fit to the Krasnogorsk and could be focused to infinity. I marked on blue the original flange to highlight how much material I had to take off. so the cylindrical part diameter is the same on both mounts but otherwise they are not "compatible" in the sense that the SP lens could just fit to the Krasnogorsk without heavy butchering of the original mount and potentially manually trying to adjust the ffd of the lens until it seems to work correctly. I have only seen plain Krasnogorsk lenses and plain SP16 lenses on sale, nothing in between. It was common in Soviet Union to have small batches of something special made as a test piece or for special purpose, maybe the dual fit lenses were some rare test run they made but there was not enough them to show up on ebay enough to get noticed regularly?
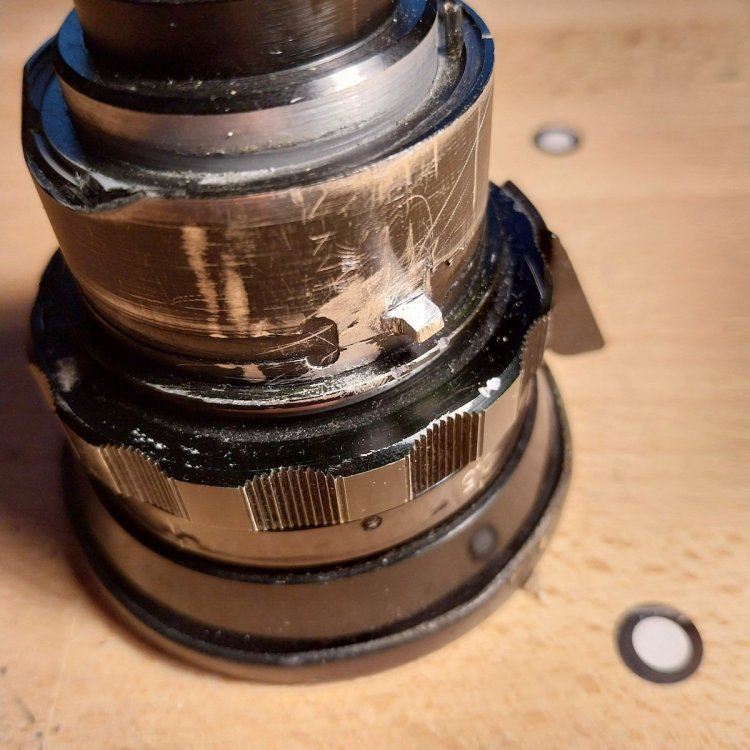
-
FFD on my Completely 3d Printed 16mm Film Camera - Looking for advice
Aapo Lettinen replied to Henry kidman's topic in 16mm
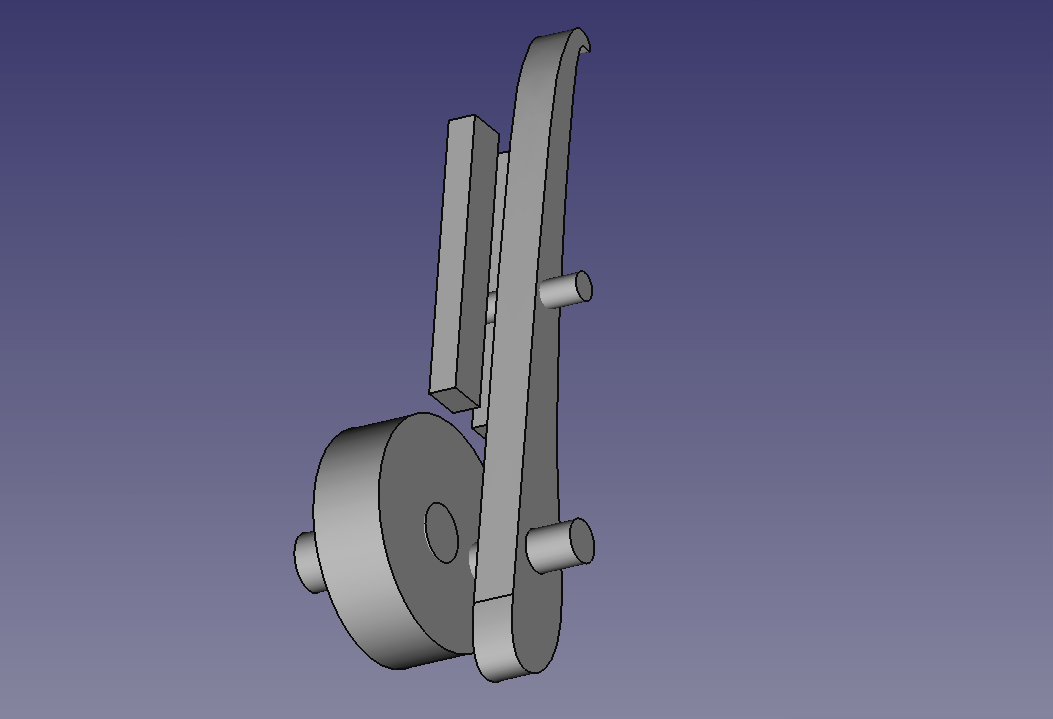
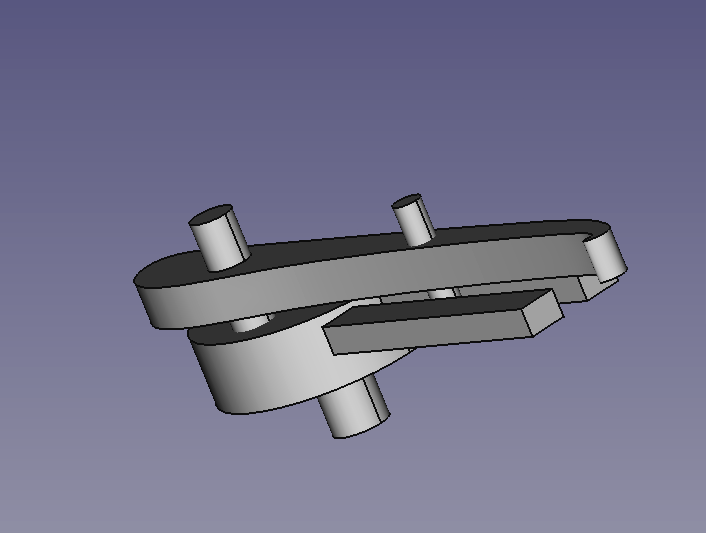
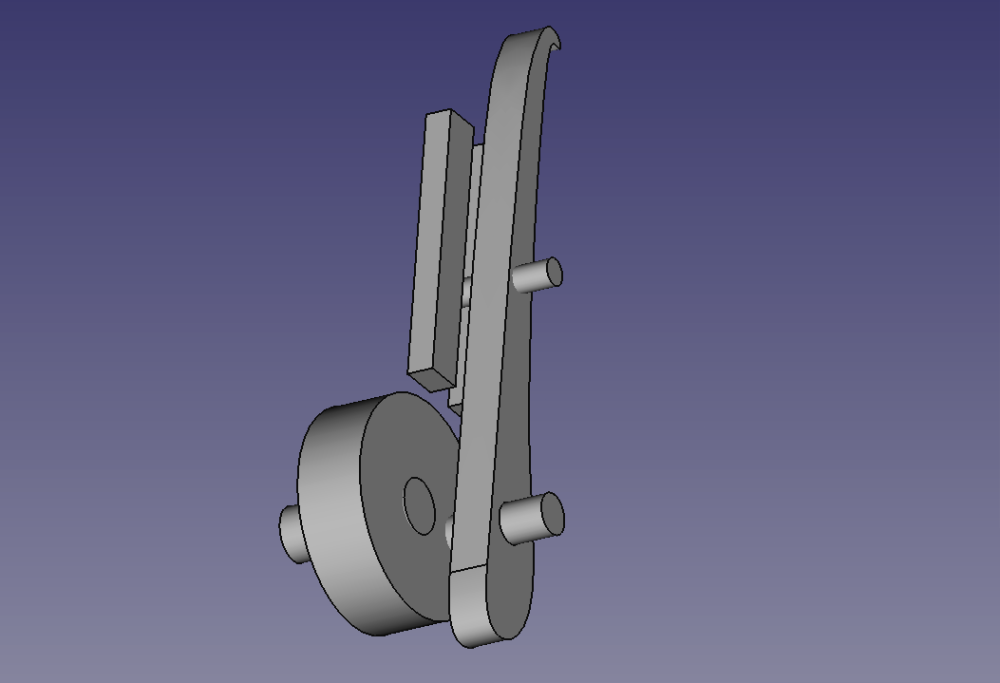
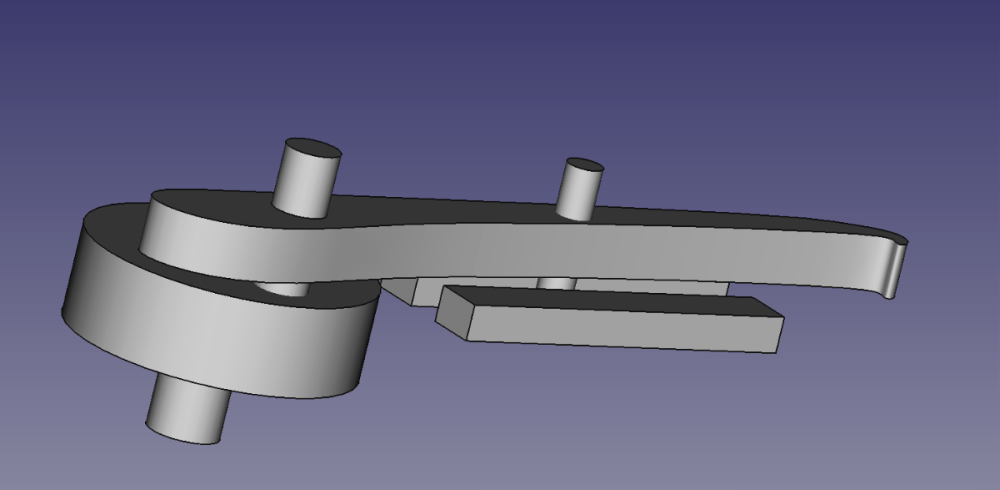
It is entirely possible to make a simple pulldown system from scratch. simplest cameras like Krasnogorsks use this style of very simple movement which should be pretty "easy" to make to work OK. there is a cam driving the end of the pulldown claw up-down-towards gate -away from gate. The claw has a guide pin in the middle-ish which slides on guide rails, translating the movement from the cam to the desired type of "pull-the-film-down, retract and go back up, repeat" type of movement. It is not perfect but it is simple and relatively easy to make to work well enough for home use. needs to be made out of proper metal though, no plastic can tolerate this use. I quickly modeled some reference images, nothing is in scale and you may want another set of guide rails on top to add stability but the basic principle is easy to see.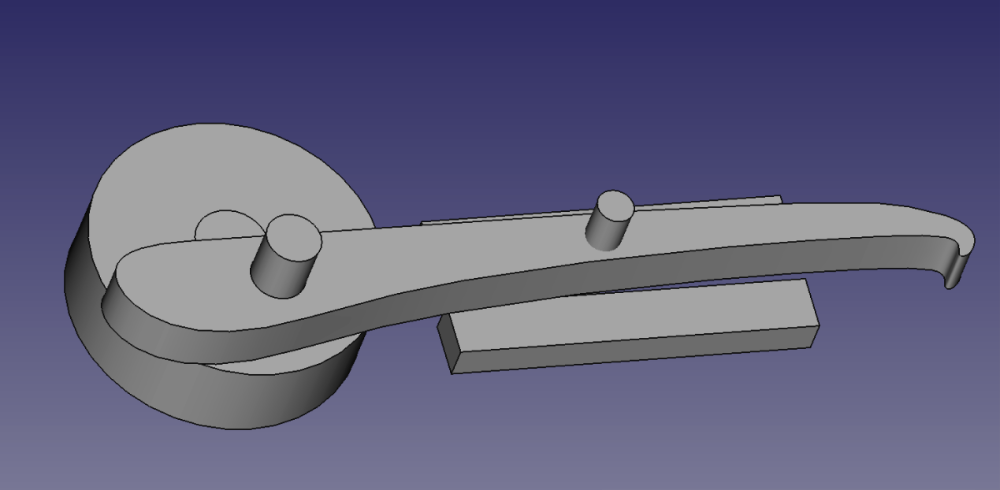
-
the SP16 lenses have the flanges of different width and thickness so the SP16 lenses are not directly compatible with Krasnogorsk bayonet unless the lens is modified. I did the modification with dremel on one 10mm lens some 10 years ago, it was like grinding of 2/3 of the mounting flanges to get them mount to the Krasnogorsk
-
FFD on my Completely 3d Printed 16mm Film Camera - Looking for advice
Aapo Lettinen replied to Henry kidman's topic in 16mm
thanks! yes it is often better to machine stuff for final parts but 3d printing is very good technique for first prototypes and saves lots of costs on prototypes. You can work very efficiently by replacing one part at a time with cnc machined metal version when you are sure that part is final. I would first replace the gate and pulldown with metal ones so that you have possibility to get higher quality images to begin with. then can replace other parts later on one at a time when feeling necessary and have collected resources for it 🙂 cnc machining has some limitations with sharp corners and one may need to have additional finishing ordered for parts which for example need sharp cornered hole cut. For example it is possible to machine the film gate with rounded corners on the gate opening but if needing to have as sharp corners as possible one may need to order additional wire saw or EDM finishing to get them as small radius as possible. machining cavities has some limitations too. For the gate I would use stainless steel or chromed brass if steel is too expensive. the surface needs to be smooth and polished on rails but other parts are possible to leave a bit rough if they are dimensionally accurate. the Soviets only polished the parts which touched film surface and other as left unfinished... most Western cameras are finished all the way through. with cnc and metal it is easy to get high quality threads on the parts which is often important when assembling stuff. top: Eclair NPR bottom: Kinor 16cx-2m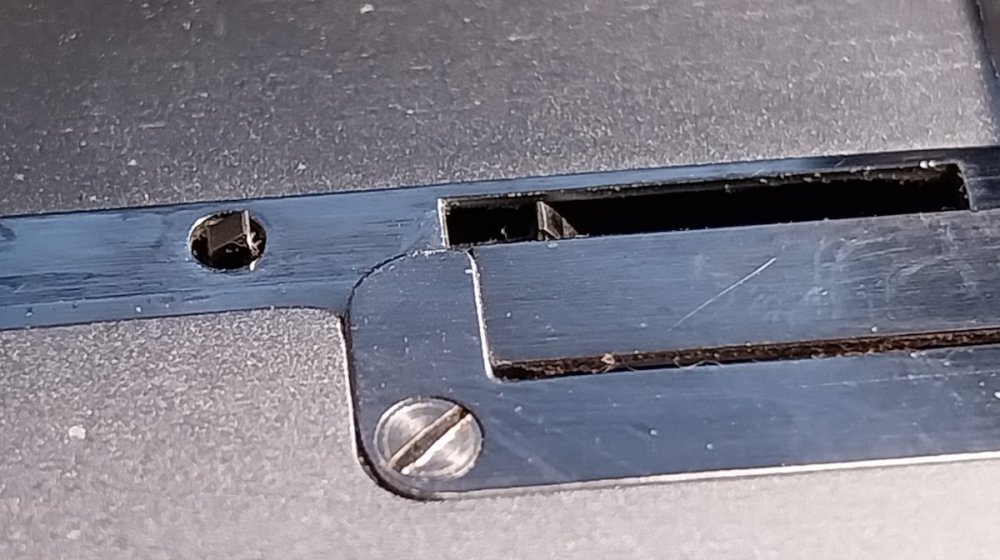
-
FFD on my Completely 3d Printed 16mm Film Camera - Looking for advice
Aapo Lettinen replied to Henry kidman's topic in 16mm
personally I would make the gate from stainless steel, the pulldown claw spring steel, pulldown axles some kind of steel which is available, the pressure plate aluminium, the shutter aluminium. All of these can be cnc machined. then the main support structure connecting the gate and pulldown+shutter assembly to the lens mount would be aluminium on basic designs and stainless steel on very high quality designs. I would use cnc machined aluminium on this one for the much lower costs. Basically it would be a kind of U-shaped structure which seamlessly connects the gate and lens mount together to control the ffd precisely. a shim under the lens mount is used to fine tune the distance. you can get the shim cnc made too though would be cheaper to use some available Chinese shims from lens adapters and just design the mount so that they can be used. film transport depends, the rollers are perfectly fine if plastic. the sprocket wheel depends but often it can be plastic if the sprockets themselves are metal. for example a metal ring with sprockets which is attached on a plastic roller to form a full sprocket assembly. All the other parts of the body which don't have high durability and / or dimensional demands are made out of plastic. on low quantity it is economic to 3d print. if making like 20 cameras it is often more cost effective and higher quality to cnc machine the plastic body too if the shape is such that it is possible to machine -
FFD on my Completely 3d Printed 16mm Film Camera - Looking for advice
Aapo Lettinen replied to Henry kidman's topic in 16mm
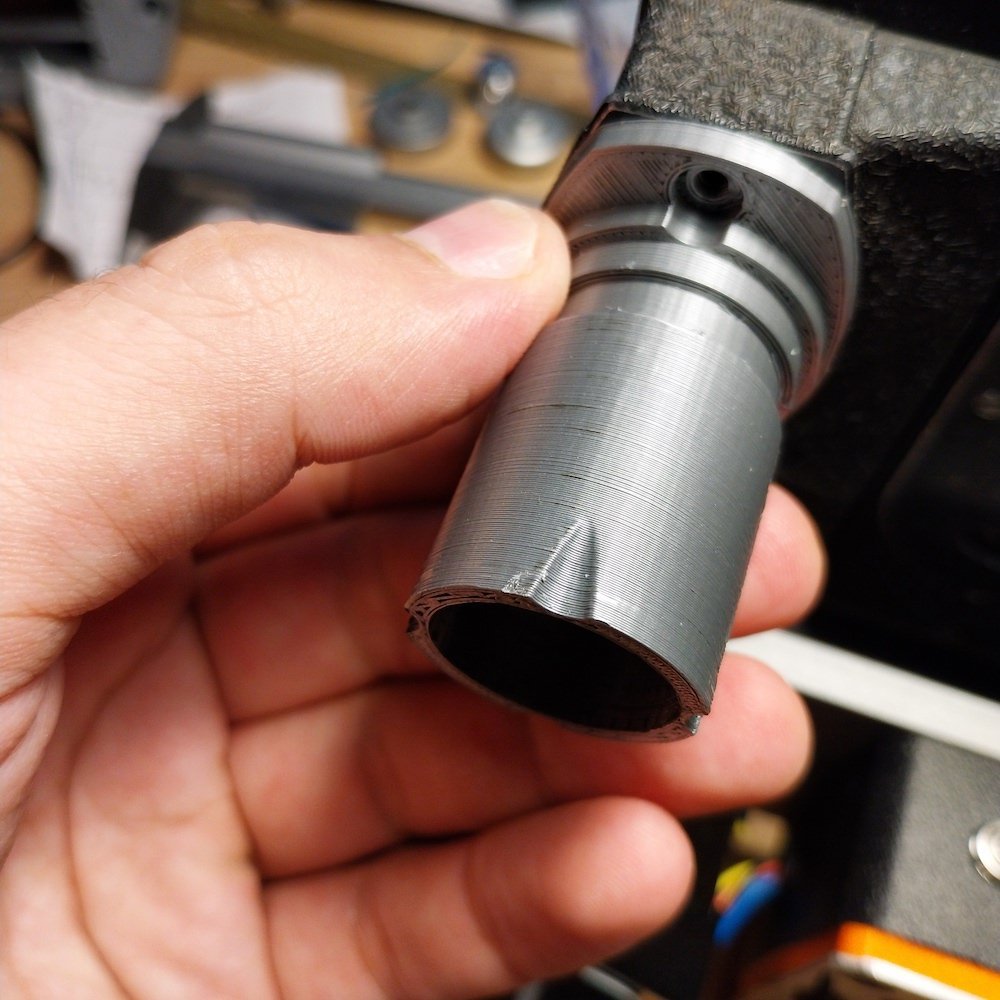
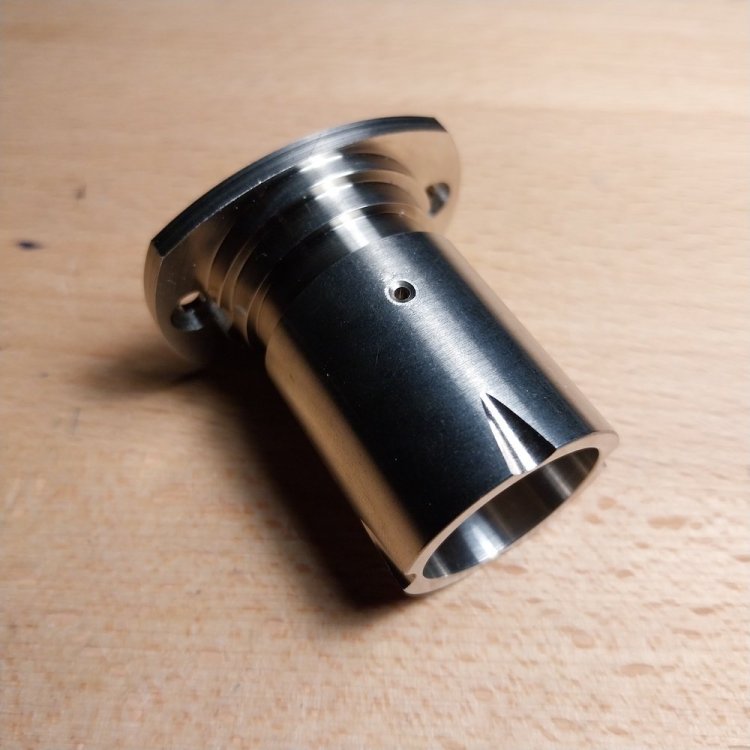
Here is an example of stuff I made last year. the first test pieces are 3d printed to save costs, then when the design is final I will check various places how much they charge for final one made. The first print is home printed from pla and not sturdy enough for use but works for optical testing. The final part is cnc machined from stainless steel by pcbway with basic surface finish. the final part cost a little over 100usd with shipping costs to make which is why I had to be sure the dimensions were at least close to correct ones, thus made multiple home 3d prints to finesse it (prints cost maybe from 1 to 3 usd a piece so one saves a lot if can find basic errors with printing before ordering 100usd+ final parts made out of metal) The camera handle made the same way btw, it is cnc machined aluminum. I was so sure about the design that did not bother to 3d print a test piece. the handle has 1/4" and 3/8" threads for mounting accessories. I think it was something around 100usd with shipping costs, made by jlcpcb. black anodizing too


-
FFD on my Completely 3d Printed 16mm Film Camera - Looking for advice
Aapo Lettinen replied to Henry kidman's topic in 16mm
Most of other people don't have personal access to high quality cnc machines either. We design the parts so that the first test design can be 3d printed to see if it is approximately correct design. Then when the design is finessed enough, it is time to look for a outside company to do a test piece from the file for reasonable price. When the test piece arrives and has been thoroughly evaluated, it is possible to decide if the design needs some final touches or if it is already possible to order the final parts from the outside company, machined to final tolerances with final surface finish. it is not necessary to purchase a 300k+ priced cnc machine when one can hire a company to make the part for you from the step file. Just design the part so that it is possible to cnc machine and then quote from various places how much it would cost to machine it out of aluminium or steel etc. you can check for example pcbway and jlcpcb for cnc quotes if can't get good quotes from AU. the ffd needs to just be calculated close enough when designing parts, then manually tuning when fitting. and when almost there, sand down and polish the shim until you get it perfect. you may need to make your own ffd gauge if there is no readily made available. the gauge would be a good project to test outsourced cnc machining, you need to make it out of metal. get a suitable dial gauge and design the rest of the parts by yourself -
FFD on my Completely 3d Printed 16mm Film Camera - Looking for advice
Aapo Lettinen replied to Henry kidman's topic in 16mm
There has been lots of discussion here on the forums about the limitations of materials and 3d printing and electronic vs mechanical links. 3d printing is just not a good technology to make every and all parts of a movie camera, and electronic links are not good idea if one needs high precision, high speed and reliability at the same time. 3d printing out of metal like stainless steel is possible but cnc machining is cheaper on most type of parts with potentially better end results. Compared to 3d printed plastic, ANY old camera including the cheapest Soviet models has better quality film transport and gate than a 3d printed plastic one would be. Fully 3d printing a camera out of plastic does not make sense, it will be a sub par product whatever you do and any 50 bucks old camera will blow it out of the water image quality wise. I think you have confined yourself inside a "I must make this entirely with 3d printing" box which limits your engineering process too much and you will never make a good working camera for actual filming unless changing some goals here. Allow yourself to use proper metal for dimensionally critical parts and a mechanical link for movement for example. You will get much better camera that way. Stainless steel, aluminium, brass, spring steel in selected critical applications. Then rest can be 3d printed if necessary. But allow yourself to consider on every single component: does this need to be metal? Can it be printed or is cnc machining and polishing and coating better option? How much each option affects the price and reliability? I would highly recommend getting some old movie cameras for evaluation how they did things. And if you find a good working used part just scavenging it from old camera instead of making basic stuff like rollers and sprocket wheels and gears from scratch 🙂 -
new ALCS compact crystal motor for Eclair NPR
Aapo Lettinen replied to Aapo Lettinen's topic in Eclair
There is five (5) days left to order the NPR Advanced motors. Price as per the previous posts. Deadline 25th April, the first payment part needs to be paid when placing the order. --------- There is TWO 3-speed motors available for the price of 1300usd + shipping, deadline the same 25th April but they need to be fully paid for when placing the order. The ordering already closed for the 3-speed model some months ago but I need to round up the batch size of them for manufacturing reasons so can offer a maximum of two motors with the original price of 1300usd if they are paid for immediately. No payment plans available but you can pay the shipping costs in July when the motors are shipping.
-
I actually did some tests in the past, maybe 12 years ago, if one can make "sunset light" by using only one light fixture and still sell the effect. I used a 1k tungsten fresnel. I added 1/2 cto to barndoors to the right side of the centerline so that the right side of the beam was orange very warm "sunlight" with sharp beam. Then I added full ctb on the left side of the beam and some full diffusion over it. The ctb made the left side of the beam cool high colour temperature and the heavy diffusion spred the beam all around reducing all directionality. this spred to all over the room bouncing back from the white ceiling and walls and creating cold ambience light. Viewed in the same room than where the light was it was not entirely convincing but in the next room, when that light was coming through doorway, it was pretty much a convincing "sunset light" because it had these two components even when it was really roughly made and the ambience still had lots of sharpness to it because the surface area of the diffusion being so small. But just something to remember: you can make two or even three "different lights" from one fixture by adding partial gelling and diffusion areas along the lightpath. Making one warm sharp light and one soft cold light is pretty easy, for example gelling first half of the beam to cold colour temperature and then shooting that warm+cold light combination past a diffusion frame so that only the cold light side gets diffused. Or you could reflect the undiffused cold side of the beam up with shiny board, then bounce it back down from large overhead frame to create very soft sky ambience. If, for example, having only one 5k and nothing else would be pretty handy trickery to get multiple lights done with one fixture
- 31 replies
-
- 1
-

-
- lighting
- natural look
- (and 2 more)
-
as per my previous post, this shot is probably interpreted by the audience as being a night scene because there is no ambience coming from the same doorway than where the warm light is coming in even when the light is pretty bright for a night scene. And they would probably think the warm light is artificial light like very bright incandescent in the next room, or car headlights flashing the door, or some heavy industrial light in the yard because it is so bright. adding some high temperature blue-ish soft light coming from the same door would be interpreted as sky ambience and thus people would explain to themselves that the orange light must be real sunlight
- 31 replies
-
- 1
-

-
- lighting
- natural look
- (and 2 more)
-
the "sky ambience" needs to come through the same window than the sunlight does. you can add some boost to the shadows by bouncing similar ambience-coloured light from inside but most of the ambience really needs to come from the window to sell the sunset effect as people see how the window opening shapes the ambience coming to the room and curtains etc are lit by it. people will see if there is only sunlight coming from outside and everything else is coming from inside, quite often they interpret this as it being a night scene with the outside light coming from a orange streetlight because there is no ambience to tell that it is real sunlight. If there is no ambience from outside then it is nighttime for the audience no matter how well everything else was done
- 31 replies
-
- 1
-
-
- lighting
- natural look
- (and 2 more)
-
I like to make golden hour / early sunset-ish light from window by using raw ungelled tungsten light as "sunlight-color" key light and bouncing either ungelled hmi or daylight led light from frame above the window. 10 years ago I often used kinos for the top light on some ocassions but nowadays it is usually overhead frame above the window with bounce or if very low budget and calm weather I may just bounce from two or three 4x4 styro boards or rigging bare white molton on stands without frame if there is no frame available 😄 the lower the imitated sun gets over the horizon the deeper and bluer the shadows and the sunlight starts to catch more red/purple tones. If the starting point was bounced ungelled hmi as sky ambience and raw ungelled tungsten as sunglight... when sun gets lower I lower the ambience a little and adding 1/4 ctb. Next the sunlight gets some cto and possible other mild gel depending on taste. The next the ambience gets lower and gets 1/2 ctb and I may gel the sunlight further. The next I may keep the sky ambience color temperature but will reduce the intensity, either scrim or adjusting bounce angle or area etc. so that reducing intensity further. The sun may get additional cto or other gel next but I am also starting to dim it down. When sun is below the horizon, adding diffusion to the sunlight and dimming it way way down to deep orange or coal red. One cool trick, if you have very powerful tungsten lights like (or just lots of 2k's and 1k's in a row for example), is to use a dimmer to dim them down to like between 10% or 20% level. One gets this weird eerie deep orange a-hint-of-coal-red hue with a hint of sepia feeling to it. Depends on the camera how it captures it but on set it is something pretty unique by my opinion, like watching real fire instead of a replica of it 🙂 If having the joker and the couple of small tungstens, I would bounce the joker from as large overhead frame possible and reducing its intensity as needed. then packing all tungsten light you possibly can behind a small-ish diffusion frame like 3x3 or 4x4 etc. with them gelled with 1/4 cto. Then if you need deeper color balance difference, gelling the hmi up instead of touching the tungsten gelling because you want to get as much light as you can from the tungstens. When sun sets more, adjust the sky ambience to lower level and when sun gets really low you can start to adjust the tungstens again
- 31 replies
-
- 1
-
-
- lighting
- natural look
- (and 2 more)
-
Oh someone is watching my film tests after all! 😄 the flicker is uneven diy processing and diy scanning. most of it caused by uneven processing (different parts of film getting different strenght of developer at different times, challenges with stirring it evenly, etc). Much weaker developer solution with much longer developing time would probably solve most of the flicker even if all other conditions were the same. I get most of stuff developed in lab and mainly developing camera tests diy with normal strength developer and as quickly as possible, thus the results often has lots more defects than would be possible to archieve in best case. Most of my b/w test stuff uses from 5 to 8 minutes developing time depending on what it is and what kind of developer. If making very weak solution and upping the developing time to like 30 minutes would definitely get much better results
-
Haze, night, and wooded areas
Aapo Lettinen replied to Graeme McMahon's topic in Lighting for Film & Video
20ft might be a little low but if you can position the camera so that the light hotspot is hid by a tree or branch then it should look nice even if the light is lower than optimal. If there is hillside/higher ground somewhere in the background which allows getting the light even a little bit higher than the stand can reach on its own it will help the look more 🙂 the "hide the hotspot behind a tree or leaves or anything" has worked pretty well on all low budget shoots I have been in so if the light is a little too low so that you can see it in the frame, move the camera or light a little to hide the brightest part of the fixture from the camera lens. the largest light pointing to the general direction of the camera and the additional smaller lights pointing out details and lighting the sides which the large light's beam can't reach -
Haze, night, and wooded areas
Aapo Lettinen replied to Graeme McMahon's topic in Lighting for Film & Video
If you can get the m40 then I would get that and cheap on the 1200s if necessary to save other costs. Like taking the m40, one 1200 and one 600 leds. If having multiple 5ks they can create quite a lot too but the m40 is still more useful for this look if having dino/lift to get it high enough and far enough -
Tobin Motors for Arri 16s / Shoulder Brace
Aapo Lettinen replied to Paco Sweetman's topic in Cine Marketplace
technically speaking, all the modern newly made motors are less expensive than the old crystal motors back in the day. The only reason why one can get the old ones for cheap is because they are used and decades old and someone does not need them anymore and wants to get rid of them. I think sawing somewhere that those old arri16s crystal motors bought in the 70's -ish cost something between 5k and 10k in today's money. For one crystal motor. That is more than the entire developing budget of a newly made crystal motor made now including all the designing and testing and making multiple finished motors. The Eclair ACL camera cost back in the day somewhere around 40k in today's money. They made a lot of them. I estimated that they probably had about half a million euros of developing money for the crystal motor system alone! then separate budget for making the devices, probably around 10k to 15k per camera to make the electronics. I typically have had about from 1k to 2k developing money to make entire Eclair ACL crystal sync motor electronics, then couple of hundred euros per motor to get the parts and put it together and test it. If used filmmaking equipment is cheap it does not necessarily mean it would be cheap to make a copy of it from scratch today. The Eclair ACL cameras are sold for something between 2k and 3k nowadays with working motor, but if wanting to make a new one from scratch it would still cost about 40k today, approximately the same than 50 years ago. Just wanted to explain why some corners need to be cut when designing new camera stuff, these are not obvious until one starts to make them by oneself. Today when designing a new crystal motor I would expect to sell somewhere between 3 and 9 motors total, WORLDWIDE. back in the old days when film was widely used they could have expected to sell at least couple of hundred motors, the best models even couple of thousand pieces. It is impossible to compare a motor which costs 500usd used on ebay but was 10k back in the 70's, and my newly made motor which is made out of scratch for 1k material costs and sold at 2k with 8 of them made total. It is pretty incredible that it is possible to cut the right corners enough to still make the motor good at that low budget with 10x more features than the 10 times more expensive old motor has -
ALCS konvas 15epss stabilized speed controller
Aapo Lettinen replied to Aapo Lettinen's topic in Russian Gear
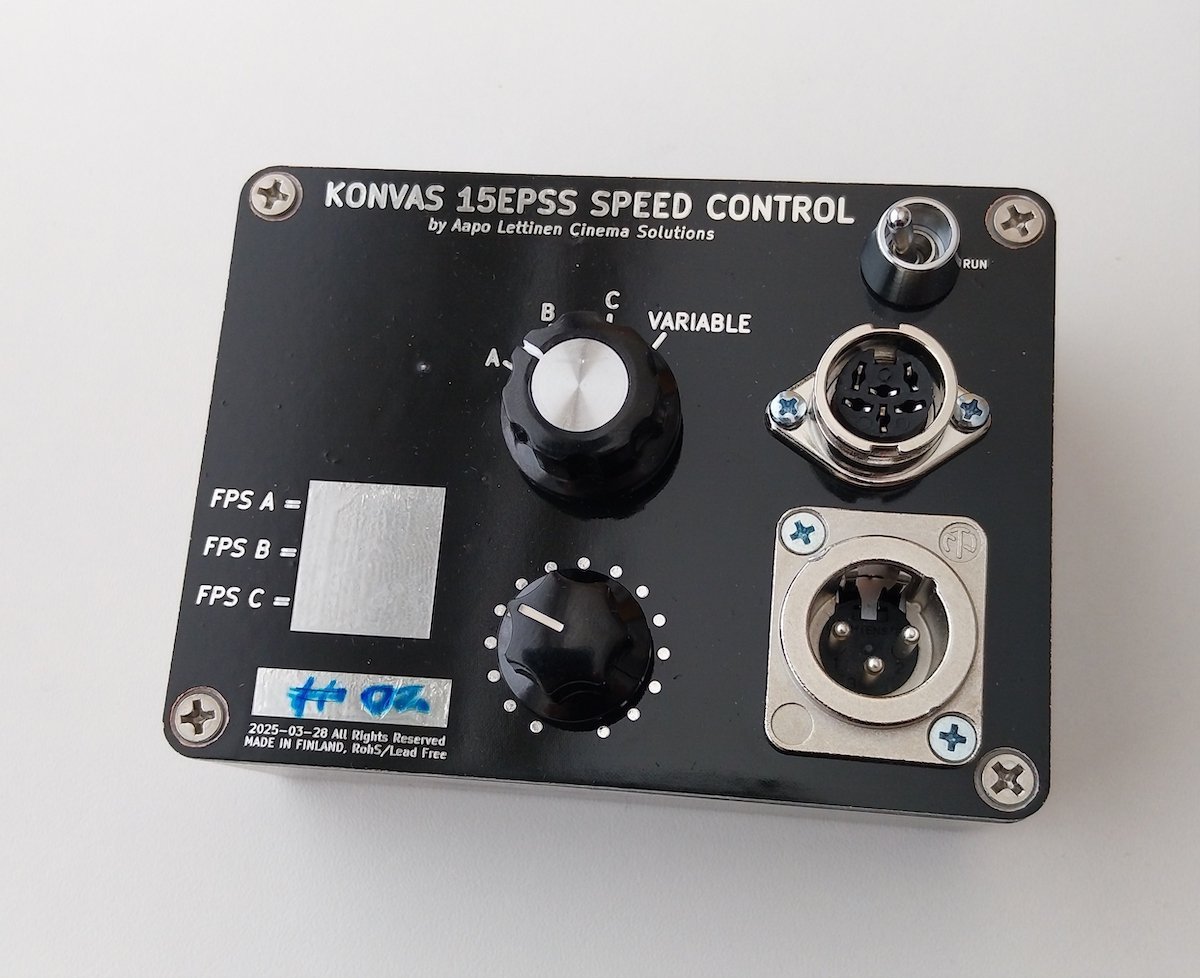
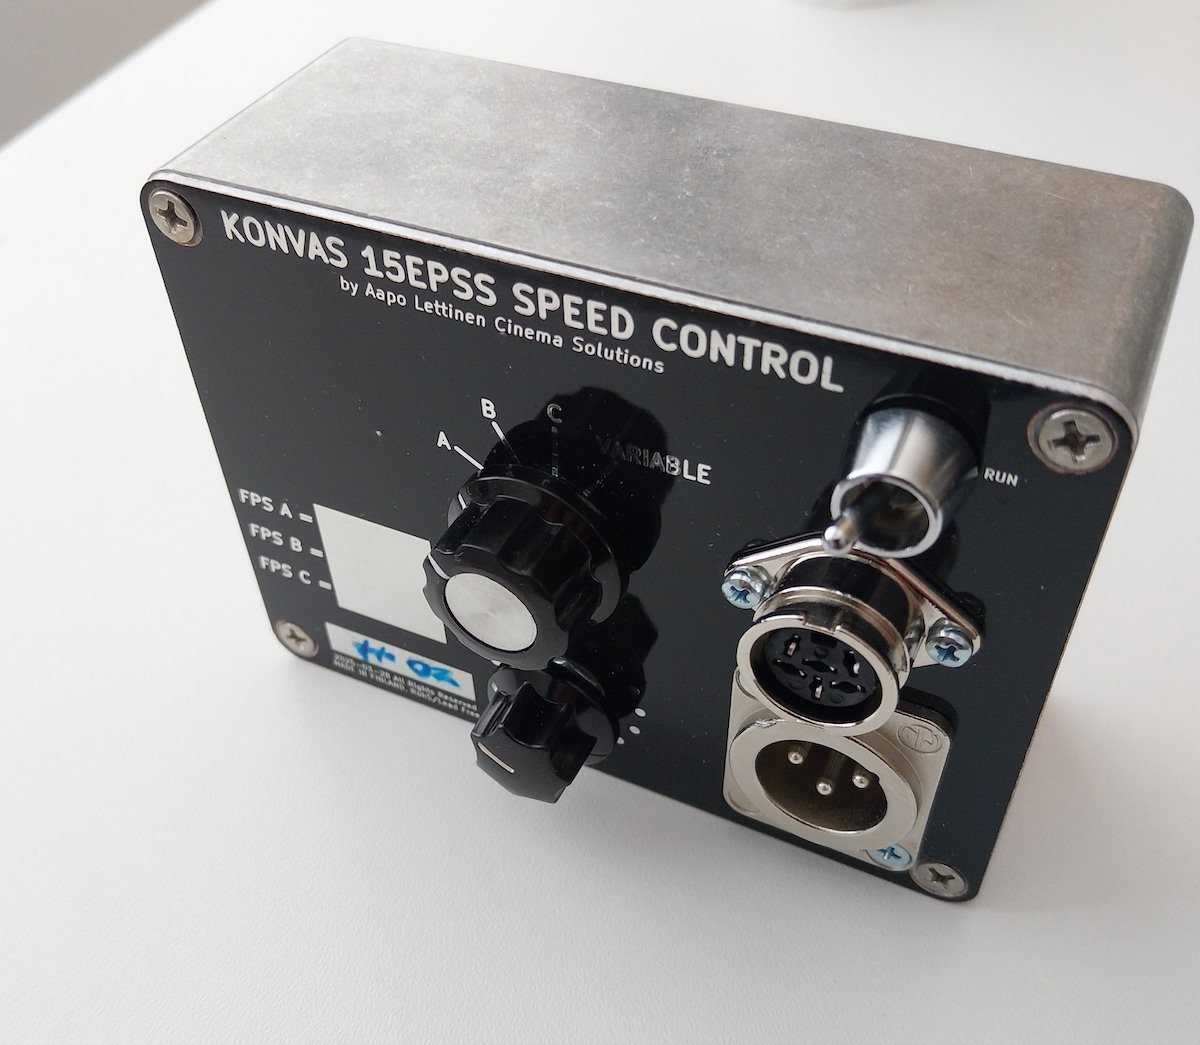
Finished front panel will look like this. there is one controller available for order from the April2025 batch, let me know asap if wanting to order it. Will ship in late April / early May. Will try to make more of them in Summer but will see if it is possible. Recommending early ordering if needing these as I have tons of other projects and if missing a manufacturing batch it may take long before next ones are made, likely from 4 to 6 months or more

-
Haze, night, and wooded areas
Aapo Lettinen replied to Graeme McMahon's topic in Lighting for Film & Video
Yes you could make it work for kind of similar type of stuff if you have possibility to place it right. Depending on where the 5k ends up and how far away it is and how wide the shots and how thick the smoke is, you may need to gain the camera quit much even with fast lenses. I would expect to shoot this at somewhere around iso3200 or iso 4000 depending on conditions. A single large led or hmi would be better than the 5k I think so if you can get single 1200w led or 1800w to 2500w hmi it would be better than the 5k for this by my opinion. On the other hand if you have lots of power on set and can't have leds or hmi, you could rig the 5k and have couple of extra 1k's, for example pars, to point out details in the background. That could look better than single large hmi or led fixture would have looked. Mat lights are fine for foreground. Take softboxes and grids and diffusion and some floppy flags to control them fully -
you would have slow film to begin with and then the tungsten balanced lights would underexpose the blue layer and overexpose the red layer so you would need to balance for that too. Maybe losing a overall of 3 or almost 4 stops compared to 7222 depending on taste and what tests show the results look like. If wanting tungsten fixture - daylight mixture mix to save costs but still control the grain levels, I would probably use higher powered tungstens for hot areas which are supposed to be bright anyway and aim the cool daylight balanced lighting to shadow areas where I want to reduce grain. The highlights might burn a little bit easier if being tungsten balanced but if protecting them a little when exposing and adjusting the levels of those tungsten units (taking into account that they might look like a stop brighter than the meter shows, or a tiny bit more) then this approach could work pretty easily and you could expose the 50D as 50 ISO . I would rather want cool light in shadows and if there is tungsten light, have that tungsten in the mids and highs so that it does not mess the blue layer shadow grain too much. If the smoke mixes these too much then correcting the exposure for something between the two. Or if gelling the tungstens a little would probably not need any corrections. I think 1/2 ctb would work fine but you may need to shoot a test to check how they behave. it is possible that you like the look just by doing no corrections and underexposing blues + overexposing reds could just work for the intended look when converted to b/w
-
I would either change the stock to tungsten balanced or change some of the lights to daylight balanced, nowadays usually led versions work fine. if shooting daylight stock with tungsten lights you will lose light and raise grain levels on blue layer even if converting to b/w later. with the b/w conversion it would be possible to control the blue grain separately if needed to make it smoother looking but it is less optimal in any case compared to having balanced colour image to start with (instead of overwhelming oranges and reds and very underexposed blues). You would get unique grain structure though if shooting wrong color balance so might add to the look, dunno 🙂 I have never liked the 7222 much, I used to shoot Orwo UN54 back when it was easily available. plus-x was great too. Fomapans can be very pleasing on 35mm but on s16 might be a tiny bit too much grain for this project if you are worried about grain levels. Slow films like 50D are good if wanting to shoot eerie low grain look almost wide open. works great on switars and other old lenses at like 1.4 to 2 aperture. you don't necessarily need that much light if it is hard light, maybe keeping some of the tungstens with using some 1/2 ctb if needed and replacing some of them with led technology if needed
-
Haze, night, and wooded areas
Aapo Lettinen replied to Graeme McMahon's topic in Lighting for Film & Video
with larger diffusion it would become harder to control the spill and spread, you would lose some contrast on the background shadows and it could behave weirdly with the haze/smoke. If using them I would limit the size of the frame to something more easily controllable like 6x6 style or very max 8x8 style and try to go with softbox+grid approach for closer shots if possible, adding the frame in between only if necessary and using only the part of the frame you actually need for each shot, not filling it fully if not absolutely needed. I personally like to go with something like about 3x3 or 4x4 frame or similar sized softbox as a talent key for that kind of Mediums. Or bouncing from 4x4 styro as the key. if you can see eye reflections it can be pretty handy to have round or octa softbox on cob led to get round-ish eye reflections. If the rectangular reflections don't matter then a lightmat with controlling gear (softbox, grid, etc stuff added) would work too. It does not need to be very large sized or very powerful but it needs to be fast to move and controllable and dimmable -
Haze, night, and wooded areas
Aapo Lettinen replied to Graeme McMahon's topic in Lighting for Film & Video
For closer shots you will need something lower power, relatively soft and easily controllable. something like 150w or 300w cob led with large-ish softbox and grid, dimmed way down and on battery power could be useful. or mat lights with box and grid. It does not need much power but it needs to be very controllable and easy to move from shot to shot. the background would need hard light, one big source and some smaller ones to cover sides if the biggest light is not super powerful and far away. you need to get it pretty high up to get that effect, the easiest is to have it uphill if possible by the terrain but otherwise you probably need to rent heavy equipment to get it high enough like 25 - 30 meters high at least for that look. smoke is relatively easy to spread by blowing continuous hazer smoke with fan to long tube which has holes at regular intervals. On arts projects I used to just buy a 200m - 300m roll of cheapest layflat tube I could find and run a half circle or 3/4 circle around the set upwind far enough away that it does not show in the widest shot. Usually took from 50m to 90m of tube depending on the set and terrain. then puching small holes to the tube and filling it with smoke. it usually spreads pretty well and you can adjust the air/smoke ratio in the tube and the hole count + size and shape to control how it spreads. You can collect the tubing after use to large garbage bag and reuse it the next day but if storing for multiple days it tends to catch mold and needs to be thrown away. So can be used couple of times but will go bad during the shooting week and needs to be replaced at some point. holes can be repaired with tape as long as it is not too shred to pieces -
Tobin Motors for Arri 16s / Shoulder Brace
Aapo Lettinen replied to Paco Sweetman's topic in Cine Marketplace
shutter parking requirement depends on what kind of stuff is shot and how. Adding shutter parking to a motor has tons of cons designing wise so it is not always good to have it in a motor, especially if the motor needs to be really small or if there is strict power management requirements how the power can be routed and if the camera body itself can be modified or does it need to work unaltered with all the motor types and especially if it needs to work seamlessly with 400ft magazine motors too which can be both 8v and 12v versions and need power routing via the camera switch. -
ALCS cp16r 45-speed crystal electronics
Aapo Lettinen replied to Aapo Lettinen's topic in Cinema Products
Made a video of the old 1-speed crystal sync system with comparison to the new 45-speed features. Pretty good basic view of the CP16R camera body too 🙂 https://youtu.be/BtI-rcAqRh4