


David Mullen ASC
-
Posts
22,404 -
Joined
-
Last visited
Everything posted by David Mullen ASC
-

How do you guys incident meter your scene?
David Mullen ASC replied to silvan schnelli's topic in Lighting for Film & Video
I will shade the dome from a backlight but otherwise the light on the key side is the key + fill so it's better to let them both hit the dome. You can shade the key if you want to meter the fill separately. -
Low light night exterior with flashlight.
David Mullen ASC replied to Filip Aladdin's topic in Lighting for Film & Video
You could try late dusk-for-night for the wide shots and then a very soft, dim ambient bounce light at night for tighter shots, matching the level of blue from the dusk light. Otherwise, if you don't want any fill, I'd try hazing up the field (I'd probably do that anyway) because that will create more ambient fill and separation of the foreground. Yes, your base ISO will be driven by the brightness of the flashlight so get a bright one. You just have to decide if you can live with a daylight LED one or need to find a bright tungsten halogen type. -
Sure... though it's a misuse of the term -- the LF camera is really FF35 and the 65mm camera is large for a cinema camera but technically medium format in still camera terms. "Large Format" really means 4x5 and 8x10 still formats and larger.
-
IPhones also have a medium focal length lens (2X)... to me, the main visual effect is a very deep focus unless you use "portrait" (stills) or "cinematic" (video) modes to simulate a shallower focus, so try shooting at very deep stops. The other effects are over-sharpening and clippy highlights.
-
I heard that the smaller ARRI 65 will still use the old sensor -- the problem with the new Alexa 35 sensor is that the outputs run along the top & bottom, so it can't be turned 90 degrees and two stitched to create an LF or three to create a 65 version.
-
I'm sure shooting on an 18mm helped a lot in that regard... You can re-mark your lens to compensate for the focus shift.
-
Choosing how to shoot 16mm (been ages, need help)
David Mullen ASC replied to Tomas Brice's topic in Film Stocks & Processing
If you are going to print, then definitely overexposing combined with pull-processing will give you a smoother grain structure with less contrast. But if you are going to scan the negative, it's somewhat of a controversy whether to compensate in development. Some colorists say yes, others say no. You push or pull process to change the final density, so if you overexpose by 1-stop and pull-process by 1-stop, the resulting negative should be of normal density. If you had just processed normally, then the negative would be 1-stop denser than normal. (I wouldn't factor in the change in contrast too much -- a log scan is much flatter than any low-contrast look that most people would aim for so color-correcting for a softer contrast is fairly easy.) Is it a problem to have a negative that is 1-stop denser on average? Probably not though some older scanners and telecines do pick up some noise in bright areas of the image (like hot skies) because that portion is so dark on the negative, but I'm not sure how much of an issue that is anymore. In fact, that was one of the main changes made to create Vision-3 film stock -- Kodak added "micro grains" that are extremely slow in order to add another stop of detail in overexposed areas. So it's harder to clip information in the highlights with today's Kodak Vision-3 stock. But I've been meaning to test this notion of whether to push or pull 1-stop versus adjust for the density difference in the color-correction. It's more of an issue with underexposure and push-processing; some colorists would rather get a negative with more density so prefer the push-processing; some don't like the shift in color/contrast and would prefer to fix a thinner negative. -
Choosing how to shoot 16mm (been ages, need help)
David Mullen ASC replied to Tomas Brice's topic in Film Stocks & Processing
You mean if the director wants it less contrasty, you'd overexpose and pull... though I think you'll find that it is easy to make it look less contrasty in color-correction with an overexposed and normally developed negative. -
Choosing how to shoot 16mm (been ages, need help)
David Mullen ASC replied to Tomas Brice's topic in Film Stocks & Processing
Sure — except that grey cards / scales are a way of communicating to that colorist what the intent was if you’re not going to be the one color-correcting the scan and any log files delivered to create a display image. -
Choosing how to shoot 16mm (been ages, need help)
David Mullen ASC replied to Tomas Brice's topic in Film Stocks & Processing
Overexposing doesn't reduce the size of the grains, which determines the speed of the stock - it just exposes the smaller, slower grains in between the larger faster grains, giving the impression of a smoother, tighter grain structure. I don't think there are any advantages of overexposing more than 1-stop to reduce the impression of graininess. And I don't think it matters whether you pull it to compensate versus develop normally and darken it in post to look correct but I don't know for sure, it all depends on whether the scanner is OK with a denser negative without creating noise in the highlights from pushing more light through it. Also, a decade ago, some labs did not offer pull-processing for 16mm, just push-processing -- though today with film processing being rare in general, maybe it is offered now. You shoot a grey card or chart at the head of the roll in the color and light level you want to be neutral. So if you leave out the 85 filter in daylight and overexpose the stock by one-stop, you'd shoot the grey card or chart (and a face holding them helps too) so that whoever color-corrects the transfer or makes a print knows that you want that to be neutral. The lab itself doing the development can only go by what you order -- normal, pull, or push, etc. They don't know what's on the negative until after it has been processed. If you want only half the color cast to be corrected in outdoor photography, perhaps you pulled the 85 filter but want some of the blue tone left in, then you'd shoot the grey card with a half-correction (81EF for example) in and then shoot the scene with no correction. Indoors you can do with with gels on whatever light you use for the grey card, or set the LED light on the grey card for somewhere halfway between daylight and tungsten, then shoot the scene in daylight lighting and get a half-corrected color from the colorist. -
Movies with peculiar bokeh?
David Mullen ASC replied to silvan schnelli's topic in Lenses & Lens Accessories
The glittery effect is from set dressing and lighting, the set has glitter and/or sequins in it to catch the light. The watery dissolve was a common optical printer transition effect, probably some rippled glass passed frame by frame in the path of the optical printer. But the blurry vignette is probably done in-camera (vaseline on glass) just to save money on optical printing, though it could have been added in an optical printer, but then all those shots would be dupes. -
Movies with peculiar bokeh?
David Mullen ASC replied to silvan schnelli's topic in Lenses & Lens Accessories
Since there's only one aperture size, they probably just tested it compared to a normal lens at different stops to see what it was closest to. But most photography in the early 30s was shot near wide-open at f/2.8 so maybe they just shot with these special apertures, lit as they normally would, and compensated in development to get a normal density based on tests. Back then, many DPs weren't using light meters very much and film stocks didn't have ASA ratings (which came along in the 1940s.) -
It's certainly possible that ARRI is working on a "mini" Alexa 65 but I'm skeptical that it will just involve using the Alexa 35 body considering that's built for a 26mm-wide sensor and the Alexa 65 uses a 54mm-wide sensor. But I don't know, this is the first I'm hearing about it.
-
Just depends on what is easier, gels (or dimming tungsten) or white balance or both. If I'm on stage with bright tungsten units creating sunlight and LEDs (space lights / skypanels, etc.) creating soft sky light, and I want the hard sunlight to be warm, I might set the camera to something like 4300K so the 3200K tungsten lamps render warmer, and then cool off the LEDs so they appear more blue, let's say, set them to 5000K. Other times I'll take the time to gel the big tungstens warmer because in the scene I also have practical lamps with tungsten bulbs and I want to keep them less warm than the sunlight. Or the opposite, maybe you want the tungsten practicals to render very warm so you set the camera to the mid-4000K range but then you add 1/4 CTB to the big tungstens so they don't also get warmer. It all depends on what look you want. But often the decision comes down to what is more efficient -- if it's only one or two lights to gel, you might use gel, but if there are 20 lights, let's say, then it's probably easier to change the color with white balance if they aren't bicolor or RGB LEDs that can be programmed to a color. Often on a set or location, some lights are easier to gel or adjust than others, so the lights you can't easily control are what drive the decision-making. Keep in mind that if you record raw, usually the camera's white balance setting is just metadata anyway.
- 1 reply
-
- 2
-

-
Nolan to use new IMAX cameras on next film
David Mullen ASC replied to Stephen Perera's topic in General Discussion
No, Nolan is already shooting the non-VFX shots in the highest film format, 15-perf 65mm -- in the case of "Star Wars", the larger VistaVision negative was used for two reasons: (1) to offset the loss of sharpness and increase in grain from optical printer compositing using dupe elements; (2) to avoid using anamorphic lenses to shoot miniatures, matte paintings, and animation elements. -
Movies with peculiar bokeh?
David Mullen ASC replied to silvan schnelli's topic in Lenses & Lens Accessories
There are also diffraction pattern filters for lenses that create star patterns like that one in Lego Batman but usually they also have rainbow color effects. -
Movies with peculiar bokeh?
David Mullen ASC replied to silvan schnelli's topic in Lenses & Lens Accessories
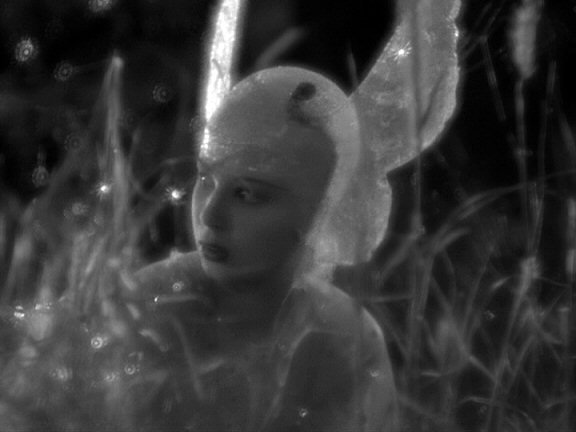
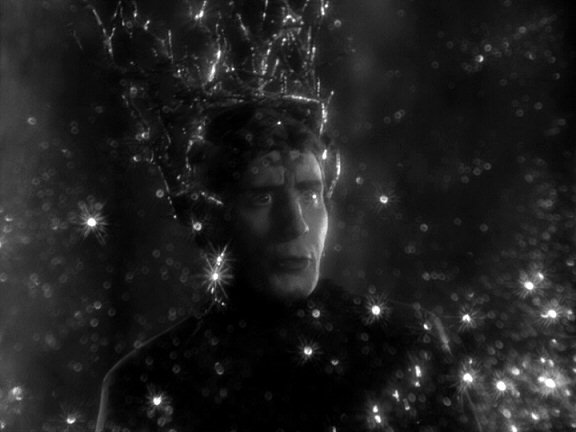
I spent years wondering about these points around lights in "Midsummer Night's Dream" (1935) -- I know that nets were used in front of the lens and glitter and sequins were glued onto them but some of the bokeh shapes can't be created that way. Then recently I saw a Lensbaby ad for creative bokeh attachments (basically replacing the iris like a Waterhouse stop but with cut patterns) and I think that's how it was done for this movie in combination with glittery things in front of the lens.
-
Nolan to use new IMAX cameras on next film
David Mullen ASC replied to Stephen Perera's topic in General Discussion
Nolan prefers being able to contact print and project as much 15-perf 65mm footage as possible for theaters, he only scans the IMAX negative for VFX shots. He did try a D.I. (I believe) for "Tenet" -- but "Oppenheimer" and most of his other films like "Dunkirk" have a cut 15-perf 65mm negative for making 70mm contact prints for IMAX film theaters. -
Overexposing for cleaner footage?
David Mullen ASC replied to Jarlath McKernan's topic in General Discussion
A lot of cameras now have dual gain but ARRI doesn't use it for high ISO settings, they use it for extended dynamic range -- the two outputs from the sensor, high and low gain, are combined into one signal. Personally, because I shoot series and features with many weeks of dailies, if not months, I don't want to shoot anything that looks "wrong" (too bright) with the idea of fixing it later, after editing is complete. Too many people will be working with the footage before it is color-corrected. I want it to look correct on the set monitors and in dailies. Yes, sensors, like film, prefer more light but you have to take into account the headroom where detail gets clipped. I think a better method is to find an ISO rating that gives you the balance of noise-to-headroom you like and then LIGHT for the amount of shadow and highlight detail you like. That way you won't be fixing it in post later anyway, you won't be trying to pull detail out of the shadows (but if you think that is likely, then you could work at a lower ISO in general knowing that your recording has less noise.) Occasionally when you shoot a very dim scene with no bright highlights, then you could select a lower ISO, which will give the sensor more exposure with less overall noise in post, and things will look the way you want on the monitor and in dailies. -
Legal/Video range or Full/Data range?
David Mullen ASC replied to Wenqi Wei's topic in Post Production
ARRI ProRes 4444 Log-C is 12-bit -
Legal/Video range or Full/Data range?
David Mullen ASC replied to Wenqi Wei's topic in Post Production
There are many major streaming shows and even features that have recorded ProRes on the Alexa -- I shot five seasons of "The Marvelous Mrs. Maisel" in ProRes on the Alexa for Amazon Studios and it had lot of visual effects in it (and I won three Emmys and two ASC awards for it...) Movies like "The Theory of Everything" was shot in ProRes on the Alexa. Sure, ARRIRAW is even better, things like color temp and color matrices are not baked in, there's no compression, etc. So ARRI offers you both options. I don't think they see much of a reason to offer something slightly in between. I've compared and color-corrected ProRes 4444 versus ARRIRAW on a big screen and the differences are minimal, I'd only say that ARRIRAW felt slightly less "electronic", more film-ish, because there's no electronic sharpening baked in. But it was a subtle feeling and it goes away as soon as you start adding the standard amount of sharpening to the footage. But I have been using ARRIRAW for greenscreen lately because there can be artifacts that pop up in the debayering internally to RGB that can affect the edges for keying, but that can even happen with ARRIRAW footage depending on the software used for debayering. I had a greenscreen shot where the VFX people kept complaining about a drop shadow black edge on the red channel subject and I had to remind them that with ARRIRAW, there is no red channel until after it is converted, so the problem had to be downchain, not in the camera or recording. Which turned out to be true, it went away once they tried a different debayering software. -
Roger Deakins is wrong.
David Mullen ASC replied to John F Hebert's topic in Lenses & Lens Accessories
The shot size determines how close the mic can get, not the camera distance / focal length. If anything, in the days of film, sound people complained about shooting close-ups with a wide-angle lens because the camera noise was too loud. Spielberg nixed shooting "Empire of the Sun" in 65mm when he felt that available cameras were too loud to record sound when close to an actor's face on a wide-angle lens. -
Legal/Video range or Full/Data range?
David Mullen ASC replied to Wenqi Wei's topic in Post Production
Log-C provides all the dynamic range of the sensor within legal video for ProRes recording. -
My guess is that it’s a scrolling roll bar effect from the frequency rate of the LED.
-
I did a short film using 35mm Ektachrome for a scene that was supposed to be cross-processed... but the lab accidentally processed it normal -- so they offered to copy it onto Ektachrome again and cross-process that copy, which they did. Talk about two radically different-looking images!
- 13 replies
-
- 1
-
-
- ektachrome
- kodak
- (and 2 more)

