Duncan Brown
-
Posts
497 -
Joined
-
Last visited
Everything posted by Duncan Brown
-
OK sure - I think "bearing" is often used as shorthand for "roller bearing" because "bushing" very specifically means the other thing. Roller bearings can handle bigger loads. If you don't need that, I suspect oilite bushings are longer lasting and more maintenance free. Just because you can't put more grease into sealed roller bearings doesn't mean they last forever. You can always look up bearings by number and generally find a replacement. I wonder how easy it is to find generic replacements for the Eclair bushings? Or do they really just need cleaning/re-soaking and then they're good to go? Duncan
-
Gregg clued me in to the parts manual floating around out there. Looks like not a bearing in sight in that assembly. Weird. Oilite bushings don't usually give that "lumpy friction" symptoms when they are going bad or dry. Duncan
-
Just going by every mechanical thing I've worked on ever, from cameras to cars, that's a bad bearing, Are there bearings (not oilite bushings) hiding inside that assembly? Duncan
-
Aha! Interesting. I had not noticed that little detail. Duncan
-
Ah OK makes sense, Sure! Someday I'll have the base apart and tell you what I find. The schematic in the manual implies the 5V regulator only gets power when the motor switch is on (not just the lightmeter switch) so I'm guessing it's a 12V circuit. Duncan
-
This part confuses me. I am by no means an ACL expert, but the camera base seems to mostly be a junction box to connect all these various things that can attach to it. There is a 5V regulator in there but you could just ignore that and provide your own voltages if you were worried about hooking to a camera where that was broken. And anything else that's broken (on/off switch, clapper switch, etc.) is outside the purview of a replacement motor anyway. Is it just a matter of needing that space to fit all your circuitry? Why else would you need to actually gut the camera base when installing your motor? Duncan
-
Eclair ACL 1.5 newbie questions (with pictures!)
Duncan Brown replied to Duncan Brown's topic in Eclair
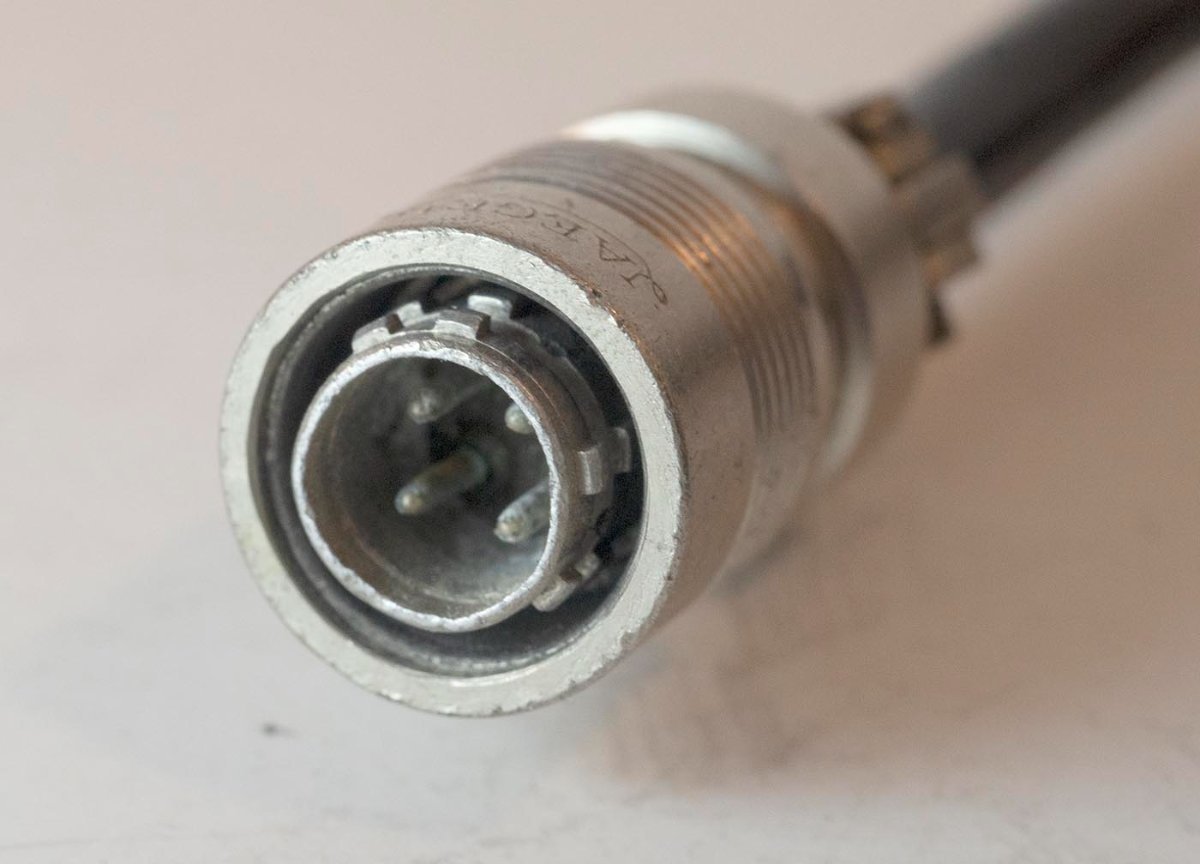
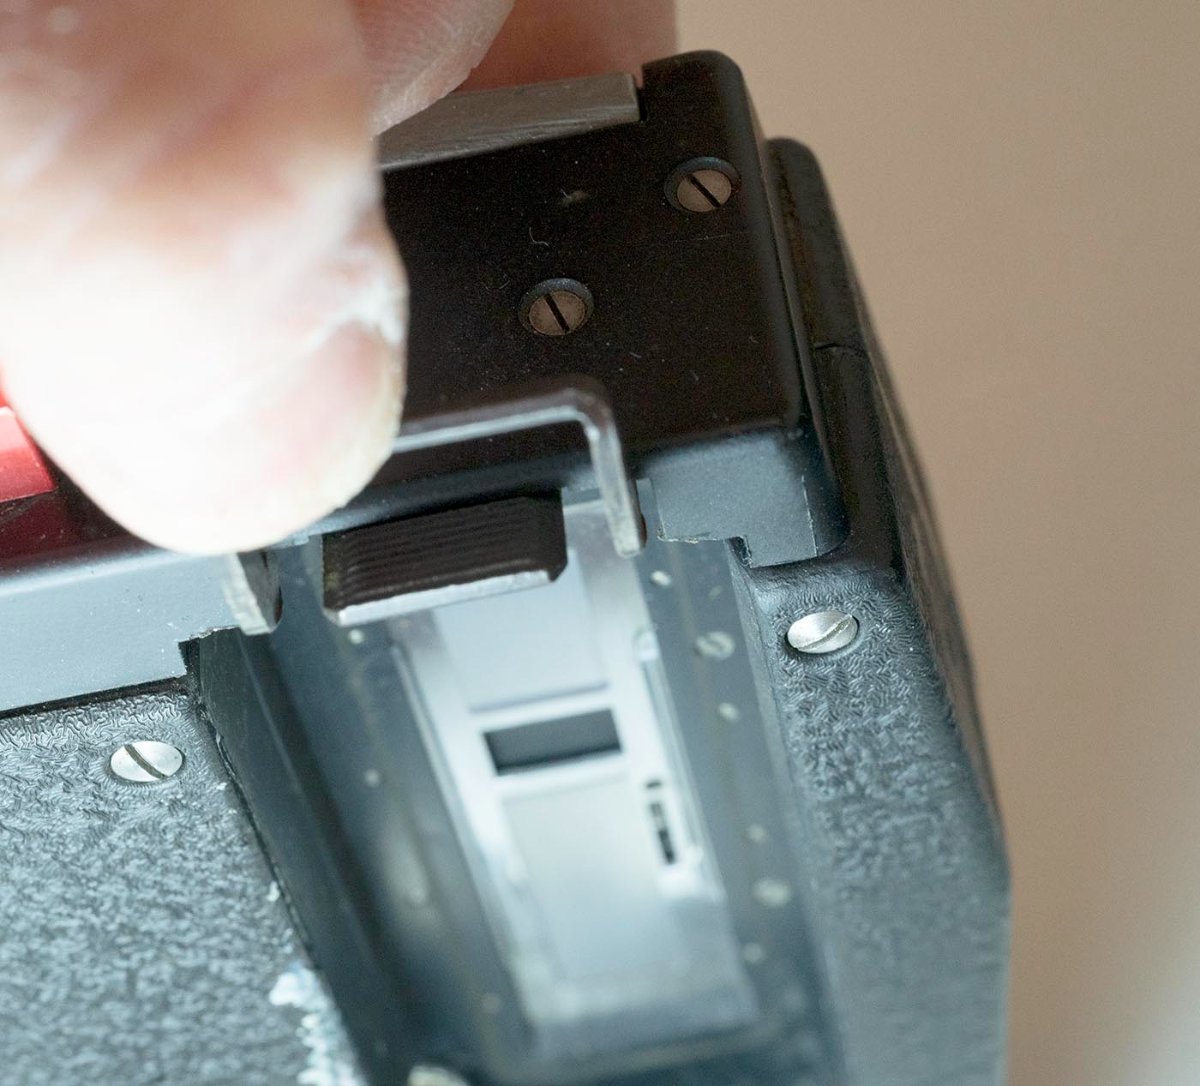
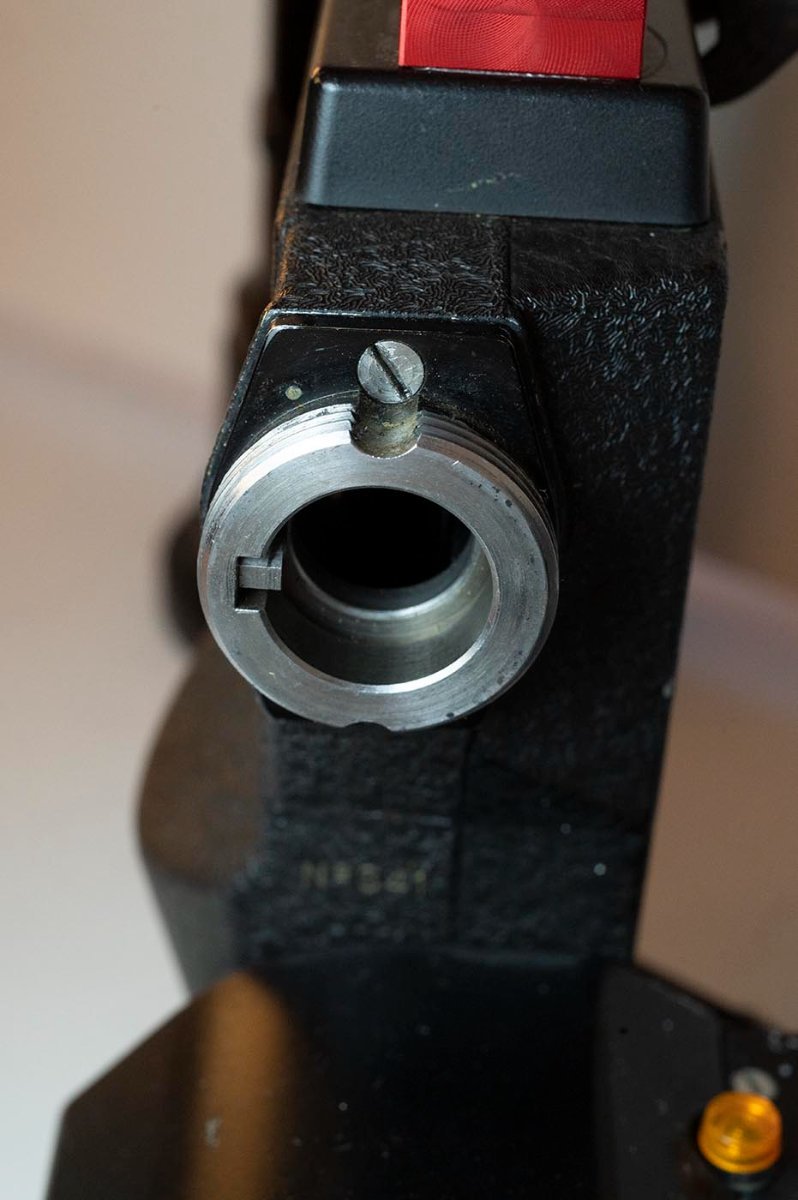
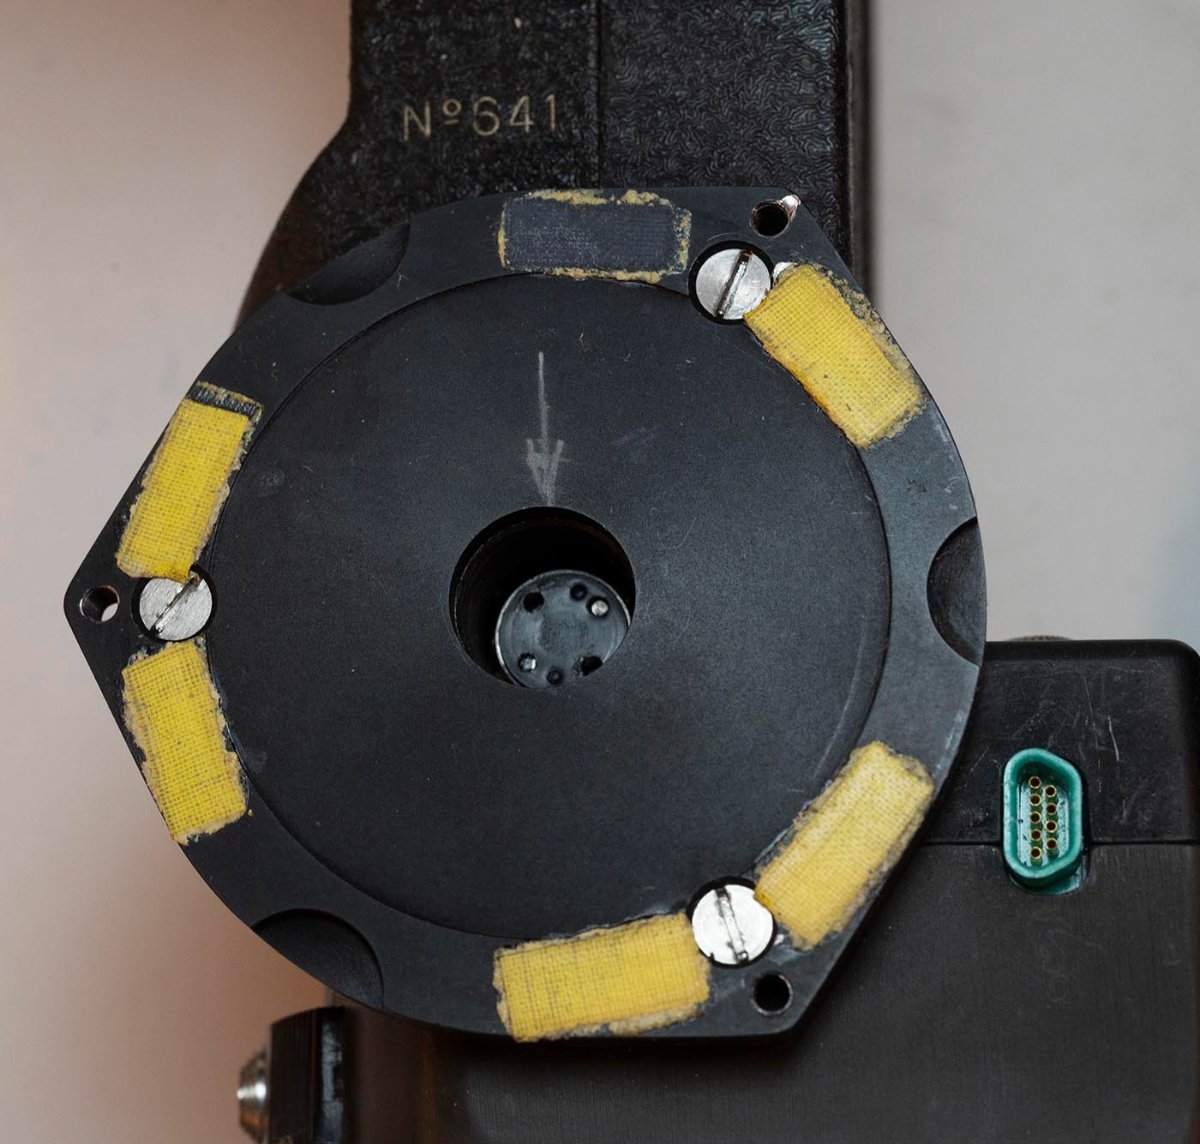
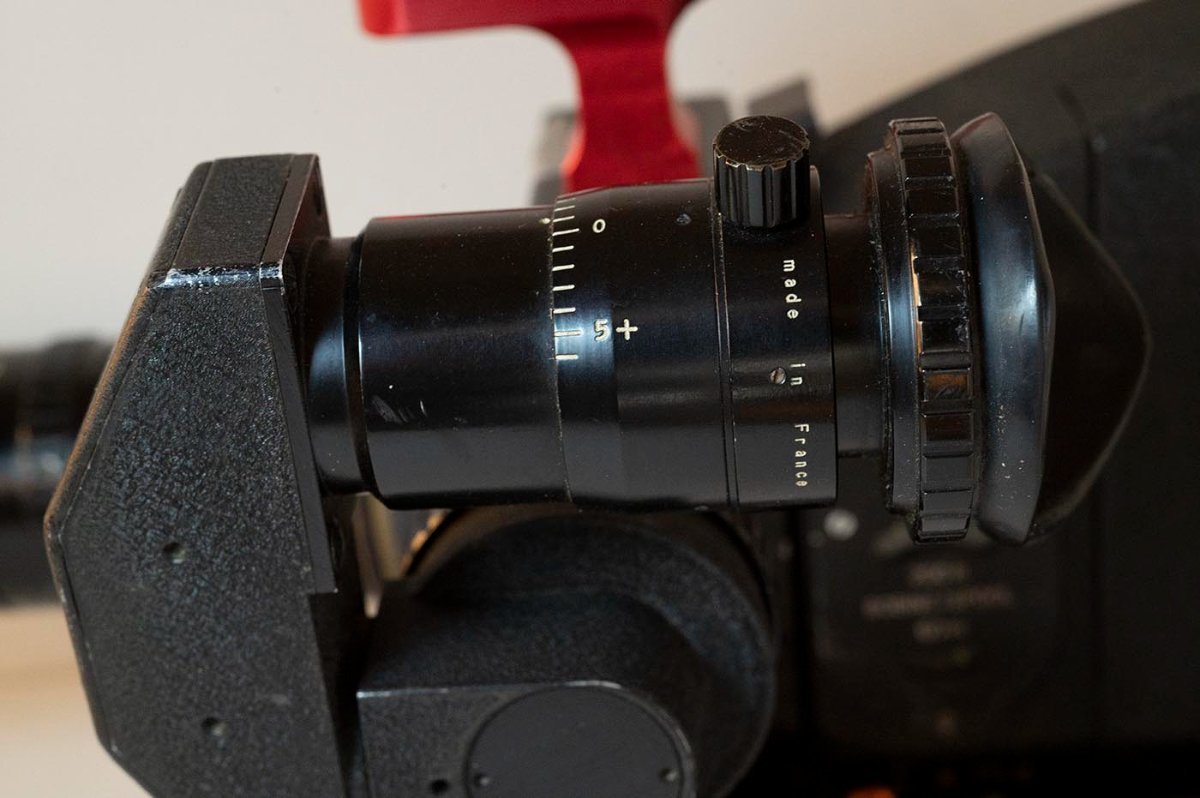
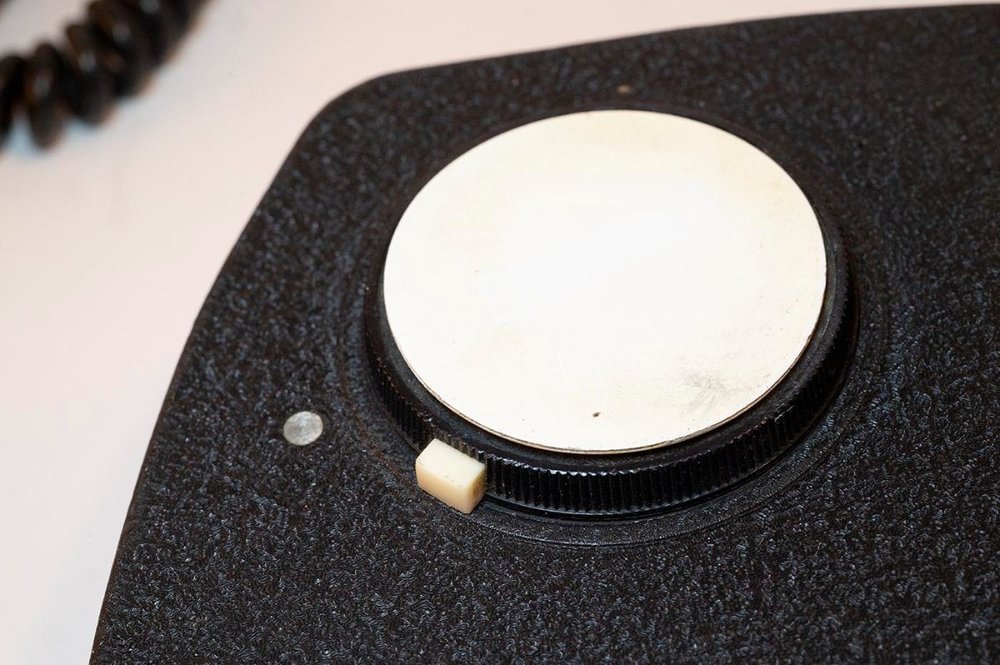
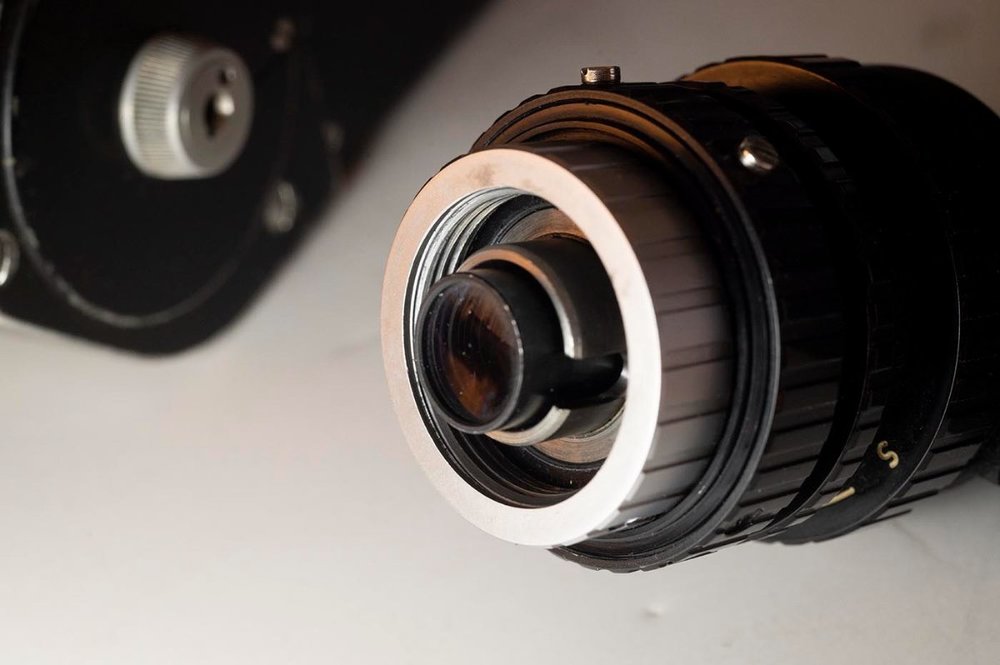
More measurements... Rubber drive coupling is medium-hard rubber (I think we have a durometer tester at work, I'll have to get a more precise number for that.) It's 9.5mm in diameter and 3mm thick. Which are the specs of the cup it sits in on the camera body side, so it sits flush with the top of that once fitted in there. The pins are 1.5mm in diameter and measure 8.25mm apart on the outside and 5.25mm apart on the inside, which puts them on 6.75mm centers. So the holes in the drive coupling have those specs, with a second pair exactly 90 degrees out from the first. The little pads they put to space the motor out from the body are .2mm thick, so vanishingly thin. I hate to sponge off of someone's knowledge when they make their living at it, so I'll hold off contacting AZ Spectrum unless I'm seriously considering having them work on the motor. When the Jaeger order shows up I'll do a whole separate show and tell thread on those. Duncan -
Eclair ACL 1.5 newbie questions (with pictures!)
Duncan Brown replied to Duncan Brown's topic in Eclair
OK, had a moment to bench test my motor. I connected pins 2, 7, and 8 to GND. I connected pins 5 and 9 to 12V. I connected pin 3 to 5V. That gives the motor circuitry power. Then to actually turn it on, I connected pin 6 to 12V. Interestingly the knob has 5 positions engraved (8, 12, N, 50, 75) but physically clicks into 6 positions. The numbers on the knob don't line up with the mark on the body very well, even though I checked and the knob setscrew is on the flat part of the switch shaft. Hmmmm.... The highest 2 physical positions (presumably 50 and 75) run at a fast speed, all the other 4 run at a slow speed. Just two speeds. Light always stays on. The motor is not that loud when on the camera. Either the body shields some of the noise, and/or it doesn't appreciate being run with its output shaft unsupported, with that heavy drive coupling out there on the end. In any event this proves the problem is entirely with the motor; it's not something wrong with the camera itself adding too much drag on the motor. Duncan -
Eclair ACL 1.5 newbie questions (with pictures!)
Duncan Brown replied to Duncan Brown's topic in Eclair
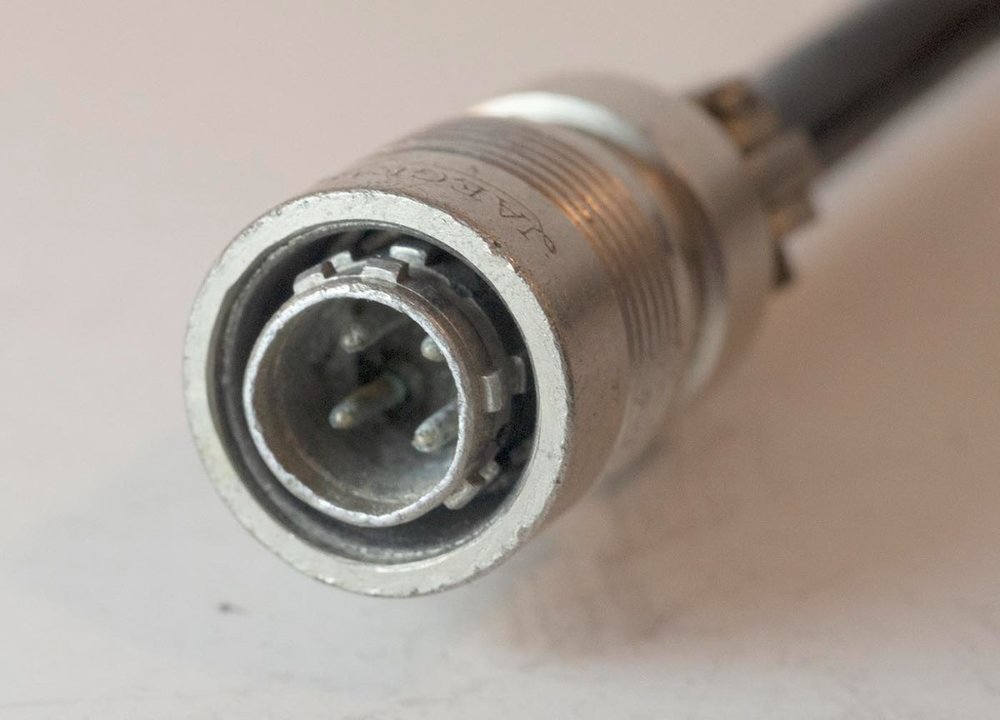
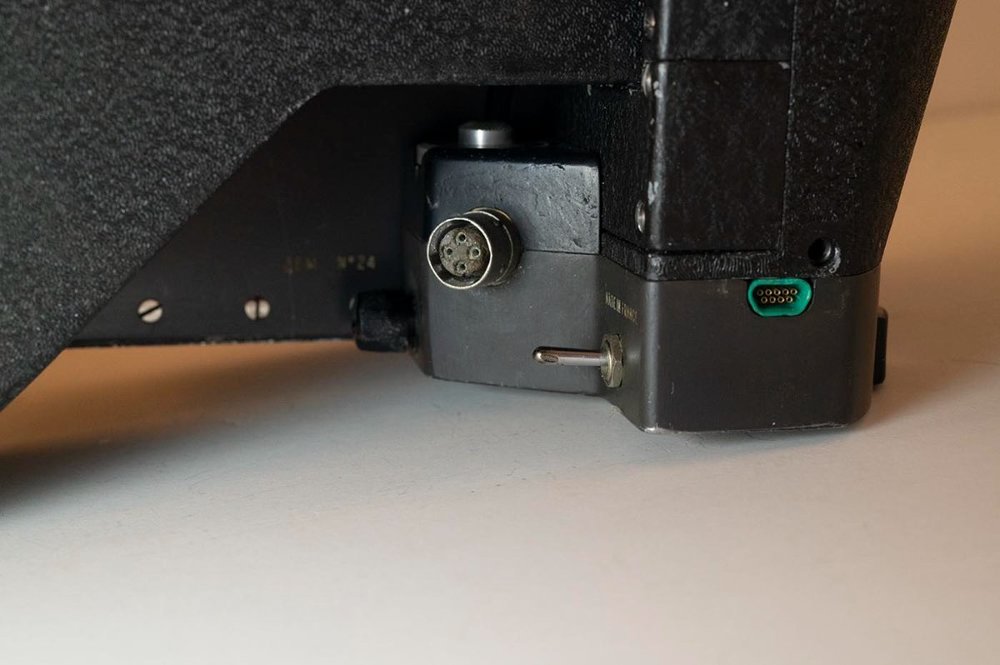
RE: the connector not fitting - but I think they could have designed it so that the metal connectors would fit if they had tried (but I could be wrong!) It also seems unnecessary to me to have used such an itty bitty connector. 3 of the connections are ground, and two are power, if they had used something bigger whose pins could handle more current they wouldn't have needed so many of them so that would have regained some space. I haven't opened things up enough to see for sure, but the part numbers they spec in the manual are for connectors with 9 yellow wires! So yes, one wire at a time is the best way to proceed. (They do make versions with all the wires different colors, not sure why they didn't use those.) Duncan -
Eclair ACL 1.5 newbie questions (with pictures!)
Duncan Brown replied to Duncan Brown's topic in Eclair
I want to stock up on the Jaeger parts so I just went new. Everything has gone up due to supply chain issues - those Cannon connectors run $50-ish now. The metal body ones may not be interchangeable in terms of the mounting, but the mating should be the same. They could have accommodated any mounting thickness differences in the design. I'm sure they had some reason for going with the plastic. It's also possible that when new the plastic wasn't so delicate. I'll figure this all out when I disassemble the motor (which I'd really prefer to not do until I have a second one in hand but that search isn't going anywhere quickly!) I did get in an old-stock Cannon connector for $25 that will mate to the motor so I can bench test it. Maybe this weekend. Duncan -
Eclair ACL 1.5 newbie questions (with pictures!)
Duncan Brown replied to Duncan Brown's topic in Eclair
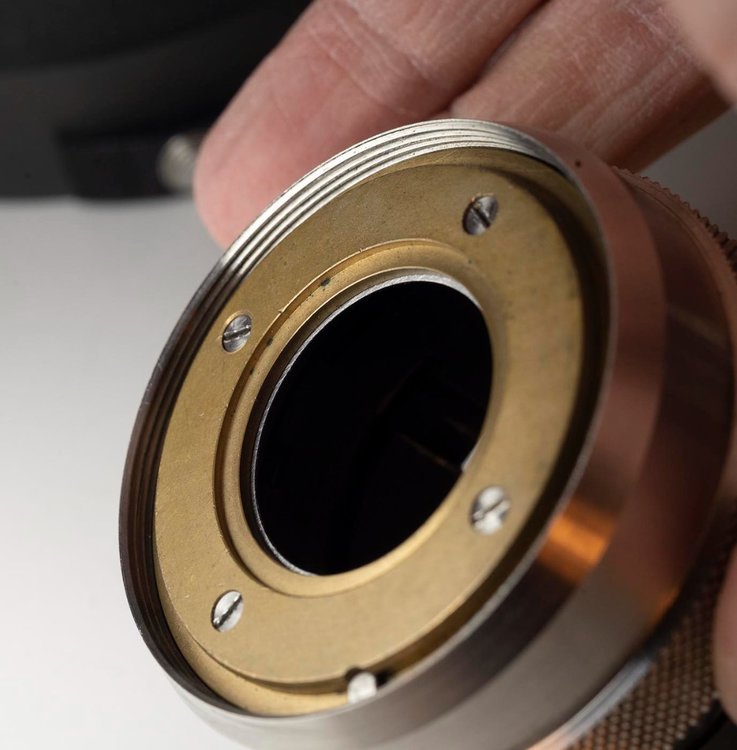
Gregg, I'll peel off one of the spacers to measure it when I get a chance. They look to be all the same thickness, which is about the thickness of cloth tape, which is what it looks like. They look to just be evenly spaced around the perimeter, not carefully placed to offset one part more than another. I'll also dig out the rubber block and measure that. It's not clear to me why they used plastic Cannon connectors instead of the metal versions, sure would have been less delicate. The rotary switch is multi-level and sealed and tightly tied into the whole mess with soldered wires. So it's going to be bit of a challenge to test separately, or replace for that matter. But it's also entirely possible it's the circuitry that's got the problem, not the switch, now that I see it is a sealed unit. Those usually last pretty well. I've gotten a quote from a Jaeger distributor, which I haven't had time to study yet and figure out my order. Pricey little buggers, and unlike 4-pin XLR or even those itty bitty Cannon connectors, there is simply no supply of them on the old-stock or slightly-used market; they're just too obscure. Duncan -
Eclair ACL 1.5 newbie questions (with pictures!)
Duncan Brown replied to Duncan Brown's topic in Eclair
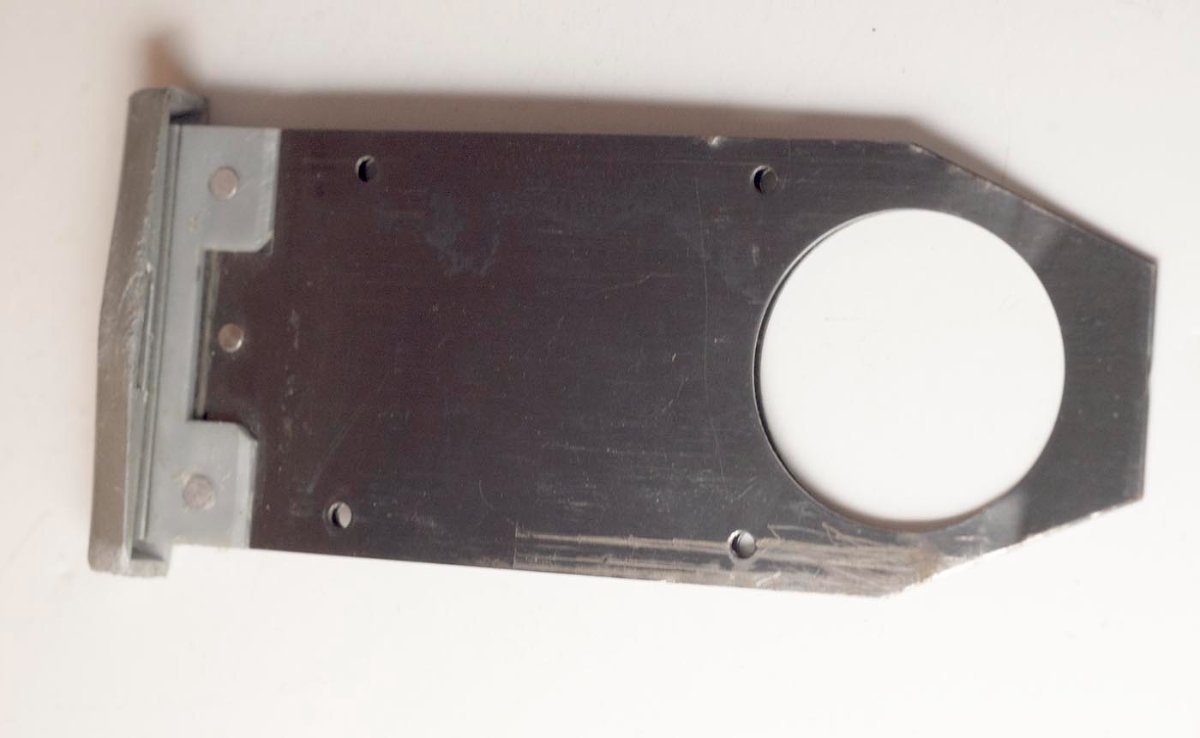
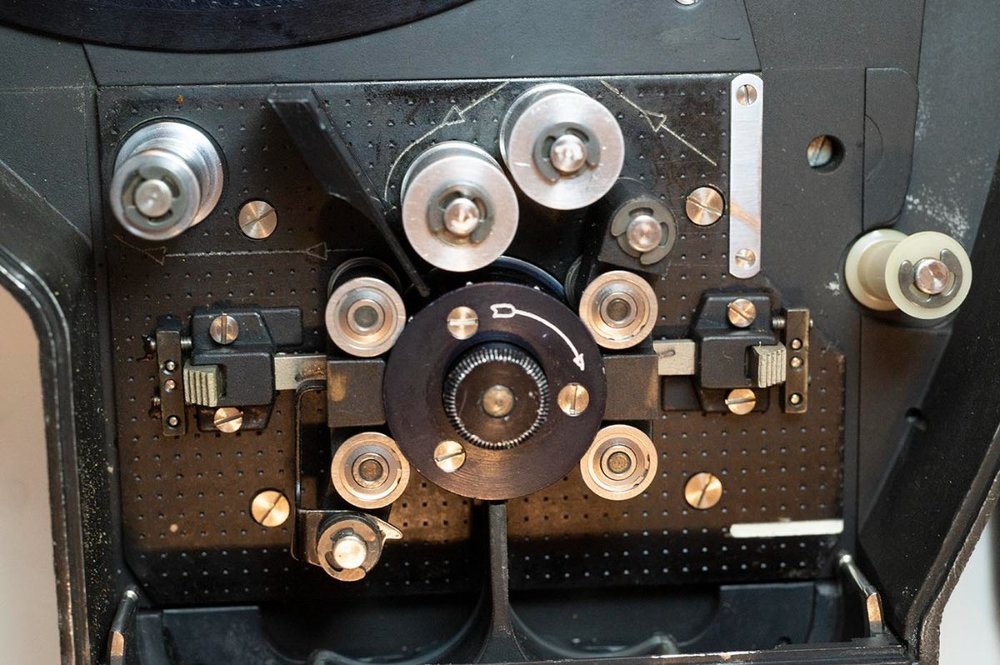
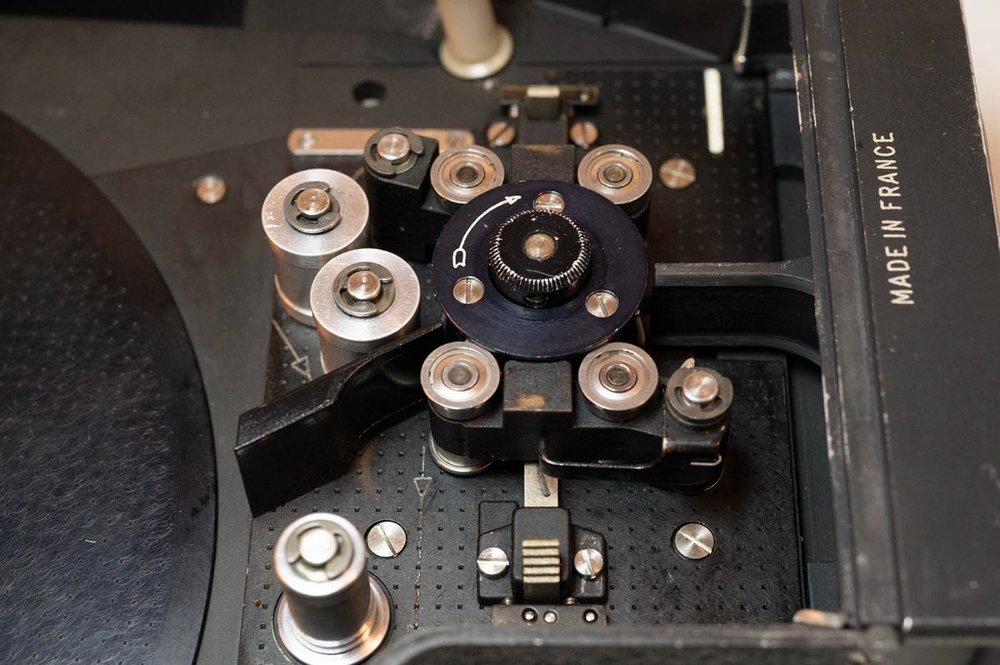
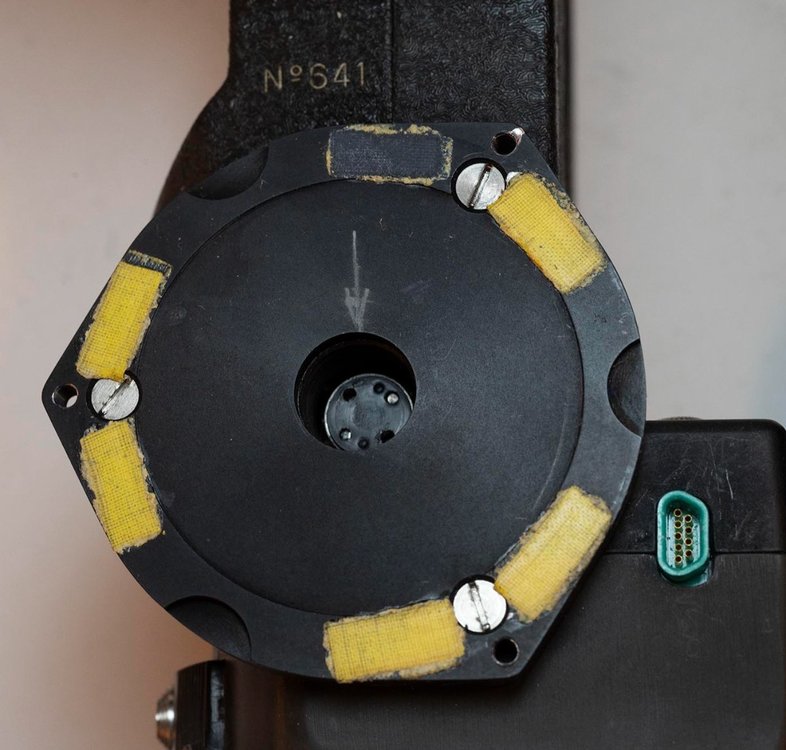
Gregg, I can weigh my body/base/motor just for comparison. The NPR feeds out of the feed side of the magazine, and back in to the takeup side of the magazine. The ACL comes back in the same side, then passes through the wall internally. Just noting the difference. I'll see how possible it is to put an XLR-4 connector on the base instead, but it seems more useful at this point to simply have an easy supply of the connectors to make adapter cables (Jaeger to XLR4) that mostly just stay in place once fitted... but to be able to have options (short, long, etc). This camera had Du-all stickers all over it originally, I wonder if those tape spacers were something they did. The extra "holes" in the rubber coupling simply look ot be where someone fitted the motor in the wrong position and then cranked down the screws, making coupler pin impressions deep into the rubber. No harm no foul once it was put together properly, At least these rubber couplings are simply enough to make from rubber rod stock, unlike say the Arri-S couplers, if it comes down to it. This one seems in nice shape other than the dents! Duncan -
Looking for stuff for my newly acquired ACL 1.5 that maybe is languishing in the back of your closet? -- MIMUL or MIVAR motor. Yeah, I know, not likely. But I'd be very willing to buy your broken motor for the right price. I'm a tinkerer -- TS - Arri-S mount. I'm told the later ones would take both Arri-S and Arri-bayonet, in the same mount. That would be OK too. -- Pilotone box that bolts to the side where the expansion connector is. It's for a crazy project I have in mind, surely nobody is still using these right? -- That little grip thing with the camera-actuating thumb button built in that also bolts to the side where the expansion connector is. -- Jaeger connectors or Cannon connectors; leftover from projects, or scrapped cables, or whatever. I'm sure I'll think of more, but that's a good start. Thanks, Duncan
-
Eclair ACL 1.5 newbie questions (with pictures!)
Duncan Brown replied to Duncan Brown's topic in Eclair
Heikki, Hey, I will have to contact them and see if they can get those connectors. They just link to the Jaegar catalog for those style connectors ("Natto") like everyone else, but at least they're in the US. I like keeping things as original as possible unless there is a reason not to (parts utterly unavailable, or inferior) so I'll start with trying to source those connectors. I will just continue to keep my eyes open I guess. It does seem like a complete replacement of the electronic guts, using the original motor but more modern components, would be the way to go these days, but given such a tiny market... I will try contacting that guy. And if I take my motor apart I'll document what I can, including developing schematics, but I really hate to do that without a backup motor in hand. My first step is going to be to get one of those tiny Cannon connectors so I can easily power up the motor "on the bench" apart from the camera. I'm pretty sure the problems are all in the motor, nothing to do with the camera, but it would be good to verify that for sure. The symptoms are: at any dial position except for "75" the motor runs at the same speed, with the sync light dimly illuminated. With my tachometer app on my phone it's hard to tell if I'm seeing the actual speed or some multiple or fraction of it... so I can get the image to freeze when dialed in to 23.1fps, but to my ear it sounds like it's running more like 11.55fps. At 75 it runs MUCH faster, with the light coming on brightly for a moment, then settling back to dim. I frankly don't want to run it at that speed long enough to see what speed that is with the app, since it doesn't matter; there are other more important problems with the motor and I don't want to damage the camera. Duncan -
Eclair ACL 1.5 newbie questions (with pictures!)
Duncan Brown replied to Duncan Brown's topic in Eclair
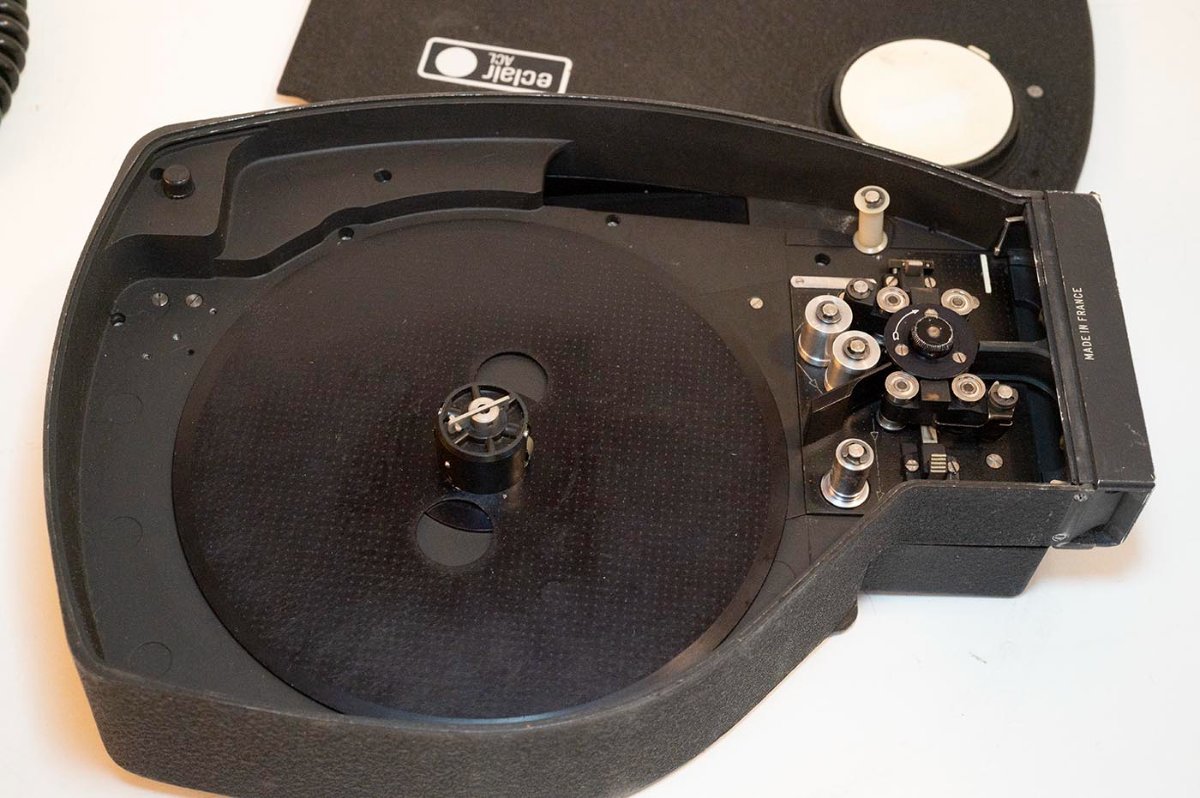
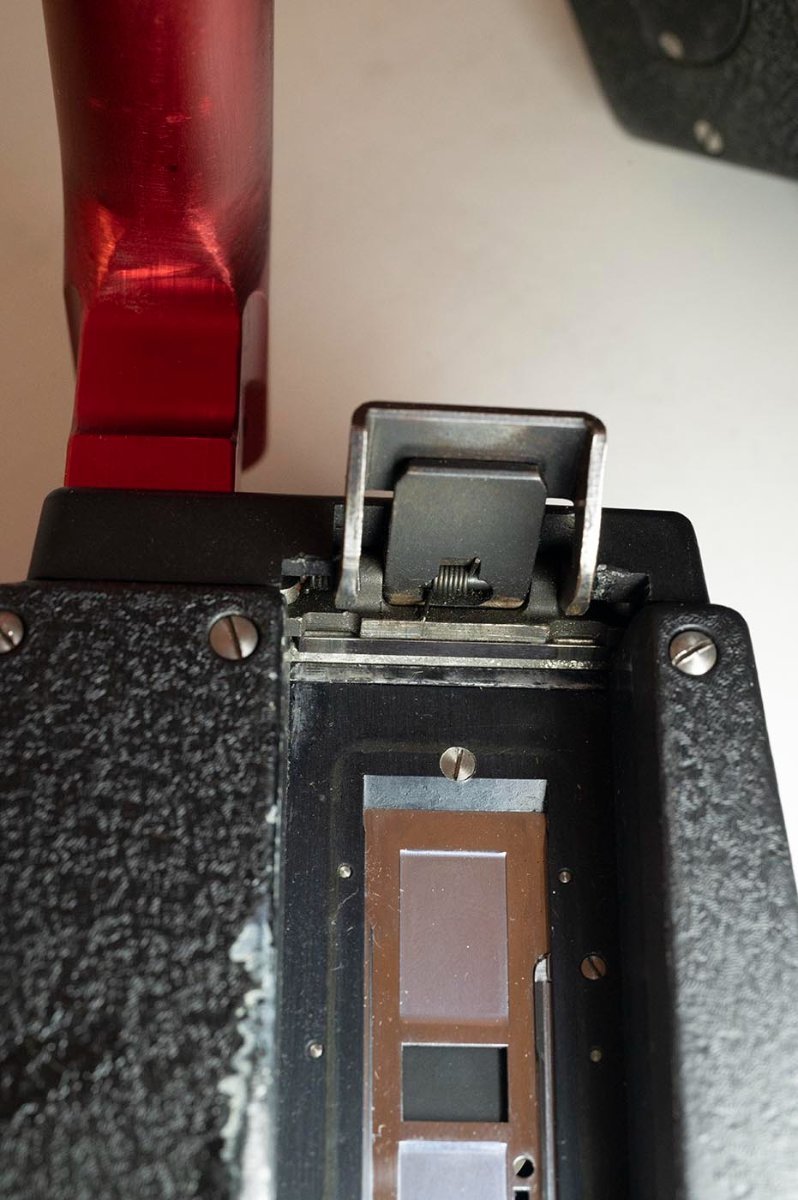
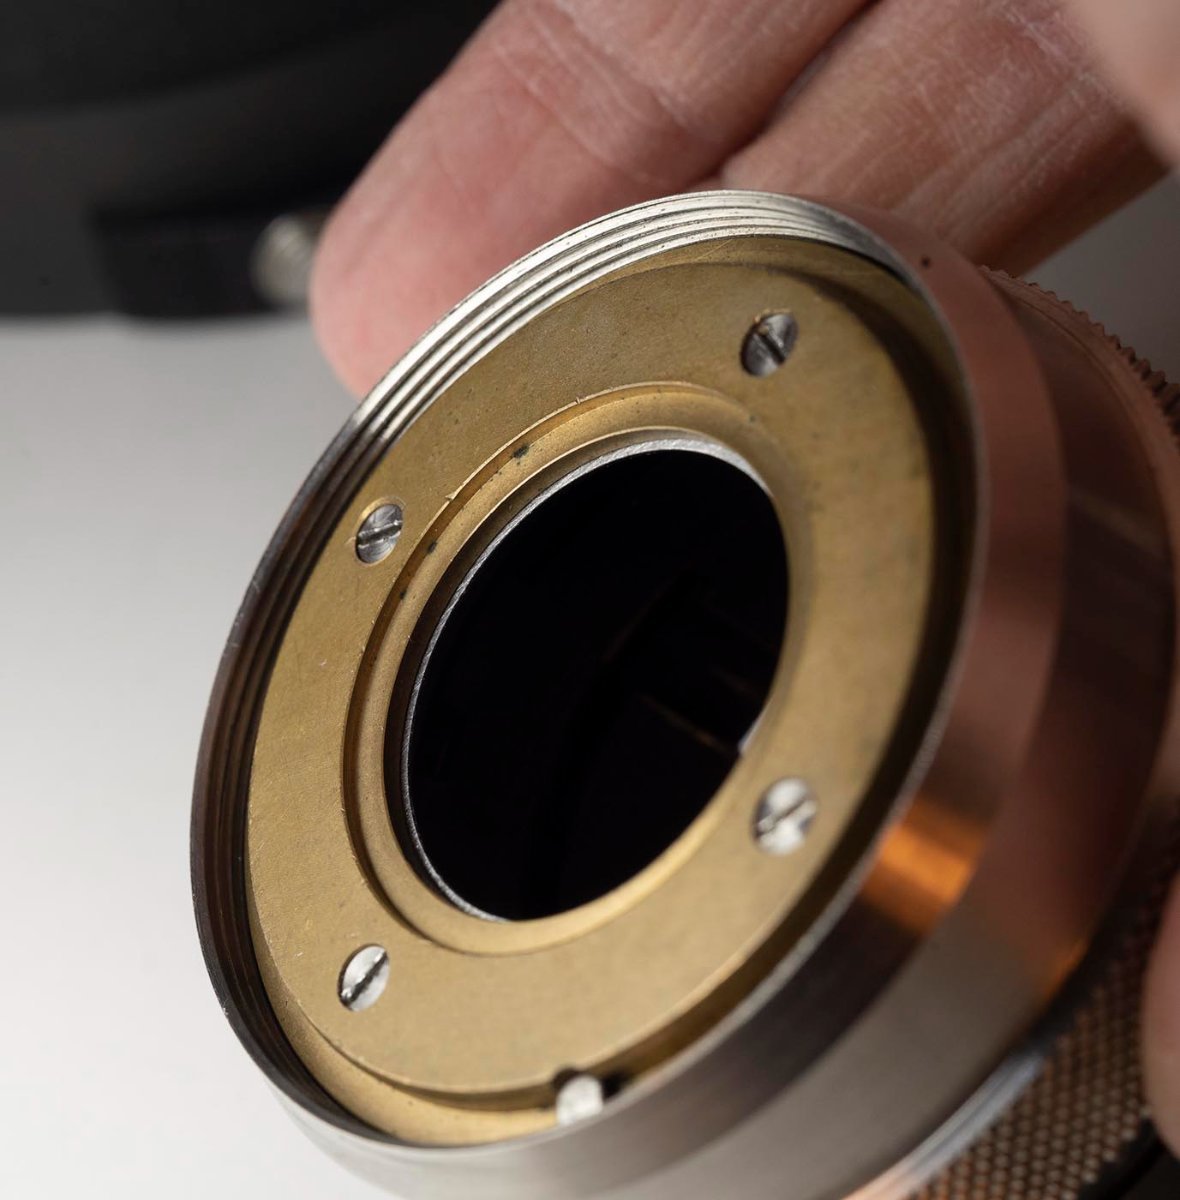
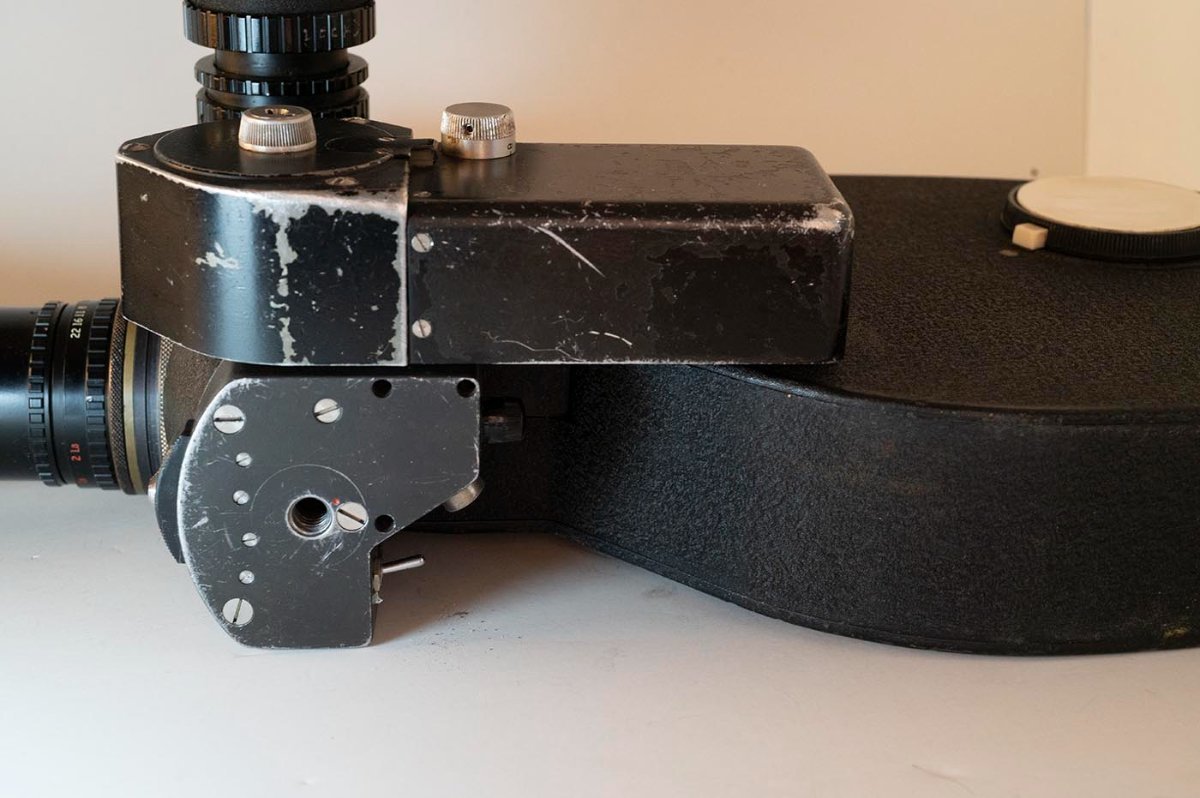
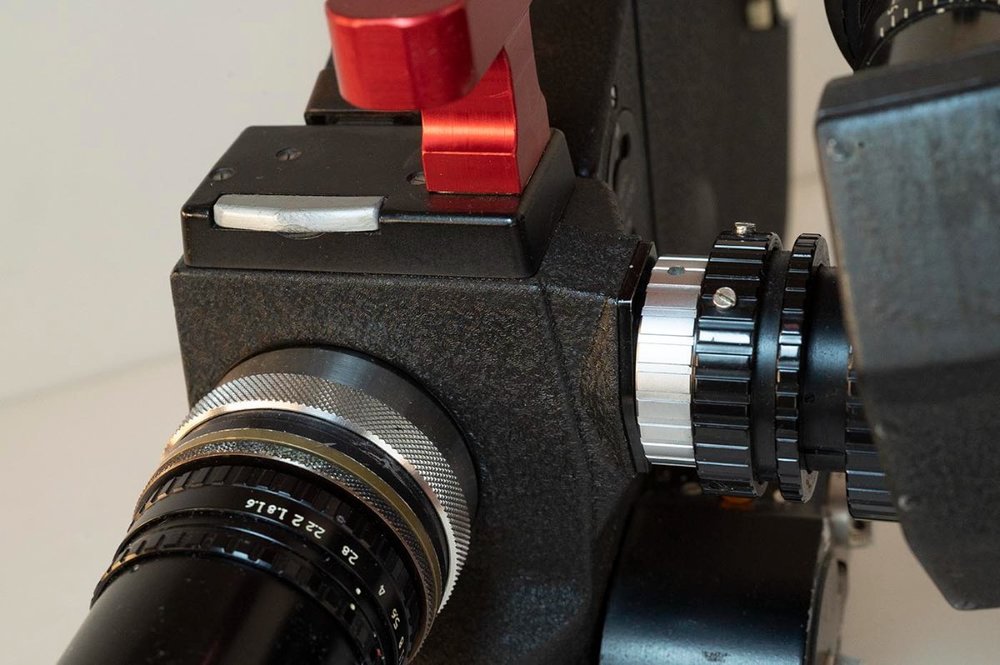
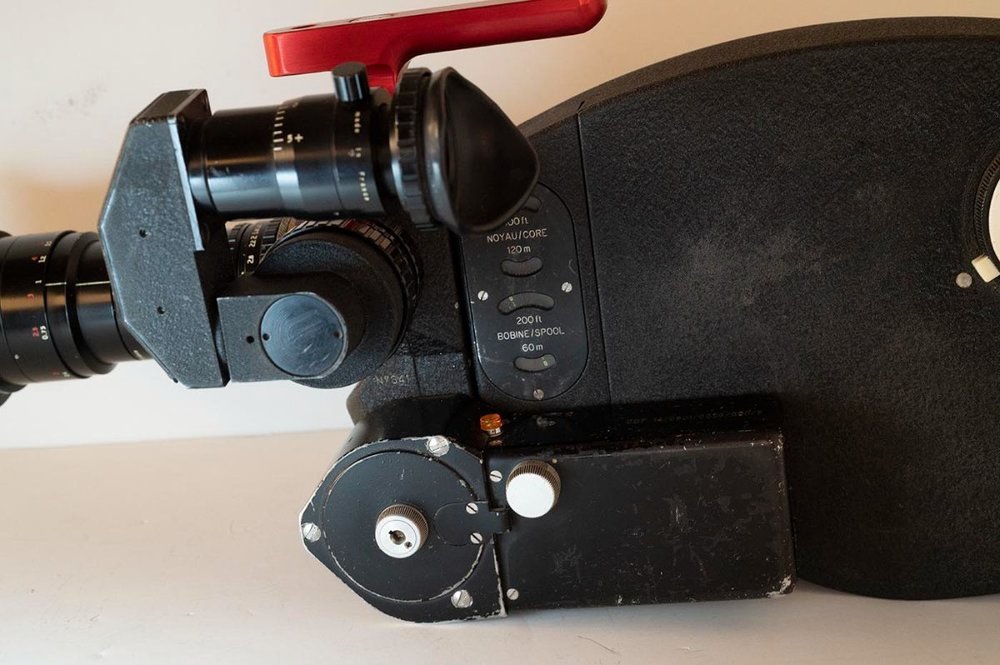
Just stuff like "how does that lens adapter system work, anyhow?" which isn't explained anywhere but is very obvious with detailed pictures. Also interesting that the film loop comes back into the feed side of the magazine, and passes through to the takeup side internally - I hadn't seen that described anywhere, but becomes pretty obvious when you have good closeup pictures. Now some questions... -- If you wanted to make some more battery connection cables, where can you buy those Jaeger connectors? I see the right connector is still in their catalog, but I don't see a mere-mortal vendor of them anywhere (like DigiKey, Mouser, Newark, etc here in the States) The Cannon connectors I can find (but woo boy are they pricey!) My camera has a Jaeger to 4 pin XLR cable so making up battery packs is easy, but I want a wider assortment of cables that hook to the camera. -- Am I correct in thinking that there is no "press to run" shutter button on the camera? If you press the button you light up the "exposure meter" (such as it is) [if it's installed] but you need to slide it one direction where it locks on to start the camera...or you slide it the other direction where it locks on and enables the optional grip trigger? So the "press to run" functionality only comes with the optional grip(s). This isn't really different from the Arri S, where on-camera it only locks on, but if you have one of the optional grips or braces with the trigger button that actuates up through the tripod socket then you can have press-to-run. -- Where are all the optional accessories hiding? I pretty much never see anyone selling anything for the ACL. Or is it just a matter of posting wanted ads here and hoping they come out of the woodwork? I could use another motor so I'd have something to run the camera with while tearing into mine to sort out its issues. A grip with trigger would be nice. I would think Pilotone box would just be gathering dust and could be picked up cheaply. -- Speaking of motors has anyone posted schematics for the guts of the MIMUL or MIVAR motors? I'll post what I figure out when I eventually tear mine apart. And I've seen MIMUL (original heavy duty 75fps) and MIVAR (later with mirror parking and all crystal speeds?) and Cinema Products modified MIMUL and AZ-Spectrum modified MIVAR...were there ever any other motors available? Seems like there were dozens of choices through the years for the NPR, I'm surprised to not see so many for the ACL. Duncan -
Eclair ACL 1.5 newbie questions (with pictures!)
Duncan Brown replied to Duncan Brown's topic in Eclair


-
Eclair ACL 1.5 newbie questions (with pictures!)
Duncan Brown replied to Duncan Brown's topic in Eclair


-
Eclair ACL 1.5 newbie questions (with pictures!)
Duncan Brown replied to Duncan Brown's topic in Eclair


-
Eclair ACL 1.5 newbie questions (with pictures!)
Duncan Brown replied to Duncan Brown's topic in Eclair


-
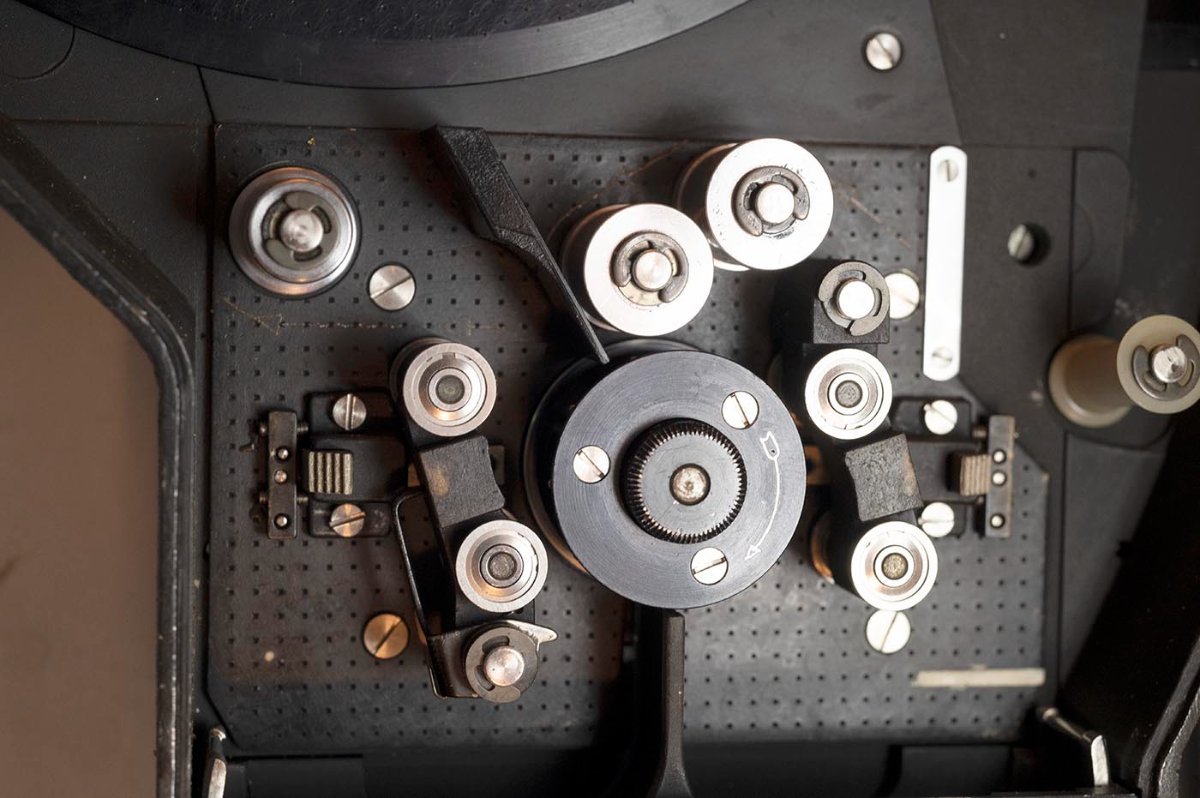
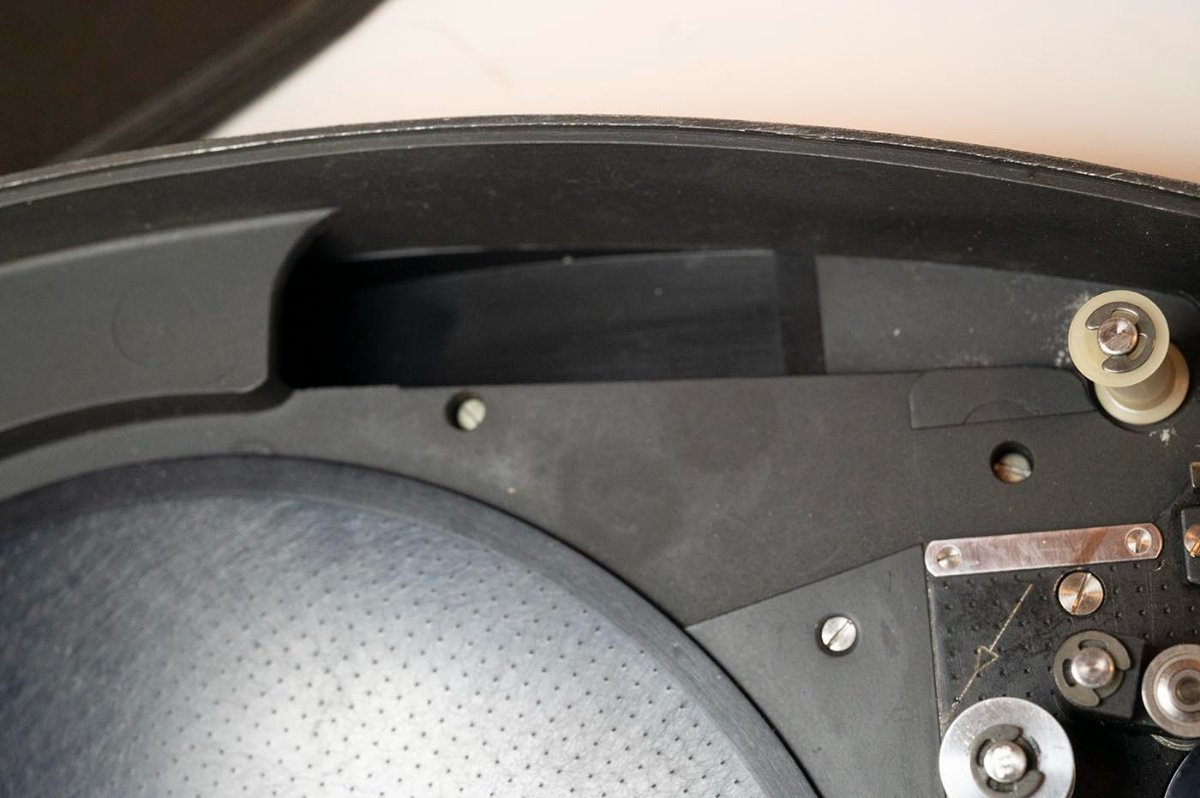
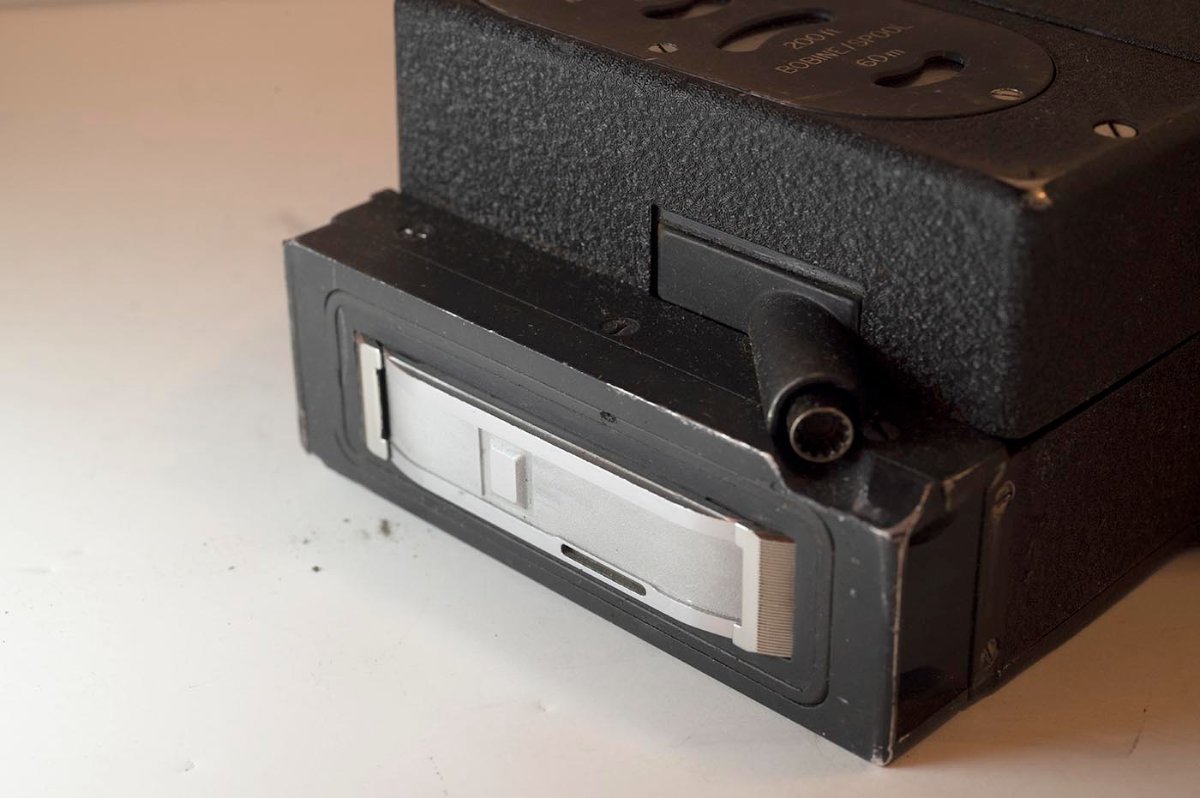
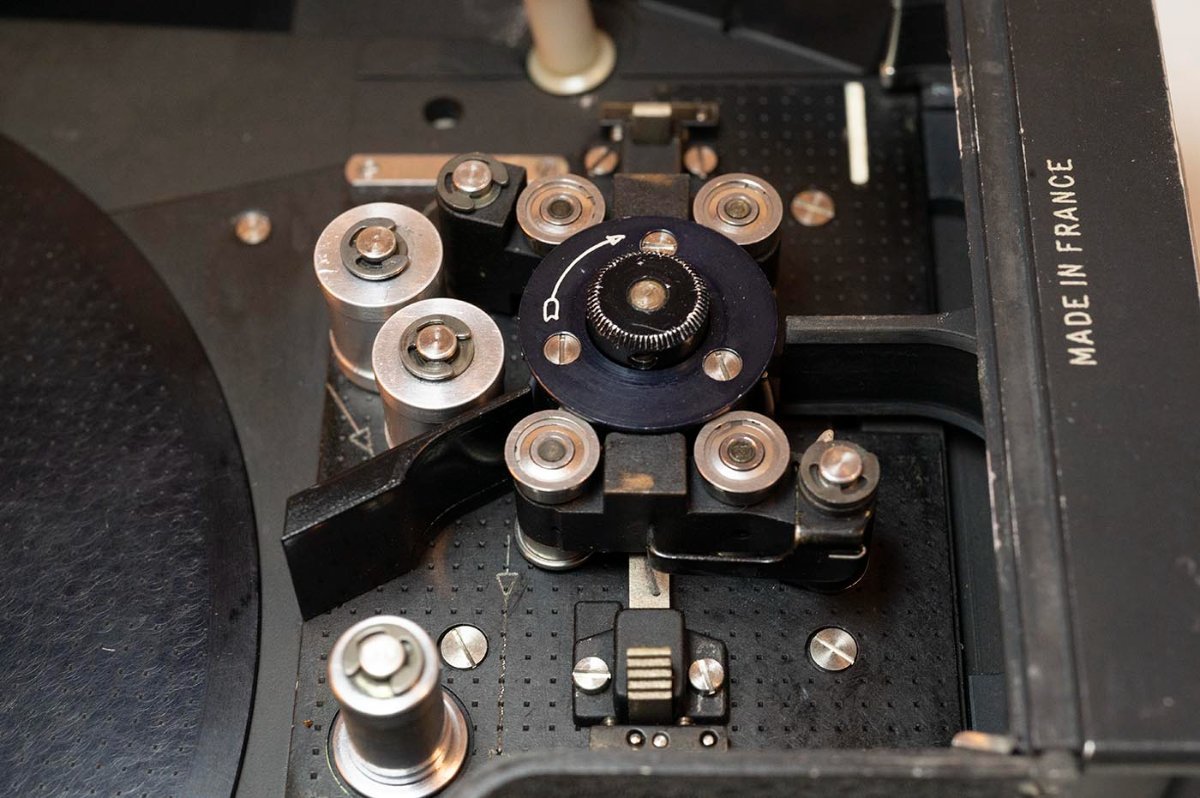
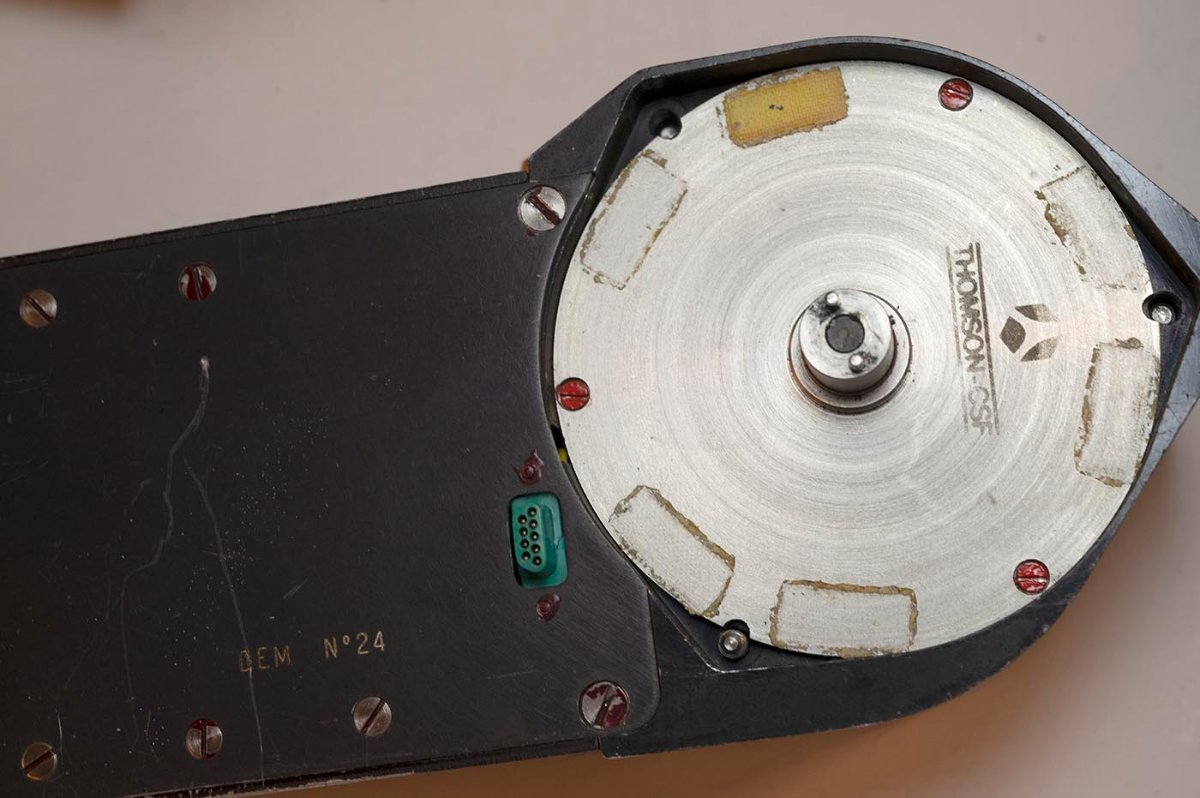
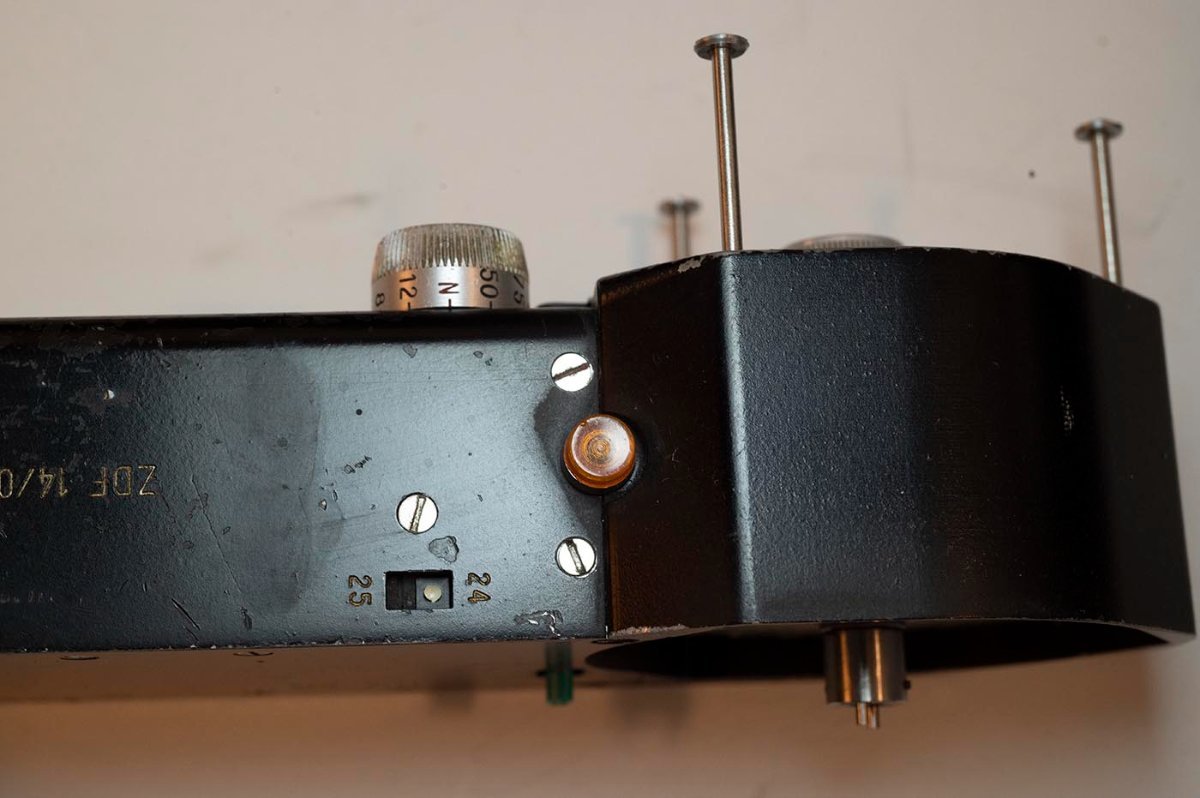
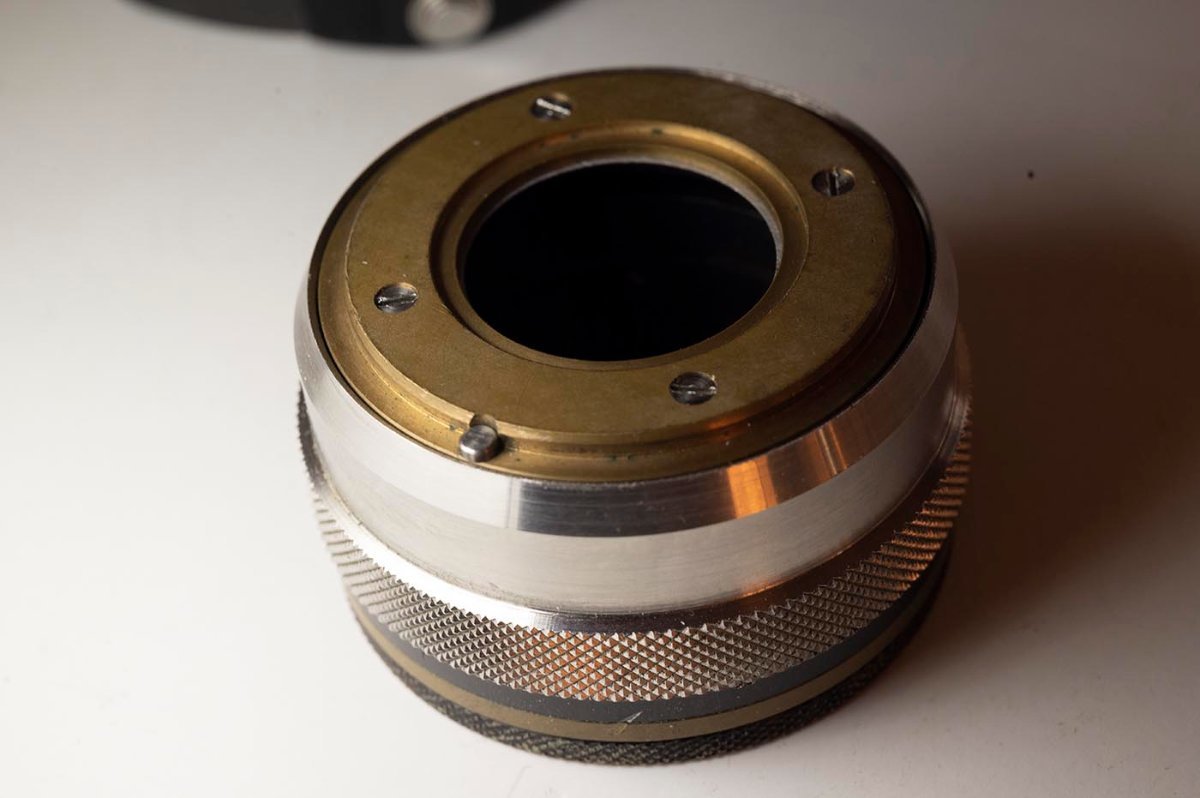
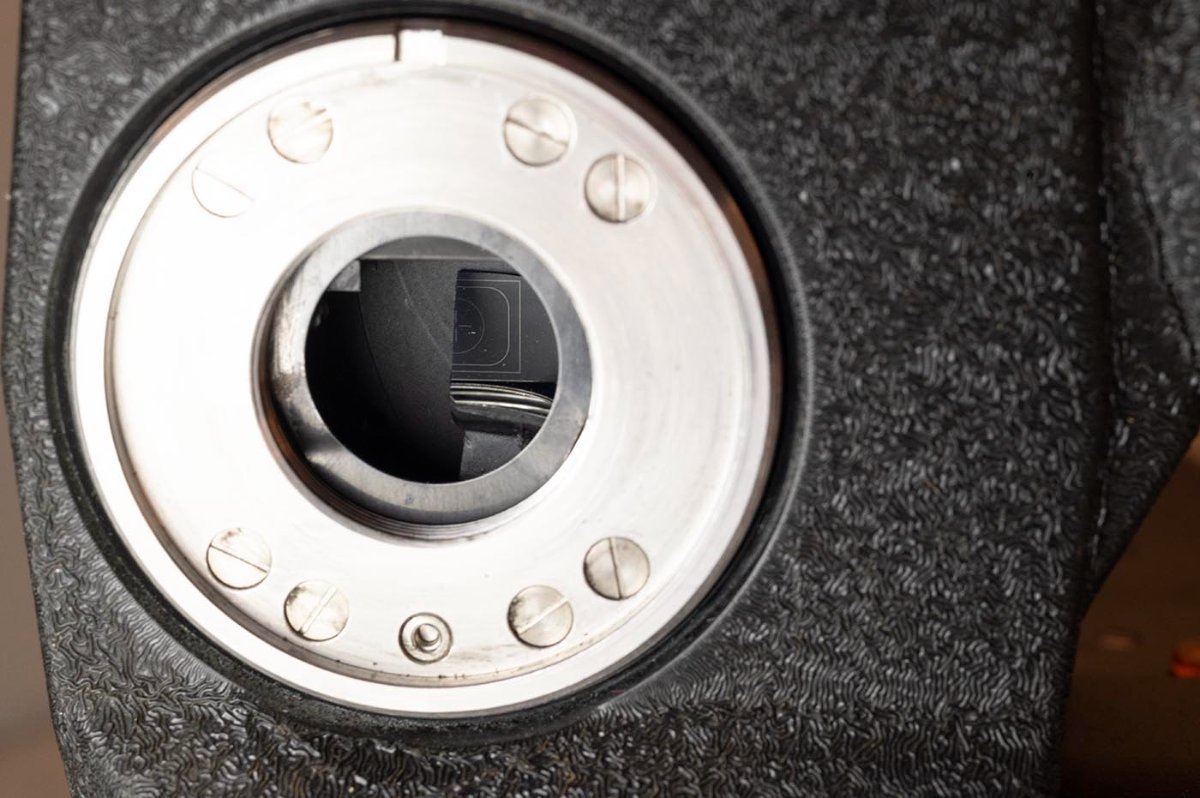
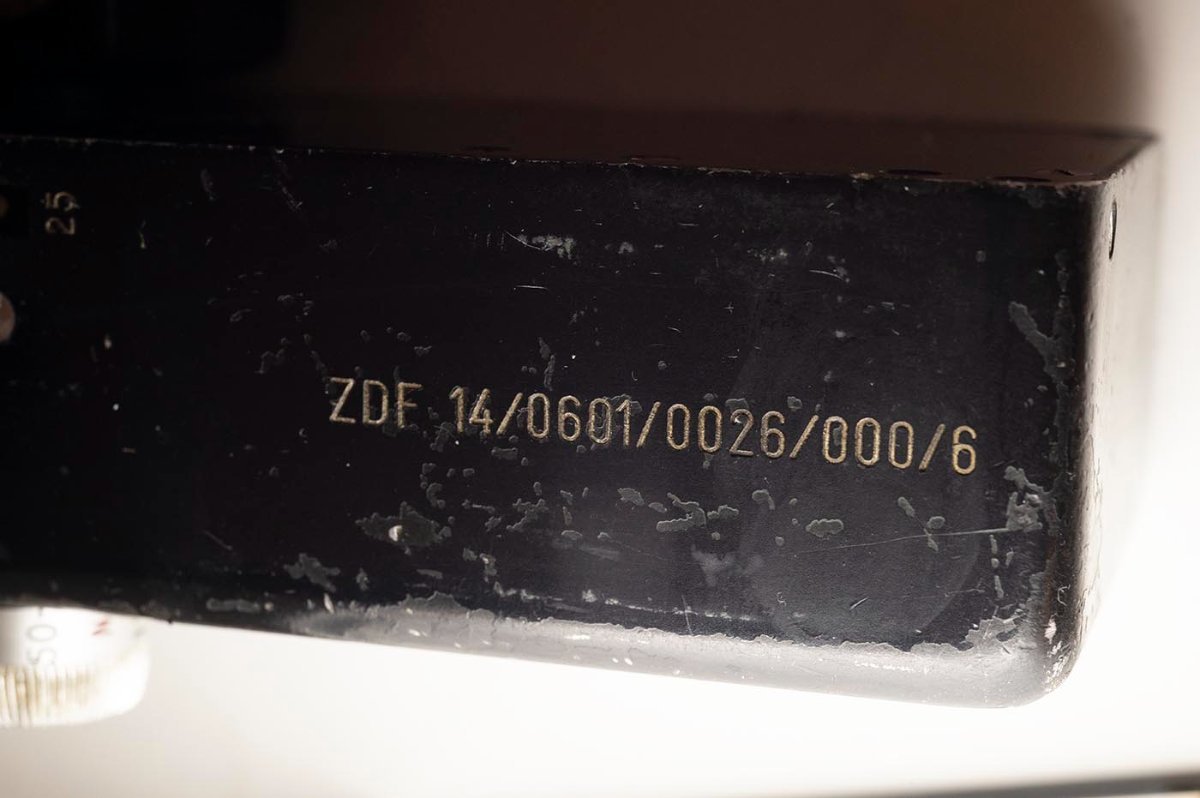
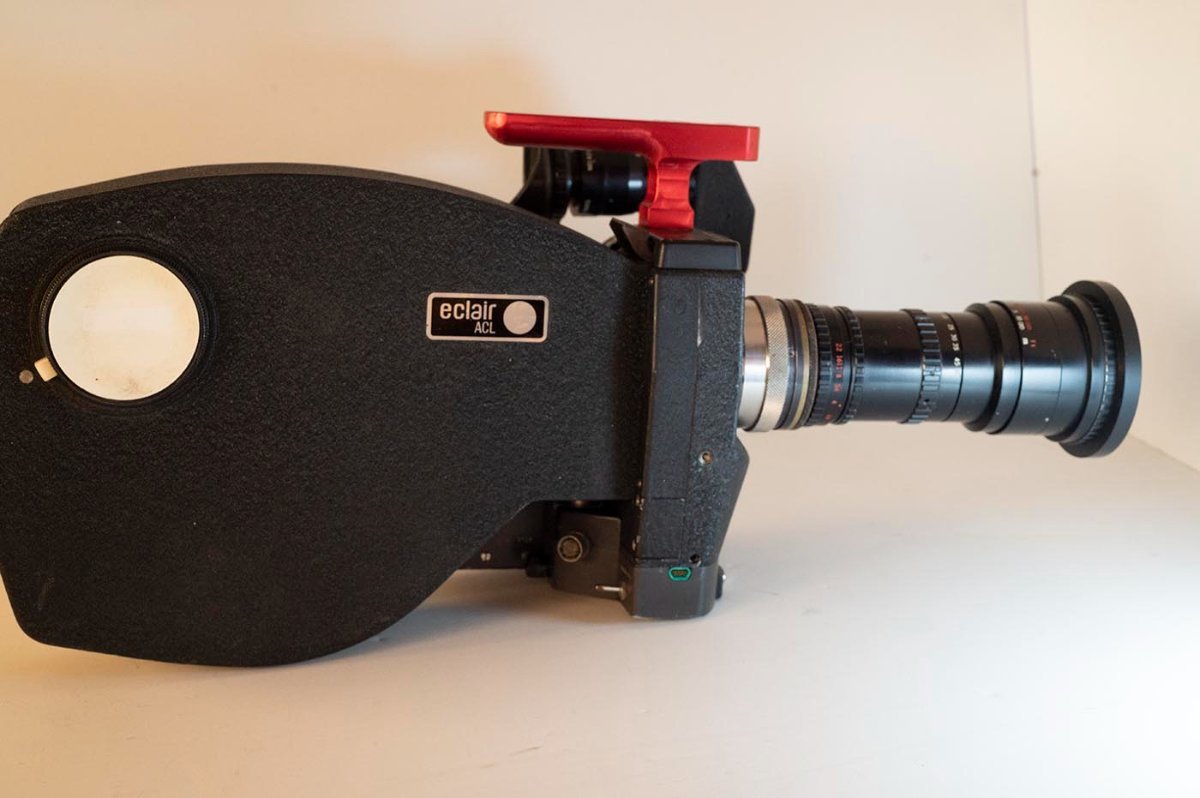
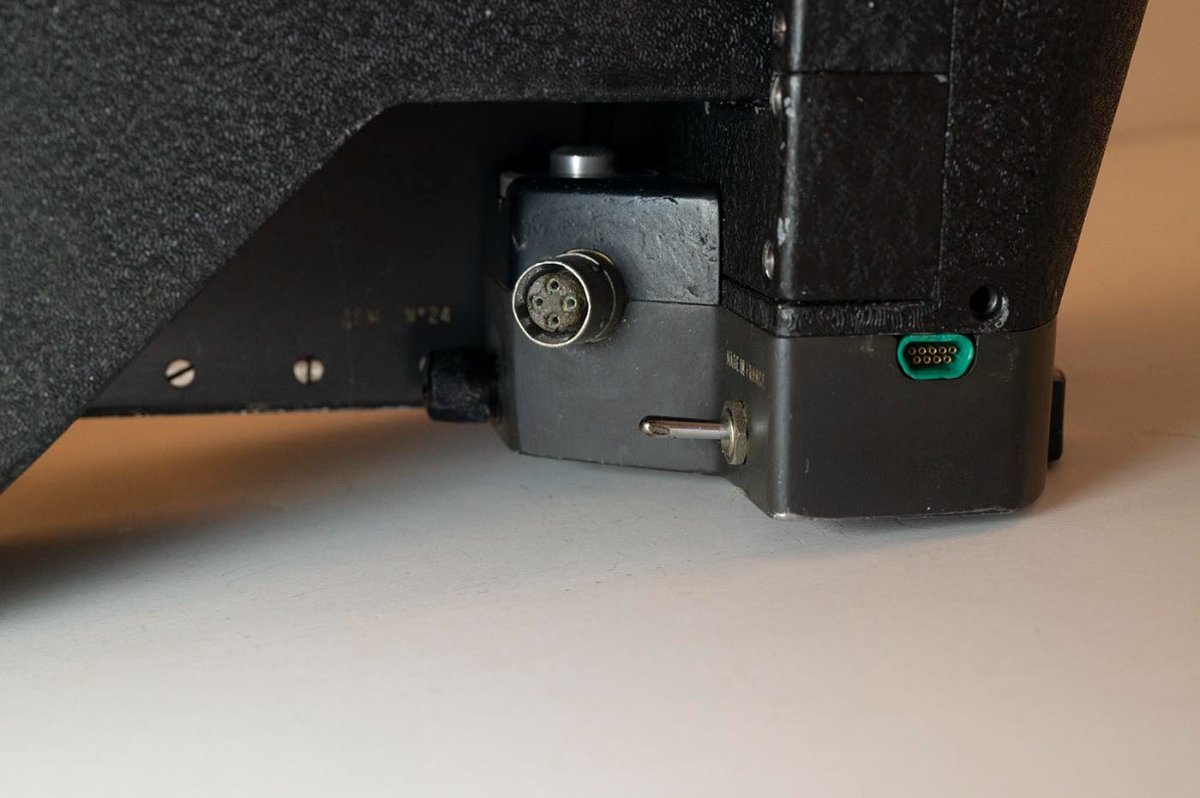
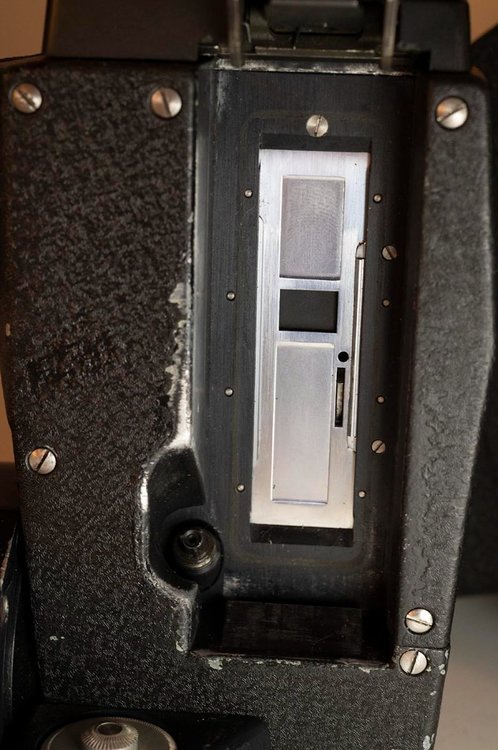
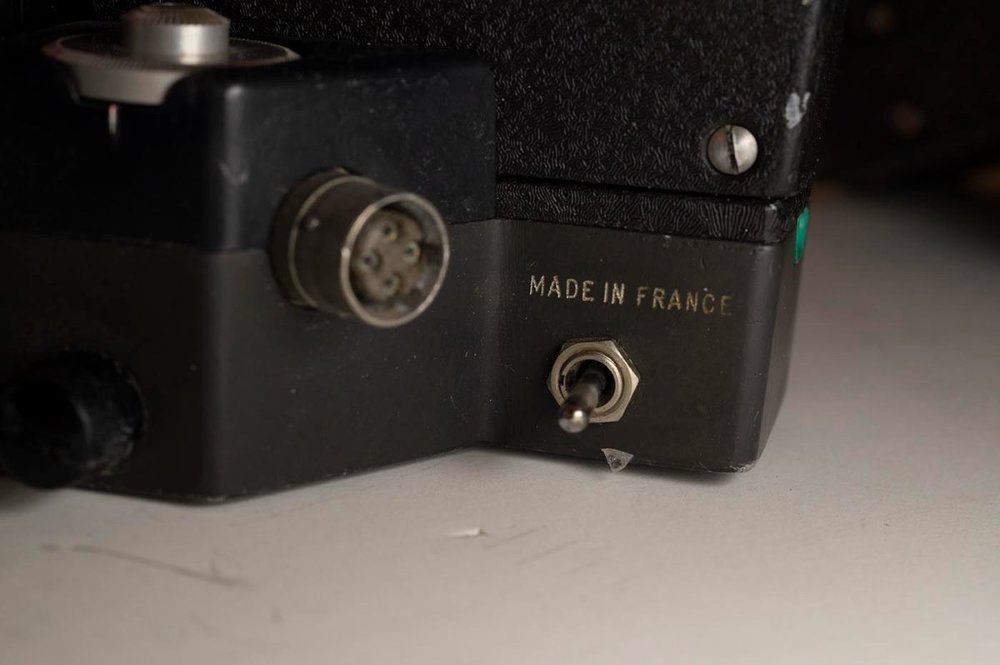
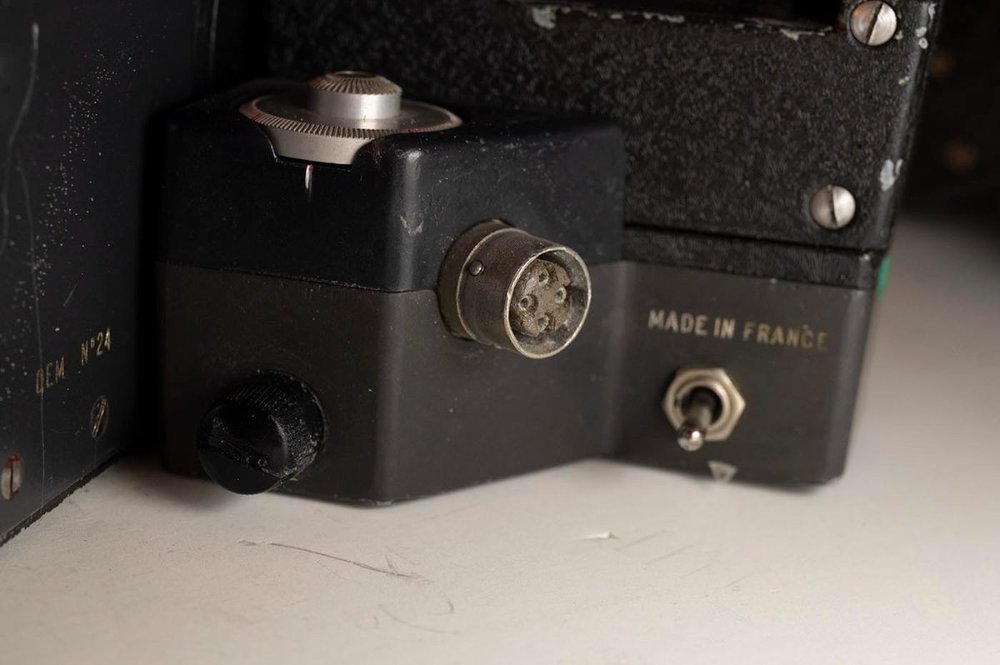
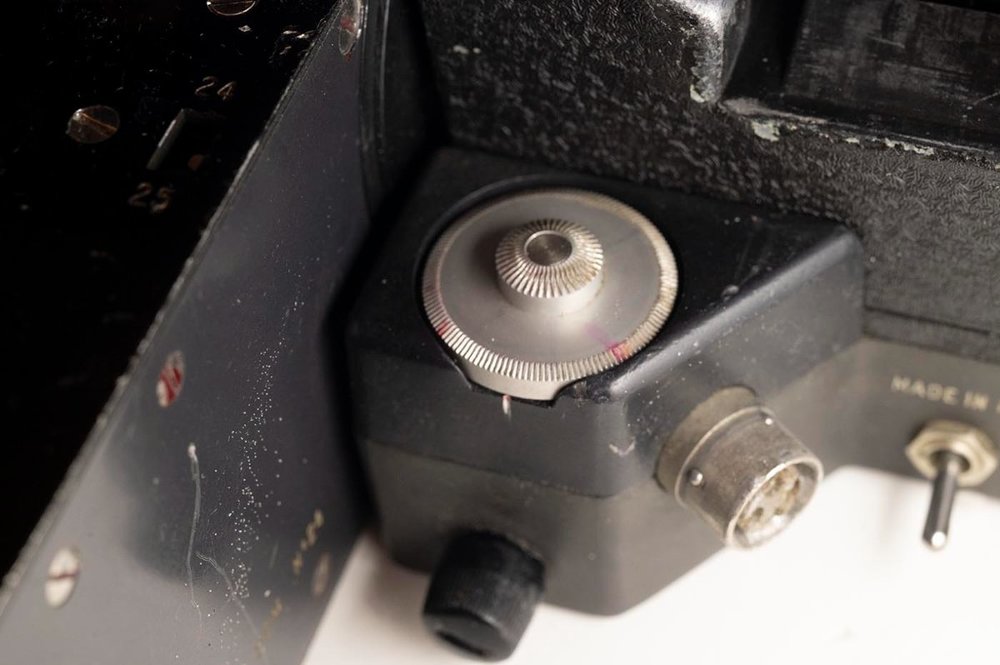
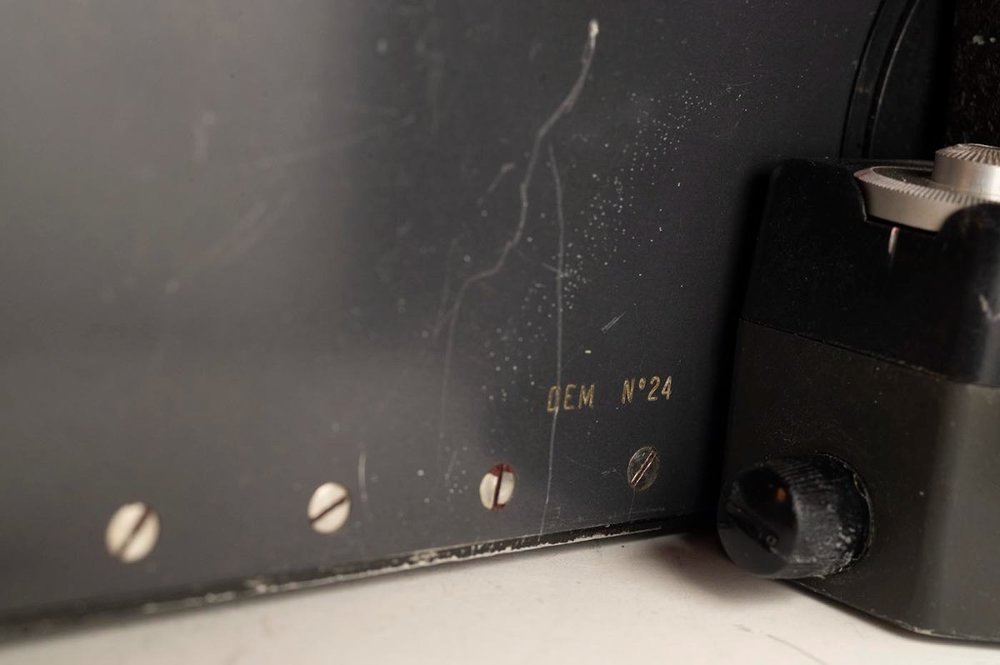
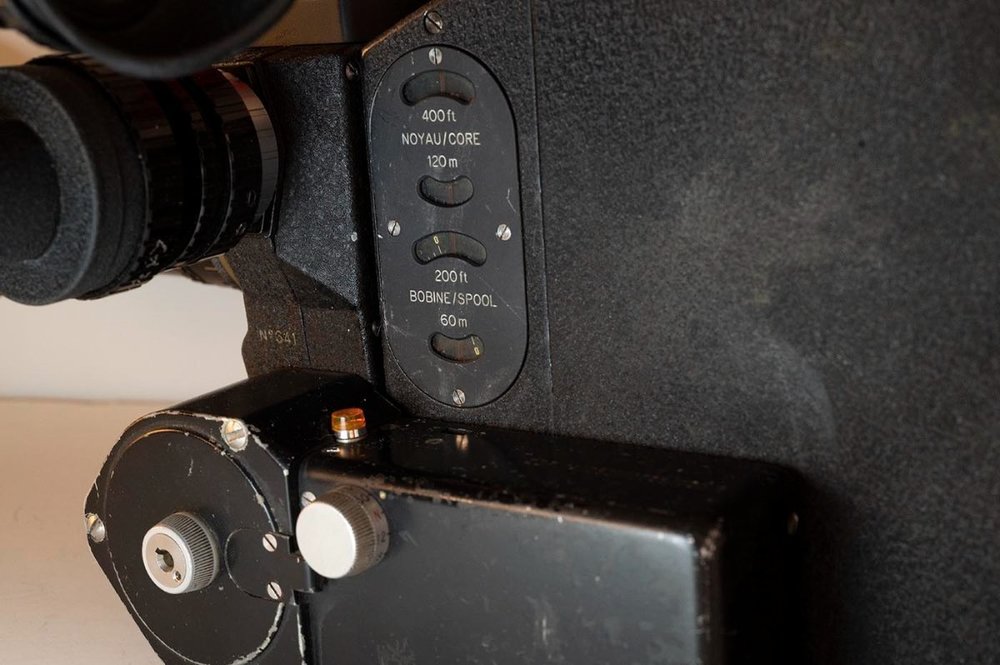
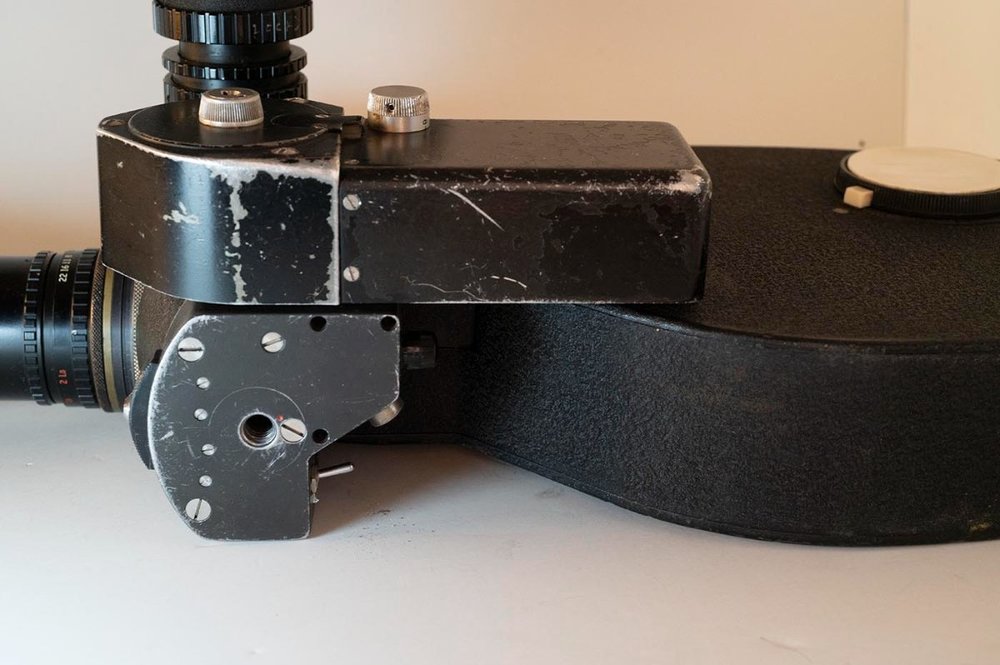
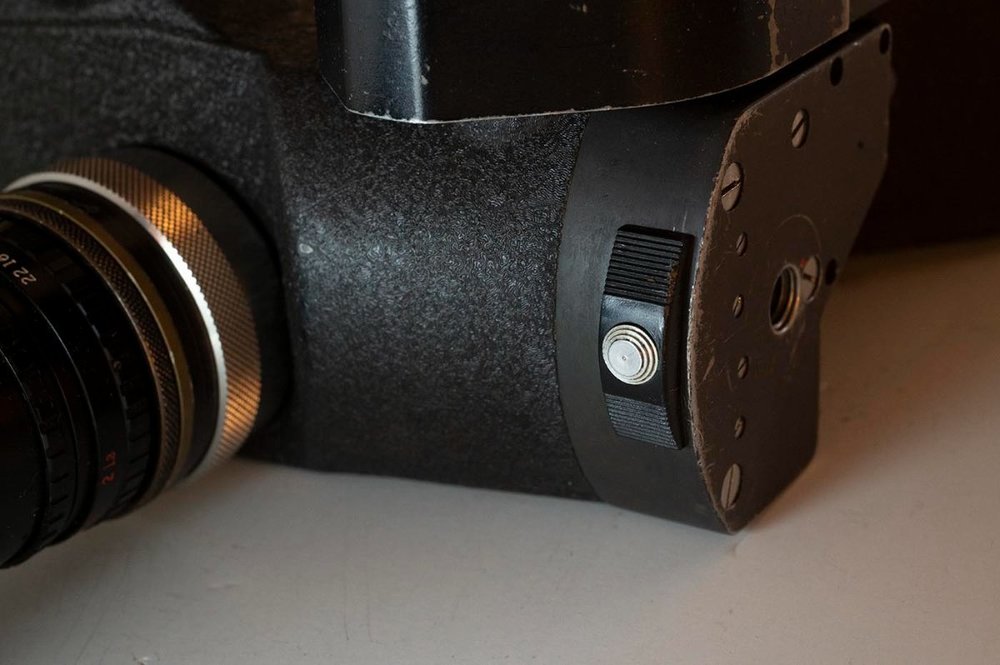
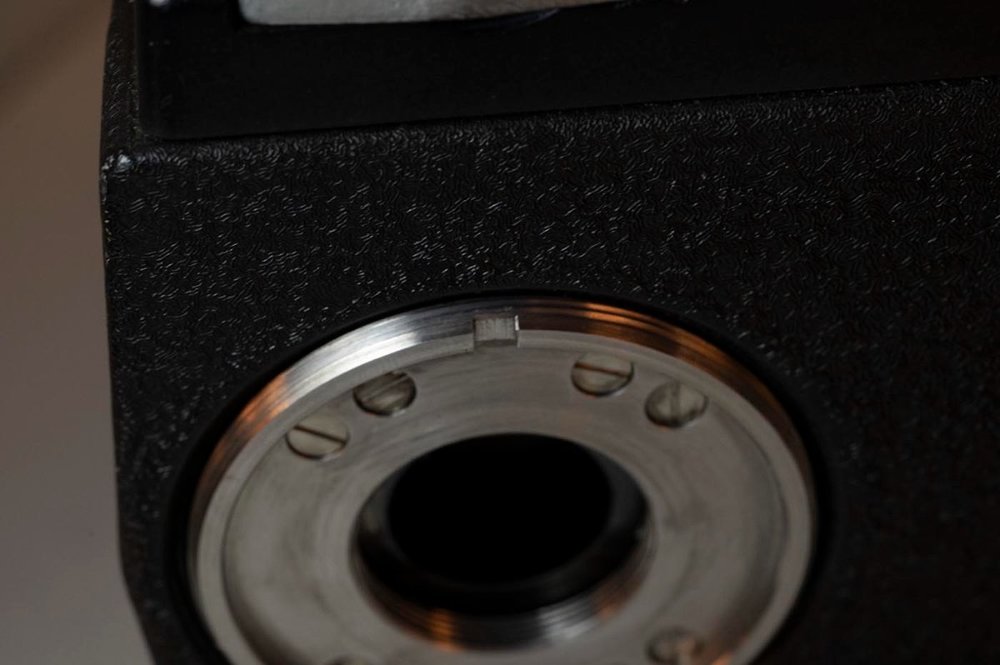
Actually, the questions will come later, I'm pressed for time, but I wanted to get the ACL 1.5 porn pictures posted. I always wish I had detailed pictures of things before I buy them and it never happens, but if I can help someone else in the future, then yay!


-
Maybe decades too late I'll stumble upon one of those manuals like I did for the CP-16R Duncan
-
The other pole should just be ground, same as the outside case. I have a handful of Arri 16 motors and some have one pole, some have two, and some look like they were set up to have two but that area is taped over. I'm not sure what Arri was up to but I figure at some point some piece of equipment used that second pole for the ground connection instead of relying on the case. Duncan
-
Explain this 16mm film to me
Duncan Brown replied to Daniel D. Teoli Jr.'s topic in Film Stocks & Processing
It's reversal film. Anywhere that no light gets to is black. Duncan -
I have a small pile from a bunch of 200 foot rolls of film I ran through my Photec high speed camera a bunch of years ago. PM me your address and I'll drop a couple in the mail to you (free). 50 Euros from the above site is ridiculous! [Note to anyone else hoping to get free ones, my pile is small and I need to keep a few for myself, so this was a one-time offer, sorry!] Duncan
-
I've posted scanned docs for other brands of cameras on their forums, but now I have some CP stuff. The first one is titled "Technical Manual CP-16R and CP-16R/A Sound Cameras - Servicing and Maintenance Procedures, Replacement Parts Lists, Illustrated Assembly Drawings" and is dated July 22, 1974 and September 18, 1975. This should be pretty exciting reading for CP-16R fans (though frankly about 30 years too late...) http://backglass.org/duncan/cinema_products/CP16R_CP16RA_technical_manual.pdf The second one is titled "GSMO 16mm Camera System Operators Manual" and is dated November 1980. If there weren't already too many people out there searching for the too few GSMOs in existence, this will probably send that over the edge. http://backglass.org/duncan/cinema_products/Cinema_Products_GSMO_operators_manual.pdf I always scan at 600dpi so you can zoom in endlessly and see the fine details of illustrations, schematics, etc. But it makes for big downloads. If you're content with less resolution just to peruse them I usually make 100dpi versions too. They are here: http://backglass.org/duncan/cinema_products/CP16R_CP16RA_technical_manual_100dpi.pdf http://backglass.org/duncan/cinema_products/Cinema_Products_GSMO_operators_manual_100dpi.pdf Enjoy! Duncan