


Tom Doolittle
-
Posts
58 -
Joined
-
Last visited
Everything posted by Tom Doolittle
-
Bolex H16 Reflex shutter stopping in slightly open position?
Tom Doolittle replied to Tom Doolittle's topic in Bolex
Thank you for the responses. There is no visible film movement while the shutter is open and the camera is advanced manually, but when run via the motor the shutter always stops with the gate's lower left corner exposed. I thought perhaps this was a feature of the Bolex, intended to produce a flash frame. From your responses it sounds like this is an abnormal condition due to a mistimed or slipping mechanism. I'll put it back on the curio shelf for now. Thanks again! -
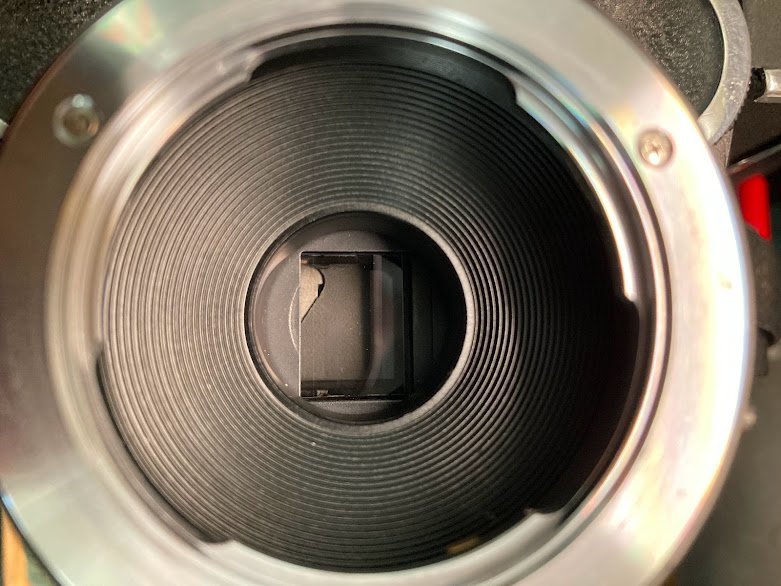
Hi folks, Probably a dumb question, but thought I'd ask... Is it normal for the H16 shutter to stop in a slightly open position? The camera runs and advances film smoothly, but it always stops with the shutter slightly open (see pic). This is an older H16 Reflex, without the variable shutter. I suspect it has been mistimed by a previous owner, but I'm new to Bolex. Appreciate any insight from experienced users. Tom
-
Which Camera on a low budget for a Ski Movie?
Tom Doolittle replied to Easton Sheahan-Lee's topic in 16mm
Just wanted to add my two cents here... I have a K-3, and I like it. "Rough and Tough" probably characterizes it best. I also have a couple of Filmos, and I like them much better. They too are "rough and tough", but far better put-together than the K-3, and smaller too. They lack the reflex viewing of the K-3, but for sports cinematography, you probably don't need or even want that. They also lack the TTL meter but you're nuts if you trust those things on any camera, especially a K-3 in the snow- now THATS a recipe for disaster! :blink: Get a Filmo with a good lens and learn to estimate distances between yourself and your subject. I usually set the focus scale by guestimation, and rarely get it wrong-- wide angles and small apertures help there. Another thought: I don't know what the requirments of your specific project are, but have you considered Super8? You can pick up a good Super8 camera for pocket change and mix it in with the 16mm footage. The film is slightly less expensive, so depending on your overall budget you might be able to pay for the extra camera AND stretch your running time. The footage will be slightly grainier, but depending on the flavor of your project that might be a good thing. -Tom -
Nikon R10 Internal vs. External Metering and 1st test run
Tom Doolittle replied to Joseph Ivey's topic in Super-8
I just shot a few tests rolls of E64T in a Nikon R10 I recently acquired. It's at the lab right now. In my tests, I compared the camera's meter readings to my external meter readings under various lighting conditions. For each condition, I wrote down the camera settings and meter readings on a card and placed it in the shot for reference. When the footage comes back, I'll be able to tell how accurate the internal meter is or at least how much it differentiates from my handheld meter. The needle should move even when the camera is empty. Mine was stuck when I first got it. I posted a thread about getting it unstuck about a month ago... http://www.cinematography.com/forum2004/in...69&hl=nikon A great camera, now that I've got it working! Good luck! TD -
I didn't want to go into it, but now I ought to mention that after f*$@!ing around with the soldering iron and various crimps on those tabs they are in pretty sad shape (no longer serviceable). My ONLY choice now is to go in from the other side. So please, forget the alternatives. How do I get into the other side?
-
I tried a variety of connectors. All were either too loose or too large. As for strain relief, I intend to run the wires back into the old battery compartment where they will connect to a 4 pin jack. There will be no tension on the wires. And yes, I am aware of the voltage differences. Just need to know what screws to take out.
-
About half of the 64T carts I've run in my Nizo jam immediately. The motor does not stop, but usually I can hear the difference between a smooth running cart and a jammed one. When I pull the jammed cart out I always see scratch marks where the pulldown claw was moving againsts the film between perfs. To get it moving again I just advance the film manually a few turns and pop it back in. This camera has shot 12 carts of 64T in the last two months, and has choked on at least 5 of them. My Nikon R10 has not had this problem, but it has only seen three or four carts of 64T.
-
I recently picked up a virtually mint Beaulieu S2008, mostly just to see what all the fuss was about over these cameras. Turns out to be a really well-engineered little camera, except of course for that goofy battery compartment. After researching what others had done, I opted for the pin-jack-in-the-body-cap method of delivering power from an external pack. Problem is, when I tried to solder wires to the three little tabs, I could not get a good solder connection. I kept trying but the solder just refused to bond to the tabs. Anyway, I decided I would prefer to connect the wires directly to the circuit board. I know how to open the left side of the camera (controls side), but I need to access the other side. I suppose this involves dropping the entire mechanism from the case. Can somebody walk me through this process? Appreciate your help!
-
Clive, Thanks for your input. You are correct to assume no filter for the 160 setting. It would be difficult to put an array of tiny holes in this thing. It is VERY small. I plan on trying the single hole, trial and error approach. I'll shoot for a hole area of 20%, but it will be hard to get any good measurement on the size or orientation of the photocell. Worst case scenario: I'm left with a camera that STILL can't read 64T. If it works, the lightmeter can stay in the bag a little more often.
-
I've been kicking this idea around for some time, and I've decided to give it a try. I mentioned it once before inside another thread but nobody seems to have picked up on it... A compact Nizo I own "reads" the cartridge film speed notch with a simple pin that can only has two possible positions: in or out. With 64T, it gets pushed in. With the side of the camera off, you can see that pushing this pin in moves a tiny blade of ND material in front of the photocell. Because the camera is calibrated for only two film speeds (40 or 160), I suspect this ND filter represents the difference between those two speeds. When the pin is pushed in, presumably by 40ASA film, the filter blocks some of the light reaching the photocell, causing it to think less light is available, and therefore open the aperture more. When a higher speed film is loaded, the pin remains out. So the little ND filter optically calibrates the meter to 40, and removing it resets it to 160. The difference between 40 and 160 is two stops, correct? So, if one were to replace that little blade of filter material with a piece that represented the difference between 64 and 160, the camera would then read 64T correctly, right? We need to let more light though to the photocell, making the system close by 2/3 stop. Another idea is to simply use a very small drill, like a jewelers hand drill, and make a tiny hole in the center of the existing filter to let just a wee bit more light reach the photocell. Because all this takes place after the beamsplitter, there would be no impact at all on the image. The only change would be how much light the photocell sees. The question is, what size should the hole be? I guess it would be a function of the diameter of the photocell, but how would I account for the remaining ND surface area? I'd appreciate hearing your thoughts, before I get out the screwdrivers...
-
Thanks for the clarification, Bernie. The only thing I was trying to say was that many Super8 cameras do not have a clear or UV filter to offset the theoretical shift in focus. The initial question was: "...should we ask the Tech to remove the internal filter and then go with an external one. I'm assuming correctly that this flimsy pieces of plastic can or could deteoriate, get damaged?..." My answer: Although I see no point in it, removing it will do no harm. All you really have to do is flip the switch from the little sun to the little lightbulb. Doing so removes the filter from the lightpath. On many cameras, nothing replaces it, and nobody ever worried about what impact that had on back focus until now.
-
Surely Bernie is the expert here. As he mentioned, any element placed in the light path will, in theory, alter the back-focus. Still, I believe that in the case of *most* Super8 cameras, removing the filter from the light path will not have any adverse affects on focus and will not necessitate an adjustment of the lens. Follow my reasoning... 1. I currently own two Super8 cameras- a Nizo and a Nikon. Both cameras have internal 85 filters that swing out of the light path when not in use. In the case of the Nizo, I am 100% certain there exists no other filter, clear or otherwise, that fills the void left when the 85 is retracted. I have taken this camera apart several times, and am willing to swear on my mother's collection of antique Tupperware that when the color-correcting filter is out, there is only an empty space left behind. In the case of the Nikon, I have not seen far enough into its internals to verify this, but I suspect the same is true. My suspicions are based on the fact that when I look into the lens and put a flashlight in the gate, I can see twenty-seven years worth of accumulated crud adhered to the orange-colored surface of the daylight filter. When it is displaced, the view is crystal clear. If there were a "clear" or UV filter in there, it would have been subject to the same accumulation of junk as the other, and I would probably not see such a noticable improvement in clarity. (Consequently, I never use the internal filter of either camera.) 2. I once owned an old Sony Betamax camera. When it died I took it apart to see what made it tick. It contained three internal filters, each one a tiny leaf of gel that was rotated into position in response to the setting of a switch on the side of the camera. When no filter was selected, there were no filters in the light path, and nothing to offset the theoretical loss of critical back focus. 3. While I do not own one, I have seen many a Bolex with the filter slot behind the lens. When no filter is used, the filter holder is simply empty, and I have never heard mention of the requirement for what amounts to an "optical place-holder". I agree that yes, in theory, the back-focus must be affected. But if the thickness of the filter were enough to throw the back-focus out, how then would these cameras compensate for that? As far as I can see, they don't. The thickness of the filter is apparently not enough to require any compensation. The only scenario I can imagine in which the insertion or removal of a behind-the-lens filter would require adjusting the back-focus of the lens is one where the filter was somehow integral to the positioning of the lens, perhaps screwed onto the back of it like an adapter, and by removing it you would have to put something back in its place to maintain the proper distance between rear-element and film-plane. Surely there are many exceptions to this but I presume most Super8 cameras have internal filter systems of no more complexity than the above mentioned cameras. Assuming one has a camera of comparable design, I am pretty darned sure you could rip the filter right out without any worry about having to re-set the lens. Why you would bother doing that, I don't know, but that's what started this topic going. It would be great to see the math done on this. If you really wanted to, you could get out your old Physics textbook and look up Snell's Law and figure out the angles of incidence and refraction all that crap but who has that sort of time? I'm guessing you'd need to see the original engineering drawings for a particular camera as well. Please correct me if I'm wrong about any of this.
-
I am unfamiliar with the Beaulieu system, but I gather from your description that the filters are somehow integral to the lens mount. Am I correct? Is the lens displaced by the filter? Only then would the flange focal distance be affected. In the case of most Super8 cameras, the 85 filter is simply a small blade of filter material that slips into a slot just before of after the shutter. Its presence or absence has no influence on back focus. Consider the average Bolex, having a slot just behind the lens into which a user may choose to place a filter. The introduction or removal of said filter does not necessitate any compensatory adjustment to the lens. In most Super8 cameras the filter functions in exactly this manner, but is operated automatically rather than by hand. Either way I'm not sure relying on behind-the-lens filters is good practice. Besides being impossible to access on most cameras (and therefore impossible to clean), they are likely to have faded considerably after twenty or more years. It is easy enough to pick up a new 85B at any camera shop and screw it onto the lens when needed. As for the original topic: I'm not sure why one would bother removing the internal filter. If you just leave it on the "lightbulb" setting, the internal filter will remain displaced regardless of what film you put in the camera. If your fear is that you will inadvertently activate the filter, you could place a bit of tape over the switch, or remove the switch entirely. Either of these solutions avoids doing irreparable harm to the delicate shutter and aperture systems which reside in the same area as the offending internal filter. Your best bet is to simply flip the swtich (if you have one) to the "lightbulb" (tungsten) setting and leave it there. Buy a screw-on 85B and remember to use it whenever you shoot T-rated film outdoors.
-
I'm not sure that's correct. The filter is not an optical element. It does nothing more than alter the color of light passing through it. Slightly off-topic, but with regard to the removal of internal filters, some 40/160 cameras (compact Nizos, for example) have a separate little ND filter that pivots into the path of the photocell when the cartridge notch reader thinks the camera is loaded with ASA 40. This filter does not interfer at all with the light reaching the film, but merely "fools" the photocell into thinking there is less light available. Obviously this filter is calibrated for the difference between the two film speeds these cameras were designed to read, 40 and 160, or 1-2/3 stop. So, if some handy camera tech could replace THIS filter with one that had a rating of only 2/3 stop, would this not make the camera meter properly with 64T? I hope I did the math right. Feel free to point out any errors in my logic. oops, yeah, I can see it already... You would need a filter that had a rating that was 2/3 LESS than the existing 1-2/3, making it a one-stop filter. Right? Man, my head hurts...
-
I wanted to lube the camera while I had it open, but I was worried about getting oil on the aperture blades and all that. Even with the side plate off, I could just barely see down into the depths of this camera, where all the moving parts are. I figured it would require a major tear-down to get at the parts that need oiling. Maybe I'm wrong. An oil bottle with a very long, thin applicator tube might do the job. Would still be tough to see what you were doing.
-
Canon 514 XL Lightmeter "stuck". Any solutions?
Tom Doolittle replied to Steve Molloy's topic in Super-8
Steve, I recently had a similar problem with a Nikon R10. You can read the post here: http://www.cinematography.com/forum2004/in...showtopic=18169 I don't have any experience with the Canon, but I'd be willing to bet your sticking meter just needs to be exercised a bit. The meter is mechanically coupled to the aperture thorugh a series of tiny linkages. The mechanism is very delicate and is designed to respond to the miniscule impulses of the auto-exposure servo. Over time, the lubricants used at all the little joints will dry up, making the system sluggish or stopping it altogether. When I got my Nikon, the meter would not move no matter what I did. I had to actually open it up and move the mechanism back and forth by hand about a hundred times. Now it works great. Hope this helps. -
Thanks for all the advice, guys. But to be honest with you, I couldn't care less what the outside of the camera looks like. The reason I didn't hesitate to do a little exploratory surgery is because I knew that, if it died on the operating table, I would probably have been doing it a favor. Now that it works, it will spend a good deal of time strapped to a dirtbike, and will most likely end up smashed to bits within the year. Don't baby those cameras too much, folks. They're meant to be used. Kodak doesn't sell much film to museums. :P TD
-
Hello, A couple of weeks ago I posted about a Nikon R10 I picked up on ebay. The ad was a bit vague, and the pic was pretty bad too, but after a run of good luck with online auctions I thought I was immune to getting burned. Ouch. Lesson learned. The short version: The camera arrived with a non-functioning light meter. The meter was completely unresponsive, regardless of how much light was coming in through the lens, and operating the manual exposure control did nothing either. It was stuck, and I was not happy. I could have sent it off to be repaired but, preferring to spend money on film and processing, I decided to open it up myself and at least take a look. I do own a nice set of screwdrivers, after all. The surgery: Opening a Nikon is not as difficult as one might think. Getting to the screws is the hardest (and most heartbreaking) part. The screws are all hidden under that leatherette stuff that makes the R10 so pretty. I read somewhere that it can be carefully peeled off and glued back down, but mine was not willing to come off that easily. I had to rip it off in little pieces. Once I had it off, the screws were exposed and easily removed. The next trick was to get the big aluminum exposure knob off. Not knowing exactly how it was attached, I simply guessed that there was another screw hidden under the black "EE-LOCK" label. Turns out I was right. I pried to little metallic label up and quickly had the knob off, followed by the entire side plate. After that it was easy. Just aft of the zoom switch is a printed circuit board that controls the exposure. (I removed the fade/dissolve switch board and set it aside, allowing a better view of the electronics.) The servo that actuates the aperture can be seen just above the circuit board. It looks like a little silver motor. By removing the two screws that hold the circuit board in place I was able to tilt it out of the way, giving me a full view of the aperture linkage. The manual aperture knob is a rather ingeneous device. When you pull that knob out, a switch opens to disable the electronics. At the same time, a little rubber cone engages the aperture linkage and the system becomes 100% mechanical. On my camera, the linkages were just plain stuck. The rubber cone was working properly, but was unable to exert enough friction to move the linkage. I gently prodded the output arm of the servo with the tip of a screwdriver and got it to move, but there was clearly way more resistance than there should have been. It should move freely, with virtually no resistance. I kept working it back and forth, and slowly but surely it got smoother and began moving easily. After several minutes of this, it seemed to be working well, so I put everything back together and gave it a try. It works! While I had the camera apart I noticed that there had once been some sort of foam strip along the joints of the cover plate, almost like the weatherstripping you might see around a door. Most of this had long since decayed and turned into sticky black goo, and I figure it was either this or 30-year-old grease that had caused my aperture linkages to stick. All it needed was to be worked back and forth a few dozen times to loosen it. A complete overhaul would be nice, but in the short term, this did the trick, and it didn't cost me anything. The only downside is that, with the leatherette now gone, the camera no longer looks pristine. But what the hell, at least its not rotting in my closet. Go shoot some film. TD
-
Sign me up. TD
-
Everyone, thanks for the help. Special thanks to Steve Hyde for the manual. It pretty much confirmed my worst fear- the meter is toast! I put a cartridge in this morning and...nothing. No needle movement at all, not even when film is rolling. Wouldn't be such a big deal (I could always use an external meter) but the manual control does not seem to do anything at all either. When I pull the knob out, it just spins uselessly and does nothing to the needle. The manual keeps referring to "servo-controlled aperture". Maybe the servo motor is dead? Who knows. Anyway this camera isn't going to do me much good if I can't even set the aperture manually (Damn auto-features! They've cursed me again! Why didn't they just put the f-ing aperture control on the lens where it belongs???) So, Andrew, I guess I will be needing the name and number of your guy who can fix these things. Alternatively, anyone know where I can get a repair manual? TD
-
Thanks, Andrew. A manual would be fantastic! I paid about $300 for it, including shipping. Hope I didn't get burned! I'll pop some film in it when I get home tonight and see if that helps with the meter. I already tried manipulating the little notch-reading pins and had no luck that way, but maybe an actual cartridge will do the trick. Tom
-
Hello, The Nikon R10 SUPER I bought last week just arrived. (Some of you may recall I've been shopping around for something to replace the Nizo I've been using.) I just opened the box, and I was hoping somebody could answer a few questions... First off, where can I get a manual for this thing? In the meantime, how do the overlap/dissolve/fade-in/fade-out switches work? I can't seem to get the meter needle to move no matter what I do. Is there are trick, or is the meter toast? (Yes, it has batteries installed.) Even with the EE-lock knob pulled out (I'm assuming this makes it manual), the needle does not move. Any advice? I've read posts here that discuss the R10's need for some sort of filter key. My camera apparently did not come with one of these. I assume it goes in the slot on top, currently covered by a little rubber plug? Any idea where I can get one of these filter keys? What does it look like? The seller neglected to mention a spot of fungus inside the front element. Any chance of getting this cleaned off? Thanks for your input. -Tom
-
Checking the registration pin on the K3
Tom Doolittle replied to Galen Carter-Jeffrey's topic in 16mm
A bit of advice on the K3, based on my own experience... The loop formers are more trouble than they're worth. I took the entire auto-loop system out (it consists of a bit of string, two plastic parts, and a spring), and threw it away. I did leave in the little plunger, and gave it its own little spring. Without it the door rattles too much. Load your film carefully and you won't have any problems. Taking the K3 apart is no big deal. It's held together with screws, and if you have any degree of mechanical aptitude you can handle it. Once inside, you'll be amazed. The average toaster is more sophisticated. While you're in there blow out the case with a can of compressed air. I gave the spring in my camera a dab of silicone grease, and after running for a while it became much smoother (It used to vibrate badly as the spring wound down). You could pay someone to do all this professionally, but why? It works remarkably well for a $200 (or less) camera. It offers an unbeatable cost:benefit ratio. I say use it and abuse it. The whole point is to shoot film, not pimp out ratty old Russian cameras. :) TD -
No footage online right now, but maybe I can dig up something interesting to post soon. As for jittery images, on the motorbike I wrap the camera in several layers of foam-rubber and strap it down with bungee cords. Shooting wide angles at 36 fps or higher helps to smooth things out. Same tricks work for handheld, too. To power the monitor and spycam, I use a 12V rechargable battery from an R/C airplane. I bought it at a hobby shop for about $20. Fully charged, it powers the monitor for almost three hours. I've been considering building or buying some kind of steadicam rig myself, but then I think about how cumbersome something like that would be for the on-the-fly kind of shooting Super8 is made for. If you come up with a good compromise let me know. TD
-
Andrew, Don't be fooled by the high-resolution picture in the adverts for those cheap LCD screens. Unless you pay big $$$, the resolution is never that good! I have a similar monitor that I use with one of those little tubular spy cameras. I bought both at my local electronics superstore for less than $100. I simply tape the spycam to the top of my Nizo. The angle of view isn't the same, but good enough if you're shooting with a wide lens. I strap the Nizo to the back of my motorbike, attach the monitor to the handlebar, and use a remote switch to catch some pretty amazing shots of other riders. Also works well when the camera is mounted to the exterior of a car. TD P.S. Don't forget to tape off the viewfinder so stray light doesn't get in there and fog the film!