e gustavo petersen
-
Posts
128 -
Joined
-
Last visited
Everything posted by e gustavo petersen
-
Ah... I see, very confusing. :(
-

sky replacements
e gustavo petersen replied to Roberflowers's topic in Visual Effects Cinematography
I would have to disagree. The last time I shot a cloud tank it was anything but cheap, predictable or re-doable. It took a whole day with a complete crew including the VFX gents. Just refiling the 100 gallon tank took an immense about of time and we had a water truck. Given what Robert is trying to achieve, the DSLR solution is most convincing and inexpensive option. -
Are you talking about a post production company by the name "Flame Discreet" or are you referring to the Flame the software formerly owned by Discreet and now owned by Autodesk? Regardless of what the answer to my question is, if you're having the footage transferred, you're definitely sending them the neg. I just wanted some clarification on which Flame you meant.
-
While it's important to fully understand tools like a waveform and vectorscope or even a light meter, don't loose sight of what's important and that's the image you're trying to create. I know folks who freak out on a video shoot when a window is so bright that it's completely blown out and yet if it were a film shoot they wouldn't bat an eyelash to. The window might be blown out for aesthetic reason but many have been taught ad nauseam to never let anything blow out so what we get is vanilla images on video. I realize that my example might be criticized for potentially being an issue with post, the bonding company, quality control, etc., but what a cinematographer strives for is a balance between the artistic and the technical.
-
Shooting on boats - stabilization
e gustavo petersen replied to Stephan Schuh's topic in Grip & Rigging
The other company I was thinking you could call is Motion Picture Marine - www.motionpicturemarine.com If found their CD-ROM today and it reminded me. -
Opps. I just realized that you're shooting with the Varicam and not the SDX900 (different thread). I think the comments still apply. Here are some baseline settings from Peter Gray for both the Varicam H and F. Baseline settings: http://www.jkor.com/peter/filmlookH.html http://www.jkor.com/peter/filmlookF.html
-
How will you be finishing the project? Will it end up on film as 35mm, 16mm or will it be finished to HD? How the project will be finished will be the biggest determinate in what resolution your animator will need to work in. If you're finishing to HDCam then most likely your animator can work from 1920x1080 since that's the resolution all your footage will be finishing to. If you're going back to 35mm film, then it might be 2048x1556 (35mm Full Aperture). If it's going back to 16mm, then my guess is that it'll either be 2048x1276 or 1920x1080 for Super 16 or 1600x1200 for regular 16mm.
-
Generally, for closer shots you would use a heavier diffusion and on wider shots use a lighter diffusion. The reason is that the wider the shot, the finer the detail in the image and so a lighter diffusion. Remember audiences look to the eyes of actor. How dense the diffusion needs to be with close ups can be determined by either experience, testing or you could look at the subject's eyes judge the image sharpness. (If you're shooting with a optical viewing system, remember that the ground-glass image will look softer than the projected image. Since you're shooting for TV, it's less of a consideration.)
-
I'm sure you will figure it out Gary. If you haven't already had a chance, you might want to visit the Panasonic's website. There's a series of scene files created early on in the development of the camera. I would suggest "Vivid" and "Eyeball" as a start and then modify to taste from there. Don't forget that you'll still need to change any setting to suit your shoot like, 50MB/25MB or 16:9/4:3, etc. Good luck. http://www.panasonic.com/business/provideo...cene_select.asp
-
To expand on Nick's suggestion, you might want to use upholstery thread which is generally stronger. Much of what will make this effect work is making sure you control the lighting and insure that little to none hits the tread (or fishing line). I have seen some folks gently rub 220 grit sandpaper to dull the line's smooth surface on thick fishing line and others use dulling spray both with some success. If the shot doesn't have to move around the object, you could of course also try securing the bike to the ground with some kind of support that's lined up behind some part of the bike and hidden from the camera's view.
-
At the risk of sounding dismissive about the question (which is not my intent), it's the setting that looks best to you and your client. I have shot food and sometimes it's plate the food, light it, shoot it and move on. Still other times, it's plate it, light it, change the food, tweak the camera, tweak the camera some more, change the lighting, change the food again, and repeat for two days until everyone is happy. A lot of what will make the food look good is in the hands of the food stylist (if you'll have one). Another contributer might be your DIT (again, if you'll have one). There's also the times when you need to shoot the food as neutral as you can because it's all going to be dialed in during the final color correction to make that apple the right color of red. So the point is no one setting will service all food. Take your example of soup and salad. What color is the soup? Is it black bean soup or butternut squash? One will be a deep brown to black and the other an orange-yellow. Those might well be the colors you'll want to focus on so that they stand out in the image. What plates or setting is the food in? The surrounding colors will effect your food's color as well. And there's the ever present question of how much time you have to tweak or not to tweak your image. Your best protection, if you don't have the luxury of time on set, is to find out what the food will look like and what it'll be placed on and run a few test prior to shooting. If it's a tortilla soup, you might want to pump up the red-orange in the camera's matrix and pump up the greens for the salad. This will take some knowledge of the camera's menus and operation but it will be time well spent.
-
sky replacements
e gustavo petersen replied to Roberflowers's topic in Visual Effects Cinematography
Phil offers great advice. I would add that you might also want to try shooting time lapse footage of the sky if you want to give some movement with clouds. It doesn't have to be lots of footage (shots) but just enough to give the sky a little movement. You'll, of course, need to have some clouds. Otherwise if you don't need the movement, just capture a still of the kind of sky you need. If you chose to shot some time lapse, you'll likely use the software that came with the camera. I use a Canon XTi and the EOS Utility software. Then I give the footage (either converted or as is) to the post folks who stitch it together in After Effects, Final Cut, or Shake as an image sequence. You should check with your post house to find out which kind of files you'll need to give them. As Phil mentioned, your DSLR files might need to be converted to either DPX, TIFF, or TGA. -
A waveform will certainly help you identify trouble spots both in the highlights and in the shadows. I would have to disagree with you that the SDX doesn't handle highlights well. I've found it to be a among the best of the standard def cameras. It does, however, like any other video camera, have to be dutifully watched and managed. Something to think about when trying to figure out the relative exposure rating for a camera and that is which lens you're using. Depending on the coating you might get a different rating when using different lenses especially if you're using standard def lenses. It's unlikely to be an issue with, say, DigiPrimes which have matching lenses. And there's also how the camera's internal menu settings have been set. If, for example, you're using one setup with a neutral setting and another that'll very stylized, you might need to rate you camera differently for each setting. One last thing, if you do use a waveform monitor and a gray card or gray scale chip chart, your middle gray should hit the 55 IRE mark (I have heard some say 50 IRE) but for as long as I've been shooting film and video, it's been 55 IRE.
-
Shooting on boats - stabilization
e gustavo petersen replied to Stephan Schuh's topic in Grip & Rigging
What about a Hydro-Gyro camera stabilization from Cinema Rentals. They can handle most of your water shot needs. http://www.cinemarentals.com/marineac.htm -
Another option if you find that you can't get to the photography shop is to shoot a few seconds of a gray card or white card at the top of the roll. Your timer or colorist can correct the blue out of the image and get you back to neutral. (By the way, you might want to call ahead since a 77mm filter is an uncommon filter size in still photography.)
-
I believe that Cinenet is approximately a 1/2 stop loss and when doubled it's a full stop. But it's been my experience that can change based on how tight the material is stretched.
-
Hawk V- Series Anamorphic rental in U.S.A. ?
e gustavo petersen replied to AmatEscalante's topic in 35mm
I thought they did. I called them today and confirmed that they do have them. -
Directors shooting script. Not necessary in USA!?
e gustavo petersen replied to VOlodya VO's topic in Directors and Directing
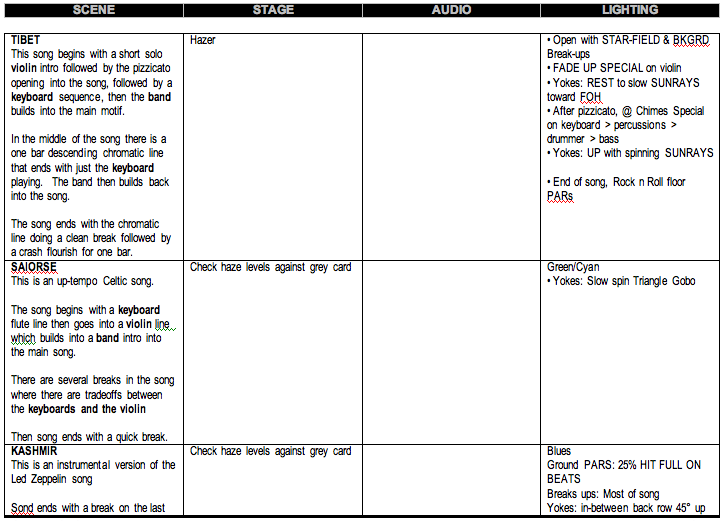
So here's a sample from a live-to-tape, multi-camera show that I was the lighting designer on. As you can tell, it's very similar to what you displayed.
-
As for Sony cameras, the F23 and the F950 both make use of 10 bit, 4:4:4 when recording to the SRW1. http://bssc.sel.sony.com/BroadcastandBusin...oot/index.shtml
-
Help for image treatment in a short film !!
e gustavo petersen replied to Matias Nicolas's topic in Lighting for Film & Video
At the risk of belaboring the issue (and Matt, you're right, at this point it may no longer belong in a lighting board) yet another option is to decompress the footage and color correct that. Here's a clip from Tim Kolb's Creative Cow article on editing with HDV: Ingesting HDV and decompressing it to uncompressed is the highest quality option, but also the highest cost due to the file sizes simply being immense and the disk speed and size requirements being substantial. For a television spot, this workflow might pay off in quality benefits, but for a wedding or event this workflow would require more resources than it would be worth in my opinion. -
Directors shooting script. Not necessary in USA!?
e gustavo petersen replied to VOlodya VO's topic in Directors and Directing
This is very similar to what is used in theater and, to a lesser extent, in a mutli-camera television show. -
the fromat wars have ruined my creativity
e gustavo petersen replied to Niki Mundo's topic in General Discussion
I'll have whatever he's drinking. :) -
Blade Runner Final Cut
e gustavo petersen replied to Stuart Brereton's topic in On Screen / Reviews & Observations
I can't wait to see the "never before seen" footage. I recently purchased the book "Future Noir: the Making of Blade Runner" - great book with lots of how-they-did-it. Here's a link to a chapter that didn't make it in the first print. It's got a section on Jordan Cronenweth (the show's DoP): http://scribble.com/uwi/br/fn/fn-ch8.html -
RGB was a lab in Hollywood that would cut motion picture film stock, put it in a still photography roll and when you returned it, they'd develop it in a C-41 bath. They closed shop a few years before the digital camera onslaught. Don't know who's doing that anymore. As far as, bleach bypass, it would be too long to write here, but you can check out this article from American Cinematographer: http://www.theasc.com/magazine/nov98/soupdujour/pg1.htm
-
Help for image treatment in a short film !!
e gustavo petersen replied to Matias Nicolas's topic in Lighting for Film & Video
Forgive me, I should have expanded what I meant. Tweaking the camera's internal menu color controls too much is where the damage to the image can be "bad". Using filtration on the lens won't necessarily degrade the image to an unacceptable level (you judge what's acceptable) so long as the chips aren't deprived of light to the point where noise creeps in.