Aapo Lettinen
-
Posts
3,324 -
Joined
-
Last visited
Everything posted by Aapo Lettinen
-
new ALCS compact crystal motor for Eclair NPR
Aapo Lettinen replied to Aapo Lettinen's topic in Eclair
Ordering closed now for Eclair NPR camera motors. I was able to sell 8 pieces of the Advanced 15-speed model and 4 pieces of the basic 3-speed model. Very good batch size overall and ordered the rest of the more expensive and time consuming cnc machined parts now to ensure I have parts for the whole batch when starting to assemble the final ones in June. Some smaller parts will be made during May and the rest of the electric motors ordered in late May / early June when I am absolutely sure the selected motor drive type is the final one (can't make mistakes with the type selection as it costs over 3000 euros to change it, thus not ordering the rest of them just yet 😛 ). The outer covers for the motor will be finished last, probably in late June/early July, because I want to use as much time as possible to refine the external shape of the covers. But the prototypes will use temporary 3d printed covers so when I start to make film tests I can test the cover designs at the same time 🙂 It looks like I will use 4-pin xlr as power connector and there will be a 6-pin accessory connector to connect external switches and other accessories to the motor. The motors will have one 1/4" and one 3/8" thread on the bottom for tripod mounting. I will make one additional Advanced motor for my own use and if there will be parts left I will try to make one or two of the Advanced motor type for later sale. Probably those will be the last ones sold as from the batch size it looks like I have pretty good market saturation and there would be no later sales after those two possible extra ones are sold. Making a second batch would require having a order of 5 or 6 extra Advanced motors at once fully paid for beforehand which probably would never happen as later sales have always been one or two extra ones tops and I already have that amount covered. If I have the one or two extra motors available later on, they will be slightly more expensive than the preordered ones. I am assuming something around 2300usd to 2400usd or so -
Looking to buy a barney for Arriflex SR2/3
Aapo Lettinen replied to Felix Finken's topic in Cine Marketplace
if you can't find one, you can get it custom made. Someone who does leatherworks like bags, purses and such could probably make one easily if you get the dimensions and can bring the camera for test fitting. You could ask them to add logos and stuff to it too to make it really cool looking 😄 If the camera is noisier than usual it should be checked. CLA would probably bring the noise down considerably and would also reduce wear to the mechanism if there is some small issue with it -
Kiev 16U & 16UE camera dismantle and re-assembly website
Aapo Lettinen replied to Gareth Blackstock's topic in Russian Gear
I still have those spare Kiev cameras and would want to get rid of them because needing the storage space for other projects. May have to scavenge them for rollers and sprockets and optical parts and throw the rest of the bodies away if no one needs these as full cameras, I dug them up from storage unit for a deal which was cancelled and I hate the box laying in the middle of the workroom
-
New Never Used Bolex SBM For Sale
Aapo Lettinen replied to Dennis Toeppen's topic in Cine Marketplace
OK brilliant, I will try to sell my old Eclair ACL for the same value that it cost back then 50 years ago when it was made, I think it was about 40 000 or 50 000 in today's dollars? 😄 If your SBM is really good and serviced it could be worth something between 3.5k and 4.5k. I would try 4.5k with really good images and report of recent service and a small video showing the camera running flawlessly with good audio. It absolutely won't be worth more than a used working Aaton LTR or Arri SR2 so anything over 6k would be ridiculous even if it is a collectible mint in box rarity. People are buying these cameras for actual use so they need to either work or be really attractively priced so that people want to take the risk -
New Never Used Bolex SBM For Sale
Aapo Lettinen replied to Dennis Toeppen's topic in Cine Marketplace
I could sell three professional sync sound cameras with new crystal sync motors and serviced and film tested for lower total price and they could be got s16 converted separately and still not break the 12k mark total costs. If the bolex is bought as collectible then it might make sense but for actual use I would definitely take two Eclairs and the Kinor and got them all s16 and PL mount converted, or go with pl mount Aaton LTR or Arri SR instead and still have money left for lenses and video tap etc -
ALCS konvas 15epss stabilized speed controller
Aapo Lettinen replied to Aapo Lettinen's topic in Russian Gear
I am assembling couple of them in the following days and testing after that. I have one extra in this first batch which I could sell. I guess from 1 to 1.5 weeks with shipping for that one extra unit on the batch. depending on how long the tuning and testing of these takes (and if you modify the motor handle by yourself to work with the controller. you will need a multimeter and soldering iron and some basic tools like small screwdrivers for the modification and a cheapest multimeter which has continuity testing. One needs to change the wiring of the motor to work at 24 volts and then replace the original cable connector with new different type one. Should take maybe 30min to 45min total with testing. It would also be possible to send the motor handle here for modification if longer shipping time is not an issue) -
new ALCS compact crystal motor for Eclair NPR
Aapo Lettinen replied to Aapo Lettinen's topic in Eclair
ORDERING CLOSED BUT I MOVED THE CNC PARTS QUOTE TO MONDAY SO IF YOU FEEL MISSING OUT JUST SEND ME DM OR IG MESSAGE (aaplet14) DURING THE WEEKEND AND WE CAN FIGURE IT OUT. There is some other people who are paying their orders in Sunday too so you can still apply if being quick. After Monday 28th it would be very difficult to add new orders anymore (would need to raise the price a lot, like 600usd extra) so have to close ordering after Sunday 27th. Sold one of the 3-speeds so there is one still available. Advanced models available as well. -
ALCS konvas 15epss stabilized speed controller
Aapo Lettinen replied to Aapo Lettinen's topic in Russian Gear
I never had the original 15epss control box but it has 48v inverter circuit inside which generates heat. If the camera runs fine at first but then suddenly stops after quite long-ish take, it can be heating related issue I think. There may be some bad soldering joint or faulty component which expands when warming up and loses connection when warm enough. could be more complex issue too. don't know the exact circuit of the original box so difficult to say but you can probably figure it out when opening it (remember that 48v is already dangerous and a faulty circuit can generate more voltage than originally rated for so definitely have all safety measures in place before attempting any repairs) . if it is heating related issue it may not show up the same way if the casing is opened for testing purposes, this can complicate repairs a lot -
ALCS cp16r 45-speed crystal electronics
Aapo Lettinen replied to Aapo Lettinen's topic in Cinema Products
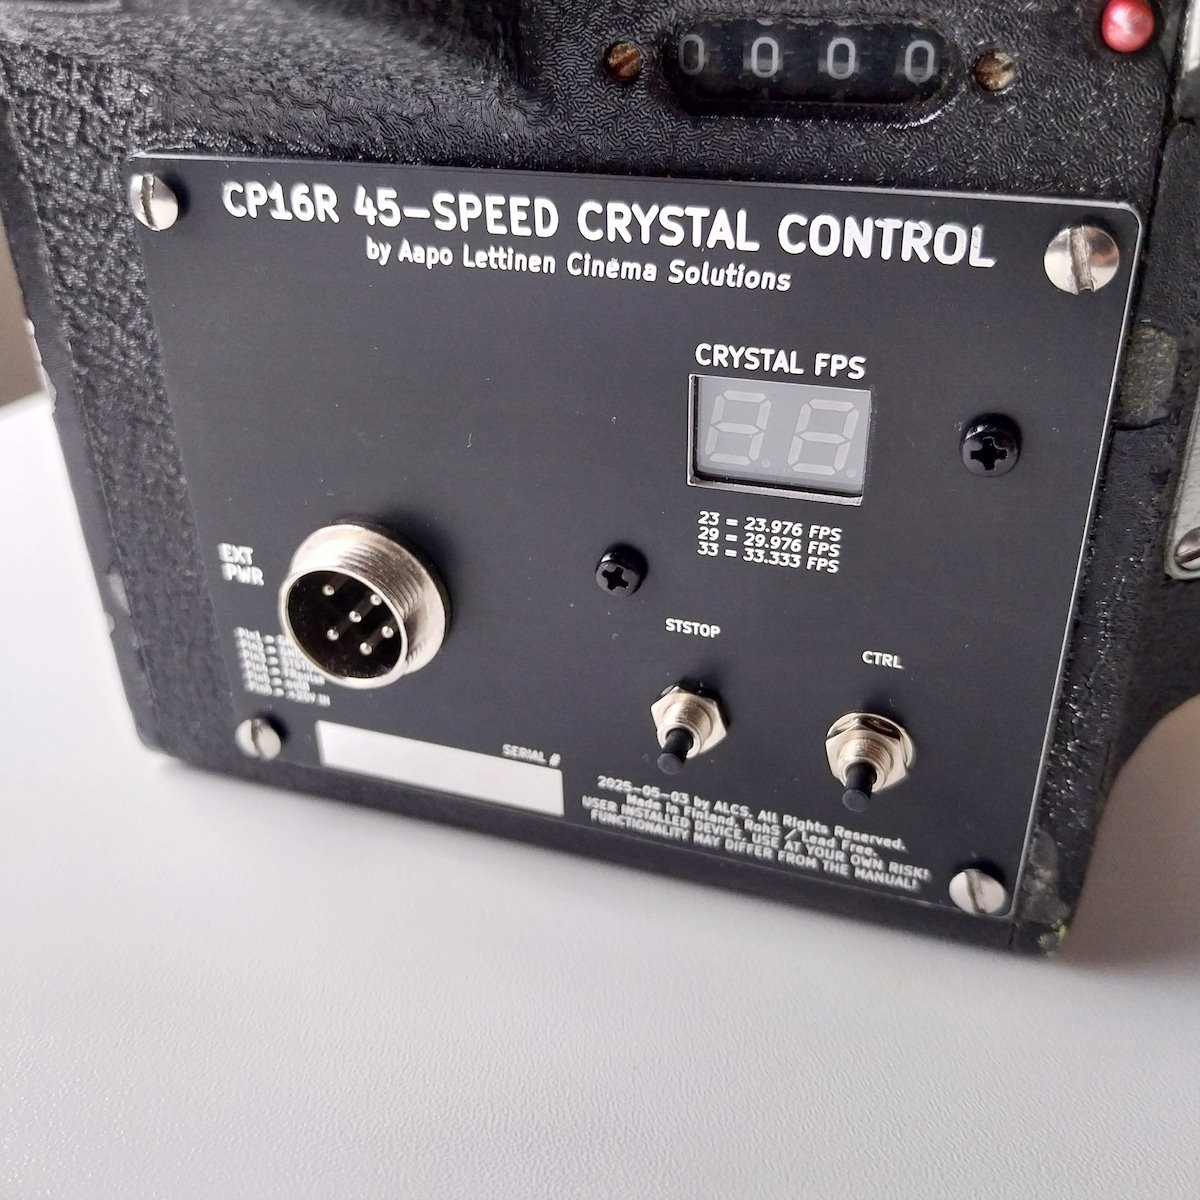
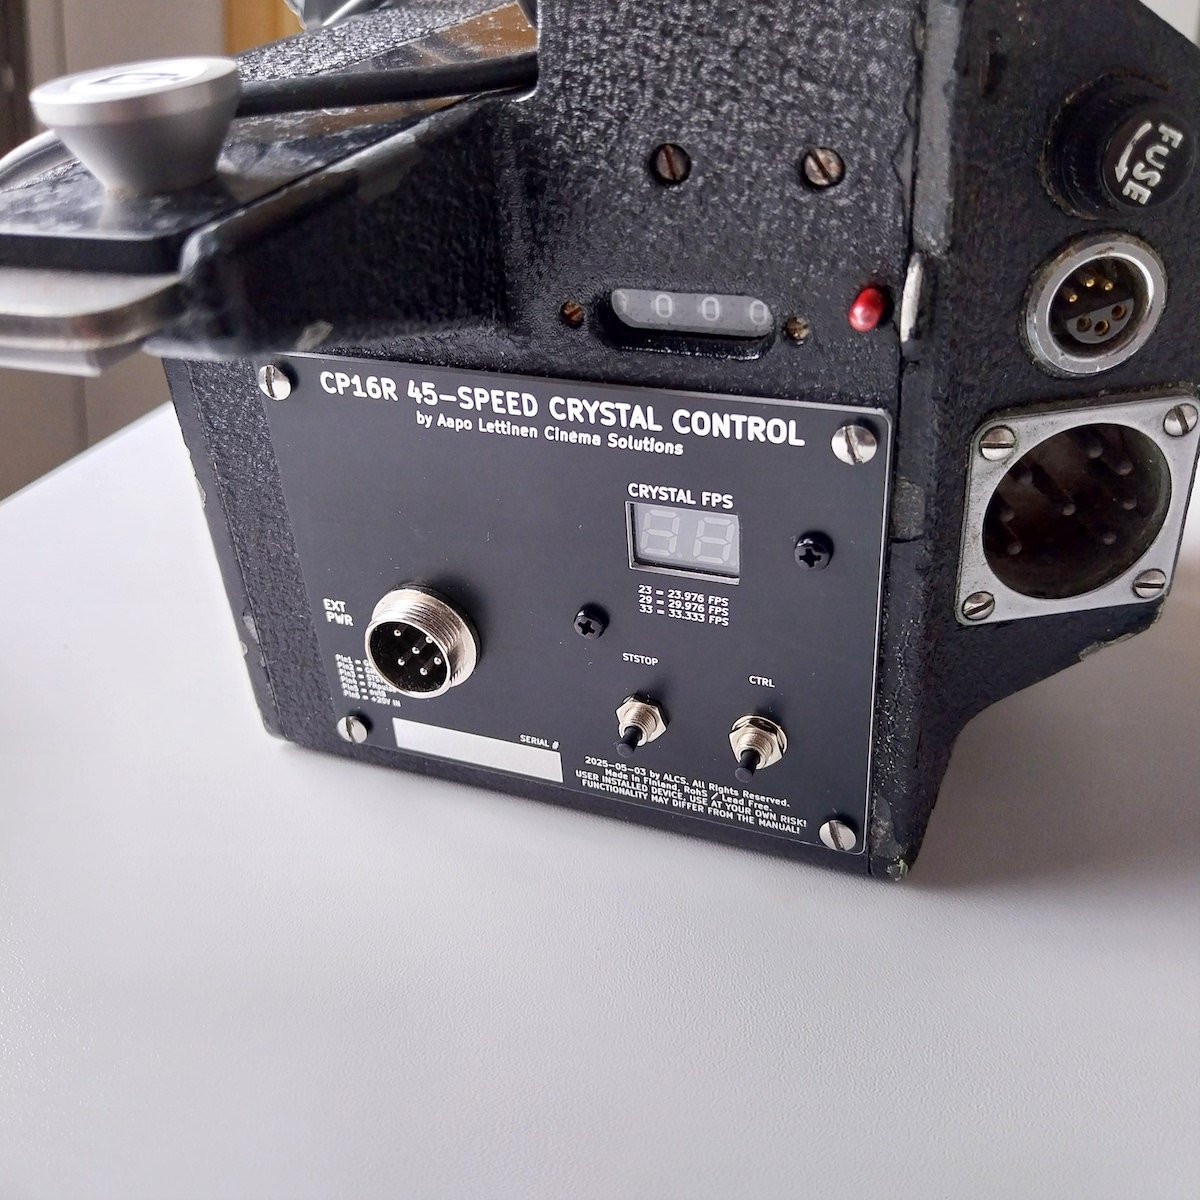
Got the control panels from factory. Much nicer to work on the software now! As mentioned in previous post, it is possible to order this system with tcxo oscillator if needed, for those super long one-take scenes lasting over 5 minutes. Price with the tcxo is something between 850usd and 900usd per installation kit depending on how many orders there is. Good discounts if purchasing more than one kit.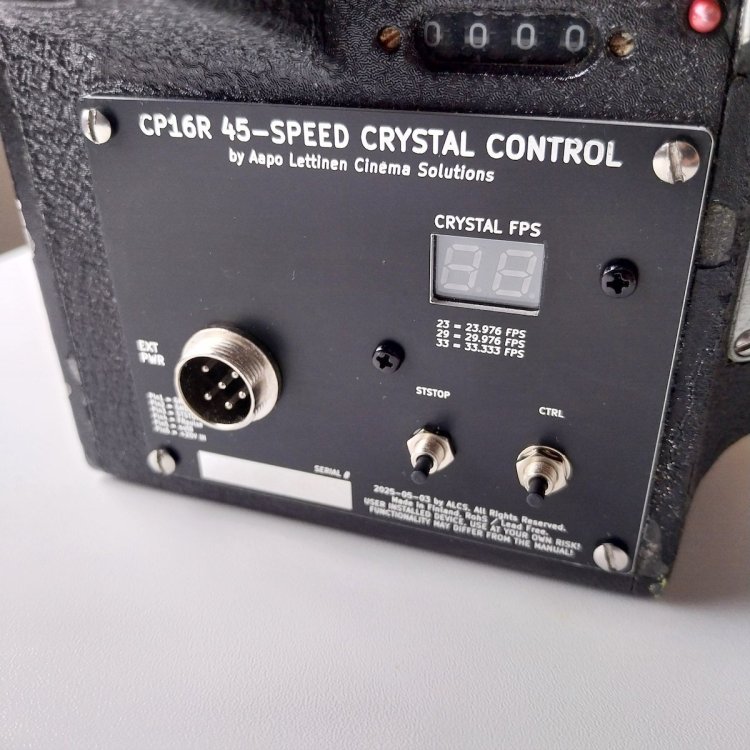

-
ALCS cp16r 45-speed crystal electronics
Aapo Lettinen replied to Aapo Lettinen's topic in Cinema Products
btw, I was bored and drafted additional stuff for the 45-speed system so that it is possible to order it with TCXO if needed (temperature compensated crystal oscillator) for extremely accurate timebase. It needs a small additional circuit board installed and if installed afterwards, desoldering couple of components. and of course costs a little extra. it is possible to do the module installation afterwards by the end user if needed but I highly recommend ordering the installation kit with this update already installed if wanting it for the camera. The regular crystal which the 45-speed system has as standard is perfectly fine if you are shooting shorter than about 4 minute or 5 minute takes. Almost all people using CP16R or Eclair cameras shoot short takes less than 2 minutes long and you won't notice any difference between regular crystal and tcxo in that kind of use. But it you are going to shoot a 10 minute single sync sound take, basically an entire 400ft roll as single take which is very expensive, then it may be useful to have the tcxo module installed in the camera. Let me know if wanting to order the 45-speed kit with the tcxo module, I will calculate how much extra the tcxo would cost but likely less than 150usd extra -
If true, it sounds like they are trying to make it easier to shoot stills on the MP films. Can't figure out other reason why they would remove remjet as most movie cameras have shiny parts on pressure plate and would cause extra issues with them
-
250D would be more optimal if you have to use the HMI for sunlight. Gelling the hmi down extensively is not good for the colour (partially the reason why I recommended using tungsten for sunlight and hmi only for cold light). But if you want the sharp venetian shadows on the wall then your tungsten package would not be enough and would either need 5k tungsten or have to do with the hmi and too high colour temperature. If you have possibility to switch for 250D on this scene I would recommend it and then would be easier to make the sunset light with the hmi by gelling the hmi down 1/2 cto and gelling the ambience-creating led fixture up enough to get desired colour temperature difference. I would aim for something like maybe from 190 to 250 mired temperature difference depending on how the ambience is exposed, the exact phase of sunset replicated, etc. the ambience will be soft light so it will look natural when it is coming through the same window than direct sunlight. The lower the ambience is exposing the colder it usually looks compared to the real temperature difference, thus enhancing the colour temperature difference even more
-
the Krasnogorsk cameras were made for entirely different use than the Kinor cameras (16sp and cx line) so I have no idea why they would have tried to make the lenses cross compatible as the Kinor lenses were better quality and there was no way a Krasnogorsk user would have got their hands to Kinor lenses in the use Krasnogorsks were made for. The krasnogorsks were made for movie club hobbyist use meant to be simple and affordable . The kinors were made for tv and propaganda, clearly made for professional use only and I can't see a reason why anyone would have wanted to use cheap-o hobby lenses on Kinors back in the day when the available kinor lenses were two or three times the optical quality, had better mechanics and were more reliable.
-
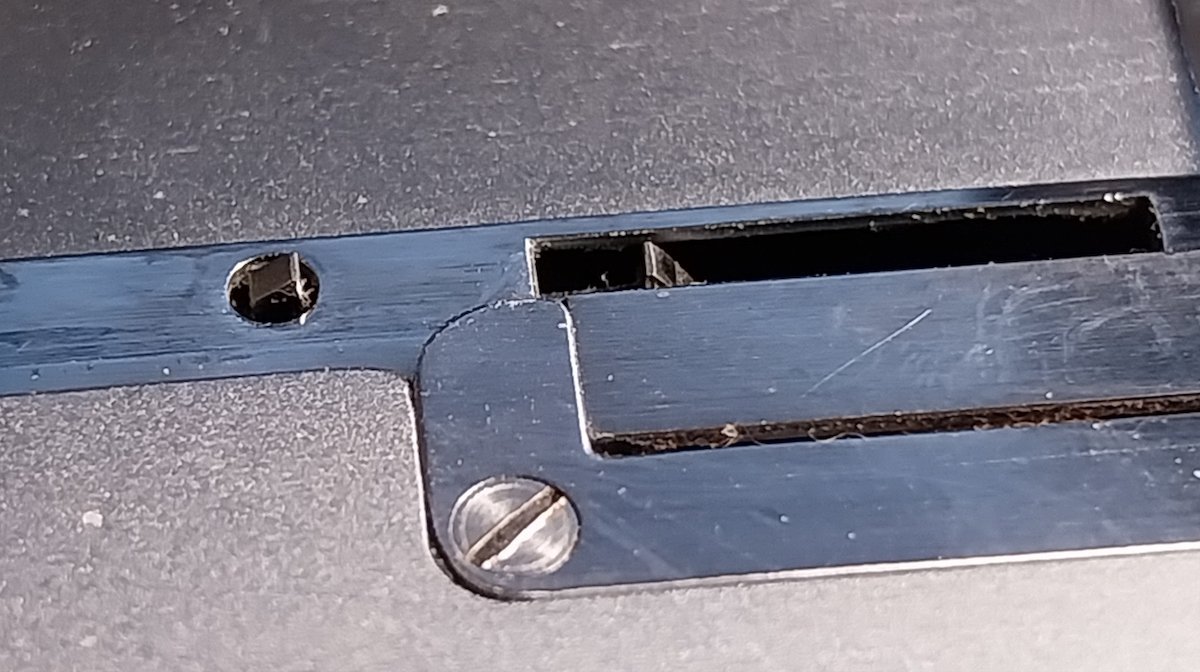
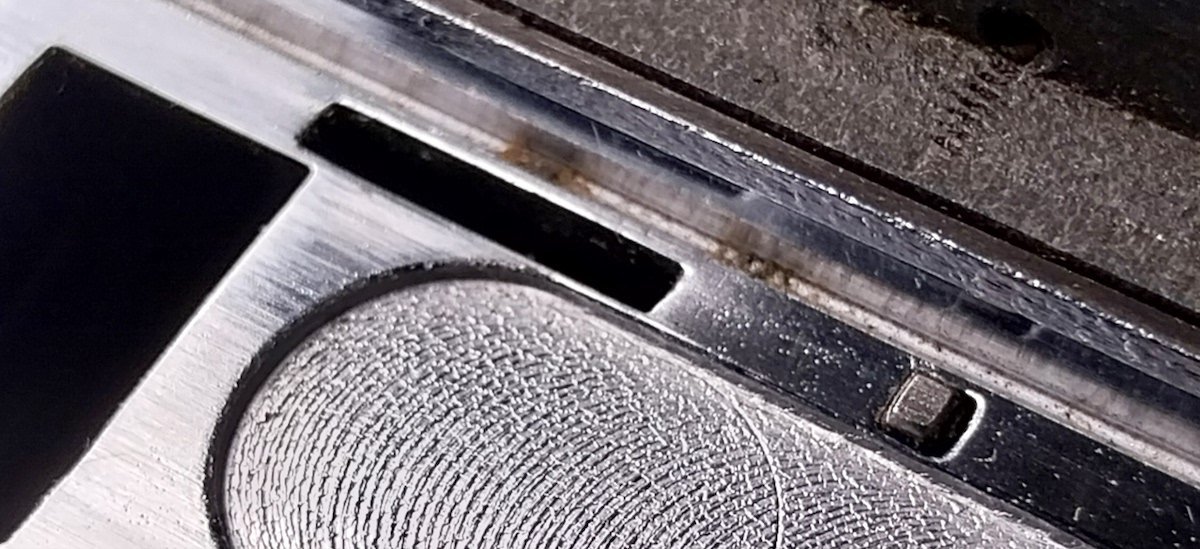
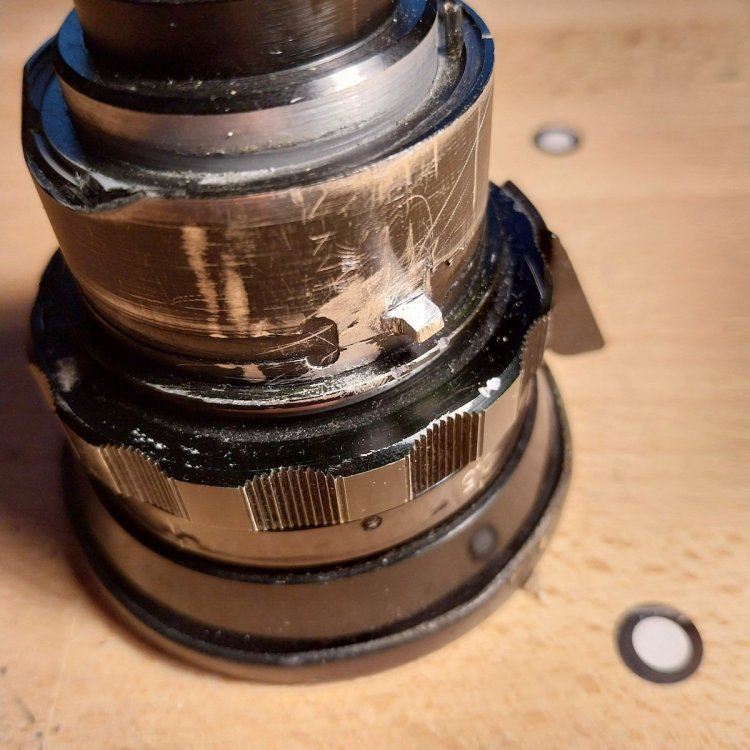
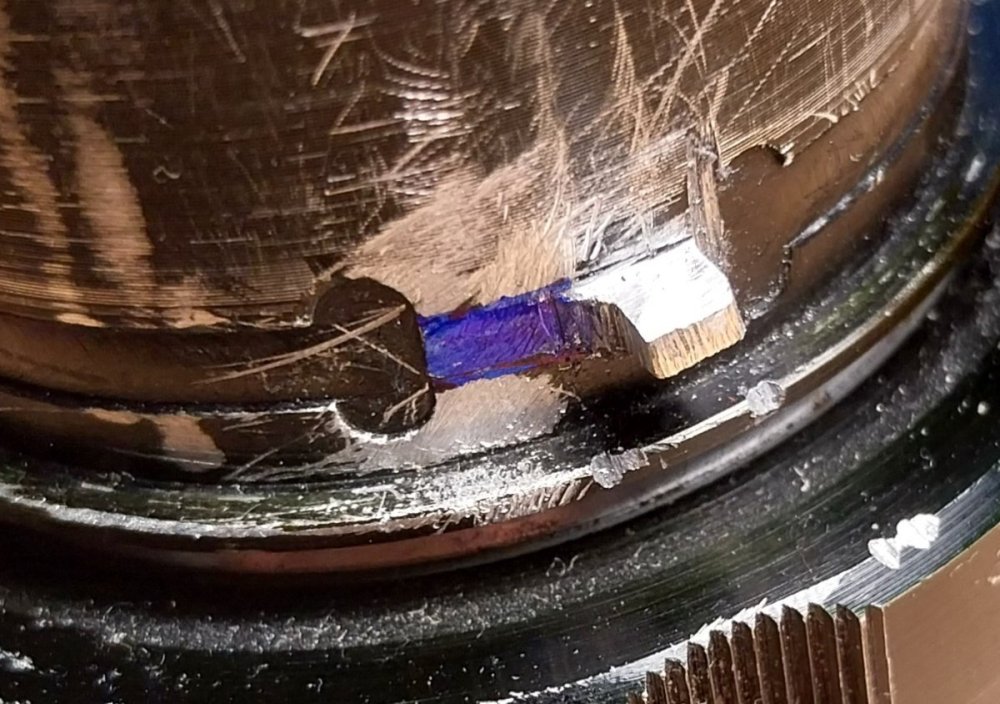
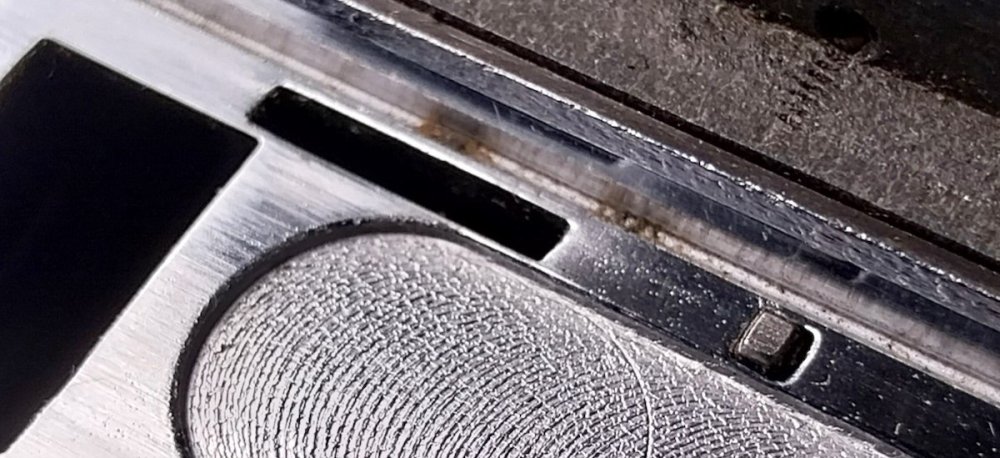
Here is the SP16 lens I diy modified to work on the Krasnogorsk, just filed off material from the flanges until it fit to the Krasnogorsk and could be focused to infinity. I marked on blue the original flange to highlight how much material I had to take off. so the cylindrical part diameter is the same on both mounts but otherwise they are not "compatible" in the sense that the SP lens could just fit to the Krasnogorsk without heavy butchering of the original mount and potentially manually trying to adjust the ffd of the lens until it seems to work correctly. I have only seen plain Krasnogorsk lenses and plain SP16 lenses on sale, nothing in between. It was common in Soviet Union to have small batches of something special made as a test piece or for special purpose, maybe the dual fit lenses were some rare test run they made but there was not enough them to show up on ebay enough to get noticed regularly?
-
FFD on my Completely 3d Printed 16mm Film Camera - Looking for advice
Aapo Lettinen replied to Henry kidman's topic in 16mm
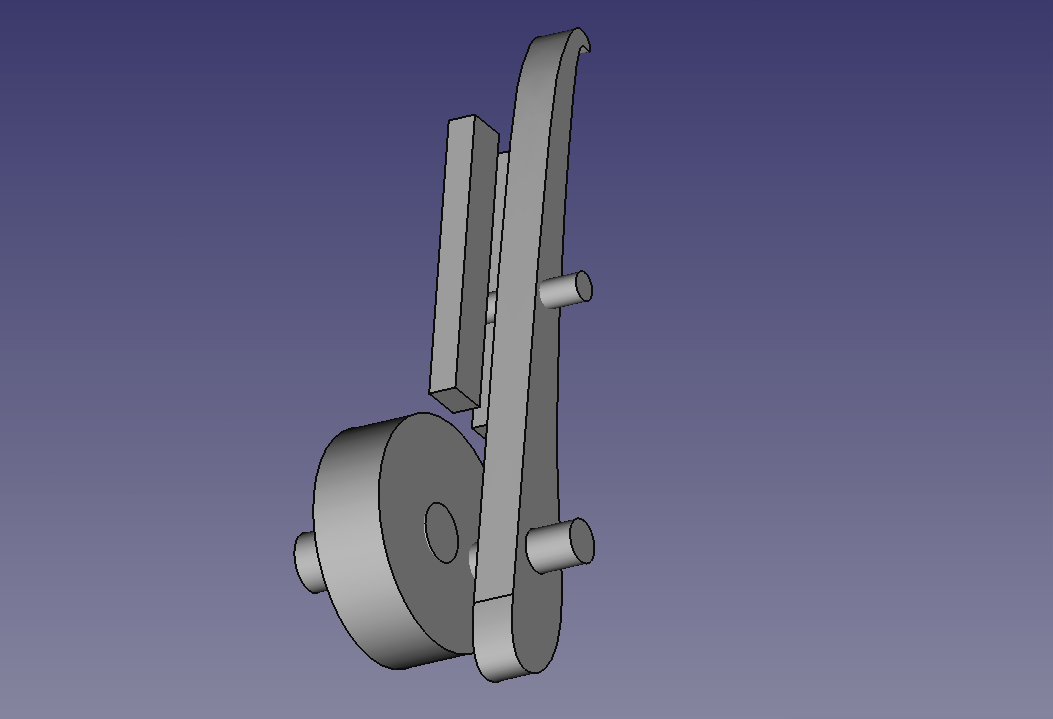
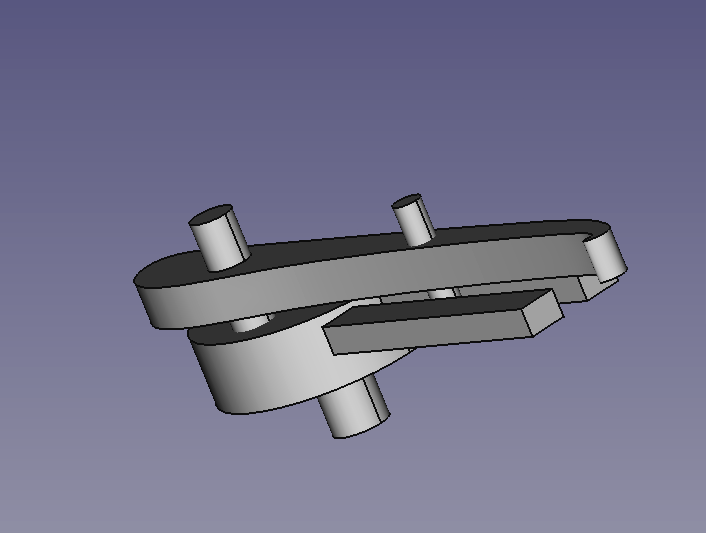
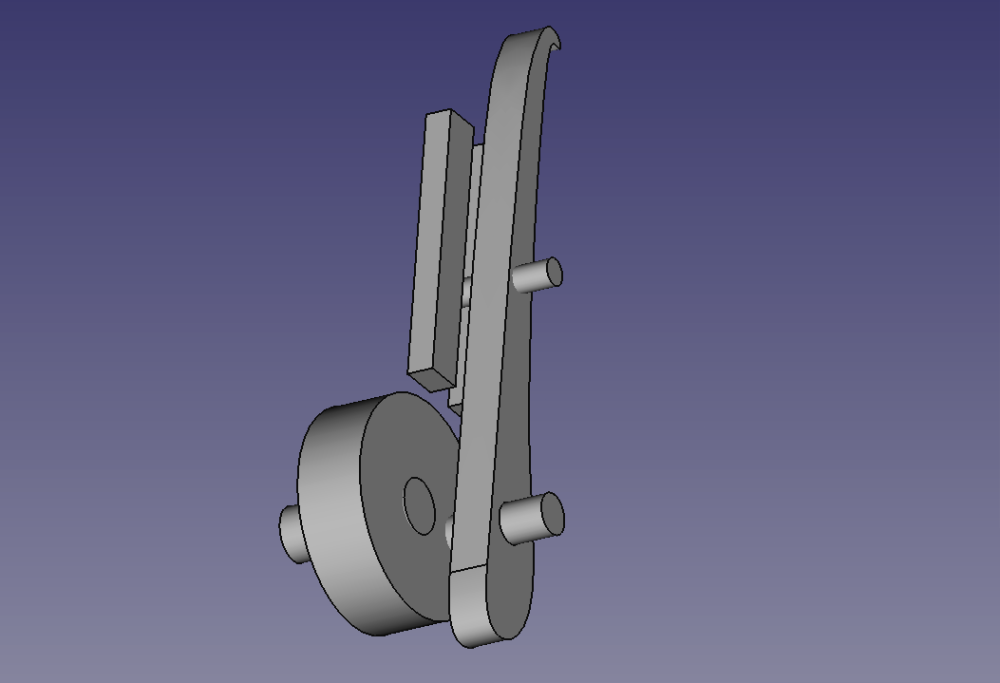
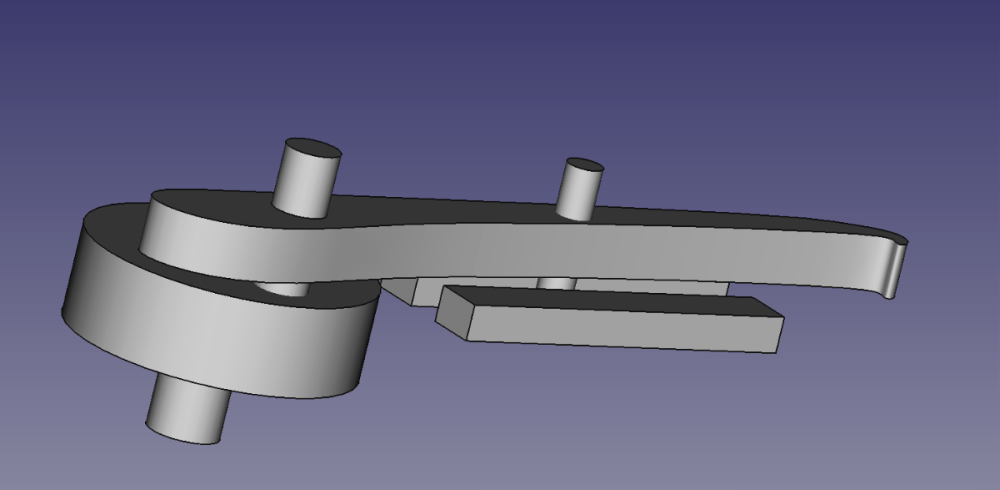
It is entirely possible to make a simple pulldown system from scratch. simplest cameras like Krasnogorsks use this style of very simple movement which should be pretty "easy" to make to work OK. there is a cam driving the end of the pulldown claw up-down-towards gate -away from gate. The claw has a guide pin in the middle-ish which slides on guide rails, translating the movement from the cam to the desired type of "pull-the-film-down, retract and go back up, repeat" type of movement. It is not perfect but it is simple and relatively easy to make to work well enough for home use. needs to be made out of proper metal though, no plastic can tolerate this use. I quickly modeled some reference images, nothing is in scale and you may want another set of guide rails on top to add stability but the basic principle is easy to see.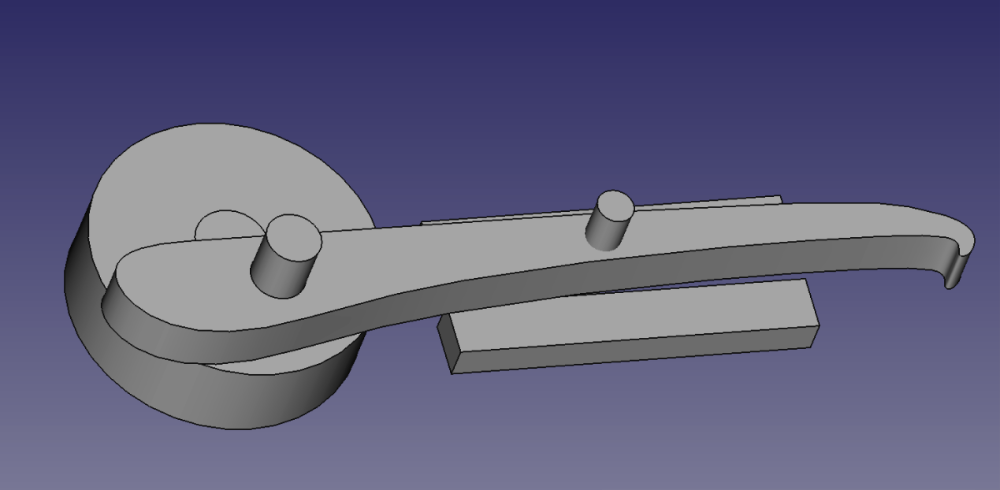
-
the SP16 lenses have the flanges of different width and thickness so the SP16 lenses are not directly compatible with Krasnogorsk bayonet unless the lens is modified. I did the modification with dremel on one 10mm lens some 10 years ago, it was like grinding of 2/3 of the mounting flanges to get them mount to the Krasnogorsk
-
FFD on my Completely 3d Printed 16mm Film Camera - Looking for advice
Aapo Lettinen replied to Henry kidman's topic in 16mm
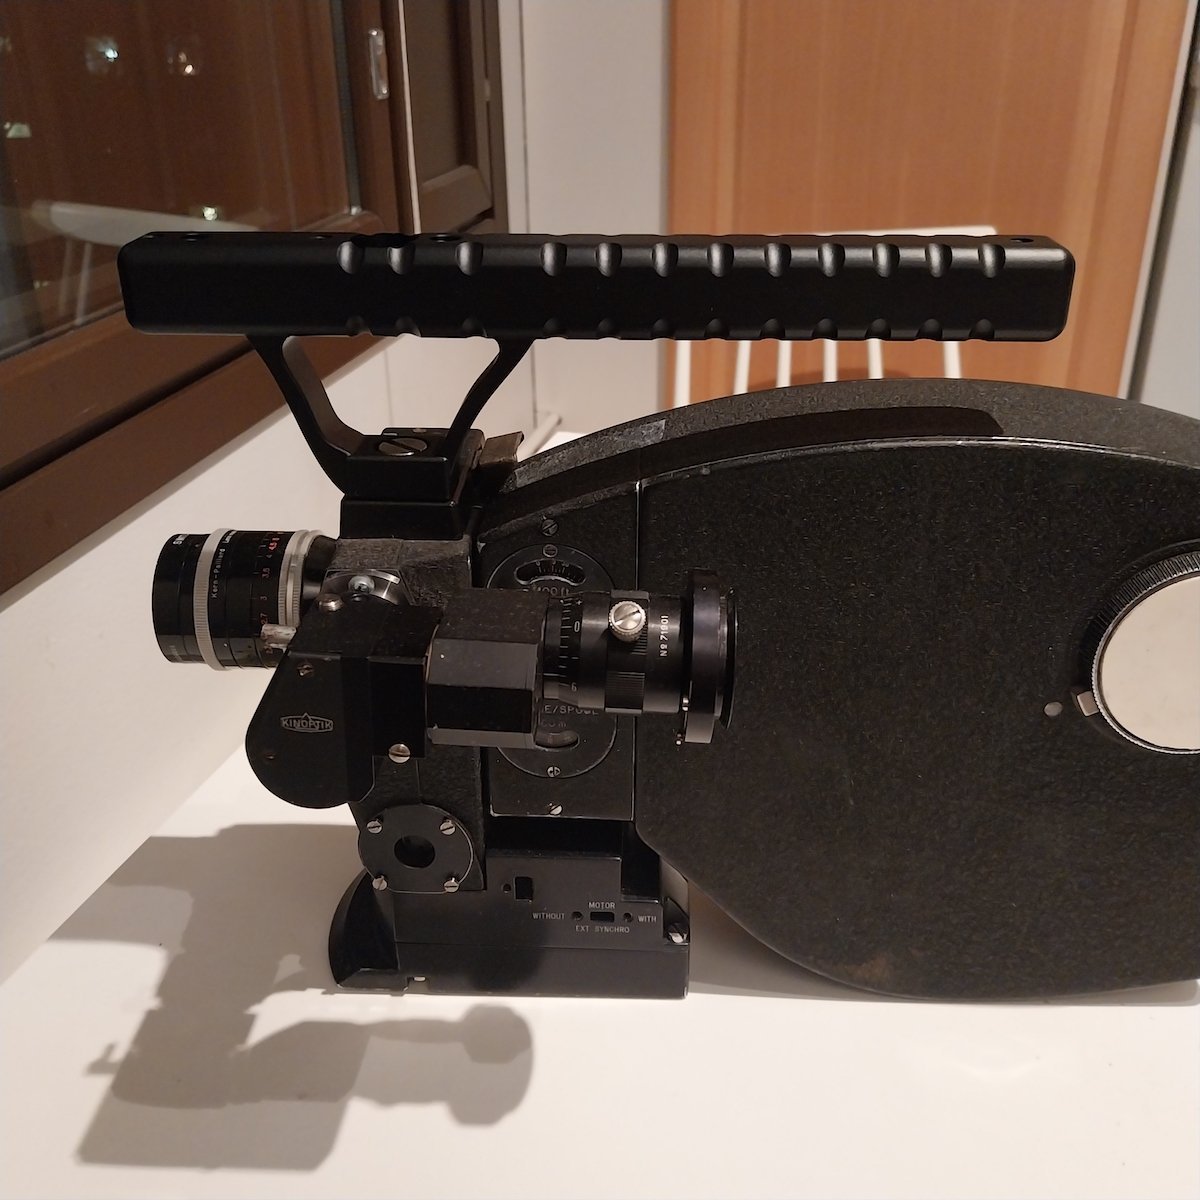
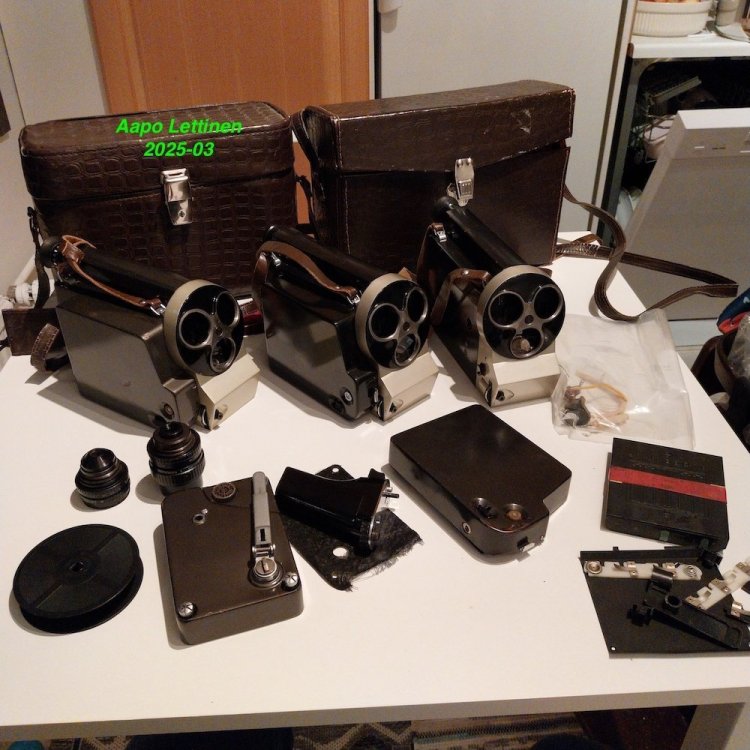
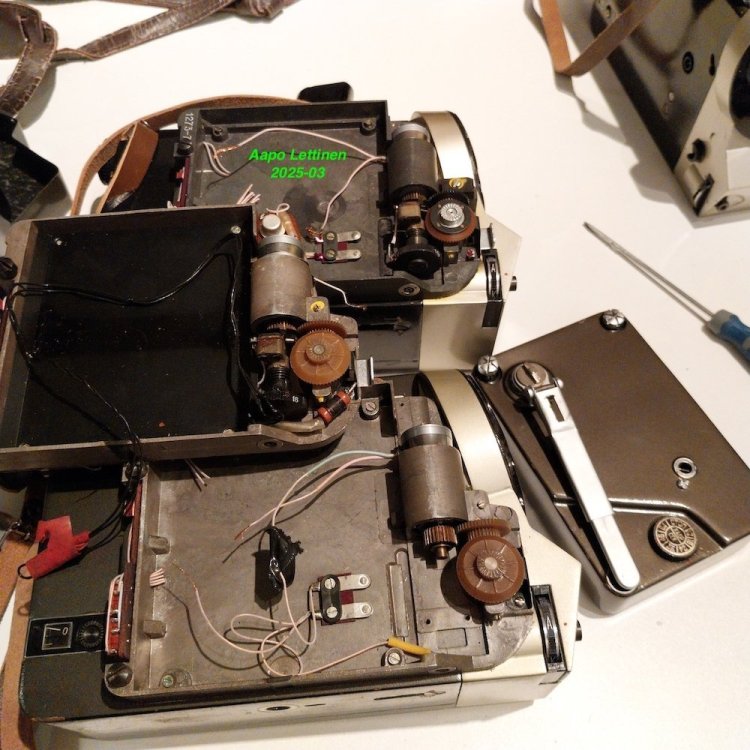
thanks! yes it is often better to machine stuff for final parts but 3d printing is very good technique for first prototypes and saves lots of costs on prototypes. You can work very efficiently by replacing one part at a time with cnc machined metal version when you are sure that part is final. I would first replace the gate and pulldown with metal ones so that you have possibility to get higher quality images to begin with. then can replace other parts later on one at a time when feeling necessary and have collected resources for it 🙂 cnc machining has some limitations with sharp corners and one may need to have additional finishing ordered for parts which for example need sharp cornered hole cut. For example it is possible to machine the film gate with rounded corners on the gate opening but if needing to have as sharp corners as possible one may need to order additional wire saw or EDM finishing to get them as small radius as possible. machining cavities has some limitations too. For the gate I would use stainless steel or chromed brass if steel is too expensive. the surface needs to be smooth and polished on rails but other parts are possible to leave a bit rough if they are dimensionally accurate. the Soviets only polished the parts which touched film surface and other as left unfinished... most Western cameras are finished all the way through. with cnc and metal it is easy to get high quality threads on the parts which is often important when assembling stuff. top: Eclair NPR bottom: Kinor 16cx-2m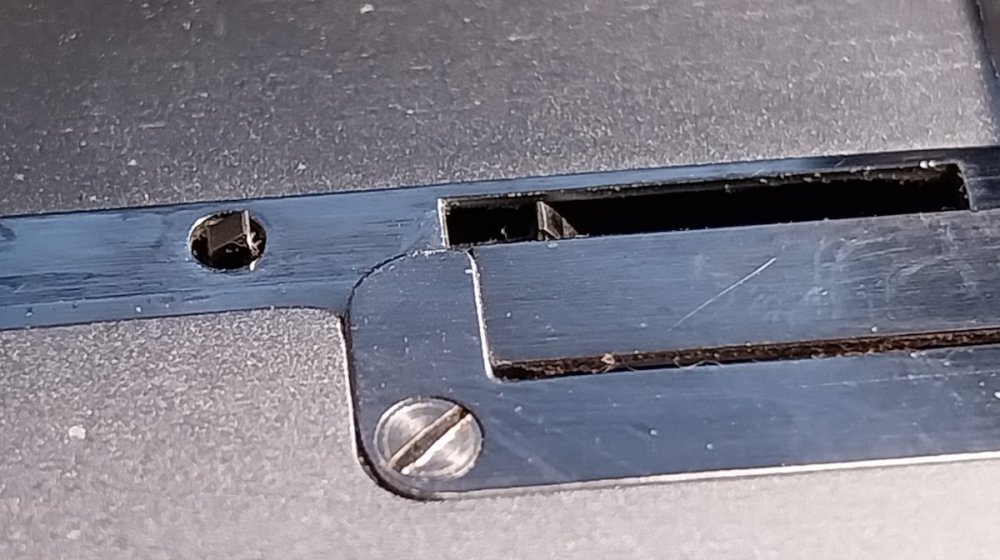
-
FFD on my Completely 3d Printed 16mm Film Camera - Looking for advice
Aapo Lettinen replied to Henry kidman's topic in 16mm
personally I would make the gate from stainless steel, the pulldown claw spring steel, pulldown axles some kind of steel which is available, the pressure plate aluminium, the shutter aluminium. All of these can be cnc machined. then the main support structure connecting the gate and pulldown+shutter assembly to the lens mount would be aluminium on basic designs and stainless steel on very high quality designs. I would use cnc machined aluminium on this one for the much lower costs. Basically it would be a kind of U-shaped structure which seamlessly connects the gate and lens mount together to control the ffd precisely. a shim under the lens mount is used to fine tune the distance. you can get the shim cnc made too though would be cheaper to use some available Chinese shims from lens adapters and just design the mount so that they can be used. film transport depends, the rollers are perfectly fine if plastic. the sprocket wheel depends but often it can be plastic if the sprockets themselves are metal. for example a metal ring with sprockets which is attached on a plastic roller to form a full sprocket assembly. All the other parts of the body which don't have high durability and / or dimensional demands are made out of plastic. on low quantity it is economic to 3d print. if making like 20 cameras it is often more cost effective and higher quality to cnc machine the plastic body too if the shape is such that it is possible to machine -
FFD on my Completely 3d Printed 16mm Film Camera - Looking for advice
Aapo Lettinen replied to Henry kidman's topic in 16mm
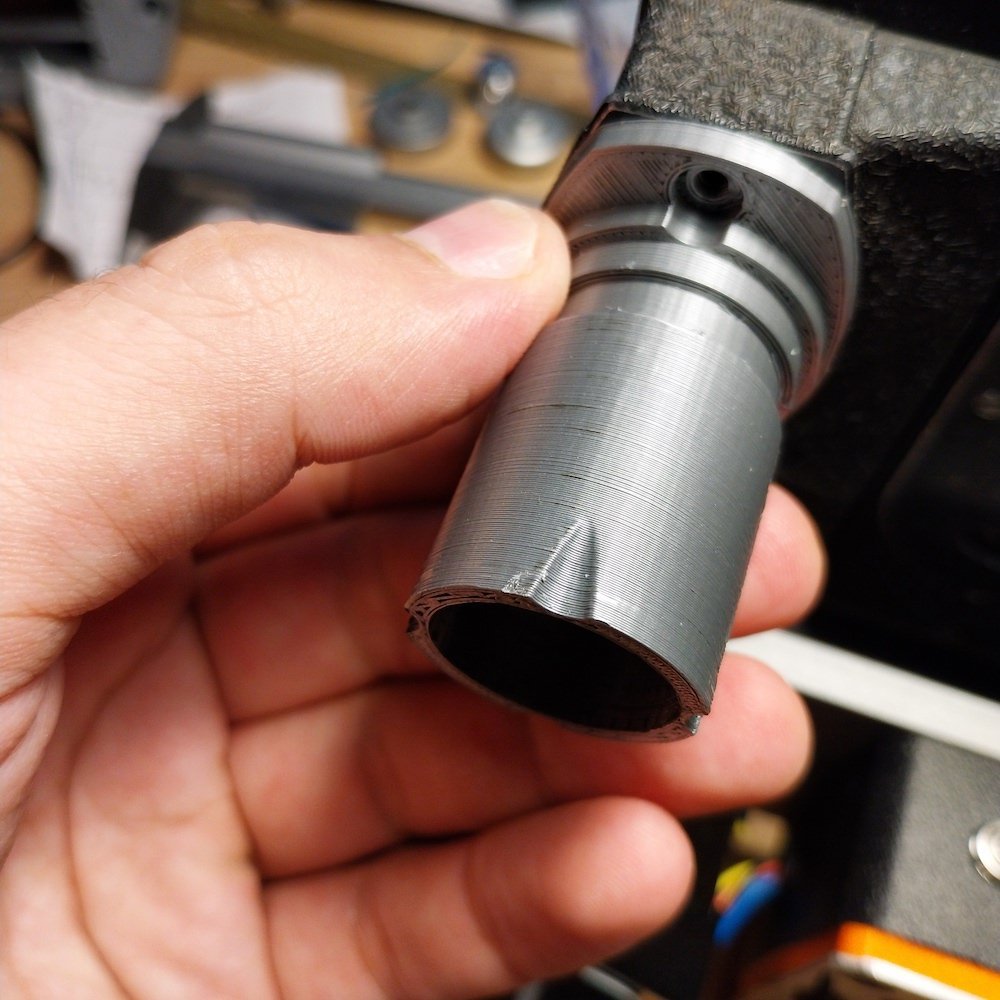
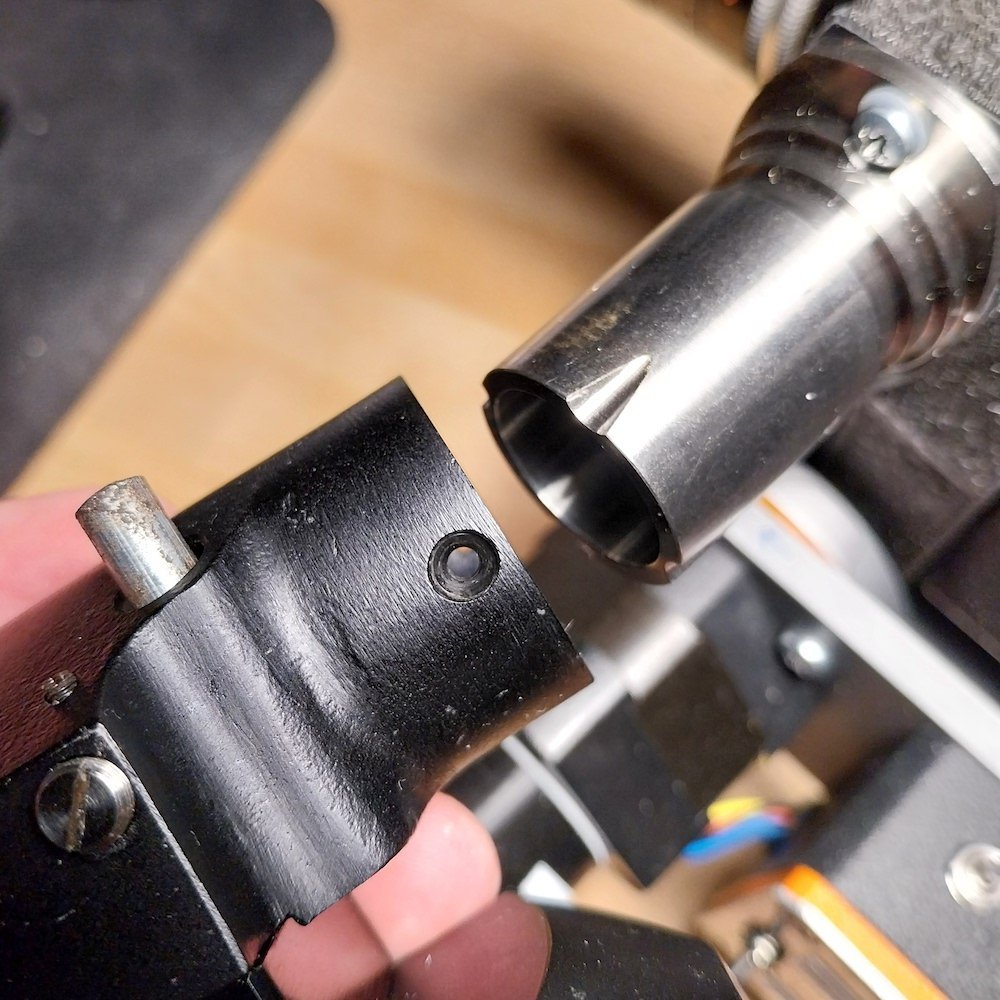
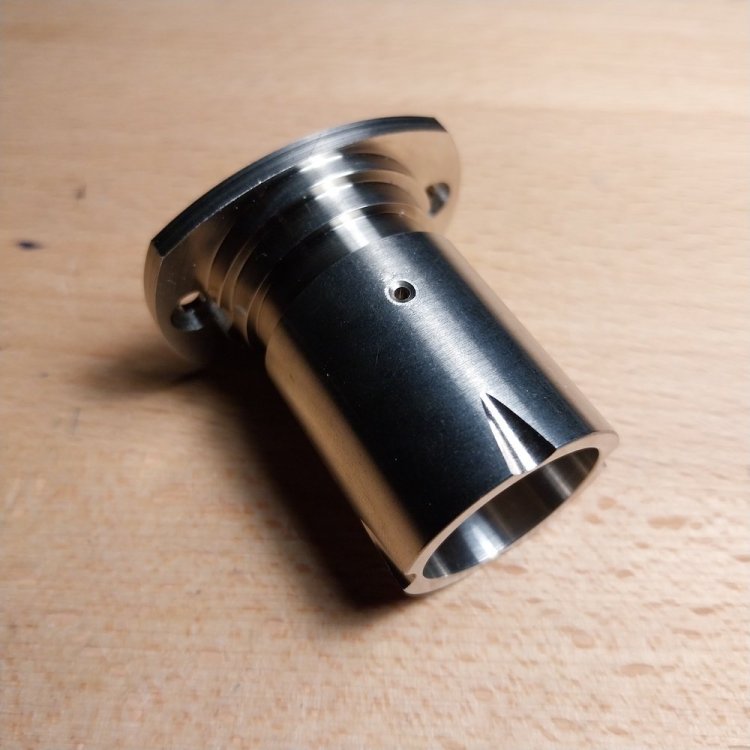
Here is an example of stuff I made last year. the first test pieces are 3d printed to save costs, then when the design is final I will check various places how much they charge for final one made. The first print is home printed from pla and not sturdy enough for use but works for optical testing. The final part is cnc machined from stainless steel by pcbway with basic surface finish. the final part cost a little over 100usd with shipping costs to make which is why I had to be sure the dimensions were at least close to correct ones, thus made multiple home 3d prints to finesse it (prints cost maybe from 1 to 3 usd a piece so one saves a lot if can find basic errors with printing before ordering 100usd+ final parts made out of metal) The camera handle made the same way btw, it is cnc machined aluminum. I was so sure about the design that did not bother to 3d print a test piece. the handle has 1/4" and 3/8" threads for mounting accessories. I think it was something around 100usd with shipping costs, made by jlcpcb. black anodizing too


-
FFD on my Completely 3d Printed 16mm Film Camera - Looking for advice
Aapo Lettinen replied to Henry kidman's topic in 16mm
Most of other people don't have personal access to high quality cnc machines either. We design the parts so that the first test design can be 3d printed to see if it is approximately correct design. Then when the design is finessed enough, it is time to look for a outside company to do a test piece from the file for reasonable price. When the test piece arrives and has been thoroughly evaluated, it is possible to decide if the design needs some final touches or if it is already possible to order the final parts from the outside company, machined to final tolerances with final surface finish. it is not necessary to purchase a 300k+ priced cnc machine when one can hire a company to make the part for you from the step file. Just design the part so that it is possible to cnc machine and then quote from various places how much it would cost to machine it out of aluminium or steel etc. you can check for example pcbway and jlcpcb for cnc quotes if can't get good quotes from AU. the ffd needs to just be calculated close enough when designing parts, then manually tuning when fitting. and when almost there, sand down and polish the shim until you get it perfect. you may need to make your own ffd gauge if there is no readily made available. the gauge would be a good project to test outsourced cnc machining, you need to make it out of metal. get a suitable dial gauge and design the rest of the parts by yourself -
FFD on my Completely 3d Printed 16mm Film Camera - Looking for advice
Aapo Lettinen replied to Henry kidman's topic in 16mm
There has been lots of discussion here on the forums about the limitations of materials and 3d printing and electronic vs mechanical links. 3d printing is just not a good technology to make every and all parts of a movie camera, and electronic links are not good idea if one needs high precision, high speed and reliability at the same time. 3d printing out of metal like stainless steel is possible but cnc machining is cheaper on most type of parts with potentially better end results. Compared to 3d printed plastic, ANY old camera including the cheapest Soviet models has better quality film transport and gate than a 3d printed plastic one would be. Fully 3d printing a camera out of plastic does not make sense, it will be a sub par product whatever you do and any 50 bucks old camera will blow it out of the water image quality wise. I think you have confined yourself inside a "I must make this entirely with 3d printing" box which limits your engineering process too much and you will never make a good working camera for actual filming unless changing some goals here. Allow yourself to use proper metal for dimensionally critical parts and a mechanical link for movement for example. You will get much better camera that way. Stainless steel, aluminium, brass, spring steel in selected critical applications. Then rest can be 3d printed if necessary. But allow yourself to consider on every single component: does this need to be metal? Can it be printed or is cnc machining and polishing and coating better option? How much each option affects the price and reliability? I would highly recommend getting some old movie cameras for evaluation how they did things. And if you find a good working used part just scavenging it from old camera instead of making basic stuff like rollers and sprocket wheels and gears from scratch 🙂 -
new ALCS compact crystal motor for Eclair NPR
Aapo Lettinen replied to Aapo Lettinen's topic in Eclair
There is five (5) days left to order the NPR Advanced motors. Price as per the previous posts. Deadline 25th April, the first payment part needs to be paid when placing the order. --------- There is TWO 3-speed motors available for the price of 1300usd + shipping, deadline the same 25th April but they need to be fully paid for when placing the order. The ordering already closed for the 3-speed model some months ago but I need to round up the batch size of them for manufacturing reasons so can offer a maximum of two motors with the original price of 1300usd if they are paid for immediately. No payment plans available but you can pay the shipping costs in July when the motors are shipping.
-
I actually did some tests in the past, maybe 12 years ago, if one can make "sunset light" by using only one light fixture and still sell the effect. I used a 1k tungsten fresnel. I added 1/2 cto to barndoors to the right side of the centerline so that the right side of the beam was orange very warm "sunlight" with sharp beam. Then I added full ctb on the left side of the beam and some full diffusion over it. The ctb made the left side of the beam cool high colour temperature and the heavy diffusion spred the beam all around reducing all directionality. this spred to all over the room bouncing back from the white ceiling and walls and creating cold ambience light. Viewed in the same room than where the light was it was not entirely convincing but in the next room, when that light was coming through doorway, it was pretty much a convincing "sunset light" because it had these two components even when it was really roughly made and the ambience still had lots of sharpness to it because the surface area of the diffusion being so small. But just something to remember: you can make two or even three "different lights" from one fixture by adding partial gelling and diffusion areas along the lightpath. Making one warm sharp light and one soft cold light is pretty easy, for example gelling first half of the beam to cold colour temperature and then shooting that warm+cold light combination past a diffusion frame so that only the cold light side gets diffused. Or you could reflect the undiffused cold side of the beam up with shiny board, then bounce it back down from large overhead frame to create very soft sky ambience. If, for example, having only one 5k and nothing else would be pretty handy trickery to get multiple lights done with one fixture
- 31 replies
-
- 1
-

-
- lighting
- natural look
- (and 2 more)
-
as per my previous post, this shot is probably interpreted by the audience as being a night scene because there is no ambience coming from the same doorway than where the warm light is coming in even when the light is pretty bright for a night scene. And they would probably think the warm light is artificial light like very bright incandescent in the next room, or car headlights flashing the door, or some heavy industrial light in the yard because it is so bright. adding some high temperature blue-ish soft light coming from the same door would be interpreted as sky ambience and thus people would explain to themselves that the orange light must be real sunlight
- 31 replies
-
- 1
-

-
- lighting
- natural look
- (and 2 more)
-
the "sky ambience" needs to come through the same window than the sunlight does. you can add some boost to the shadows by bouncing similar ambience-coloured light from inside but most of the ambience really needs to come from the window to sell the sunset effect as people see how the window opening shapes the ambience coming to the room and curtains etc are lit by it. people will see if there is only sunlight coming from outside and everything else is coming from inside, quite often they interpret this as it being a night scene with the outside light coming from a orange streetlight because there is no ambience to tell that it is real sunlight. If there is no ambience from outside then it is nighttime for the audience no matter how well everything else was done
- 31 replies
-
- 1
-
-
- lighting
- natural look
- (and 2 more)