

Dom Jaeger
-
Posts
3,373 -
Joined
-
Last visited
Everything posted by Dom Jaeger
-
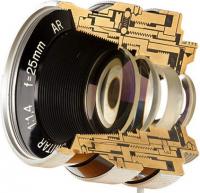
Ah the Bolex prism.. So much confusion about this little chunk of glass - light loss, back-focus, spherical aberration, RX vs non-RX lenses - maybe Bolex should have gone with a pellicle or a guillotine mirror like Beaulieu. The 3mm back-focus adjustment thing is a common misconception, based on the fact that the physical flange depth (ie the actual distance from lens mount seat to film plane) on reflex Bolexes is 20.76mm while a C-mount lens is designed to image 17.52mm behind the mount. But this is confusing the optical distance with the physical distance. The truth is that RX lenses will also form an image at 17.52mm if the prism isn't in the optical path. Any C-mount lens made for 16mm (including RX lenses) fitted to a reflex Bolex will have the light rays coming out the back refracted a bit by the prism and the lens focal plane extended out to around that 20.76mm point. The problem with a non-RX lens is that while the central rays will focus at that point, the rays passing through the outer regions of the lens aperture will focus a bit past it, causing a blurring of detail. As you stop down, you use more of the central rays and the spherical aberration diminishes. (I should clarify here that the outer or marginal rays are not referring to the outer edges of the image, just the edges of the light ray path.) Now, because the central rays are focussing at 20.76mm but as the rays become more marginal they focus further and further beyond this point, the total error at full aperture when all the rays are combined can throw the focus scale off. You can adjust the lens back-focus slightly (certainly not 3mm, closer to about 0.1mm or the equivalent of unscrewing a C-mount by 1/8 of a turn) to re-align the focus scale at full aperture, but as you stop down the point of best focus will shift back and your adjusted scale will now be a bit out. The softness caused by the spherical aberration won't change either, you're just playing with where the focus scale lines up. It won't make any difference if you're focussing by eye. You should be able to reach infinity with non-RX lenses, if anything the introduced aberrations will cause the lens to pass through it. If you're not reaching infinity the lens or camera or adapter has an issue. All this complication is why it's better to just use RX lenses or use non-RX lenses stopped down a bit. But once you shoot some tests you might find the issue isn't even that noticeable.
-
Beaulieu R16 (12-120 Angenieux) camera shake issues
Dom Jaeger replied to allison gibbs's topic in 16mm
Yes it does sound like a registration issue, sometimes referred to as "camera unsteadiness", which has nothing to do with the camera body shaking, but with the film not being properly positioned in the same place for each frame. You can introduce unsteadiness by incorrectly loading the film in the camera, if the loop is not the right size or the pressure plate is not properly seated, so that's one thing to be aware of. Keeping the gate and pressure plate clean will avoid any potential issues with a gummed up film path. The other cause is if the camera is worn or out of tolerance somewhere. In this case, as Jean-Louis recommended, you should have the camera checked by a technician. It's actually a good idea to have any older film camera checked if it hasn't been recently serviced. You can check the camera steadiness yourself quite easily, by shooting a registration test. This test would also help a technician diagnose any problems. The process is quite simple - at a medium focal length shoot a grid pattern test chart at a distance that fills up the frame. Draw your own grid if you need to. Have the camera firmly mounted on a solid support. You only need to shoot 10 or 15 seconds worth. If you don't mind using more film you can shoot at a few different frame rates to check the steadiness at other speeds (write the fps on the chart as a reference). Then rewind the film in a darkroom or changebag, twist the chart slightly and shoot the chart again, this time just at normal speed, for as many feet as the first pass. What you'll end up with is a double-exposure with 2 grid patterns overlayed, one slightly skewed from the other. When you view it on a projector or transfer, watch for any movement between the 2 grids. Don't worry about the whole image steadiness (which could be the projector), just watch the gaps between the 2 grids. If the grids are jumping around relative to one another, you have an unsteady camera that needs to see the doctor. You can use any film that makes an image, even processed negative in a projector, you'll still be able to see the grids. -
Sure they can Jeremy, you could even venture in further and say g'day! Ask to see Dom.
-
Forget JJ Abrams' bloated Hollywood reboot, this 30 minute non-profit fan film DP'd and co-written by my talented work colleague Bryan Meakin in Brisbane deserves a plug. It's taken them more than 10 years, with literally no budget - just a lot of people willing to donate their services for the fun of it - yet they managed to shoot it on film and achieve some pretty spectacular production values. Here's the trailer: and a link to their webpage: http://swdufanfilm.com/
-
Zeiss super speeds mkIII issue.
Dom Jaeger replied to John Christoforou's topic in Lenses & Lens Accessories
Yes any adapter system has the potential to be a little off. P+S Technik tends to make things very well and to very tight tolerances, but all it takes is a bit of grit between mating surfaces. -
Zeiss super speeds mkIII issue.
Dom Jaeger replied to John Christoforou's topic in Lenses & Lens Accessories
Hi Gregg, there are a few tools out there to measure FFD on digital cameras, from the rather expensive: http://www.pure4c.de/dynasite.cfm?dsmid=102935 to the fairly affordable: http://www.abelcine.com/store/NULL-Lens-Target-Optical-Collimator-Kit/#tabs I used a Denz FDC for a while, until it went out of tolerance itself and we needed the special checking tool for the checking tool for only a few thousand more Euros.. These days I just use a couple of test lenses that I know are spot on with a chart and a big monitor. Describing that the focus scale is out by a meter is not much help - at the infinity end being out by one meter is a hair's turn of the scale, at close focus it can be half of the rotation. With linear focus mechanisms like the helical threads used in Zeiss Super Speeds (where the distance that the focus group or lens moves away from the image plane is directly proportional to the angular rotation of the scale ring) it makes more sense to describe the discrepancy in measurements of the scale rotation ie 3 lines out, where a line is the thickness of the index mark for example. To give an idea though, on a 9.5mm Super Speed if the focus distance was 2 meters but the scale read 3 meters you'd have a back-focus or flange depth error of about 0.025mm or one thousandth of an inch. If the distance was 1 meter but the scale read 2 meters the error would be more than twice that, maybe 0.06mm. Roughly the diameter of a human hair. -
Zeiss super speeds mkIII issue.
Dom Jaeger replied to John Christoforou's topic in Lenses & Lens Accessories
I'm sure you can estimate where the sensor plane is close enough to not be an issue. Judging exact focus on lenses that wide can be tricky, ideally you'd want a nice big monitor to check the image on. The camera flange depth might be only a few hundredths of a mm out, easily fixed by removing or adding some mount shims. Maybe take it to a reputable rental house (ie one with a service department) to get checked, along with the lenses. They shouldn't charge much for a collimation check. It could be that the camera is slightly out of tolerance in one direction and the lenses slightly out in the other direction, adding up to a discrepancy that shows up on the wider lenses. If the camera flange focal depth (or lens back-focus) is out of tolerance the entire lens scale is thrown out, including infinity. More of a problem if the FFD is too long and the lens no longer reaches infinity, rather than too short in which case the lens will pass through it. -
Hi Hans, nice to meet another person interested in cine camera history. Do you work for EYE in Amsterdam? I recently discovered that Jacques Cousteau made his first underwater movie using a 35mm Kinamo in a home-made housing. He spliced together rolls of B&W still film to fill the magazines. Not a great transfer, but the film is on youtube: http://www.youtube.com/watch?v=KzaZW02MA2Q
-
Zeiss super speeds mkIII issue.
Dom Jaeger replied to John Christoforou's topic in Lenses & Lens Accessories
G'day John, how did you check the lenses? Since all the shorter focal lengths are out it seems more likely that the camera (if that's what you used to check them) is the problem. If the camera flange depth is out it will throw the focus scale out on all the lenses, but it's more pronounced on shorter focal lengths. It only needs to be a tiny error in camera flange depth to throw off the scale on lenses as wide as 9.5 or 12mm, by the time you get up to 25mm it may not be noticeable. -
If you're still interested in the Keystone you can try contacting Java Photo (http://www.javaphoto.com/filmpage.html) who advertise 50ft magazines loaded with B&W negative, but I don't know how up-to-date their webpage is. I don't know too much about the S8 Elmo, other than what you could find yourself doing a google search. Like all S8 cameras it takes S8 carts that are readily available, but if you want automatic exposure you'd need to source a replacement for the original PX25 3.9V mercury battery that powers the internal light meter, and it probably won't read correctly anyway for modern film stocks above 100 ISO. You could just use it manually though, using your own light meter. Unlike the other 2 cameras it's a reflex camera, which makes focussing and framing easier. The Bell & Howell 252 is a very basic 8mm camera that takes 25ft spools of Double 8 film, which are still available (though very limited in stock choice these days). Try John Schwind if you're in the US: http://www.zerelda.com/internationalfilm/internationalfilm.html The Director's Series Bell & Howell cameras are later, better quality 8mm cameras that also take Double 8 film on spools (some models are also 'magazine' types, so watch out for that). I've got a spool model and was quite impressed with how steady the image was. If you're lucky the meter still works and you can use the camera set to automatic exposure. No batteries required, even for the motorised zoom! One of these cameras (a magazine version) was used by Zapruder to film the Kennedy assassination. Super 8 is a far more popular medium than the older Double 8 (also called Standard 8 or Regular 8), you have much more film stock choices and the cameras are almost all reflex viewing and battery powered and easy to use. But I personally love Double 8 for a number of reasons.
-
The 50ft magazines that camera takes are a pre-loaded sort of cartridge, a bit like how you get Super 8 film. They haven't been made for decades, some people re-load old ones with new film but it's not a simple thing to do and you're limited to 2R (perforated on both edges) filmstock. So unless you're a collector or a somewhat experienced enthusiast willing to spend hours fiddling in the dark those old 'magazine cameras' are pretty worthless. The main reason people might buy one these days is just for the C-mount lenses. You're better off getting a camera that takes 100ft daylight spools which are still readily available. Something like a Bolex H16, Canon Scoopic or Krasnogorsk K-3. More professional film cameras use removeable, easily loaded film chambers for larger loads (often 400 ft for 16mm) that are also called magazines and are part of the camera kit, so the term can be confusing.
-
Hi Gregg, yeah I'd say your adapter would be for a camera, there's no use having a lens mount offset for a collimator or test projector. Pretty sure Eclair would have made the system first.
-
My workplace Chrosziel auto-collimator and lens testing projector use the ACL TS mount to attach different lens mounts. In my workshop I've got Chrosziel (or ACL) adapter mounts for every kind of lens I might typically work on - PL, Arri standard and bayo, Aaton, BNCR, OCT 19, C-mount, D-mount etc. Chrosziel also make adapters for still photo lens mounts - Nikon, Canon, Leica and Olympus. See: http://www.chrosziel.com/data/chrosziel/produkte/documents/Mounts_for_test_equipment.pdf It's precision test equipment, so probably not very cheap. Some of the adapter mounts I use I've constructed myself using a TS base (which is normally attached with 4 screws) combined with a mount from a junk camera or another adapter. Easy enough if you have access to a machine shop but getting the flange depth correct down to within 0.01mm can be tricky. The best solution to that is machining things slightly under tolerance (around 0.1mm under) and then having a camera technician measure the flange depth with the mount fitted on the camera. The discrepancy can then be accurately shimmed up.
-
Angenieux F. 16-44mm T 1,3 repairable??!!
Dom Jaeger replied to Jonas Roemmig's topic in Lenses & Lens Accessories
Yes using matte black paint or lacquer is a good trick for stopping a deep scratch or chip from refracting light into the lens. It works better for longer focal length lenses though. With short focal lengths at deeper stops and closer focus the front element surface becomes visible and you can see the black mark. It depends on the size of the scratch but at a focal length of 16mm you'd probably start to see a shadow stopped down past f/4 or 5.6 even at infinity. More forgiving at 44mm, where you'd likely be safe anywhere up to around f/11. So definitely worth a try. Aside from finding another junker lens with an undamaged front element that you can swap over, the only other possibility is to have the scratch polished out and then the element re-coated. But the scratch can't be too deep into the glass, and at many hundreds of dollars the cost is probably not worth it. If you do find a replacement front element I would recommend having a lens technician do the fitting, the lens will probably need some adjustment. -
Help! Trouble with Zeiss Super Speeds!
Dom Jaeger replied to Hannah's topic in Lenses & Lens Accessories
I would play with the setup and try to isolate the cause - use a black cloth like Gregg suggests, remove or tilt filters, place the camera in shade, shade the mattebox further with flaps or french flags etc. Is it only happening when you're facing the sun, is it every lens? -
Help! Trouble with Zeiss Super Speeds!
Dom Jaeger replied to Hannah's topic in Lenses & Lens Accessories
Most likely a reflection somewhere that lets you see back into the lens. Are you using filters? Are you shielding the lens with a mattebox or some kind of shade? Oily or otherwise shiny iris blades can also cause an iris to reflect internally under strong light. -
Hi Robert, Can't really help you there sorry. Sent you a PM with some options.
-
Arri SR2 viewfinder eyepiece, will it work on a 2C.?
Dom Jaeger replied to P Mitcheltree's topic in ARRI
Hi Paul, yes an SR2 eyepiece should fit a 2C. -
I think the brown gears are phenolic. According to the G16 manual the gearwheels and claw mechanism are lubricated with 'ASEOL' grease, but you could probably use other high-temp greases suitable for projector gear trains. This one is popular: http://www.ebay.com/itm/SUPER-LUBE-SYNTHETIC-FILM-MOVIE-PROJECTOR-GREASE-/150389549891
-
Thanks Pav, apologies David C :rolleyes: Sounds like it might be an easy fix which is a good thing.
-
Actually, thinking about it further, if the timing was out far enough it's possible that the preceding or following frame would get smeared as well, on the other side. I'm used to seeing small timing errors which happen if a belt slips a tooth or something and the smearing is far stronger on one side. Looking at the footage again there is a small break in the smear just above the point source which could be the shutter closing just near the end of the transport cycle. That would put the timing very far out, and underexpose the stable image quite a bit I imagine.
-
Well, to repeat what's been said, if the shutter timing is out you get a smear from the point source either up (if the film is being exposed as it is transported into frame) or down (if the film is being exposed as it is transported out of frame). The image is upside down if that helps to visualise things. I can't picture a timing issue that causes both ends of the transport phase to be exposed. It could be something odd like the shutter spinning way too fast I suppose, which might be possible with cameras that have a separate motor to drive the shutter. If the shutter isn't spinning at all, the film is still being positioned and held steady for about half the cycle, but will smear both up and down as it gets transported in and out of frame. Total exposure will only be one stop over (double the time), assuming a 180 degree shutter.
-
Looks like the shutter wasn't spinning at all. If the timing was out, as David mentions, you'd get smearing either up or down (depending on whether the film was being exposed as it was transported into the frame or out of it). The Ikonoskop is non-reflex if I recall, so you might not notice if the shutter wasn't spinning. If the camera seems OK I would examine the neg to make sure the issue is on the film and not a transfer problem.
-
I've got a Revere model 81 (Ranger) with a similar exposure guide printed on the door - eg "open shade on a bright day" is marked f 4. It mentions that the guide is for "all colour film and any film rated 10 ASA or Weston 8". Model 81 came out in 1949, while your model 88 came out in 1940.
-
That one might sort of work, but there are issues, like the height of the optical centre as Brian mentions, and the fact that the optical centre is also offset from the camera's mounting threads in the base. A few measurements to keep in mind: SBM height from base to lens mount centre is 107mm. So if the lens is say 100mm diameter (50mm radius) at the point of support, the lens support needs to rise 57mm above the camera base. The rods are mounted below the camera base, on that example maybe 50mm below, so the total rise you'd need (without doing some sort of modification) is over 100mm. You could choose a support point where the lens diameter is larger, requiring less of a rise, but the rubber strap might not reach around. The lens mount centre is offset by 24.7mm from the rear 3/8" camera securing thread, or 18.7mm from the front 3/8" and middle 1/4" ones (if I'm reading the dimension specs properly). So you really need to be able to shift the camera (or lens support) to one side. Either that or mount the camera/lens at a slight angle, in which case the lens support will sit a little skewed under the lens. A little creative modification might be in order!