


Robino Jones
-
Posts
158 -
Joined
-
Last visited
Everything posted by Robino Jones
-

WTB: Kodak Vision3 5207 + 5219 *ASAP*
Robino Jones replied to John Tashiro's topic in Cine Marketplace
Contact ReelGood film Monday am- http://www.reelgoodfilm.com/- 1 reply
-
- 1
-

-
I power my AATON 35III (rated 10-14V, same as XTR per your info) using a couple of these batteries: https://www.bhphotovideo.com/c/product/1048193-REG/bescor_fp_12vatm_12v_lithium_ion_battery.html On my last shoot we shot 7 magazines and powered the tap using a single battery. Lasted the entire day. 11.4V was the charge left on the battery when we put the camera back in the case at the end of the day. I wouldn't use 14.4V batteries on older film cameras like AATON rated 10-14V because on a full charge these batteries sometimes can go up to 15+V. I'm sure there is some tolerance built in but it's not worth risking it in my opinion. I have no experience with the BL but quick search says they are 12V.
-
Eastman Double-X 7222 16mm home processing
Robino Jones replied to Marco Leoncino's topic in Film Stocks & Processing
According to Massive Dev Chart, DoubleX in D76 1+1 (ISO 250) should be 10min at 20C DoubleX in D76 1+2 (ISO 250) should be 12min at 22C DoubleX in D76 1+1 (ISO 250) should be 10min at 20C DoubleX in D76 1+3 (ISO 250) should be 20min at 22C You should get this app, it's the best I know out there for recipes. I use it on iOS but i'm sure it's on android as well. They also have a website and this is what they have for 5222 in D76 https://www.digitaltruth.com/devchart.php?Film=%Kodak+Double-X%&Developer=%D-76%&mdc=Search&TempUnits=C&TimeUnits=D -
How to Process 35mm Colour Kodak Negative
Robino Jones replied to Daniel Porto's topic in Film Stocks & Processing
I hand process 35mm color film in b&w developer sometimes and it has a really cool look. For special projects only, I wouldn't process large batches by hand if you need consistency. I use 5207 and 5213 and you can process up to 100' in a lomo tank. You can also use little 35mm still film stainless steel reels for testing small batch and fine tune your chemistry. For the remjet here's how to take care of it. I used to do the baking soda / hot water trick and it was not good, was really hard to do but with this recipe, you dip the film in the solution and then rinse with water, the remjet comes out automatically like magic. To create the Remjet removal solution you will need these: - Sodium sulfate https://www.freestylephoto.biz/101340-Formulary-Sodium-Sulfite-1-Lb - Sodium Hydroxide https://www.lowes.com/pd/Roebic-Laboratories-Inc-32-oz-Drain-Cleaner-Crystals/4751600 - Sodium Metaborate (Borax) https://www.freestylephoto.biz/101285-Formulary-Sodium-Metaborate-1-Lb 1. Bring 900ml of water (filtered is better but not required) to a boil. (I put 900ml so if you let the water boil by mistake you'll have the required 800ml left) 2. Pour 800ml of the hot water in a beaker 3. Add 1 to 2 grams of Sodium Hydroxide and stir until it’s completely dissolved. 4. Add 100 grams of Sodium Sulfite and stir until it’s completely dissolved. 5. Add 20 grams of Sodium Metaborate (borax) and stir until it’s completely dissolved. 6. Fill the beaker with water until you reach 1000ml 7. Done! Bottle the solution. I don’t use it warm - just room temp, same as your processing chemicals. To use it, simply pour the solution in your developing tank before you start processing and let it sit for 30sec. Agitate a little and pour the solution back in your bottle - that stuff is reusable. Then fill your processing can with water and agitate a bit and pour out. The black remjet stuff will come out. Rinse and repeat 2-3 times and you’re done you can now start processing. -
AATON 35III Single Frame / Stop Motion issue with split frames
Robino Jones replied to Robino Jones's topic in Aaton
Here's an update - I did 2 tests this morning. First is outside and had to put on the mattebox because I needed a lot of NDs for the 1/4th exposure.To block the light between frames I taped a flap of duvetyne and was moving it out of the way when taking frames. This was a fail and I still saw the split screen. (i was expecting it..kind of ? For the second test I did it inside and used the lens cap on the lens to block the light between frames - and it worked! The table was lit by the window light behind me and that's why you see a bunch of shadows moving but there's no split screen. Shot the tests on leftover 200T (5213) and hand processed it in Ilfosol 3. I looped each sequence twice since it's very short, I can only load around 3.5feet on each "still film" stainless steel reels. So I'm happy - my camera is fine and as Dom and Webster said, it's because of the mirror shutter. If I need to shot some stop motion i'll just make sure to do it in controlled lighting and use the lens cap. Thanks for the help guys, scan is below: -
TMAX 100 AND 400 Special Order?
Robino Jones replied to Scott Pickering's topic in Film Stocks & Processing
I just put some still film in my camera and it advanced nicely. Is there any color reversal still film in bulk these days? That would be amazing. -
AATON 35III Single Frame / Stop Motion issue with split frames
Robino Jones replied to Robino Jones's topic in Aaton
Yes It makes sense that this happened in my test since the light panel I was drawing on was very bright and shining directly through the lens. Must have been waiting at least 10 seconds min between frames.. I might design an automatic capping shutter for my lenses if my next test works (by putting lens cap on between frames) -
TMAX 100 AND 400 Special Order?
Robino Jones replied to Scott Pickering's topic in Film Stocks & Processing
My AATON 35III movement doesn't use registration pins, it's a single pulldown claw - would it work well with KS perforated film? - Would be great to be able to shoot some ILFORD BW or TMax for specialty projects. And what about remjet pass at the lab - would that hurt the non-remjet still film? -
AATON 35III Single Frame / Stop Motion issue with split frames
Robino Jones replied to Robino Jones's topic in Aaton
Ok yes that makes sense. So my camera is fine, I'll shoot another test with cap on between frames and see what happens. to be continued. -
AATON 35III Single Frame / Stop Motion issue with split frames
Robino Jones replied to Robino Jones's topic in Aaton
I don’t recall - this was done a while back. But it was shot in a very dark room. Only light was a light panel in front of camera that I was drawing on.. I typically close the viewfinder from the toggle on the camera body under the handle. My bet is that it was closed and for sure there was no light hitting the back of camera / viewfinder because the room was in the dark -
Shot a stop motion test using the AATON 35III handgrip which serves as a simple intervalometer with 1/4th exposures and the frames are split in half horizontally. The top part of the frame has a different exposure than the bottom half. See a video of the issue here: After some research I came across an old CML post about film “time-lapse issue” where someone is describing something somewhat similar to me. https://www.cinematography.net/edited-pages/timelapse_problems.htm The issue in this thread is caused by light leaking. My camera works great at all frame rates, I only see those split frames when I take single frames with the handgrip or when I flip the switch to test mode to move the mirror out of the way. To verify that the single frame was exposing / working correctly, I sharpie’d some negative and looked in side the mount to see if everything was ok and it seems fine. See video of this test here: As you can see the film is not moving during exposure. If anyone has any insights on this, if my camera is defective or if I need to figure out light leaks please let me know!
-
Phil Tippett interview, Bolex + Auricon
Robino Jones replied to Webster Colcord's topic in Please Critique My Work
Love this! -
How should I rate expired EXR 50D and Vision 1 250D
Robino Jones replied to Jake Wolfert's topic in Film Stocks & Processing
I would say the bare minimum is 1 stop of overexposure and 2 stops to be sure. If you have enough stock to do a small test that's the best way to approach it, just shoot a chart exposed in the middle, +1, +2, etc. Refrigerated 50D will hold really well, the 250D not as good but still nice. I have some 5247, 5248 older than yours and it looks amazing - it was frozen. -
DIY 2-Perf Techniscope conversion? For Real?
Robino Jones replied to Samuel Berger's topic in General Discussion
I would be very curious to do a test with my AATON 35III just for fun. I don't have my camera with me at the moment but I saw an old post of someone selling a Aaton 35III and he listed a "1.85:1 gate mask" as part of the package. see post here: https://steadicamforum.com/index.php?app=forums&module=forums&controller=topic&id=15503 Anyone knows if there's a slot on the AATON 35III for gate masks? If there is I'm pretty sure I could build one. -
Reading about your K3 issues brought back some bad loops PTSD. Yes I think getting another body might be the solution or even better, get a Bolex equivalent, I hear they are much better. I abandoned trying to solve the issue after I disassembled the entire thing, really getting in it and still could not figure it out what the problem was. Not worth the time. I was going to throw it down the balcony but I opted for the trashcan instead where it belongs. I kept the lens and the K3 metal plate as souvenirs. Best of luck to you, I know how frustrating it can be.
-
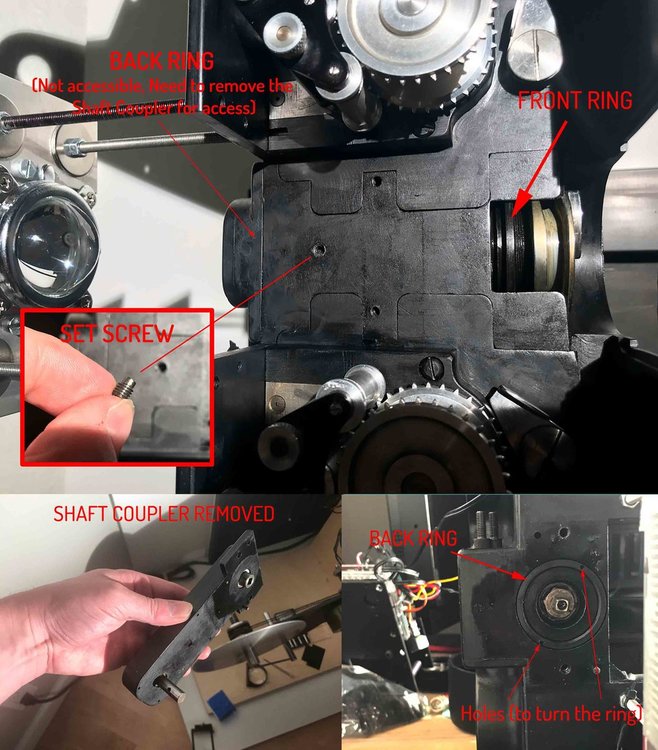
Update: I's fixed! Richard guided me through email and I was able to adjust my Vistavision movement pressure. Here's some information if anyone in the future need to adjust the movement pressure for ACME projector, pretty sure Oxberry works the same way. Everything needed is on the CAM block. There's a set screw on the side of the cam block, you have to loosen it to adjust the cam block. Basically there are 2 rings, one behind the cam and another one in the back. The front ring is easily accessible when removing the movement, it's right there.. the one in the back you have to remove the shaft coupler from the back of the CAM block and the ring is there. It's a ring with 2 little holes so you insert a small screw driver and can rotate it. Doesn't look like something you can adjust but once you insert a tool in one of the hole the ring turns very smoothly. You can now move the cam back and forth, forward increases the pressure and back loosens it. Front ring is more like a guide, once you set the pressure needed you turn the ring to set the position and the back ring allows you to move the cam block back and forth. Once everything is set you tighten the set screw on the side of the cam block and that's it. See image for details.
-
The bearings are fine, I have many movements (vista vision and a couple 4 perfs) and they all have the issue. The clamshell is not going down enough, that's the problem. It still works ok, vertical and lateral registration is perfect, issue is the film is not held tight enough so one corner flaps a little bit when playing back footage. Small update - I talked to Richard Bennett at Cinema Gear and he said it can be adjusted but that once adjusted, Only the movement used during the adjustment will work properly. Richard is very busy right now but will get back to me next week. If I could figure it out sooner would be great, some of my scan are a little sloppy because of this.
-
I need to adjust the cam on my ACME optical projector to adjust the pressure in the shuttle movement so the film is held tighter in the gate. If anyone around here knows a technician familiar with optical printers please let me know. thanks!
-
Got it from Alan Gordon via Clairmont. It's a 4 Perf.
-
Thanks for the info - I don't hear any weird noises, sounds like a nice even purr. I never adjusted the pitch because I never heard anything strange. About the steadiness, I never found my footage to be rock solid, it always slightly jitters from time to time and my last roll was scary with lateral and vertical unsteadiness. Since getting that last roll I really looked into the loop situation thinking it might have been the source of my issue. Also this last roll was expired and stored in a very cold fridge and I shot it maybe 1 hour or less after taking it out. Maybe that had something to do with it. Anyhow - I'm picking up a bunch of test rolls from Fotokem later this afternoon, I shot all different loop sizes, testing all my mags etc. And yes I think Andree will tune it up and figure out my issue, he seemed very confident about it.
-
Looking for people with experience loading the AATON 35-III and what loop size you use. I've been told when I purchased my camera that the loop size was around 2 fingers but after talking with other people I got conflicting information, some say it's 3 fingers, some 2 loose fingers. I never found my camera to be the steadiest, not terrible but not great. This is the information from the the AATON manual "The correct loop size can be adjusted, by using the loop tool delivered with the magazine. If you cannot insert the tool between the mag pressure plate and the film, you need to enlarge the loop. To do so, push the disk marked "push for loop adjust" with your right thumb while holding the film against the pressure plate with your right forefinger. Using your left hand rotate the upper magnetic wheel clockwise until the loop length allows you to insert the tool." During my research I came across a picture of the actual loop tool and also a technical drawing from AATON showing the loop tool on the magazine. See them below: The strange thing is the picture of the loop tool appears to be taller than in the technical drawing. These images got me thinking so I printed the technical drawing to scale and using a little piece of sheet metal I built ( hammered ;) my own loop tool with the exact dimension found on the technical drawing. When using my custom tool the loop size is a "tight" 2 fingers loop. See images of my custom tool below: I will be dropping off my camera to Andree Martin at AM Camera after the Holiday for a checkup and tuneup but in the meantime, has anyone seen or worked with an actual loop tool before and if so, is my tool accurate / the correct size? ..If you haven't - what size loop do you use when loading?
-
Kodak 5248 EXR 100T in daylight
Robino Jones replied to Jay Young's topic in Film Stocks & Processing
Nevermind I saw on the Vimeo description you metered at 50. -
Kodak 5248 EXR 100T in daylight
Robino Jones replied to Jay Young's topic in Film Stocks & Processing
Hi Jay - looks great - did you expose at stock speed / 100ASA? -
Thanks Tyler - I just tried moving the pin in and added more pressure, tried different levels of pressure but the claw is still is skipping some perfs, Maybe I should bring it - i'll call you.
-
Thanks Mark - That's a good guess and I tried it the correct way as well - it still is loosing the loop either way.

