Steve Broback
-
Posts
32 -
Joined
-
Last visited
Everything posted by Steve Broback
-
Repair manual for the 5008 is in this dropbox folder: https://www.dropbox.com/sh/wsz7x0joghgjvja/AADq-qeOV0PFjSrzzb5g6m9qa?dl=0
-
My guess is that the plate under the leather is threaded into the body like the later batteries. If there are no holes in the cap you could try drilling a couple so you could use a pin wrench to unthread. Even with holes in the later caps, these are almost impossible to unscrew due to aluminum to aluminum corrosion. Good luck!
-
I disassembled one of these a few years ago. Photos are here: http://imgur.com/a/If73W Hopefully these will be some help. Steve
-
Dom - Take a bow? Your piece is a real tribute to the beauty of this camera. Steve
-

Some general beginner-Questions about S16 Filming
Steve Broback replied to Jan Jessen's topic in 16mm
The grease in these cameras turns to a solid over time. If you press the release button while heating up the inside with a hot air gun or a hair dryer set on low - it just might start running. Good luck! Steve -
Does anyone know if this needs to be lubricated? If so, with what? I am tempted to use some McLube which dries completely and is very "fast". Trying to get my R16 back together - I had it apart to clean the glass in the finder tube. I couldn't find a way to get to them without taking EVERYTHING apart. Thanks! http://imgur.com/a/jv6rO
-
Fixing a broken Bauer battery compartment door
Steve Broback replied to David Nethery's topic in Super-8
A long time ago, I made a simple plaster casting from the broken parts and cast a couple of polyester resin battery doors. They functioned but were crude. These cameras are beautiful and worth repairing - even if the spares cost more than the camera. -
It looks like my file didn't attach. I posted two magazine loading files to the yahoo cinecamera group under files: http://groups.yahoo.com/group/CineCamera/files/ I have reloaded quite4 a few magazines and they have all worked just fine. It does give you a chance to use some really compact 16mm cameras.
-
I have loaded magazines following these instructions. It does help to make a little flatbed winding board to load 50' spool.
-
I will check mine when I get home but I am pretty sure that the batteries fit in a plastic case with pos/neg contacts. You might have to buy a battery holder and solder some contacts on it - or return it and buy one that includes the battery case. Steve
-
Beaulieu 4008 Battery Dummy 3-pin DIN socket PIN-OUT ?
Steve Broback replied to DGB's topic in Super-8
David - I have only used the R16 but I do have a remote battery holder. When I plug the battery pack for the R16 into the remote holder I get the correct voltages at all of the pins so yes, this appears to be a Beaulieu standard. The R16 manual states that pin #1 is negative and pin #3 is positive. Apecity.com has 4008 user manuals as well as the 4008 repair manual if you want to go through the wiring schematic. Have fun! Steve -
Beaulieu 4008 Battery Dummy 3-pin DIN socket PIN-OUT ?
Steve Broback replied to DGB's topic in Super-8
David - Looking into the socket - The 3 o'clock pin is the ground, the 12 o'clock pin is 3.6 volts for the meter and the 9 o'clock pin is 7.2 volts. If you have a Beaulieu battery - the center is 7.2, the middle is 3.6 and the outer ring is the ground. ....hope this helps. Do a test before you solder anything to make sure it works. I have built a few battery packs for the R16 with 6 AAs tapping 3.6 volts at 3 batteries and they work great. Steve -
My daughter just placed an order with Kodak today (1(800)621-3456) for some 16mm Tri-X reversal in 100' loads. With her student discount she paid $18.34 a roll. Kodak still gives students a great discount!
-
I just noticed that the Kodak online store stopped selling film as of October. Too bad!
-
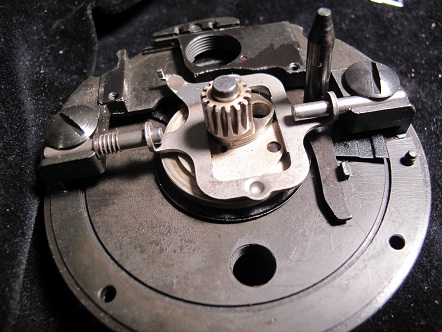
Having the exploded view and instructions was a big help - thanks again Dom. The oil on the shutter shaft had dried up on my DL. Once I got the shaft cleaned and some fresh oil on the shaft it ran fine. I couldn't resist putting a little grease on the cam that operated the pull-down claw - a little grease on the plate that moved the claw towards the film as well. There are 5 parts with springs so you do have to pay attention to this or they will take off across the room.

-
I happen to have a 70DL that got stuck recently as well. Having a non-functioning camera at home always kind of eats at me. Thanks for the useful information Dom - as always. I will be getting the little wrenches out as soon as I get home.
-
I recently took apart one of my variable speed motors to see if I could get it to work again. Photos here: http://imgur.com/a/OiuGU#0 It turned out to be a soldered connection on one of the wires so it was simple to fix. Other repairs to the motor may not be as easy but assembly is very straightforward so if your motor is dead - it is at least worth a look inside to see if the problem is an easy fix - or not. Enjoy! Steve
-
Kodachrome 40 home developed and scanned HD
Steve Broback replied to Niall Conroy's topic in Super-8
...second that. I am interested in your caffenol formula as well as your DIY telecine setup. I have lots of out dated kodachrome - I wonder if it would still be usable with this process? Thanks, Steve -
Zac - Some old projector cords are pretty close to the Arriflex plug. I made a cut between the contacts, inserted a piece of rubber to get the right spacing and then taped the plug back together. I also had to spread one of the contacts slightly to fit over the larger male pin on the camera. I use this cable with one 9.6 volt RC battery (suggested by Tim Carrol) and it works great and stays in the plug socket just fine. Steve
-
Thank Dom - I appreciate that! You also make a good point about the potential dangers of soldering the batteries. I did solder directly to the batteries (Ni MH) but did some research first. The batteries stayed cool and the soldering iron was only on the contacts for a moment so it did seem successful. The new wires are also very securely attached to the batteries. That being said, it would probably be a good idea to wear a face shield next time. When I started this project, I assumed that new batteries were unavailable. I discovered yesterday that they are still available from Beaulieu but they are not cheap - close to $375 each. Steve
-
I have two grip handles for the R16 but no batteries so I decided to make a couple of batteries from scratch. The handle contains 6 - AA batteries soldered together with taps for 3.6 volts and 7.2 volts. The contacts are stamped from copper sheet, the contacts are contained in a Delrin housing that is threaded on one end to fit the grip and internally threaded on the other end to contain the contacts. The battery housing is machined from aluminum tubing with the ends knurled for grip - similar to the original. I could probably trim about 1 CM from the total length -I wasn't sure how much room the wires would take. Yes - it works! Photos here: http://imgur.com/a/mis7S Steve
-
There is a nice vintage movie showing the threading of the cine special: http://archive.org/details/0892_Threading_the_Cine-Kodak_Special_01_10_36_00 I also have a cine special parts manual from the 50's. If anyone wants a copy - I would be happy to send a PDF by email. Steve
-
Hi David - That is the "crux" of the operation. I ground down an 1/8" drill bit to fit the pin and supported the shutter button with a block of wood that I had drilled a hole in for the pin to exit. It was still a little tricky to drive out the pin and I broke the punch a couple of times before I got the pin out. After the shutter button is off the camera, the case come apart with a little light coaxing. Steve
-
-
Thanks for posting this Simon - I thoroughly enjoyed it. I am going to go home and do the test with the film snippet in the pull-down mechanism. I haven't figured out how to adjust the governor - there is an inspection port on the top of the cine special that appears to allow access for adjustment but I'm not sure what to do there. One of my cine specials runs a little fast. Steve