Stephen Sanchez
-
Posts
282 -
Joined
-
Last visited
Everything posted by Stephen Sanchez
-

Variable Electronically Diffused LED Panels
Stephen Sanchez replied to Jordon Pollard's topic in Lighting for Film & Video
No experience in Florida. We don't have specialized stuff like that (Hive Plasma lights, Grip clouds, Softsun, etc.) If you want users, I'd search Instagram for tagged gaffers and contact them. It may benefit to contact Rotolight and ask for known users for research purposes. -
Variable Electronically Diffused LED Panels
Stephen Sanchez replied to Jordon Pollard's topic in Lighting for Film & Video
Advantages. Their greatest advantage is the output remains, whether you want warm or cool light (as opposed to losing output by gelling). It keeps you from buying/renting/storing dedicated fixtures each for tungsten setups and daylight setups. The RGB lights can match to the surrounding atmosphere, say to the green spill in a jungle or the green cast of fluorescents. — Disadvantages. They are not spot-floodable like our traditional hotlights. Advantages. Diffusions are great at scattering light (making soft light). Can be cut to specific sizes, say for practicals. Disadvantages. The frames require storage. 216, 250, 251, 410, Hampshire frames in 4x4, 2x3 and tubes take up space. If you've selected the wrong one, it needs to be replaced. They cut light, but that is physics and no way around it. I assume you mean Rotolight and Zylight. Advantages. I can see the adjustability used for a panel light's version of spot-flood. This would allow the panel LEDs to be fitted with directional reflector cones like an Astra or Digital Sputnik for the spotty throw, and the active diffusion pane inches ahead to intercept the light for scattering. As for Rotolight's Titan X2, I can't tell if they did this. This would be awesome as an attachment on an Astra! Disadvantages. None really. I can see newer shooters thinking they can create soft light by simply cranking the diffusion knob, and that's not true in this case, as the panel and diffusor are the same size. So I see potential for confusion, or worse, marketing misinformation. In all the gizmos that technology has popped out, few of them have 1-for-1 replaced the prior equipment. Most of them open new doors. It's important to remember that diffusion is used commonly in 4x4, 6x6, 8x8, 12x12 frames. A 1x2 panel, whether a Skypannel or Rotolight, is not large enough for naked use if you need 4x4 sizes. Some people may place diffusion on a fixture, but that will spread it more, and only soften minimally. So no, I don't see it replacing anything. I see a 4x4 or 6x6 size enticing. But that would still need power, and delicate grippy hands, which I don't think is feasible on set. Also, such large sizes would probably be so expensive that they'd never get rented. BUT. If one 6x6 active diffusion can replace 1/4, 1/2, and full grid, it may be advantageous. But even in terms of one active frame replacing the 4x4 frames of 216, 250, 251, opal... Those frames will still get used on set at the same time. So again, it wouldn't replace the 4x4 frames either. Unless storage space was a concern, like with an owner-operator who only ever uses one frame and doesn't need to truck 6 with him up an elevator. Unknown. I live in commercial land away from L.A. Here, I've never encountered it. I'd love to see them as a softbox add-on for Astra panels and anything else that has directional spot LEDs to give them spot-flood! The power can plug in-between the main cable and the fixture with a new type of siphon-like cable. That's a great question. Again, it might be best suited for owner-operators who will take care of their equipment. This is what makes the Litepanels Gemini attractive to owner-ops. They're less robust than a Skypannel but more affordable. Rental houses would see this stuff destroyed, folded instead of rolled, plugged in wrong, scratched, clamped, overstretched, baked in the sun, etc. Hope this helps. -
He's making a 4x4 space light or lantern. There are balloon lights that do the same. I'm not a fan of a silver card in the top as it will throw a lot of light back down at the fixture or whatever direction the angle of reflectance is. I'd prefer a styrene top. But then it would be like a booklight cube with lots of stop loss. I agree with Stuart on the direction those par lights throw. Every production has a budget, and every budget has solutions. Rosen has some really interesting techniques. Like his greenscreen exposure trick and the "double 85b", both I've wanted to give a whack at.
-
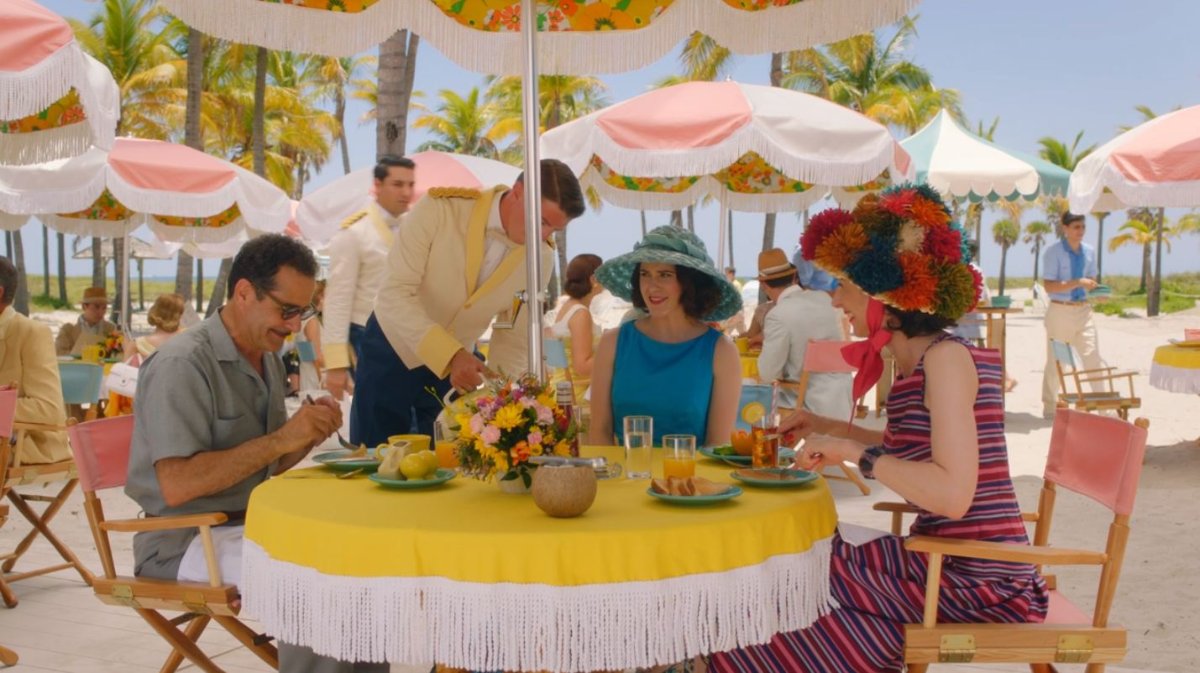
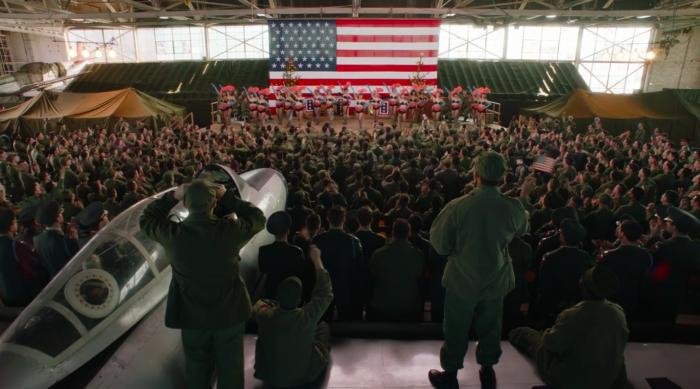
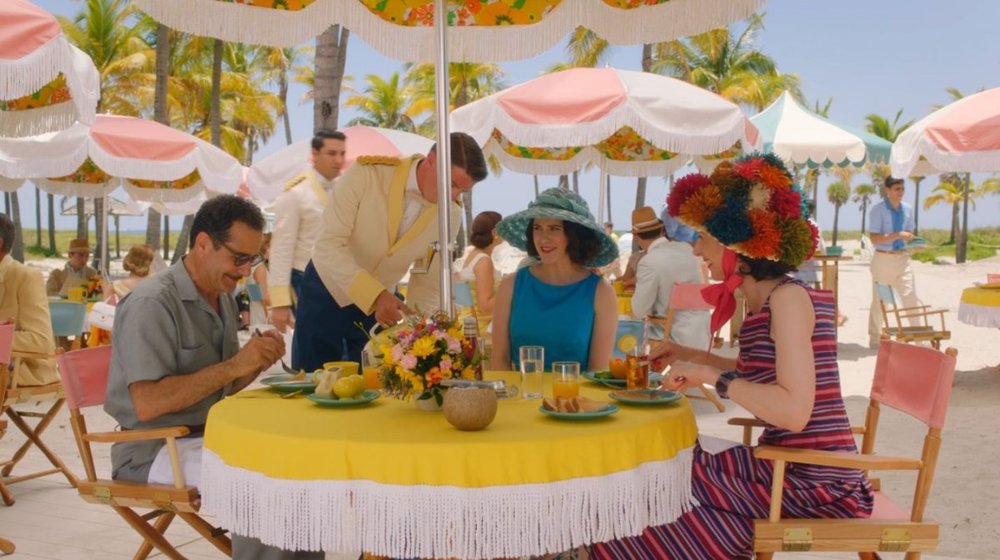
I intended to ask about these after watching Maisel S3 during the “great break” of last year. Hence the random timing. These shots were my favorite to dissect. Thanks in advance David. The aircraft hangar in S3 E1. The stage exposure. Was that a 6x20 balloon light overhead? A tube perhaps at the edge of stage? Is it painted out in post? It seems to be well controlled off the rafters overhead. For the umbrella scene S3 E6. The foreground is under what appears to be a 60’ overhead. How did you expose under the umbrellas so well? To add, two of the subjects are wearing hats! At least Midge’s face should be so shadowed by this point but they have a great exposure. I was so impressed upon seeing this. Was it simply an ultrabounce on both sides of camera? On the windy boat S3 E6, it appears like a somewhat overcast or wispy day. What was the plan if the sun had been out? Expose for the fill and let the sun burn on surfaces? Expose for the sun and let the faces fall dark? Being so windy and unlevel I can’t imagine a sound way to rig fill cards without problems. Or would contrast get lowered in post?


-
How to avoid Light in Frame !!
Stephen Sanchez replied to Saikat Chattopadhyay's topic in Lighting for Film & Video
You're concerned that moving the exterior lights that will break continuity with the other shots? My response to that would be yes. But that doesn't mean it will be obvious. Being the DP, you are the caretaker of the image throughout the show and must make sure that the different shots seem like a believable space. I cheat light positions all the time when repositioning. It's possible to put yourself into a position in a scene where a shot can't match the others because you had to remove the lights. So, any coverage directions should be considered before lighting so that doesn't happen. One way to give yourself a safety net is to light for the widest shots first so that all the tighter stuff shot later matches. Consider the sun, of course. Benefit yourself as much as you can, but be flexible. Sometimes the schedule doesn't allow you to get everything you want, so prioritize the most important or widest shots during the best time of day for your angles. Or modify the bad sun times with rags or flags to cut it off your windows. -
How to avoid Light in Frame !!
Stephen Sanchez replied to Saikat Chattopadhyay's topic in Lighting for Film & Video
If you want to avoid blown out windows, it's an exposure balance you need to achieve. This is a solution you find by taking your location, and planning for the sun's position and the amount of exposure your lights offer. Something that I do when windows are in the shot is set the iris to expose for the window at a range of detail I like, then light the frame to meet the window at a pleasing level. If it's your lights that are blowing out the windows then turn them off. -
How to avoid Light in Frame !!
Stephen Sanchez replied to Saikat Chattopadhyay's topic in Lighting for Film & Video
I'll preface by saying that every category of cinematography has different priorities with the image. Truly. Fashion likes flat unrealistically bright lighting and windows can blow out if they want. Commercials like well exposed perfect representation images, drama can like anything and is usually contrasty. This is a wide generalization. To compare. My profession is mass-market commercial (infomercials), with non-dramatic happy perfect scenario images. The windows are never blown out, and they contain detail on the edge of clipping. I couldn't get away with the church shot you described (window slats being closed down) because it detracts from the appeal of the church, which are usually beautiful inside and out. A dramatic piece will be different. Fashion will be different. So, it depends on the project and it's intended audience. What I mean is there is not one solution for a specific scene that fits all categories of imaging. As far as my take on the subject for my field of cinematography. I'd have to open the windows and keep the lights out of frame. For the interior shot that's easy, but when you take a shot at the windows themselves, the lights will have to get pulled back. It's your job to make sure that it's a believable match between the two. But for my field of work, I can't get away with background lighting alone. I always bring something big and soft for the talent's face inside. There must be budget for that or the spot is a failure. If it's a choice between the window lights and key light, I'd have to choose keylight and bring something smaller inside for the background to "fake" a window push, and likely have to iris open more. But those are the priorities in my field. Music videos, PSA, a burger commercial, they'll all have different things they can get away with and things they won't let pass. I hope this helps. -
As far as color accuracy. I've not noticed a difference. LEDs and HMI are interchangeable. The early LED fixtures had some green to them, like Aadyntech Eco Punch (like a 2.5kw HMI). But 1/4 green might be desirable moonlight for you. I would prioritize output of the fixture and only use lightweight coloring gels. Any heavy gel will cut a lot of light. Outside, you'd be surprised how much a 1200 HMI doesn't expose to, when throwing it over a large space. Tungsten is already expensive on the amps, gelling them would need even more amps to reach the original output. I tend to shoot HMI naked and set camera to 4300k. This gives a half-blue HMI and half-warm Tungsten. And you don't loose exposure from gelling. 1200w is easy because they can be ran off a put-put Honda 2000 generator (But 3 Aadyntech Eco Punches can too!). And LEDs like Aputure 300D or Litemats make for great floor lighting on the faces and foreground. If I can have the choice I'd go with punchy LED. It's lightweight and fast setup/teardown and keeps generator cost down. I've wanted to try the Hive Plasma 1kw for moonlight, but there are none available in Florida where I work. Of course I shoot commercial. For narrative, you could start with this 4300 WB, then stray into the color effects category, with say 1/4 teal, 1/8th green or something like that. Or go with white moonlight. Have you tried white light yet?
-
I should probably clarify that the 4x8 cards and 4x4 were powered by HMI lights. A white card at night alone will do nothing without a source of light to collect from.
-
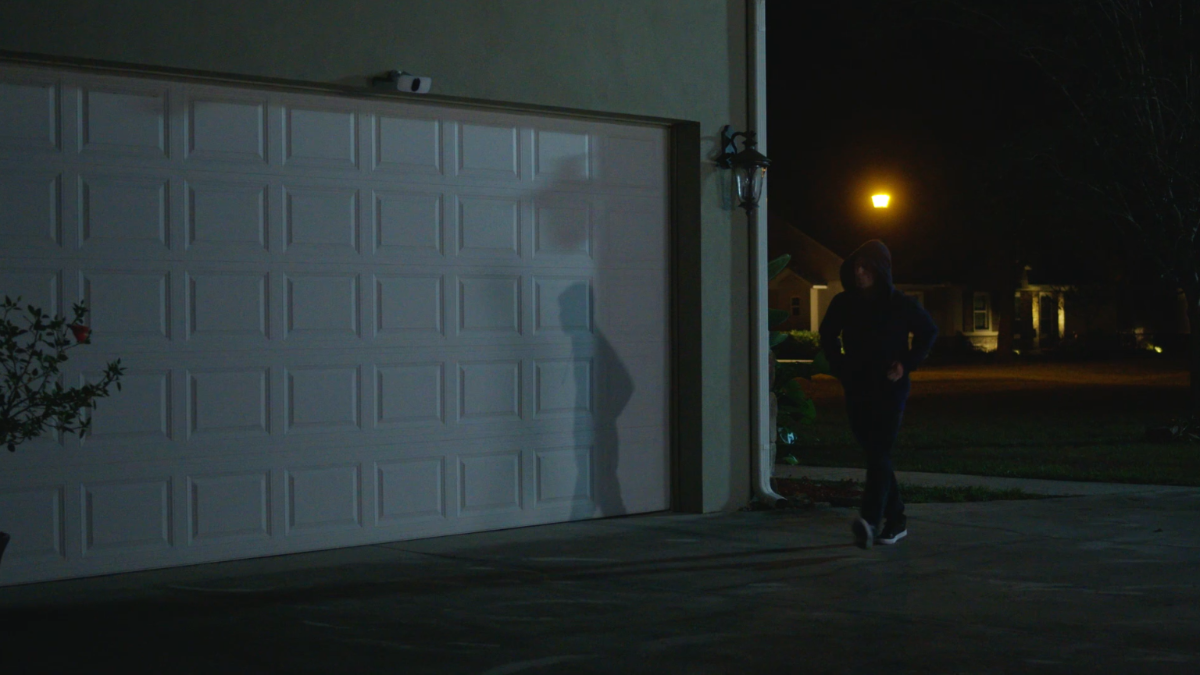
This is in the city? A neighborhood? A country road? The woods? If in the city, especially an alley, it makes sense for foreground moonlight to come primarily from top. But if it's in the country, or woods, a sidier back light lifted from ground can work as opposed to a balloon. Budget may prevent the mombo combos necessary to reach a bounce or diffusion high enough to sell large frames as moon light. A balloon could be either sidey or toppy though, so there's a plus! Construction cost, time, and materials is really your judgement call. Bear in mind possible problems that may arise on shoot, such as leaks or accidents setting it up. But if it's a small foreground, I've gotten away with filling two 4x8 cards (set end-to-end) from the side for fill, and let a harder backlight from up high serve as the moon (a 4x4 bounce). You can see the double shadows from the separate sources. Next time I attempt it, I'll try to lengthen the fill more to feather the softer shadow more.

-
Questions for other DPs (About lighting)
Stephen Sanchez replied to Stephen Sanchez's topic in General Discussion
That sounds like a great idea. In my experience super tight shots always take longer than budgeted. That brings up some great talking points. 1) budgeting time to light shots, 2) having to complete a task in unideal situations. I'll add that to the list. -
Questions for other DPs (About lighting)
Stephen Sanchez replied to Stephen Sanchez's topic in General Discussion
Satsuki, did you consider setting this up outside? Skylight will incident meter at f30 for me on a normal day. Use that for the back soft light, build a tend around the camera side with floppies (or dense diffusion rag), and set an HMI for the rim. The hard light will show the texture of the iris, which I liked from the first image you posted. That would be my go-to for the required stoppage. -
Questions for other DPs (About lighting)
Stephen Sanchez replied to Stephen Sanchez's topic in General Discussion
@Satsuki Murashige , fantastic! Actually this discussion is an example of what I plan to do live with a handful of other shooters. It's purpose is to show there are different viewpoints and solutions for a given scenario. Its secondary purpose is to foster conversation on lighting between DPs who don't get to watch others work. To get in on this dapple train, it may be that projectors are the best option for the cost. My stab at the solution would be expensive. Remember that branches are volumous, while cammo net is like a 2D plane. I believe it's the random stacking of arms and leaves that create the familiar dapple effect (coupled with distant light). I'd look to place loads of fake trees out of frame, or outside on the skylight if necessary. The closer a lights are to the trees, the blurrier and larger the dapple will be, so the lights would have to back off by quite a bit (a distance I'm not really sure about). Since you can't place lights 300ft in the sky, a condor with a span of mirror boards lifted up would do with a row of spotted lights at the bottom. Parabolic lights might be best. Softsun makes 3.5kw Parabolics. My hesitation on spotted maxis or wendys would be too soft of source, so the fewer fixtures the sharper the dapple. -
Lighting is a developed skill and there is no shame in recognizing one’s images lack for some reason. I’m collecting questions that new or inexperienced shooters would like to ask other well-lit DPs. I would like to point out that we are all inexperienced in some capacity, so those of you well-knowledged DPs, I would encourage some advanced questions from you. These questions can be hypothetical scenarios or problems from the past. Perhaps there is a subject you’ve always been curious about but never tested it or knew how to deal with. Perhaps you don’t know how to shoot black on black on black in a dark room. Perhaps you don’t know how to deal with dappling under a tree scene. How do you place lights in a room of mirrors? Why doesn't my setup look like your tutorial? If you could ask “the lighting gods” anything, what would it be? This is for a group video Q&A with other DPs on lighting approaches. It’s a test meet I’m planning on doing with the intent on providing experienced insight on lighting, the results of which I’ll share with the forum.
-
Brand Recommendations For Light Kit
Stephen Sanchez replied to Mark Coger's topic in Lighting for Film & Video
I'll third the Astras. The Pelican hardcase Robin talked about can take x2 25ft stingers and a tri-tap, including the kit stands, and still be under the 50lb limit for airlines! -
For vehicle travel, I typically do the same and keep a prebuilt camera and separate lens case. I use the Portabrace CC-22-PW Quick Draw. I keep an FS-7 with 8"rods + Matte Box (4x4 size) and goldmount plate + battery, all as one inside. The spare batts and charger goes in the outer pockets, with room inside for random other stuff like cleaning kit or separated follow focus. I've also ran a Fujinon 20-120 and 18" rods and it still fit. It is a softcase with rigid thick plastic walls, so it ends up being very sturdy yet soft.
-
Best all round on camera monitor?
Stephen Sanchez replied to Daniel O'Flaherty's topic in General Discussion
Atomos has a great image, but I've experienced many failures with those monitors. Setups and breakdowns every day, after around the year mark I've had 3 fail in some aspect. Two had SDI inputs stop working, one stopped powering on. Of one of the SDI failures, half the touchscreen stopped registering commands so you couldn't change the input to HDMI. Great monitors, but cheaply built, or not built for heavy use. Also, their focus peaking is unusable. I now use a TV-Logic F5-A. It's like a brick of armor and has the ability to roll your false color up or down the IRE range, which is useful. It's not bright under skylight. I use the sun hood that comes with it and a hat. -
Do you have a resource on this subject? I'd like to understand more on this.
-
Oh I never thought of it that way. So theoretically if you were to shoot 5500k with tungsten in studio and used a blue glass to correct the incoming light, that would present less noise?
-
Hmm. Would an 800w jokelo work better for you? Also, I've used the Andyntech Punch several times for sunlight. They are impressively spotty when bare. Shooting Sony, I have to gel them magenta.
-
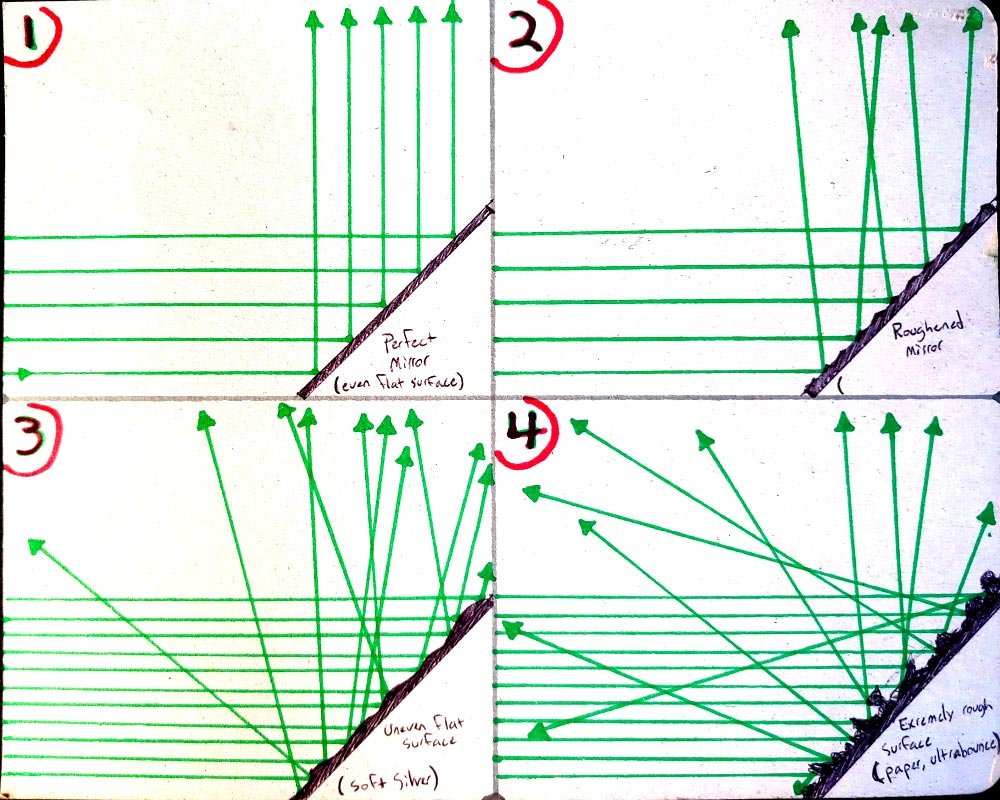
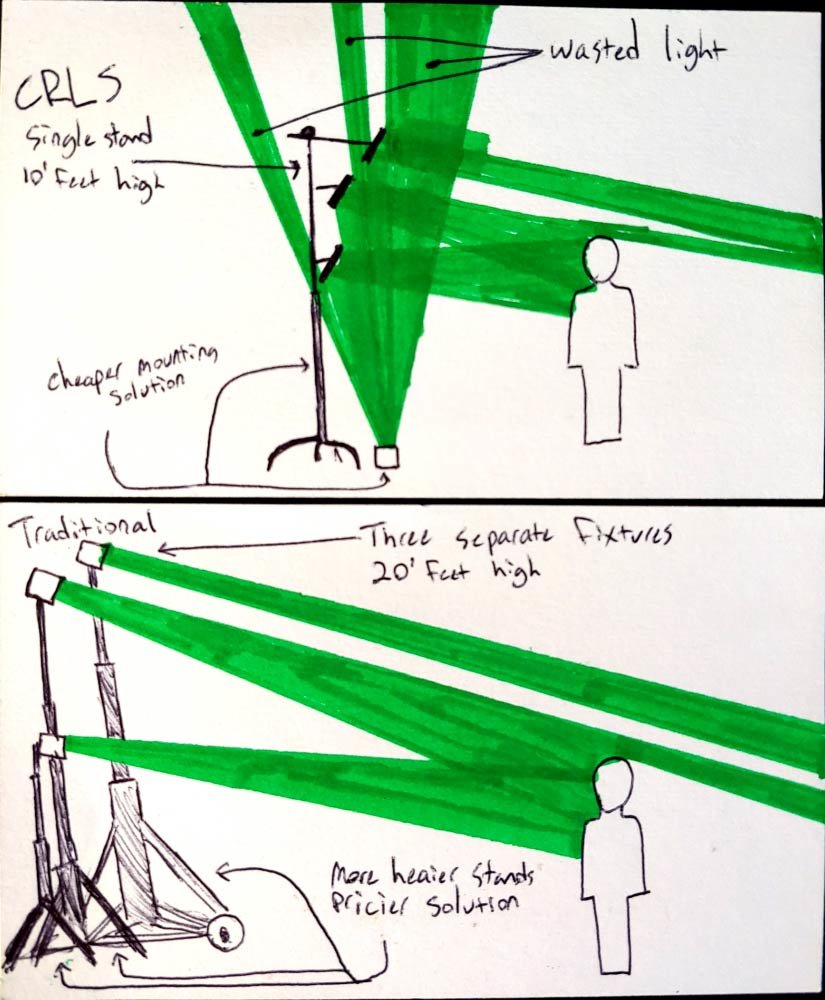
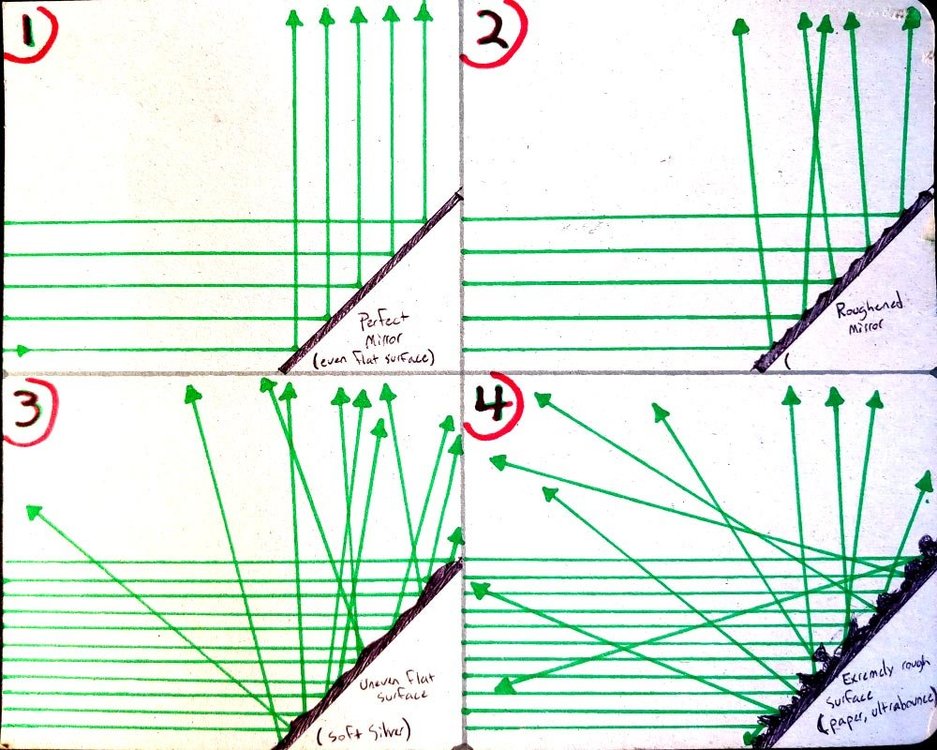
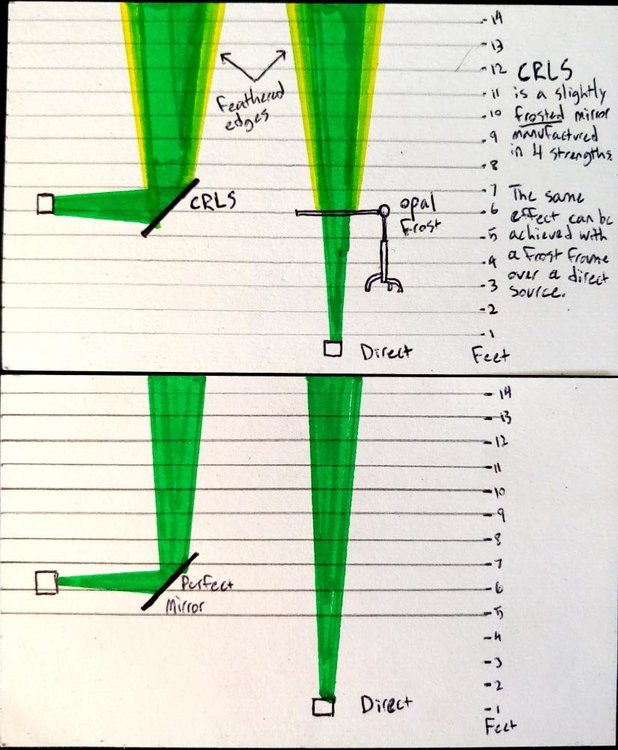
Understanding their properties will help you decide when and how to use them. I'll explain, because they are not ideal in every situation. CRLS reflectors are literally aluminium mirrors with a frosted surface. The frost ranges from #1, #2, #3, to #4, the latter being most frosted. Box 2 in the image is akin to CRLS. The light frost keeps the beam intact but slightly spreads it. Box 3 is a traditional insulation board, which is directional but wastes light in other directions. You can re-create the CRLS properties by using a mirror and draping frosted gel over the glass. Half-hampshire, full hampshire, and opal are good analogues. I've done this when I needed to backlight a steamer in a cramped bathroom. But mirrors are heavy and fragile. CRLS reflectors use a polished aluminium plate, so they are shatter-proof, but the exposed ductile aluminium can be easily scratched (they come in protective soft cases). Their precise manufacture and measured strengths of frosting makes them high quality and efficient reflectors. That is their main strength as reflectors. Unfortunately they're expensive, so they won't be replacing mirrors or the less efficient depot insulation boards. So that's their physical properties. Onto the use of the system. Using mirrors/reflectors is beneficial in situations where, 1) You need more distance in a small space, 2) budget limits gear rental to place light fixtures high. The benefit is you can place a large reflector out the window on a combo and avoid renting a crank stand for a heavy light fixture. Light adjustments can be done on the floor and make for a speedy setup. But it may just as easily be better to place individual lights. So it's use should be weighted before setup. The drawback of the system that Lightbridge promotes is it ends up being wasteful with light. Notice in the picture above how much light is collected vs wasted. In addition, that wasted light can hit a white ceiling or wall and provide fill to the room where it might not be desired. Also, the system promotes subject lighting from a single location. If all your reflectors are pulling from a light on the left of frame, you will need something on right of frame for a kicker, hair light, fill, etc. Keep in mind that CRLS is a frosted mirror, and is no different than shooting direct through a frosted frame. The benefit with a reflector is utility in a compact space, or having light appear from an unachievable angle. The benefit with direct through a frame is the frame distance can be adjusted on a whim. If you wished to bring the reflector closer to the subject to take advantage of the frosted panel, then both the light and reflector will have to travel, then the light will have to back off to maintain the original distance to subject. Neither methods are superior, neither are inferior. So don't try to work only within one "system." It will be limiting. With that said. Don't let other people sell you on a higher form of mysticism about these shiny boards. Remember that they are only frosted mirrors. A 50x50cm #1 reflector is NO SOFTER than a 50x50cm #4 reflector. Their softness is equal and shadow lines will not feather more. The #4 has a heavier frost, so the beam is diffused upon exit of the mirror. If you want softer, you'll need a larger board or move the reflector closer to subject.

-
Movable 4kw HMI on Dolly - Ideas required!
Stephen Sanchez replied to Montell Taraschewski's topic in Grip & Rigging
Well if you want it moving in 3D space, that is different from pan/tilt from a locked position. Its the same as faking sunset by slowly dropping a flag over a light vs lowering the light behind a flag. Mirrors. If you wanted a 3D move using mirrors, I can see an array of mirrors placed at your desired height (the angles must match), then placing a light on a doorway dolly on the ground and shooting up to the mirrors. This is a great way to get lights high like the sun without cranking the light up there. You'll want to spot the beam so as much of it passes into the mirror. It will continue to spread upon exit like normal and from the set's point of view, it will appear high in the sky. This might be great because you could use several smaller HMI shoulder-to-shoulder, and clock the side lights a few degrees away from center to collectively act as a single point source. Again objectively from set, it would be as if several HMI's were spotted in from far away. I imagine that full hampshire over each board will blurr the multiple sources as a single. At this point, the break in the boards would be the only limitation. A few branchasaurus setups might be desired to hide the breaks. What about strapping the light to a golf cart? Or better yet, someone's open-back jeep. I'm sure those rollbars can be mounted to. Ora crank strapped in the back of a truck with the bed sandbagged? Your key grip is going to vomit to these ideas haha. -
Movable 4kw HMI on Dolly - Ideas required!
Stephen Sanchez replied to Montell Taraschewski's topic in Grip & Rigging
Actually... 4 crank stands would make sense, as that would be a lot of weight to hump up by hand. -
Movable 4kw HMI on Dolly - Ideas required!
Stephen Sanchez replied to Montell Taraschewski's topic in Grip & Rigging
This might sound stupid. And it sure will look silly. But what if you underslung the 4k on a dana dolly and goalpost both ends with mombo combos? Then the combos can be saftey-lined from four corners. I'd advise from a grip on this idea. Then it could be operated from below from a wooden platform, or a plank of wood spanned across two ladders. Goalpost example below: -
Studies done on soft light & inverse square law
Stephen Sanchez replied to Stephen Sanchez's topic in General Discussion
Yes, and as you pull away from the sharp angle, the more the edges contribute to the illumination. That's my main suspicion on why falloff is so slight or plateaued up close. Up until a certain angle of view. I've related my observations to perspective. But you've put formulas and definitions to what I can only describe in concepts. I'll contact you at some point when my schedule loosens up.