


Nicolas POISSON
-
Posts
88 -
Joined
-
Last visited
Everything posted by Nicolas POISSON
-
Is This Camera Suitable for A Feature?
Nicolas POISSON replied to DorSinai's topic in General Discussion
Soderbergh shot Paranoia (released in 2018) with iPhones 7. Upstream color (released in 2013) was shot on a Panasonic GH2. Arround 1995-2000, there was a bunch of film shot on DV cameras (The Blair Witch Project, Festen, Dancer in the Dark…). I do not know how Chris Marker did shoot La Jetée (1962), but since this is mainly based on still pictures (except for a short scene), he could almost do it without any camera at all. There have always been movies shot with cheap equipment while much better cameras were available at the time. So yes, you can shoot with a DSLR and dream of an international distribution in theatres or on Netflix, as long as you produce a masterpiece… … Or just shoot with what you have. Considering your list, I guess you are rather in the "no budget" category ? Then the question is not whether this is acceptable for a feature, but what drawbacks you will face. I guess your lenses have fly-by-wire focus and aperture control. Most if not all Fuji X-mount still lenses do, as well as other brands AF lenses. Even if there are rings, they do not control physically anything. These are just encoders, and a stepping motor is set accordingly. From my little experience, this is usable, but the relationship between the rotation of the ring and the actual change in focus is not perfect. If you write down marks and pull focus once and revert back, focus should be OK. If you do this one or two more times, focus has started to shift. You need to set the focus again on a very regular basis. Note that this behaviour still occurs even if you set the ring control to « linear » (which is mandatory anyway, « non linear » is unusable with a follow focus). Using purely manual lenses with adapters will not have this problem. But you loose autofocus, built-in image correction, and Fuji-X lenses are usually great optically. Ring strength is a bit on the hard side. Using a follow focus will tend to raise or push down the lens, as the camera body is thin and the attachment to the rods will have sufficient flexibility to allow some deformation. This is more obvious at longer focal lengths. The workaround is to have something attaching the front side of the lens to the rods, so that mechanical efforts are balanced. The aperture is stepped and cannot be de-clicked. You just cannot modify the aperture while shooting, because it jumps in 1/3rd of a stop increment in a very apparent manner (again, it is electronically controlled). Some lenses have focus breathing, some do not. In my own collection, the XF23mm f/2 and the 56mm f/1.2 have remarkably no visible breathing. The 35mm f/2 breathes. The Fuji X-series have clever built-in tools to tweak the image processing. Using F-log, the dynamic range is claimed to be a little above 11 « real » stops (source : Cine-D). Using Eterna film simulation with DR400 and highlight setting at -2, you loose only half a stop. If you do not have the ability to shoot log correctly and if the Eterna look please you, this will ease your life and you can focus on other important things, or save money and rent for more lighting. -
Why actors' faces in some new films look so waxy?
Nicolas POISSON replied to Petr Kvapil's topic in General Discussion
On this very example, it seems to me that there is absolutely no technical constraint at stake. It is the director's wish to have that look. It is made on purpose. Whether we like it or not is just personal taste. Moreover, it is really hard to tell whether this look deserves the story, just based on the trailer. -
Why actors' faces in some new films look so waxy?
Nicolas POISSON replied to Petr Kvapil's topic in General Discussion
I would not call modern LEDs "spiky", as even the cheap ones now have a rather continuous spectrum. They are much better than fluorescent lamp (definitely spiky). However modern white LEDs share the same drawbacks: - lack of deep red. By the way, this also means "lack of infra-red", or "lack of heat", which is the very reason for their high efficiency. You cannot have it all. - cyan gap: even expensive LEDs find it hard to produce light around 480nm - blue peak: this indeed can be described as a spike This is a totally different story if one use RGB LEDs to recreate white. Week-end warrior DJs do that, but I very much doubt that is used in movie production. Maybe the waxy aspect results from make-up as well ? Or too high compression ? Or some post-processing in VLC ? -
Light to simulate hard sunlight
Nicolas POISSON replied to Sairaj Batale's topic in Lighting for Film & Video
the colour depends on the source, but also on your white balance settings. If your sources all have the same colour temperature, there is no reason to gel them (I mean CTO/CTB, not ND) : you would loose a bunch of light, whereas setting your WB correctly would render the same without gels. You would think about gels if you want to match sources of different colour temperatures (like tungsten and the sun). You may want this... or not. Search this forum, there are plenty examples of people using different colour temperatures and still creating a believable sunlight. -
Light to simulate hard sunlight
Nicolas POISSON replied to Sairaj Batale's topic in Lighting for Film & Video
In every picture there is fog/haze that makes the beams apparent. The use of diffusion is not expected, as it would create the soft light of a cloudy day, not hard sunlight. If what you mean by "light strength" is "power", it does not matter for the hard/soft aspect. But low power sources will require greater aperture or raising the ISO on the camera. However, distance does matter: the further the source, the more parallel the beams. If you put your source far far away, then you need high power sources that can be focused (like HMI frenels), to avoid loosing too much light. -
48/96 Channel Light Board
Nicolas POISSON replied to Amber Rout's topic in Lighting for Film & Video
There are plenty of free software console that will be OK for controlling a few fixtures. Film lighting does not require the same level of direct access to controls as live performance since you usually do not fire 100+ cues in a single hour. Personally, I like MagicQ, although the learning curve is a bit steep. -
48/96 Channel Light Board
Nicolas POISSON replied to Amber Rout's topic in Lighting for Film & Video
It is a bit like asking for a "good brand" of camera. Many brands have products that cover various ranges, for different user needs and budgets. Usually one define needs and budget first, then look what could match. -
1972...when photographers had Go-Go Girls for assistants!
Nicolas POISSON replied to Daniel D. Teoli Jr.'s topic in Off Topic
Didn't know Mr Steed and Mrs Peel worked for Kodak. -
Different skin tones are expected to be at different "gray levels". You would not want a deep black skin tone talent to be exposed at middle gray. You can expose using skin tone as reference, correcting with a personal scale inherited from your experience. Something like: "if the talent has typical Caucasian or Asian tone, expose at middle gray. If she is Afro-American, expose one stop under middle gray. If he is Ethiopian, expose two stops under middle gray. If she is particularly white skin with red hair, expose one stop above middle gray,". That is very similar to using a gray card. It is less reproducible, but it still works if you do not have a gray card.
-
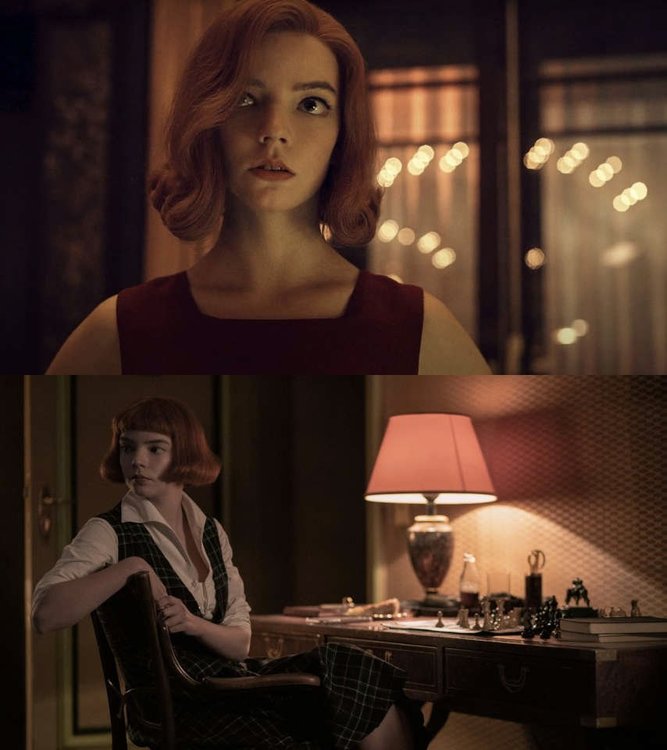
Hello, Here are two pictures taken from The Queen's Gambit. To me, the upper image is fine, the lower one not so much. The skin of the actress looks like if it were a colourized black and white image. What could make that ? And, more important, how to avoid it ?
-
The 50mm is claimed to be close to human eye for full frame. For "super35", the equivalent is 35mm. But... The human eye is not a simple lens. And another question is to know what criteria one use to estimate the eye focal length. If this is the angle of vision, well... The angle covered by either one eye or the other is over 180°. The angle covered by both eyes simultaneously is like 120° (+/-60° around centre). But one do not really "see" in the surrounding angles, only suspicious movements are detected, and then one turn our eyes to check for any danger. The angle in which one see colours is around 60° (+/-30°). The angle were accuracy is high enough to read text is only 20° (+/-10). And the maximum accuracy is within a pinspot 3-5° angle. Which one of these angles should be used to estimate an equivalent focal length of the human eye ? Moreover, one cannot isolate the information given by the eyes from the processing performed by the brain. When looking around you, the brain concatenates images from different focus distances and directions, a bit like the panorama mode of some cameras. And it uses the long term memory for object recognition. That way, you know that Macmini on the desk has a power button at the rear, although you do not even see it. You know you should not sit on that aluminium chair that has been taking sun for hours at the café terrace. Another argument for the 50mm is not angle of vision, but the fact that an image shot with a 50mm lens projected on a screen of typical size will look "real size" for a member of the audience seated at a typical distance. Or, for still photography, a picture printed in a typical format size, seen at a typical distance, will also look "real size". There is a lot of undefined "typical" here. The claim of the 50mm should not be taken too strictly. It just tells that the image will appear more or less "natural". But a 35mm, 85mm or 135mm will also look rather "natural".
-
Low contrast or Dark cinematography
Nicolas POISSON replied to Bineesh Viswam's topic in General Discussion
I am no expert, but I do not see how low bit depth is responsible for noise. My understanding is that noise comes from the randomness of electronic reading circuit, but as well from the inherent random nature of light. When light is low, its randomness becomes more obvious, even with the perfect noise-free sensor and 1-zillion bit AD converter. Hence the best solution is to add more light. I would think that low bit depth could even reduce noise: with levels more distant from one another, there is less digital levels to choose from. Analogue levels slightly varying due to noise will lead to the same rough digital level. But this could create banding. In the audio domain, "dithering" is the art of adding noise to reduce low bit depth artifacts. -
Well, some fundamental parameters are missing here. A RAW file cannot be seen by the eye, it cannot be displayed. So it cannot “look good” or “look bad”. It has to be processed in some ways : de-bayering, white balance, and so on. Indeed, there is not such thing as a "RAW image", even if everybody uses this term. There is only "Raw data", that can be processed immediately in the camera or stored as RAW data to be processed later. You cannot compare the quality of a RAW and a Jpeg image. You can only compare RAW data processed by a user and the same RAW data processed automatically by a device. And YES, automatic algorithms can do a better job than an inexperienced user. Algorithms may even do as good as an experienced user. What’s more, in most imaging devices, the automatic algorithm generating the Jpeg will be tweaked by the user. White balance is a tweak. Offsetting green/magenta in the white balance is a tweak. Adjusting ISO is a tweak. Choosing what “picture profile” / ”film simulation” / ”whatever the manufacturer named its tone shaping algorithm” is a tweak. Depending on the camera, adjusting the ISO might change the Jpeg only or both raw data and jpeg image. On the other hand, the user might process the RAW file externally in LightRoom/CaptureOne/otherApp using the same algorithms as in the camera because the manufacturer made them available. It could even be that the user performs in an external software the exact same processing as in the device, getting exactly the same jpeg image eventually. Using Jpeg compression-decompression 31 times in a row does not prove anything. What is important is the compression ratio. Compress an image only once with a very high compression ratio and artifacts will already be obvious. This is exactly the same for video, audio, as soon as one use lossy compression. Again, the compression ratio is usually tweakable in a camera, but even the highest ratio is still conservative compared to what will be used to post an image on the internet. I really do not see the point of a “RAW vs. Jpeg” battle. These are just tools you choose according to your needs, work, motivation… I am a jpeg shooter. I do not want to spend my Sunday afternoon processing family portraits. If I were a pro selling pictures, I would probably shoot Jpeg+RAW: I could then use the RAW data for highest quality work, heavy correction and so on, and I could use the jpeg version to show the client what the picture looks like on the rear screen of the camera.
-
Let’s play with practicals
Nicolas POISSON replied to Nicolas POISSON's topic in Lighting for Film & Video
Very interesting ! My feeling is: - I do not find the soft-box too powerful. Indeed, the problem is mainly a question of direction. If it was at a lower height and slightly upward, it might work better at selling the book as a reflective source. - yes you could cut a hole in the lampshade, or hide a light behind. But in such a scene, I would not put the lamp in front of the character. I would rather put it on its side. Then this kind of trick would no longer work. - I am not at all annoyed by the lampshade being too thick. A slight hot spot would be good too (slight variations are great), but I think that is really a question of taste. - the HMIs are too powerful. I really like the idea of creating a geometric flat pattern in the background, but with that power it kills the intimacy. Are these HMIs creating the back light on the head ? You might cheat with this too: having lower power HMis to light the window outside, and another cold white source for the rear of the head. -
Let’s play with practicals
Nicolas POISSON replied to Nicolas POISSON's topic in Lighting for Film & Video
I do not understand what you mean by "dominate". The pen is just a stuff an actor can play with, no more. -
Let’s play with practicals
Nicolas POISSON replied to Nicolas POISSON's topic in Lighting for Film & Video
The shadow on the upper third is due to the bulb with a silver cap on its top. Now I use aluminium gaffer tape instead. LED bulbs do not heat much, and this allows to shape the cap as desired. -
Let’s play with practicals
Nicolas POISSON replied to Nicolas POISSON's topic in Lighting for Film & Video
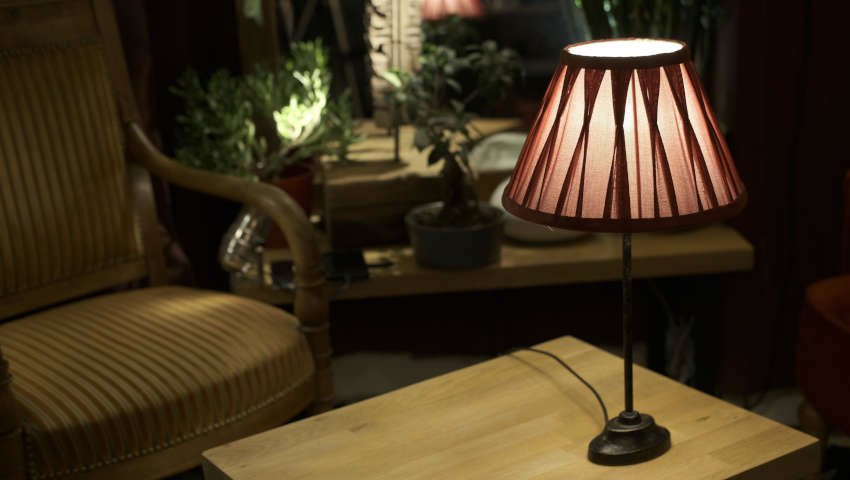
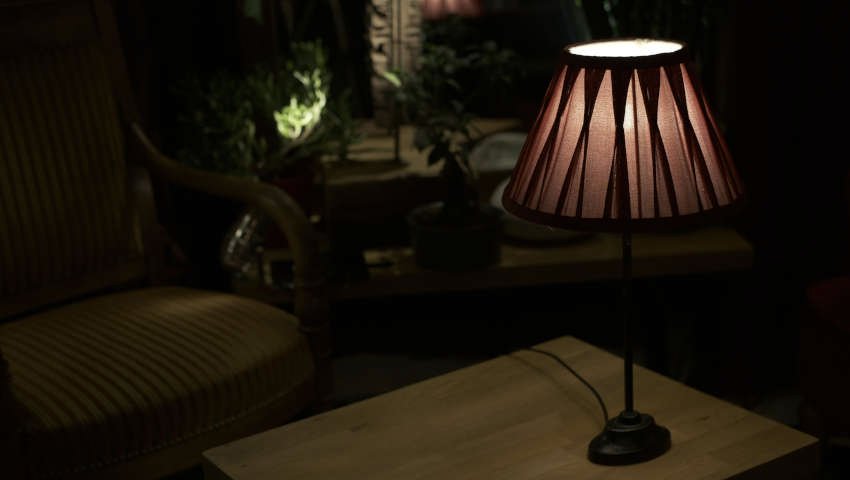
I start to understand where I mistook. What please me in picture #8 is that one can better see the folds of the lampshade, whereas in picture #6 we see more the mesh of the fabric, folds being more "shadowy silhouette" (do we say that ?). From what you all say, if I want the lamp to look like in picture #8, I should accept it to be purely decorative, and have the key light motivated by something else. The lamp could still justify a bit more light here and there, but not be the key light. By the way, is there a benefit to have the (fake) source from that other key light in the frame at some moment, to make it clear in the viewer's mind what the whole place looks like ? Or can we skip this because any viewer knows and accept a modern room is lit somehow ? -
Let’s play with practicals
Nicolas POISSON replied to Nicolas POISSON's topic in Lighting for Film & Video
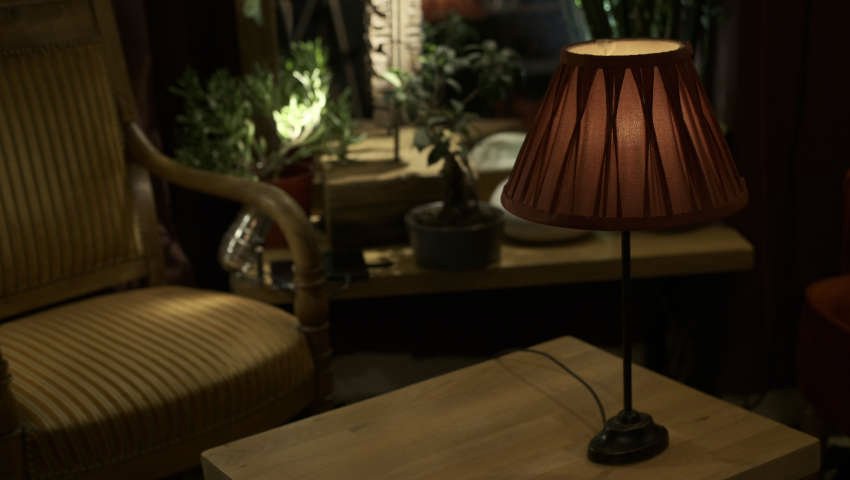
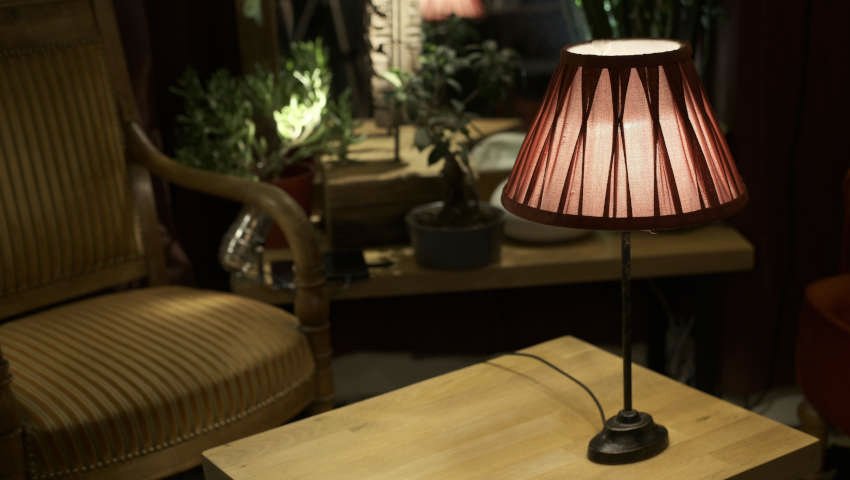
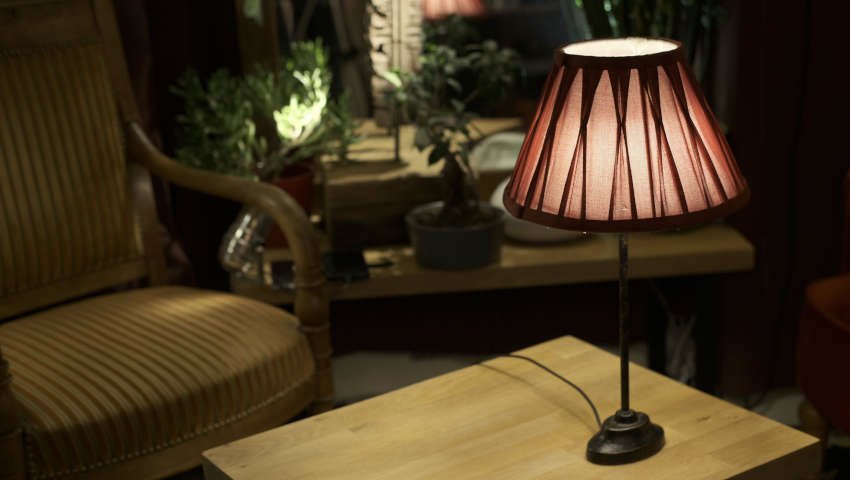
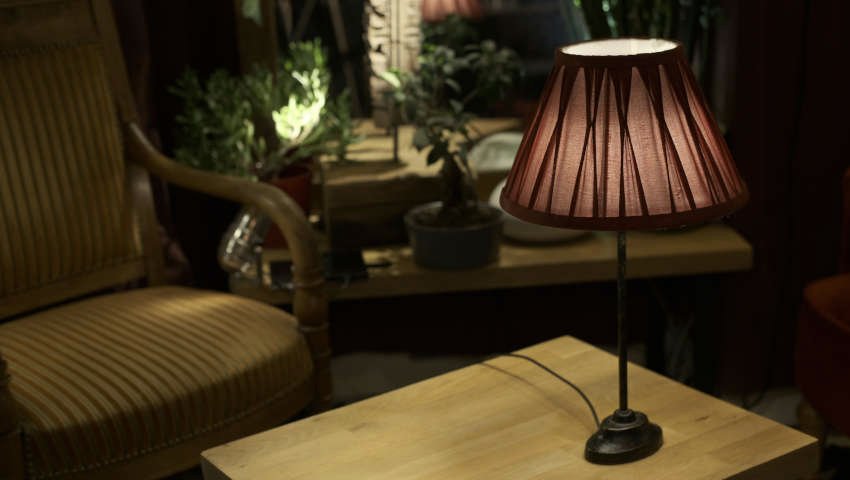
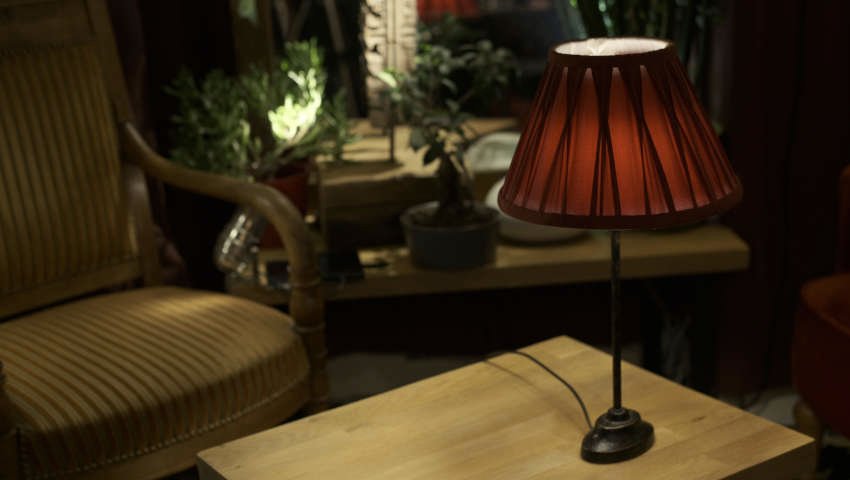
Sure! This is the goal. Thank you both of you for your remarks. By the way, anybody willing to share its own experiments or tricks is welcomed. I am a bit surprised, and thus interested, by what I understand as a question of “realistic” look. I thought, maybe naively, that one could cheat a lot with lighting. Even in movies that are supposed to be somewhat realistic. One cheat with white balance. Characters are rich spoiled brats that leave lamps on during daytime. The moonlight is deep blue. There are smoky atmospheres in bars where nobody actually smokes. I spend a lot of time googling pictures from movies. Here is an example by the Coen brothers: The brightness of the lampshade is slightly below the character’s left part of the face. I currently have this kind of winter soft horizontal lighting in my living room, and I have a lampshade similar to this one (it appears in every other movie indeed). I checked: even with a low wattage bulb, even at noon, the lampshade is several stops above every other object in the room. Here is the lamp I modified, in context: When I saw this afterwards, I was still wondering if the lampshade was not too bright. When looking at this image, do you tell yourself “oh, there is something weird with the lighting” ? Is there some kind of secret rule that tells “the audience may not notice, but unconsciously, it does matter much more than one would think” ?

-
Let’s play with practicals
Nicolas POISSON replied to Nicolas POISSON's topic in Lighting for Film & Video
Picture 3 We go back to initial exposure. We replace the bulb with a 0,5W (yes, half a watt) LED bulb. The intensity through the lampshade is better, but the bulb still appears as a hot spot. The top no longer clips. This is better. Picture 4 We place a roll of diffusion (Lee 400) right around the bulb. We are rather happy: the lampshade brightness is adequate, it is rather homogeneous, and the top is not clipping. We really like the lampshade now. But the table now receives hardly any light. We did try to light it using a projector outside the frame, but the lamp creates shades that look unnatural (no picture of this, just believe me). Picture 5 The bulb in the lamp shall be strong enough to light the table top. We use another bulb, a 2,5W LED, with a silver cap at the top of it. It prevents the light to hit directly the upper part of the inner white fabric, which avoids it to clip. Great. But since we removed the diffusion, the lower part of the lampshade is washed out again. Picture 6 We know we cannot put the diffusion directly around the bulb, since it would lower the light hitting the table. So we put the diffusion right against the inner white fabric (we needed to remind some geometry to create the shape at this point). The light through the lampshade is more homogeneous, but still too bright and washed out. Picture 7 We inserted a layer of ND0.3 filter between the diffusion and the lampshade. It is better, but still a bit too bright. Picture 8 We could have used a stronger ND. But we would also like the lampshade colour to pop. We add a layer of red filter Lee 106 between the ND the lampshade (this is the third layer: Lee400 + ND 0.3 + Lee106), which will also cut off some light as a stronger ND would have done. Yeah! Look at that wonderful red lampshade! No need to play with Resolve’s Colour page later. Our mission is complete. Champagne! (for those old enough: think about the victory theme of Dune II game)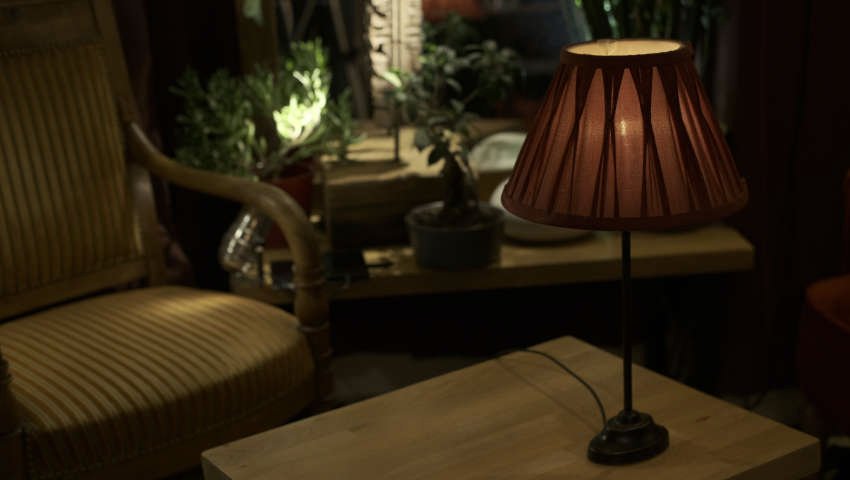
-
I am looking forward to improve my lighting know-how. I did experiments a few weeks ago for a short film. Two people are talking around a table in the house of a theater. There is a lamp on that table that will be in the frame. It will be the fake source to light the characters. Our mission, if we accept it, is to have the dynamic range of that lamp to fit in what the camera can accept, without catching the eye too much. We are enthusiast (read “we have no money”). We do not have plenty of devices to balance the overall lighting. So we go the cheap other way: lower the hot spots, raise the ISO. The photos below were made on purpose later after the shooting. These are taken in my living-room. Here we go! First picture: The lamp with a conventional 4W LED bulb. The lampshade does not lower the light enough, it is way too bright, and washed out. The top allows to see the inner white fabric that reflects too much light and clips. Picture 2: Same setup, we just lower the exposure. The whole scene is very dark, the bulb create a hot spot through the lampshade, and the top is still clipping. That is exactly what we do not want: YES, we could make the whole scene dynamic range to fit going that way, but the lamp would be by far the hottest object in the frame. Changing exposure will not allow to change the order of brightness of the objects. Wrong, try again.
-
Wider or... lower height. When shooting with the full sensor width, 16:9 uses a greater surface than "17:9" or "DCI" (other ways to say 1.85:1). However, on mirrorless cameras with high pixel count, the "1.85" ratio, although smaller in surface, might be less downsized than the 16:9, resulting in a "wider" image (4096/2048 vs 3840/1920).
-
Approaching High Key (sort of) Interiors
Nicolas POISSON replied to Saikat Chattopadhyay's topic in General Discussion
Ooops - mistake, sorry. -
Approaching High Key (sort of) Interiors
Nicolas POISSON replied to Saikat Chattopadhyay's topic in General Discussion
There are a few pictures of the set-up of " Portrait of a Lady on Fire" here: https://www.red.com/news/claire-mathon-afc Given the size of the windows, half the surface of the wall can be considered as a large source, the other half being a large reflector. -
Can you name this kind of rotational lighting?
Nicolas POISSON replied to Jim Brando's topic in Lighting for Film & Video
I vote for theatrical "moving heads" as well. There are three kind of these: beam, wash, spot. "Beam" type has a very narrow beam. "Wash" is similar to a PAR64 lamp, rather wide angle, with soft edges. "Spot" is similar to a profile projector, with sharp edges, homogeneous light within the beam, and the ability to be shaped with a gobo. Since the beams in the video appear rather sharp, I'd say these are "spot moving heads". These used to be of HMI technology or similar, with a rather high colour temperature (7000K or so). LED is becoming more and more common, although not as powerful, but still in the 6-7000K range. -
Mechanics of digital video capture.
Nicolas POISSON replied to Bob Speziale's topic in General Discussion
I would not categorize all DSLR in a single set and make generic conclusions based on two models that are 6 years old. All I can say is that the 645Z delivering lower quality video than a BMPCC is not really surprising. Concerning the images you posted, well I cannot tell which camera has better skin tones since there is only one sample. But I would not link skin tones to any debate like pixel binning vs line skipping. I do not understand what you mean. Whatever video device you use, there is always a compromise between the amount of data, image size, frame rate, compression ratio, and image quality. That is true for a smartphone as well as an Alexa. But this is a different story than the algorithm used to create a 2K stream from a high resolution sensor.


