


Steven Buckwalter
-
Posts
18 -
Joined
-
Last visited
Recent Profile Visitors
907 profile views


-

LFL - Lens & Filter Library
Steven Buckwalter replied to Richard William Preisner's topic in Lenses & Lens Accessories
Thanks for this, it's fantastic! -
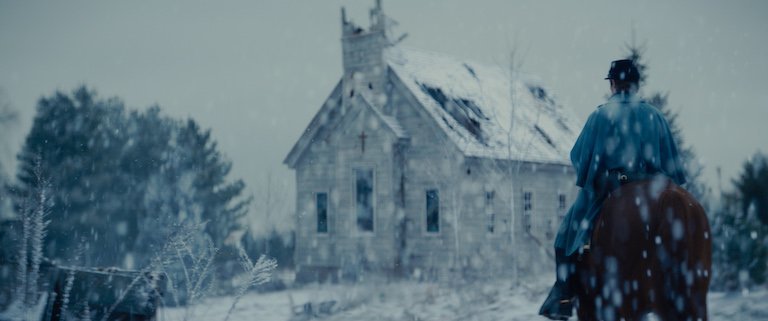
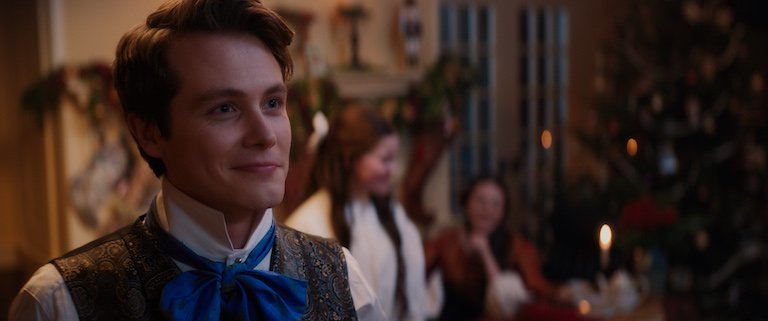
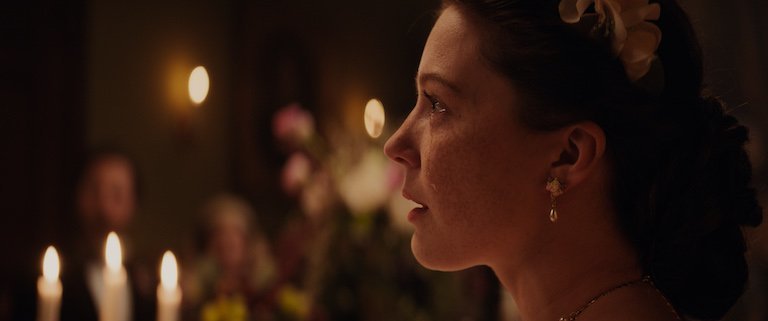
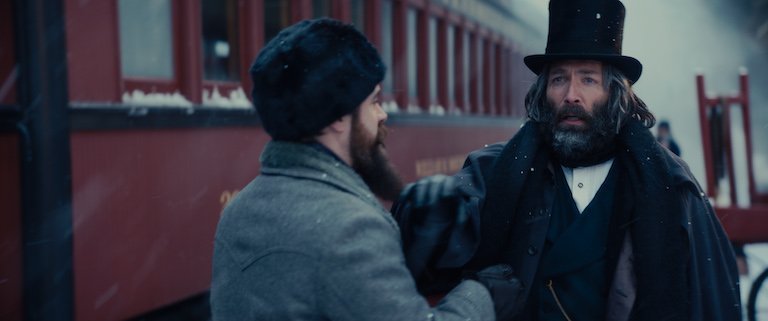
"I Heard the Bells", a feature that I shot last year, was finally released over the weekend in wide release across the country, which I'm still having trouble even wrapping my head around right now. It's still showing in different areas, although in fewer theaters than before. I don't have a lot of experience shooting features; this was only my second one, but it was the first one that everyone worked hand in hand, both the crew and the producers, to make sure that every penny we spent ended up on screen. I normally tend towards self deprecation, but I am actually pretty happy with how this turned out. It is a civil war era period film about Henry Wadsworth Longfellow, and I was lucky with the production and costume designers, because no amount of good lighting or lenses will make up for bad production design or bad costumes. I didn't know it while we were making it, but the producers have publicly said now that the budget was $3 million dollars. The director Josh Enck, first told me to watch Little Women, shot by Yorick Le Saux, and that was an incredibly useful resource because it inspired the choice to have two distinct tones between the two parts of the film. But we also looked at Conrad Hall's work on Butch Cassidy and how he did period interiors. Dan Laustsen's work on Crimson Peak, even though it was a horror movie, inspired us to keep a little theatricality; the color of night in this film is what it is because of Crimson Peak. And then of course Roger Deakin's work on Jesse James is so influential for how to shoot period pieces as well. David Mullen was kind enough to answer some questions I had last year about how he got some of his imagery in Jennifer's Body, and that helped me to understand the value of cool fill light in a warm room. But after all of that, your film ends up being its own thing, because no two films are ever going to be the same and I didn't really want to copy anyone outright. One of our first and smartest decisions was choosing to shoot on the Arri Mini LF with the Cooke 1.8x FF Anamorphic lenses. It was such a beautiful combo! The lenses were brand new, and the set kept growing as we shot which made rentals interesting, but it was worth it because they just gave us such incredible, rich, amazing images. If anyone is interested, I have more stills in full res here: https://www.dropbox.com/sh/3eqtml5cs7dvruj/AAAanNalbTzxYrvwQCJPhioMa?dl=0 The trailer is on youtube (search "I Heard the Bells movie") if you want to find it. Embedding it here makes it huge on the page for some reason. The color in the trailer isn't from the final film, it's closer to what it was on set, so you can compare if you're curious. For a variety of reasons, we shot for 30 days over the course of 13 months, which was unusual, and challenging to maintain continuity of acting and image, but on balance was actually a lovely way to shoot a movie. Our longest stretch of shoot days was two six day weeks in a row. Most of the rest was anywhere from one to four days of filming, with about six weeks in between. I did some additional days of nature photography for transitional elements, and went to Cambridge MA in two different seasons to shoot Longfellow House Exteriors. I wasn't holding on the film full time, in fact I worked on another film as a location scout and 2nd Unit Cinematographer while we were shooting this. But I still had a lot of time to prep with the director, and we made good use of it. We shot listed every scene, and did a lot of scouting and shooting stills with Artemis Pro and would prep each shot list with a frame grab for each setup so that the crew could see exactly what each setup was going to be. We mostly stuck to those, or they were at least a starting point, and if we adjusted after rehearsals (where I would grab new stills), we would review the revised shot plan quickly and then execute. It made the crew confident when we were confident in our choices, but we were confident because we had spent so much time looking at dailies of what we had shot, and knew that what we were planning was going to work. The hardest thing about filming over the course of 13 months was keeping a consistent crew. I had a mix of long time collaborators working with me, but also was having to audition some new people on different shoots. But the advantage of working this way was that I was able to keep the crew size elastic, and I also kept the rental package elastic. If I knew we were going to be outside all day, I brought very few lights and just a few grips, but that meant that production knew that I was saving our money for the interiors where we converted locations into mini studios. But even there I had to think carefully about what I brought to set, and I often begged and borrowed lights and other gear from friends just to help with the budget. Camera movement was important to director Josh Enck and myself, so that was the other place where we spent money when we had to, but it was always well thought out in advance, and I like that we have a good mix of handheld work where it belongs, as well as steadicam and jib. I learned a lot from this experience, and there is a lot I would do differently. In retrospect, it's amazing how many decisions you are making all the time that you have to make in a split second, and then you just have to live with them. I sometimes struggled to communicate framing to the steadicam ops, and that's on me, so I need to get better at that. If I could do it over again I would help my focus pulllers a lot more: I shot most of the film at a 2.8/4 split, and on full frame anamorphic, for the most part that's too shallow, especially for how much movement we had. The film would have been better if more of it was exposed for a 4 or even a little higher at times. It was a reminder of how much I love making movies, I waited five years between shooting the two I've done, and I'm hopeful that it won't take as long for me to get my next one. This has been more successful than anything I could have dreamed, not on a blockbuster level, but for something that felt very small at times it feels like a win. But also it's been a meaningful movie for those who have seen it. I'm not going to pretend that it's perfect (it's not), but I like that we've made an adult drama that takes on serious emotions like grief and loss but still leaves you hopeful in the end. And even if for some reason I never get to shoot another movie, I'm proud of having been a part of this one. If anyone has any questions, feel free to ask in the comments. And if anyone has any constructive criticism of any of the shots, I'm always interested in learning how to get better. I also have a lot of behind the scenes posted on my IG page: https://www.instagram.com/stevebuckwalter/
-
- 1
-

-
Hi, I'm coming to the Palm Springs area from the East Coast for a shoot in February, and I'm looking for a Gaffer who can help me crew up and find gear for a one day shoot. Anyone have any recommendations? Thanks
-
Filter order in a matte box.
Steven Buckwalter replied to Steven Buckwalter's topic in Camera Assistant / DIT & Gear
Makes perfect sense of course. -
I'm sorry for the super basic stupid question. I was moving quickly today, working on a documentary shoot, with a glimmer glass 4x5 filter loaded in a matte box, and then decided to add a polarizer into the mix. I had a lot on my mind, but at that moment was frozen with indecision about what the "correct" filter order would be. I raced through all kinds of permutations of what physically is happening to the light as it's going through the filters, then tried it both ways, couldn't see a difference in the space of 10 seconds, and went with the glimmer glass in the front. I've been doing this a long time, and somehow I never put a diffusion and a polarizer together before, but I'm curious about other filter combos as well. So, other than a hot mirror always going in the front, does anyone have any rules or reasons for which way they stack a filter?
-
4x5.65 thin filter frame for nets.
Steven Buckwalter replied to Steven Buckwalter's topic in Camera Assistant / DIT & Gear
Thanks for the help, all good options. -
4x5.65 thin filter frame for nets.
Steven Buckwalter posted a topic in Camera Assistant / DIT & Gear
I was recently given some old school net material by a friend. I've seen people that had nets glued into a thin plastic frame that you could drop into a normal filter tray, it was easier than having to stretch a net over the lens every time you did a lens change. I can't seem to find anything like it on sites like B&H, but I also feel like I am not using the correct search terms. I would appreciate any ideas for what to use. Thanks. -
Really great work Borja. It's not often that you see an SR3 on a stabilizer, it feels stylish and looks interesting. It's a lot of interesting setups considering you only had a day to do it. Here are my opinions (that's all they are). Likes: 1. The movement and lighting at :36. 2. Shot design at 1:10 3. The switch to handheld at 2:19 and the shot coming through the bleachers. 4. The backlit shot at 2:06 5. The way that evening light renders on film towards the end of the handheld sequence and at 3:01. 6. The way that film will hold skin tones even in cool light. (3:18) 7. Interesting use of flares in the last sequence. Dislikes: 1. I'm not sure if the light on the main character at :45 is a conscious choice or an artifact of how you had to light the whole shot, but I wish it was a little softer on his face, and the color of the light mixes poorly with his skin tone, giving him a little bit of a pink pasty look. 2. The tracking shot at :52 is so close that it lost all sense of motion because it cropped out any foreground that was moving faster. It was an impressive technical feat, but I like the wider tracking shot that comes a little later. OTOH, you or the director may have decided it served the story better to stay that tight, or to make the shot seem dreamier. 3. The coach's eye socket at :31 is just slightly burned compared to the runner's skin at :55. That's an incredibly picky thing to nitpick at, I'm not saying it's something that ruined the whole movie. I'm more just curious as to how that one highlight on his face couldn't seem to hold compared to the rest of the footage where the skin tones in direct sun held just fine. Even the backlight on the shot at 2:06 is way over, but rolls off or reads in a much more pleasing way. I'd be curious to know the difference in time of day between the two shots, and it's possible that just getting a frame of very light diffusion, or some powder on the coaches face could have softened it just enough. Could you give us some insight on your lab and transfer process? Did you do a one-light at the lab, or get a log transfer and grade it yourself? Also, what kind of prep did you do with the director? Sometimes it can be hard to get on the same page with a director about some of the visual language, and then you only had one day and were changing mags on a ronin, there had to be some challenges. Also, how involved was your color grade? A lot of the tones seem pretty straight on for what I would expect from Kodak film, but did you find that you had to do a lot of exposure or tone matching as the sun dropped toward the end of the day? Thanks for sharing.
-
Starting Day 20 of 29 of a period feature, shooting “summer” in winter of course.

-
- 1
-
-
35mm Moviecam test shoot
Steven Buckwalter replied to Marco Montenegro's topic in General Discussion
I'll fly to Vegas and shoot it for you, sounds like fun! ? But I'm a little confused by your post, are you testing your Moviecam for your short? Or are you testing it by shooting your short? But if you're looking to connect with other locals, Instagram isn't a bad place to start. Just start searching for Las Vegas DP or cinematographer and you'll start seeing interesting work I'm sure. Funny enough I'm really bad at keeping up IG, but I'm going to be making it a priority this year. Really I am! -
David Mullen answered this when someone asked about the LLD filter, basically it filters out some of the blue light that Robert is talking about. I used it successfully last year and can confirm that using Davinci's White Balance tool worked fine for me, although some colorists still insist on using the color wheels for some reason.
-
I did some of my first work in the early 2000s with an ancient Arri 2c that had a viewfinder that didn't swivel, and the ground glass was held in by bars, so it looked like you were just operating through a jail cell. I'm not really sure how I got anything usable out of it, but I feel like it all held up pretty well the last time I looked at it. But I'm definitely thrilled to have a modern digital viewfinder to work with.
-
Use a calculator and a tape measure. Those formulas are a ratio, where 1 is the vertical height, so if you're trying to find the exact crop for 2.39, measure the width of your panel and divide it by 2.39. For example, and I'm going to do this in metric to make the math easier, even though everyone measures their panels in inches. If your panel is 10cm wide, then the vertical height of the image should be 10/2.39=4.2cm. Divide that in two again to give you the size of the bars at the top and bottom of your screen, so each bar should be 4.2/2=2.1cm. Measure in that distance from the top and bottom and make that your tape line. Alternate way is to use a framing chart. Print out a framing chart that shows your desired frame line, then set and frame the camera to match that, and just align the tape on the monitor to the lines on camera. If you're having trouble finding a chart, you can use Arri's frame line tool, https://www.arri.com/en/learn-help/learn-help-camera-system/tools/frame-line-lens-illumination-tool. It's specifically built for Arri cameras, but you should be able to find a camera combination that would match most cameras in terms of resolution.
-
I made the mistake last year of thinking that I could make it through a test using an older BL3, not realizing that the viewfinder would be so unusable. But it still astonishes me that so many older movies look amazing and sharp when you consider how awful the viewfinders were in their cameras.
-
Doorway dolly and macro lenses
Steven Buckwalter replied to Matt Rozier's topic in Camera Operating & Gear
I've done a fair bit of macro work on tabletop, and it's very difficult to be smooth even on a dana dolly, so I can't imagine it being better on a doorway dolly, but you may find differently. What's worked best for me is dana dolly with a few extra shot bags on the dolly just to give it more momentum and help to smooth the starts and stops.