Mateusz Czopek
-
Posts
20 -
Joined
-
Last visited
Recent Profile Visitors
3,306 profile views


-
FOCUS ON CAMERA - Coming Soon!
Mateusz Czopek replied to Gregory Irwin's topic in Camera Assistant / DIT & Gear
Awesome Gregory, can't wait! Already signed up to get a notification when it launches! -
Hey all, I'm starting pre-production on a new short film and thought I'd jot down some thoughts here as it may help give me clarity and some folks may find it interesting! The short is a currently loose-scripted docu-drama ala Nomadland following a young korean boy who goes to the market for the first time in America. It's directed by Joon Cho, who is a USC graduate but grew up in Boise (where I'm from and where we're shooting the film.) I've worked on two of his short films before, although I was 1st AC on the last one. His usual DP is a good friend of mine, but he couldn't make the dates due to working on a feature in LA during the summer. Joon's a great director and brings a great energy to set and knows what he wants, so I feel very lucky to be able to shoot this particular project of his. Currently in the very loose planning and creative stages, finding references, lookbooks, dreaming about what the film could be. Since a lot of it is dependent on what locations we shoot at and on the young actor, it's going to be a very small crew that will have to move quickly. Only 1 AC and 1 Gaff/Grip. I'm hoping to shoot on the ARRI Alexa 35 or the RED EPIC with either Zeiss CP.3s or the Standard Speeds, although currently I'm leaning towards the CP.3s. I'm borrowing equipment from my work so the shoot will take place over two weekends, with possibly a Friday after working hours. I've been testing the different lenses and cameras, and of course my preference is the Arri 35, the sensor is quite superior than anything I've worked with and it has internal NDs which will be helpful for this more run and gun documentary style film, rather than wearing NDs in the mattebox with RED. We want to have more natural light as most of it is outside and we don't want to overwhelm the kid actor with a lot of lighting equipment or make it feel like a big deal. This does lead me to believe that I should try and light more from the outside in interior locations such as his house, so there's not a bunch of smaller lights inside his space, which actually means I'd need bigger lights and more light control. Quite the paradox. That's about it for now, hoping for more to come as things start getting closer and closer and we finalize equipment and lighting plans, I'm sure I'll have more to share. See ya next time!
-
- 1
-

-
Module 8 Tuners. Thoughts?
Mateusz Czopek replied to Zack Mahar's topic in Lenses & Lens Accessories
Seems extremely use-case for me. I would think you could achieve a similar look with various diffusion filters if you wanted that softer look. from what they show on their own youtube videos, the effect looks super intense even at "subtle". I don't think film looks need to be that soft/diffused and people have a weird thought that film is this super soft low contrast look when it's really not. Certainly not as sharp as digital, but nowhere near as soft as those tuners look to be. That said they might have a use for dream sequences or something more stylized, but I wouldn't see a use in buying them. Also, hey, fancy seeing you here! -
You also don't want any additional noise, which click marks can make, to happen during a take with audio rolling.
-
Stitch shot inside to outside car
Mateusz Czopek replied to John Russell Schmidt's topic in Visual Effects Cinematography
There's also this incredible scene from Children of Men that goes from inside the car to outside stitched together. Happens near 2:25 -
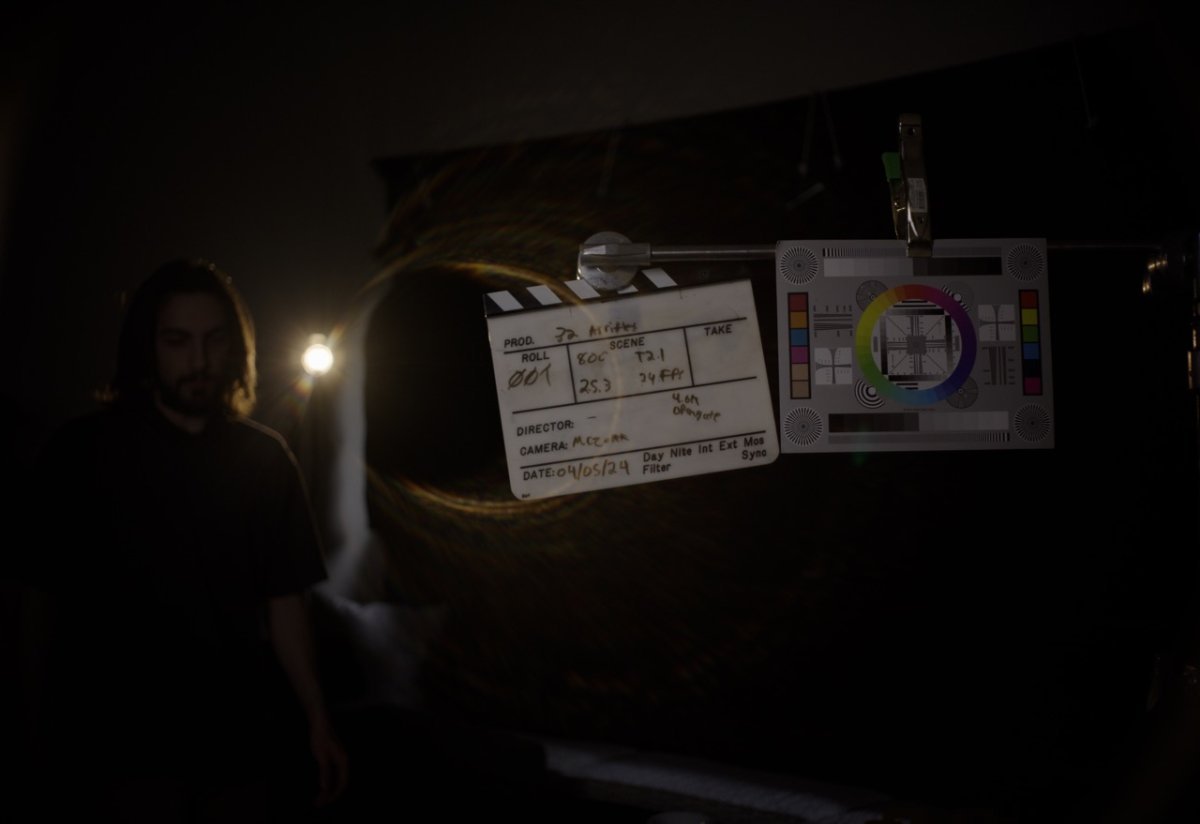
Hey all, I was testing two sets of lenses - the Zeiss CP.3s and Arri/Zeiss Standard Speeds on the Alexa 35 for a side by side test following the outline in this article by American Cinematographer: https://theasc.com/blog/shot-craft/the-generic-lens-test When I was testing the 32mm Standard Speed I noticed there was a weird flare that happened when I had it wide open (T2.1) but not at any other stops. Any idea what would cause this and if it's indicative of something in the lenses needing to be fixed/tuned up? I didn't notice it on any of the other standard speeds otherwise I'd probably just mark it up to a lens characteristic. I've attached an image from the test.

-
An enlightening and horrifying interview. Hard not to get emotional at it, especially when they show the crew on set. "There's a direct correlation between budget and safety..."
-
In my experience, I find that lighting for B&W Digital is more about trying to create dynamic shots through gradations of light and how light plays in the shot, because you don't have color to make a shot more interesting or pop you have to do this with light. Harder light typically plays better in B&W, but that may be a more personal choice and depends on the look you're going for. I definitely recommend having a LUT that is close to what you want the final image to be - a low contrast B&W or a higher contrast B&W, whatever you're more going for. And it's more okay to mix tungsten and daylight lighting since it'll be more about how the light is hitting the subjects and not about the color of the light. Hope this helps, I've shot a few short films on B&W digital and a feature in B&W!
-
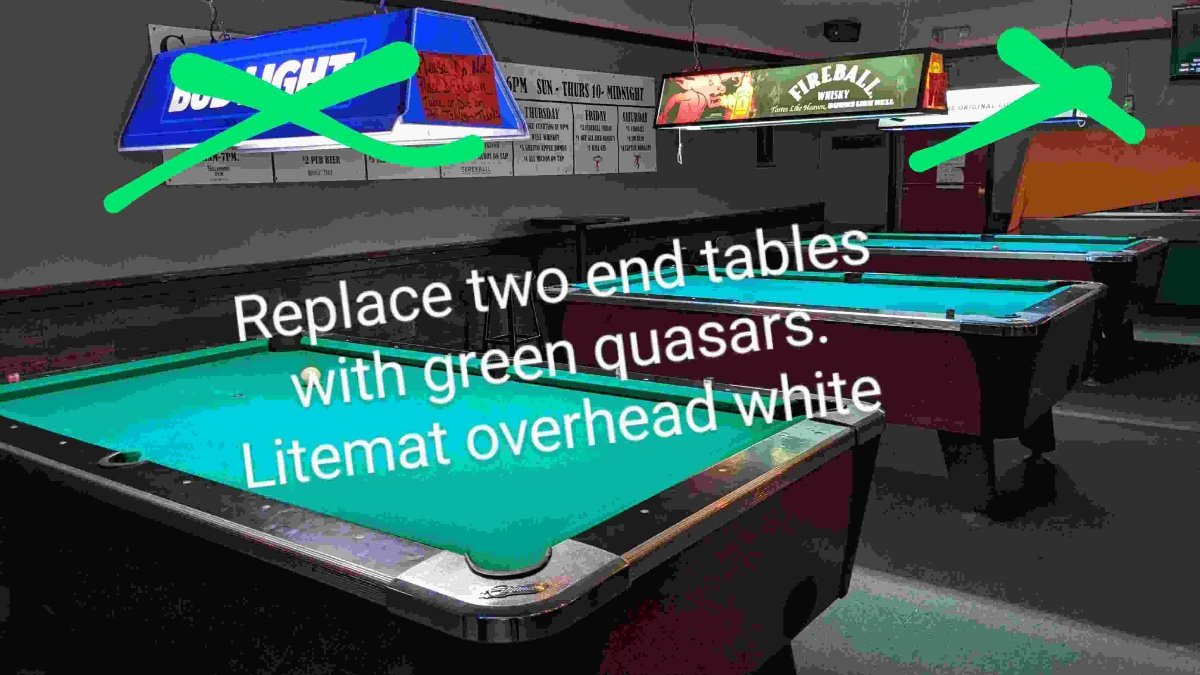
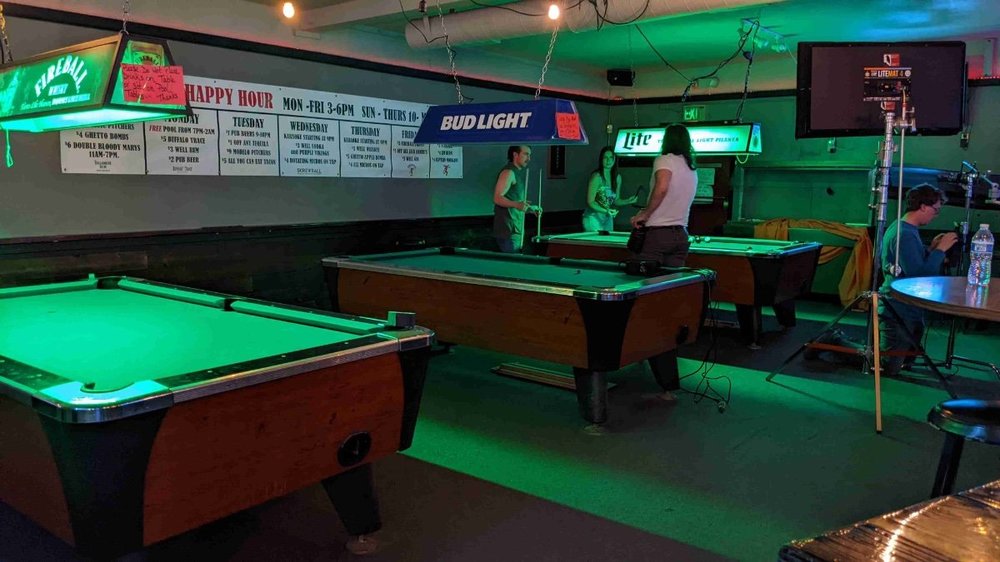
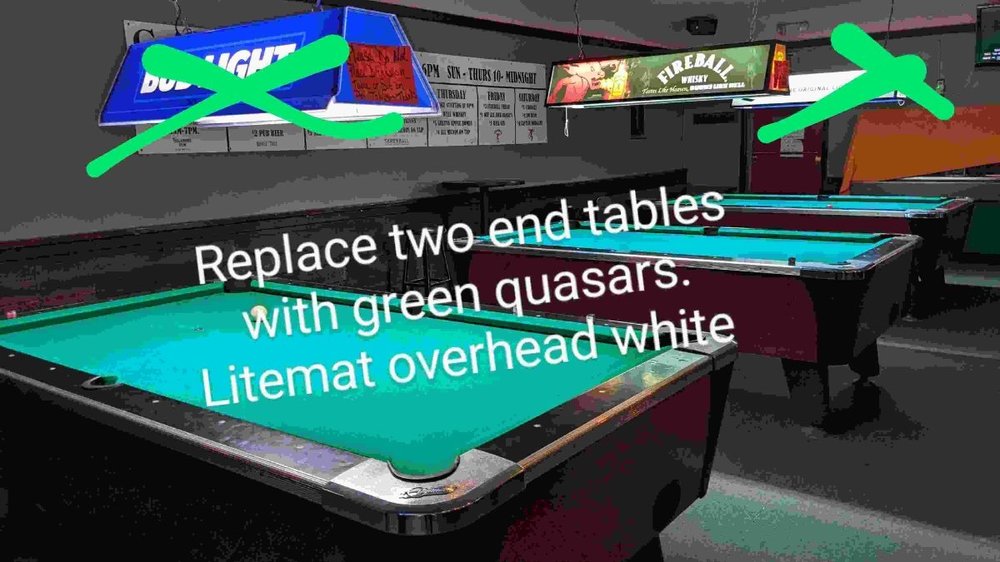
Here's that setup I showed from the lighting sketch. This is just a photo from my phone. We ended up having to switch the first two light domes because the first one didn't fit the 4ft quasar tubes. To the right of the image is the gaffer getting the litemats ready and the very left person is one of the directors who acted in this scene.
-
Hi all, I thought I would share some notes and thoughts from a feature I recently shot back in April for those that are interested. What started out as a 25 page short ended up becoming a 65 page feature when the two directors had a change of heart! 3 days before shooting, the lead actress (who had the main location for the film) dropped out of the film, and rather than recasting her, the two directors decided to pivot and completely change the story with the remaining actors and locations they had. So, a well planned and shot-listed film got thrown out the window as we all turned to improvising what to do every day. I should note that this is truly a low budget feature with most people working on it (including me) coming fresh out of film school working for very little or no money. The budget mostly went towards camera, lighting, food, and smaller expenses. We shot on the Arri Amira with Zeiss Ultra Primes. Red Finch Rental in Salt Lake City gave us a great deal on the camera package and were super accommodating towards us. Their 50mm was out for repairs so they offered a different lens set to me, but instead I decided to keep the Ultra Primes and they shipped the 50mm out once they got it. Our lighting package consisted of 2 1.2k HMIs, 2 litemats, 2 quasar rainbows (RGB was needed and played a big part later on in the film), a 12x12 frame and an 8x8 frame, as well as some bounce cards and other grip equipment. I also had some tungsten units on hand including a 2k open face and some 1k fresnels, but unfortunately never had an opportunity to use it which I regret. This is the first feature I've ever shot, and have worked on some as AC and in Grip and Electric before, as well as DPing some shorts in and out of film school. There are definitely some moments I wish I had lit differently or had thought of some trick on the day, but those are the lessons you learn! Production was a bit rough as we had to pivot and change all of our plans and often I was not made aware where to be or what we were shooting until the day of when I got on set. This made it hard for me to light things properly as I typically am a big planner and big believer in pre production work for lighting. However, there were some locations that had similar scenes to the original feature which I could light according to my original plans. Here is a lighting "sketch" I sent to my gaffer when we were scouting the location for this bar. The directors and I wanted a slightly surrealist 70s feeling to the film, with color playing an important part in various locations. We ended up turning off the middle pool table light for more contrast and shooting mostly around the end table with a litemat set to warm light to match some practical bulbs that were hanging from the ceiling and to have a neutral color on the actors. The 2 1.2k HMIs were my bread and butter for most of the shoot, playing for both daylight and moonlight in a lot of scenes, typically using the litemats or quasars as fill. I didn't end up using the 12x12 frame or 8x8 as much as I would have liked as most of the outside locations were either remote, rocky, or it ended up being a cloudy day. Overall, I made a lot of mistakes but I think I did some things right as well. I wish I had been able to slow down and think more about lighting than I had, but often we were rushing to get out of a location in time or get done with the day. I don't have any stills or videos to show yet, but hopefully soon in the coming months! We're doing some reshoots and additional shooting at the end of August, so I can share more stories from that. The shoot was 2 weeks long which of course is never enough time for a feature. Hopefully I can take what I learned to the next one. I would love to hear from anyone about your first feature experience!
- 1 reply
-
- 1
-
-
History of Cinema book
Mateusz Czopek replied to Mateusz Czopek's topic in Books for the Cinematographer
Thanks, that's the book I ended up getting! -
Hey all, I'm wanting to find a book about the history of cinema - the progression of films and important films that came out over the years. Ideally something that covers more than just American films and the typical surface films that everyone knows - something that's a bit more in depth. Any good recommendations or suggestions? Thank you!
-
Dune - night exterior lighting question
Mateusz Czopek replied to Benjamin Handler's topic in Lighting for Film & Video
Greig Fraser did a Clubhouse Conversation about Dune and he talks more about how he achieved his night looks. He does say some of it was on stage, with painted backgrounds. Here's a link to it, he begins talking about nighttime shots around 22 minutes in. https://vimeo.com/647609522 -
Dune - night exterior lighting question
Mateusz Czopek replied to Benjamin Handler's topic in Lighting for Film & Video
Not certain because I haven't seen the film or even seen much behind the scenes, but I know Greig Fraiser, the DP, is a big fan of LED Volumes, which can replicate sunset/blue hour for as long as they want and provide realistic backgrounds. Because they're LEDs, they also provide lighting that's accurate to the image being displayed. Again, not sure if that's what they did, but that would be my guess on what you've said and on the DPs preferences. Here's more information about Volumes: https://www.xrstage.com -
Shooting Handheld in River Advice
Mateusz Czopek replied to Mateusz Czopek's topic in Camera Operating & Gear
Thanks everyone for the responses, unfortunately our production got cancelled for the time being, but I'll be sure to keep all of this in mind next time!