Dennis Hingsberg
-
Posts
43 -
Joined
-
Last visited
-

Cheapest Method For LOTS of Light?
Dennis Hingsberg replied to Max Field's topic in Lighting for Film & Video
3-4 of these: Lithonia Metal Halide lights - $327, 1500w each. -
Sekonic L-508 zoom master is a great meter you can get one used for very little. Features a spot meter as well as incident which can be handle if you want to measure reflectivity vs incident (light falling on meter).
-
Agree with Robin here, look at the data rates and you'll be pleasantly surprised to learn 4444 is actually larger than Sony's 3:1 RAW, or you can have X-CON 30% or 60% smaller than Sony 3:1 RAW but still 16-bit linear. 60p max is only for this sensor block shipping in February. After, there will be HFR block and possible much more: monochrome, HDR, low-light, whatever the demand is... Sony can do it, the block is user swappable and can be done in the field, not a clean facility like RED. Also about the extra licenses for FF $6K and Ana $4K USD - those are permanent license prices, temporary licenses will be much less let's assume. Camera is $45K for body, $11k for R7 and 1TB media, $5k for OLED VF.
-
Had a lot of fun as co-producer, DP and colorist on this short film titled ITCH! Synopsis: A man with an uncontrollable ITCH on his hand goes through increasingly extreme measures to get rid of it. Writer/Director: Sean Patrick Kelly Producers: Dennis Hingsberg, Sean Patrick Kelly Editor: Jonathan Chiovitti Music score: Everett Dungeon Colorist: Dennis Hingsberg As mentioned, I was the producer, DP, and colorist on this short film (runtime 4 minutes) and it was shot on the Sony PMW-F55 in 16-bit 4K RAW. It was colored in DaVinci Resolve on my custom built Mac using the AVID Artist surface controller and a Flanders Scientific CM171 monitor. There's also a fan page with a ton of behind the scenes photos and funny stuff if anyone is interested, or wants to like the fan page for future updates: https://www.facebook.com/ItchFilmSKProductions/
-
For ratios I use the Sekonic Zoom Master L-508 which has great features yet isn't overly "electronic" like the L-758 which Mark has stated.
-
Horror Lighting. Very low Key Inquiry
Dennis Hingsberg replied to Jae Solina's topic in Lighting for Film & Video
Yes if you shoot RAW on RED or BMD cameras you can adjust metadata later in post from 800 to 400 which is -1 stop, or 800 to 200 which is -2 stops, and get what you need. As a side note; if you shoot non-RAW you can use plugins that adjust exposure in proper stops, or 3D LUTs that adjust exposure, or of course you can just use offset wheel in Davinci Resolve. When you increase exposure in post it will always decrease the signal-to-noise ratio which means you increase noise. So as others have mentioned it is can be better to overexpose slightly (even with a low-key scene) than to underexpose it. My fear of lowering exposure in-camera by 1-2 stops is you have to be 100% sure your exposure is right on because if you need to increase exposure you are in trouble. I don't think Blackmagic has any built in tools to allow you do preview 400 ISO while recording 800 ISO, so you can use an external monitor with a -1 stop exposure LUT loaded on it, or for a poor man's method you can put a 1 stop ND filter on your lens and set exposure and then before you are about to record take off the ND filter. This is a good trick until you forget to take the ND filter off before pressing record :) -
Horror Lighting. Very low Key Inquiry
Dennis Hingsberg replied to Jae Solina's topic in Lighting for Film & Video
I know for clean blacks rating the camera ISO one stop lower is going to yield a 6db improvement in the signal-to-noise ratio. So also if you expose at key and bring it down in post you will get improvement. Right? Hence I'm wondering if DP's prefer to either 1.) actually record the way they want to image to look (ie. in-camera with say 2 stops underexposed from key light) which then means you're getting the camera rated signal-to-noise ratio, or 2.) shoot properly exposed for key and bring the image down in post which technically increases the signal-to-noise ratio and improves the noise/grain from the first option. If the camera has an exposure index feature or loadable LUT's (where you would load a -1 or -2 stop LUT) then it's easy to work with seeing the image 2 stops under exposed whilst actually recording it at normal exposure, and later lowering it in post for that improved clean black. Thoughts? -
how can 4K HMI use 120volts?
Dennis Hingsberg replied to Dennis Hingsberg's topic in Lighting for Film & Video
Thanks for replies. I don't know why I assumed it would plug into 120v 15 amp circuit. Knew something was missing from my assumption, glad I asked. In the meantime seller advised it has 60 amp stage pin. -
Hi, Was looking at getting an old 4K HMI off a local company. It's a Stand Sirio 4K HMI frensel with Quartzcolor magnetic ballast. Model 2080 if I remember correctly. Apparently it's 120 volts, but how can it be a 4Kw in power if max per circuit is 15 amps, or around 2000 watts? Lastly, anything to look out for when buying such aged equipment? Moreso the ballast I'd be worried about. Cheers, thanks,
-
White Balance and Lighting in "Gone Girl"
Dennis Hingsberg replied to Robbie Fatt's topic in Lighting for Film & Video
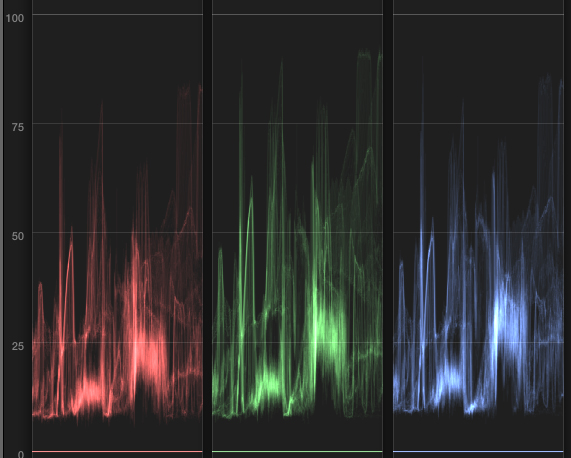
I'd sort of say that a lot of the "look" is coming from grading. Put the original frame with Ben Affleck on some scopes the dark side of his face is 12% IRE and bright side under 40%. Here's what the original shot might have looked like before grading: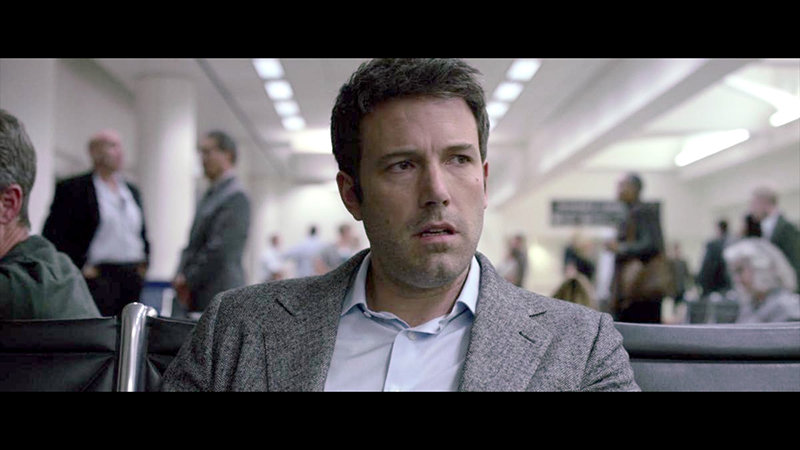

-
Exposing for highlights
Dennis Hingsberg replied to YuZheng Lim's topic in Lighting for Film & Video
Downscaling 4K 8-bit to 2K will not increase the bit depth. Basically think of 8-bit as only having 256 levels of grey, the resolution doesn't matter, after any resolution scaling it will still only have 256 levels of grey. Having said that, I've shot with the Sony F3 a lot to internal cards which was 8-bit and as long as your exposure is good you can still have a little room in post to color the footage and do a little style grading. The natural lighting there does look pretty good as it is. -
Judging from the trailer mentioned by David, I'd say get those overhead flo's in the shot and make sure they have a slight magenta cast, and make anything that's suppose to be white, tinted teal. https://www.youtube.com/watch?v=vLt6djxhNe8
-
251 Vs Opal frost difussion's
Dennis Hingsberg replied to Matias Nicolas's topic in Lighting for Film & Video
Here's one I had bookmarked: www.vimeo.com/39856572 -
251 Vs Opal frost difussion's
Dennis Hingsberg replied to Matias Nicolas's topic in Lighting for Film & Video
I also agree with others, the steampunk set video doesn't really go a long way of showing the nature in variety of shadows created by various diffusion materials. In fact I'm quite sure the camera was on the exact same axis as the light itself, except the light was raised. Overall just too hard to see any shadow qualities, speaking for myself anyway. Mark that Don McVey link is pretty good on the other hand, thanks for sharing. -
late 60's 35mm film stock?
Dennis Hingsberg replied to Dennis Hingsberg's topic in Film Stocks & Processing
I realize it's not "like for like" but just saying in agreement (and realizing now) with David that you can end up with varying looks just based on a transfer method alone. Here's what is maybe a cleaner "original" before the more recent color? Maybe not.