


Alex Sprenger
-
Posts
36 -
Joined
-
Last visited
Recent Profile Visitors
4,507 profile views


-
light bulb sockets for batten lights
Alex Sprenger replied to Johanan Pandone's topic in Lighting for Film & Video
I have had good experiences with metal screw bases. Lighter than the ceramic ones and a lot less annoying in terms of handling. The ceramic ones often often break when some force is applied, as in someone drops it during rigging. Maybe the ones I have found over here were a lot cheaper and of inferior quality, but no store bought ceramic e27 socket I have tried up till now was really fun to use. -
I dont know how things are going in terms of "green producing" overseas, but here in Germany and Austria it has become such an important part of the entire filmmaking process that I feel the days of using tungsten on narrative features are kind of numbered. Here, almost all features are state funded, so they want the money spend in a resource responsible way. Sure it pains my heart, as an M40 does something entirely different then a T12 (aside from the obvious fresnel par difference). As there even is special funding to receive for fullfilling certain green producing criteria, a local rental has let me know that during the most recent talks with the national funding agency the idea to ban all tungsten entirely for all state funded movies was discussed in the room, but ultimately stopped (for now).
-
I have been using the Aputure Lanterns (both sizes) with their b7c e27 lamps for handheld walk and talk kind of situations at night. Because both are so cheap, I recommend putting a e27 splitter with 3 or 5 bulbs in there. That way, the batteries last longer and if you need it (which in those classical night ext 800 iso, t2.8 situations you wont) the output is still there. If you want to run them of a v mount, I recommend using a Tether Tools d-tap to edison adapter in a backpack and wiring the lantern up to that. Of course, if you are using said adapter, you could also use Astera Nyx at that point, whatever is easier and more accessible to you.
-
I own both Moonlites by Lumenradio and Skynodes by Cinelex and I have had more issues with the skynodes to be honest... Sometimes its hard to pinpoint whats the problem is, but I use a moonlite as transmitter and a mixture of moonlites and skynodes as receivers. Maybe the problems with the skynode come from having them work with a moonlite as a transmitter? Technically shouldn't be an issue, but you never know. I never had an issue which I couldn't resolve within a couple of minutes with either system and most are just a case of one skynode losing connection and me pushing the link button on the transmitter once and everything works great again. Could you describe the problems you are having a bit more?
-
Fashion Studio Shoot - Throwing Shadows
Alex Sprenger replied to Conor Gault's topic in Lighting for Film & Video
Just to add to what Joseph said: Will there be direct sunlight coming into the studio? If there is no direct sunlight in the studio you might get away with your small LED package, if there is direct sunlight hitting any part of the white (even if its off screen), you will need a lot more blackout material than just a floppy. Generally speaking a room without any stray light is best for these high key kind of situations, as you need a lot of control over the levels to make it look good. If you want crisp, clean cuts on your homemade cardboard cookies, a par light like the M series by ARRI isn't really the way to go, especially at the close distances you might end up using these. I would prefer an older HMI fresnel, because you have just one, clean light source (the glass of the lens, not the bulb AND the reflector). Where I live, you can get a 4k fresnel for the same day rate of an M18, just because the lamps are a lot older. How much power can you draw at the location? Generally speaking, it works best if you can back off your lamp as much as possible in the location, that way you can get very crisp cuts on your cookie. You could also go with the Aputure Spot Mount and some gobos, as mentioned before. This would only work if you are not fighting daylight though, otherwise the stop difference between the projected window and the general ambience would be too small to make the effect believable. Colorwise, I prefer the look of straw versus orange for making HMIs look like warm daylight, but that is a merely personal preference. You should bring at least 1/8 and 1/4 in both CTS and CTO, so you can see what you prefer. -
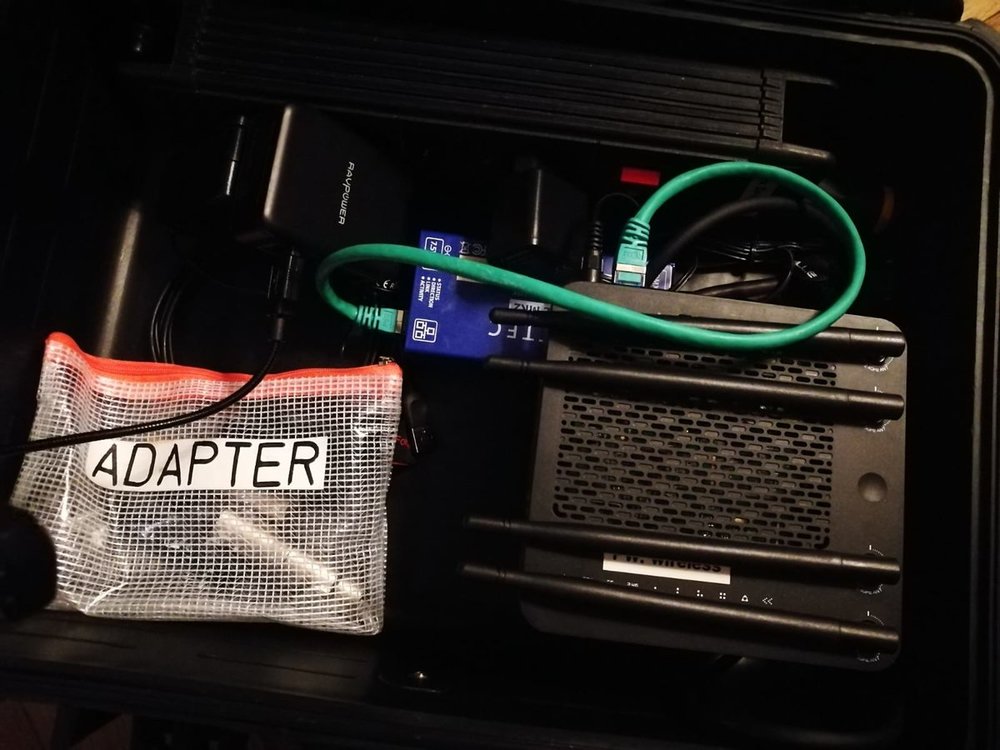
So my current setup is pretty basic and is geared towards rather simple cuelist programming, all of which I do in an app called "Art-Net Controller". The way most of my friends seem to do it is via Lumiair, which I chose not to do because I use Android products. For me, if you build a super small setup into a peli case, it makes the most sense to keep that small footprint and stick with a tablet. Of course that limits you in terms of functionality, but for most situations its more than enough. You put that case down somewhere in the corner of the set, have a few CRMX receivers on your lights and off you go, standing next to the camera with the tablet, having more time to tweak the light with the DP. In terms of outlets on that peli case... I mean the front right is just a Cintenna TX (so a 5 pin DMX port that likely goes into some kind of node under the board) and to the right is a USB port to power that Cintenna. Behind that seems to be another DMX port, so maybe it has two outlets, one for the Cintenna and one for hardwired DMX? The other side seems more complicated to me, the back looks to be the power in and I just cant tell what the other 2 ports are. I have just 2 ports on my case (the blurry picture for reference), a powercon True 1 power in (I love this connector, its the same they use on the Skypanel PSUs) and a 5 pin DMX. Usually I use a short 3m (9 feet) DMX cable and have the wireless transmitter a bit elevated on a stand with a mobile phone powerbank for power. For reference also the inside of my case. At the top we have a power outlet strip with a single on off switch that starts everything once you hook up the power cable to the case. Plugged into that we also have a USB multi outlet adapter with a small reading light (always useful if you want to replug something in the dark, often less disturbing than a headlamp). To the bottom right we have the router (I glued it onto a bit of wood to elevate it so the antennas arent sitting to low in the case) which provides the WiFI for out Art-net. Below the router is a Enttec ODE Mk2 that provides us with 1 DMX512 universe, which is directly wired to the DMX out port build into the case and hooked up to the router. This way, when I roll onto set, I only open the case, take the power cable out and plug it in, flip the antennas of the router up and switch the power on. Then I only have to wait about 40 seconds and I can send a DMX signal over my app to every fixture that is hooked up to the DMX out. Having a bit of a bigger setup like you are planning is of course great when you want to do something more complex than changing the colors on a couple of Skypanels, say when Asteras enter the mix. For a bit more complicated programming tasks, the app doesnt cut it anymore. In those cases, I bring my laptop with dot2 on it with me and rent a MA onPC command wing to go with it. I am kind of biased on this one, as MA lighting distribution is based in my hometown haha. Anyway, I would suggest you start getting into a program which would enable you to apply the skills you learn in there on a greater scale. Of course I dont know what programs lighting designers use where you life, but where I life, its mostly grandMA and a bit of MagicQ. It just seems sensable to build your skills in the same software that is used by the guys who do this kind of stuff day and night, you know? I had never heard of Nomad before you brought that up, though I must admit that keyboard they sell to go along with the software looks nice. It doesnt provide tactile feedback like a fader though, which would be my main reason to expand into a hardware controller. Especially if you have a bit of screen real estate (as you tend to do with an extra monitor), the keyboard does fairly little in terms of improving the functionality aside from making it nicer to use for you, I am not mistaken. All that aside, your plan looks solid, it should do all that you are trying to do, albeit with the same 1 universe restriction I have with my setup. This usually is not a problem unless you have to deal with Asteras in the 16 pixel setting. As I said though, the way you are trying to build it is more a "sit down and tinker with your lights and learn something" setup then a "take this on set to make money" setup, but I think you are very aware of that.

-
Lighting for overcast day
Alex Sprenger replied to Sushanta Barman's topic in Lighting for Film & Video
I think that shooting in the forrest under a clouded sky comes down to mainly 2 things. 1. Negative. To create visual interest under the very flat and at times boring grey skylight, it is always very pleasing to add negative fill to your actors. This works by subtracting light instead of adding it. Most of my daytime shoots outside nowadays seem to work mainly with that and adding a bit of bounce back. For a medium shot like the first one you shared, even a 4' x 4' floppy flag right next to the left side of the frame would to wonders. As your foliage doesn't seem to be too dense, you could even get away with bigger butterfly frames, like 8' x 8's or 12' x 12's. 2. Blocking. Ideally, you want to stand somewhere, where the natural environment around you shapes the light to your advantage, so beneath a thicker tree, creating a bit of shade. This molds the light in much the same way you would with a floppy, only in a much more natural way. I have added this picture to show what I mean. We shot directly under a giant tree (you can actually see it on the left side of the frame). Behind us and to the right of us was thick foliage, through which very little ambient daylight came. It was a very overcast day as well. We added a 8x8 of black cloth to the right of frame (not nearly as close as you would think looking at the picture, the trees did most of that job) and thats it. The light on the left side of his face is just the ambient daylight creeping in from under the tree. Another benefit of finding something to shoot underneath is that the light falling on your subject is coming more from the side than from above, which generally looks rather flat and unflattering. Side light kind of enhances the texture of anything and as such can be rather interesting on faces in general. Also: another good idea is to be looking into dark spots, something very clearly visible on the last two stills from Mr. Mullen. This creates further contrast and draws the eye towards the brighter part of the picture (your foreground / the actors). Obviously, there are tons of way to shoot day exteriors. You can find more on Patrick O Sullivans Wandering DP Podcast, here is a link to one article which details the process fairly accurate.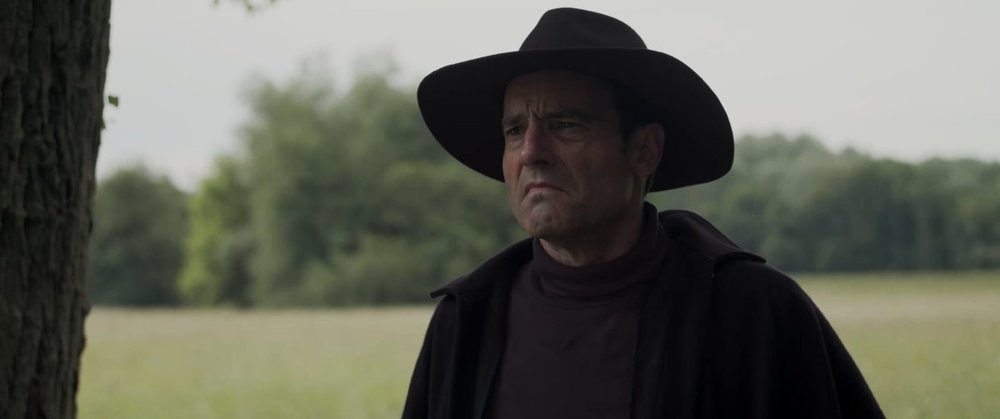
-
How to light a dark and low ceiling club
Alex Sprenger replied to Claudio Monni's topic in Lighting for Film & Video
Its kind of hard to tell what exactly is going on in the left side of the background, is that dark spot where it leads out into the street? You could use that area to have a bit more light as well and kind of have the middle ground (the area where the 3 standing people are located in the picture) silhouetted against that slightly brighter area? However as Satsuki already mentioned, a bit more ambience would probably help. With as spotty practicals as those wall scones, it often looks just underexposed if you try to have those parts correctly exposed and the rest falls into darkness. Are you planning on using haze or any kind of atmospheric? If not, You could also just tape white bouncecard right behind the columns into the corners and bounce into them from a bit further away with a leko or even a snooted fresnel. Both are very budget friendly solutions. This solution would only work without fog or haze, because the beams of the lights become visible once you add atmosphere into the mix. -
Best way to place a titan tube on a ceiling?
Alex Sprenger replied to Nick Grosvenor's topic in Lighting for Film & Video
That really depends on a lot of factors. Dimensions of the room, what kind of walls are there, what does the ceiling look like. Sometimes, if the camera moves, lens choices and shot numbers permit it, you dont even have to attach the tube to the ceiling, you can just boom it. A picture of the room with a detailed description (and measurements) of what you are trying to achieve in terms of exact placement of the tube would really help here. -
Smart way to store rags? (on set)
Alex Sprenger replied to Benjamin Hesselholdt's topic in Lighting for Film & Video
We usually store everything in eurocrates, which are cheap, stackable and can be outfitted with dividers. Just remember to always store them with the label up so you can find the right rag with a glance. You could also label the bottoms of the crates and put the rags in the same divider every time, that would build kind of a muscle memory. -
Im a bit late here, but thank you very much Jason. I took your advice to heart and a few months ago build a ENTTEC ODE (Single DMX universe node) into a peli case together with a router and have been experimenting with it ever since. I was (and still am) a complete noob when it comes to programmable lighting, but it has opened up a new world for me. I am currently using it only hardwired and it has absolutely transformed my on set workflow. Now I find myself bringing that case with me basically every time I shoot, with the rare exception of an all HMI / outside shoot with just modified available light. I am currently learning MagicQ and it is indeed very powerful, but currently I am still using a very simple DMX app on my android tablet, as I most of the time just use it to set levels. As a lot of film lighting people have zero experience with DMX (me included), it took me a long time to wrap my head around many concepts, as it seems all the online information concerning DMX is either very entry level oriented or insane live touring stage lighting with 20 moving heads, tons of floods and generally a lot of lamps which I will probably never end up using. I am concerned with other things - how can I make a practical flicker? How do I program a convincing TV gag on an LED that doesnt have an effect build into it? How do I create a good gun shot effect? These things are covered nowhere and I am currently thinking about doing a YouTube tutorial about how to start DMX for film lighting and the basic concepts. Granted, everyone who has any real experience with the subject matter would laugh at that simple a task (check out Matt Ardine´s portfolio if you want to see crazy programmed lighting), but I think a lot of people would profit from that. I am wondering if there would be a real interest of the community to delve into that topic.
-
I have rented their M18 equivalent in the past. Feels alright in terms of build quality, but even in 50 Hz (so non flicker free mode) the head gave of a high pitched whining noise. We ended up removing it in post - at least it was only evident in a very small frequency range, so removing it didnt hurt the sound, but took extra time and therefore money. Generally speaking the same rules as with all equipment apply - you can buy the off brand product, just expect to make much less money off of it, even if in some situations it might be better suited for the job than the name brand product. If you dont plan to rent it out youre fine, obviously.
-
I would just visit your local light rental place, most of the time they have tons of scraps lying around and as tiniest bits are enough for a dedo, you should get all you need there for a small donation.
-
Animals and tungsten lighting
Alex Sprenger replied to Alex Sprenger's topic in Lighting for Film & Video
Unfortunately the shoot never happened (agency didnt fancy the idea anymore), but the animals in question were dogs and lamas. Maybe you are right though Richard, maybe she meant LEDs. I can only imagine that HMIs might be problematic as well, with the high frequency buzz. -
Animals and tungsten lighting
Alex Sprenger replied to Alex Sprenger's topic in Lighting for Film & Video
Well my reaction was of course I would listen to what she says, she works with them everyday and shoots with them very often, so she clearly is the expert on the topic and I would adhere to the topic. Currently it looks like the shoot isnt going to happen anyway, so its not urgent anymore. I am still very much interested in what others have to say on the subject matter anyway.


