Kamran Pakseresht
-
Posts
42 -
Joined
-
Last visited
Everything posted by Kamran Pakseresht
-

Help needed - Eclair ACL Losing Loops
Kamran Pakseresht replied to Aaron Yang's topic in Camera Operating & Gear
Paul at Visual Products is an Eclair expert- definitely can recommend them. That being said, this doesn’t immediately sound like an issue with the camera itself - Nicki is right that you want to evenly distribute the slack on each side when you push your loop in and it’s possible it got shifted when you removed the magazine and the re-engaged it later. Try shooting another 100ft roll- without ever removing the magazine, if it comes out perfect, then it’s likely operator error and you can just adjust your workflow to watch out for issues like this. And yes - I usually tell anyone looking to buy a used film camera to factor in a few hundred dollars for a CLA - just so you can ensure it’s running smoothly, quietly, and will last a long time. Because you’re in LA, you can probably save a big chunk of change in not having to ship it out by having Tyler take a look at it. -
I was discussing the flicker issue with Paul from Visual Products - here is what he had to say:
-
Aaton LTR serviceability and general thoughts?
Kamran Pakseresht replied to Raymond Zrike's topic in Aaton
Paul is amazing - he just converted my eclair ACL to Ultra 16 - has been so thorough and helpful the entire time and always very detailed in responding to questions. VP definitely gets my seal of approval. -
I just ordered one on ebay - I'll try and get some designs made for them once they arrive - hopefully I can send a couple to some users on here to test as I don't have an a-minima myself.
-
I actually have thought about something very similar. I would like to make 200ft split reels for my eclair ACL - just to make spooling up 200ft cores simpler. if I could get my hands on one of these, I’d be more than happy to put up the designs for it - I’m not sure how they work differently from a split reel (do these ones open up in the same way?) - does the A-minima require these reels or can the A-minima use simple cores as well?
-
Nikon to Acquire US Cinema Camera Manufacturer RED
Kamran Pakseresht replied to Jeremy Saltry's topic in Cinematography News
There seems to be a lot of negative comments towards Nikons video offerings - but everything I’ve read about their latest cameras (Z8 and Z9) is that they are incredibly capable and actually competitive with the other cameras in their price bracket. I had started to think that Nikon was making a bit of a comeback based on the reviews, but the comments here seem so far in the other direction that it’s confusing. I definitely assumed this to be great news for Nikon and video cameras in general. -
Based on measuring the threads and experimenting with the sizes until I reached a lens cap that screwed on smoothly without excessive friction - the specs in onshape for my cap threads (the inner threads that can thread onto this mount) are: Pitch: 1mm Threads Per Inch: 25.4 The diameter of the cylinder that I ran these threads on was: 52.5mm If you read the patent - it suggest the mount is basically just a c-mount with twice the diameter (2 inches) and the same thread pitch - but while the diameter might be accurate - I'm not so sure about the thread pitch as I seemed to arrive at different results from the patent.
-
It's great you started a thread about this! I recently have been working on reverse engineering some of these adapters. Here is the official US patent for the mount for those interested: https://ppubs.uspto.gov/dirsearch-public/print/downloadPdf/3682069 I was very motivated to create an adapter for Micro Four Thirds lenses but after actually starting to calculate it and model it - it's just not possible, there is not enough room. I think there is a possibility of a mod - where you remove the 6 screws holding the TS camera mount to the camera body and replace it with a Micro Four Thirds mount - but I will need to get a cheap/parts only ACL to test this on. I did make a 3d printable model of a cap that fits the TS mount as a starting point to all of this work - you can find it here. What type of lens mount adapters do you think are the most useful/would you most like to see?
-
That actually sounds like a fun project - I might give that one a shot
-
In my opinion, for the price you're looking to spend - buy an Eclair NPR (that's running) on Ebay for ~2k - send it to Tyler or Visual Products for a CLA (VP does a CLA for between 3 and 400 dollars) - and spend whatever is left-over on adapters and lenses. Once you have one that's been looked over by a professional (assuming it was running to begin with) - they should run well for many years to come. They are relatively quiet sync-sound cameras that are a great intro to the format if you're just trying to get up and running. At 4k - this is probably where you could realistically start. If it was me and I'd never shot on 16mm before and I could give myself advice - I'd tell myself to just buy a Arri 16s or a Beualieu R16 that was gone over by someone and already running - you can do so much with just a solid camera, you don't necessarily need sync sound to get familiar with the format and explore the medium.
-
I actually took a look at this one and it's in pretty bad shape - it is one of the very very early LTRs (Serial # was B76). It does not run properly (shutter just kind of lurches and then stops) and all of magazines would certainly need to be completely gone over (the rubber belts had completely disintegrated and gotten into basically everything). Definitely not a running camera and possibly a money pit if the electronics are in bad shape.
-
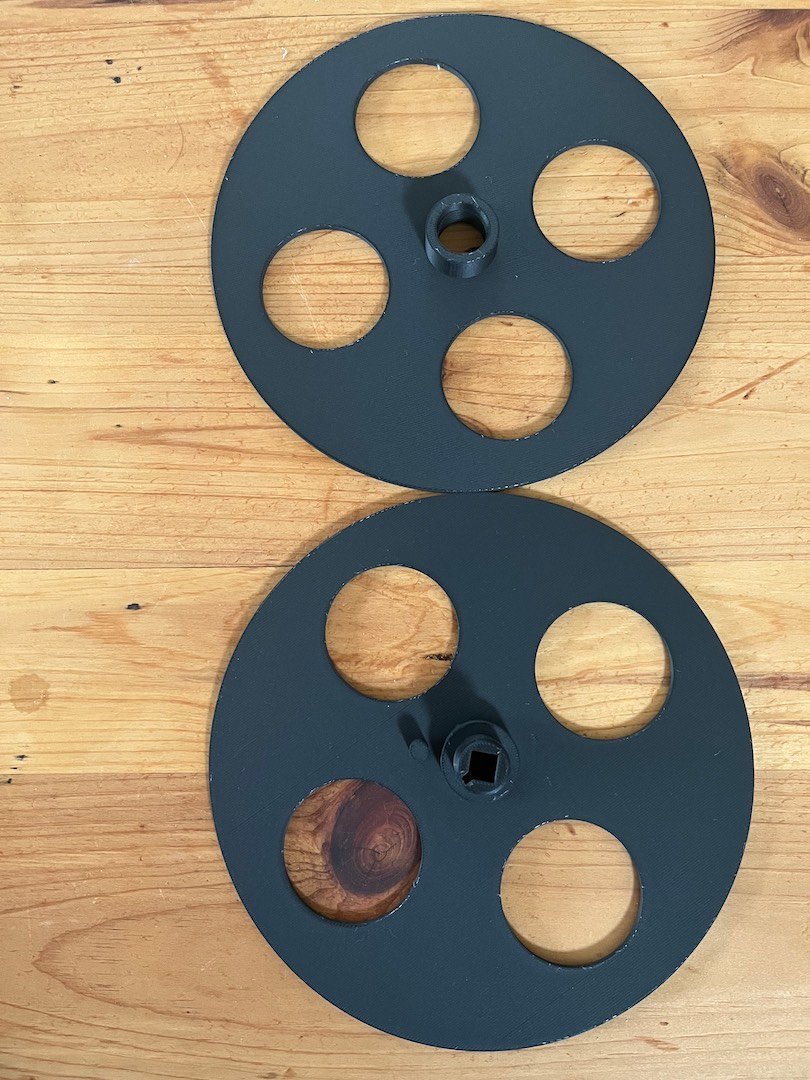
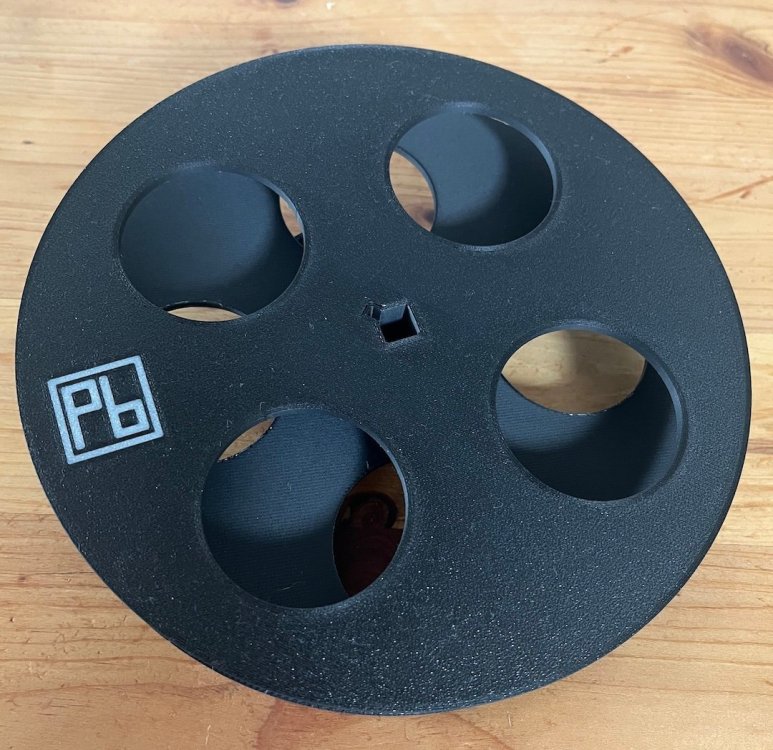
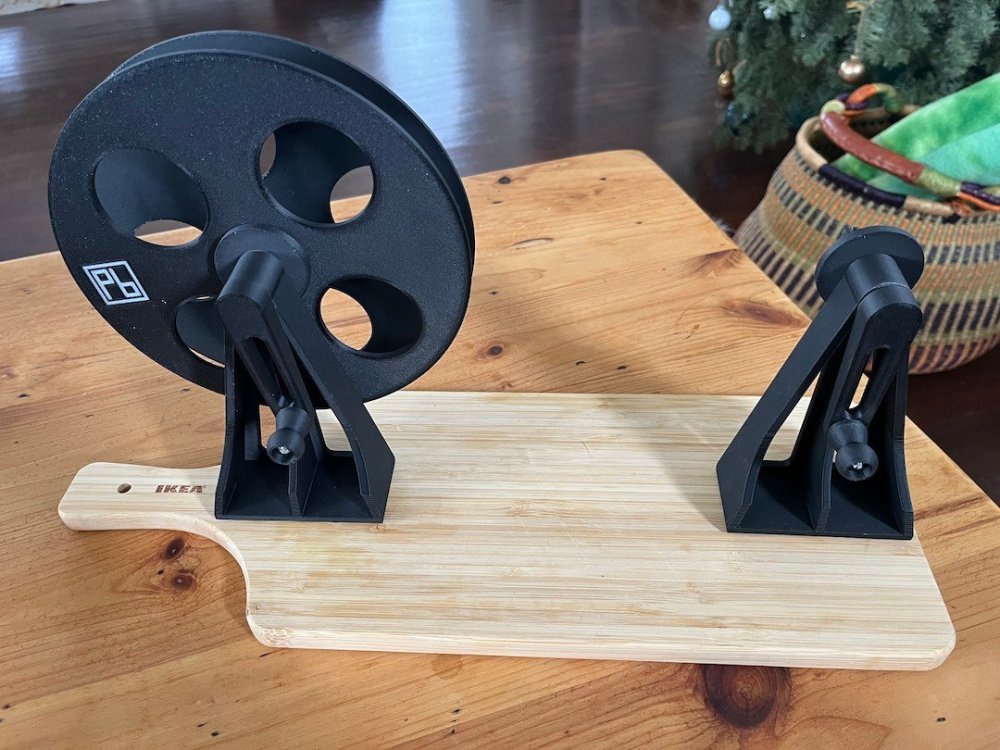
As part of my growing mission to make it simpler and more affordable to shoot on film - I whipped up a 16mm split reel design yesterday that can be easily 3D printed. I have a whole fridge full of Fuji 16mm film that I finally decided to break down into some smaller reels and having a 400ft split reel made it very simple. You can download the files here. You probably will need to flip one of them 180 degrees on the X-axis in your printing software. 0.1 mm layer height is best for the threads. On my Bambu Labs X1C it takes ~2 hours per side. Uses about 111 grams of filament so rather affordable if you're printing yourself. As always my Onshape work is totally public - so you can very easily modify this if you want to make a smaller or larger reel - here is the link. This pairs really nicely with the Short 16mm Film Rewind designs on thingiverse here, which I use for my setup (just double side taped them down to this ikea cutting board which fits nicely into my film changing tent) And for those curious - I just ran 100ft of respooled Fuji 64d that I had been storing in a fridge for the last 12 years through my Beaulieu R16. Developed in a Morse tank and it came out great (rated it at ~25 iso) Here are some close-ups of the reels:

-
Divinity (2023) // Kodak Tri-X // Feature shot on Arri SR3
Kamran Pakseresht replied to Kamran Pakseresht's topic in 16mm
Found the thread here. Really interesting and very cool to see this discussion for such a beautiful film. Here is quote I think you were referencing: The Tri-X results were superior in sharpness, highlight tonality and grain. Contrast was actually normal and comparable between the two. I saw the results both as prints and in a 4k DI suite at Fotokem. It's unclear how much the results were improved by the stock being Tri-X, and how much from the more moderate development. The "normal" developed double X footage showed signs of overdevelopment (especially poor highlight separation) that the 35mm Double-X did not. -
Divinity (2023) // Kodak Tri-X // Feature shot on Arri SR3
Kamran Pakseresht replied to Kamran Pakseresht's topic in 16mm
Curious about that, as far as I knew The Lighthouse was shot entirely on Double-X - here is the a quote from this article about the film choices: “The results confirmed my hunch, that nothing approached the palette we were after quite like B&W negative film,” says Blaschke. “Rob and I saw that the blottier, murkier qualities of DOUBLE-X better-suited our misty, salty, visually-distressed film.” -
Wanted to draw attention to a film I just saw in theaters - Divinity by Eddie Alcazar - shot almost entirely on Kodak 7266 on a super 16 Arri SR3 Incredibly stylized film, mixing all sorts of special and practical effects and even stop motion animation. Definitely worth a watch if you like seeing things originating on 16mm. I didn’t know the film was shot on 16 until after I had watched it, and originally thought it was surely shot on digital with grain added in post - but turns out it was just natural grain from the format. here is the IMDb entry for the technical aspects
-
Les Bosher - Anyone been in touch lately?
Kamran Pakseresht replied to Alexander Boyd's topic in General Discussion
I emailed him just a little over a week ago and he responded the next day. -
Premium membership to post in the marketplace
Kamran Pakseresht replied to Samuel Preston's topic in General Discussion
I guess on the other side of the equation it probably does a really good job at eliminating scammers. -
Does anyone still have this file? All the links seem to fail at this point - would love to host it permanently if someone can help me get hold of it. For those looking for it - was able to find a functioning link here: https://drive.google.com/file/d/1W4WwzNspJ6UckoK67JG5PVsJIsy7poQ_
-
I have not! I will certainly watch that one next - awesome that he self-developed it, just watched the trailer and you can certainly tell - I wonder what type of method he used (bucket, morse style rewind tank, or lomo spiral)
-
Just wanted to bring attention to a film I watched on Kanopy last night called Enys Men. Kodak made a really short spotlight about it. It was shot entirely on a Bolex H16 - it's really quite a beautiful film if you're drawn to things shot natively on 16mm. Because it wasn't filmed on a sync sound camera, all sounds were added in post - but I thought it was really well done, there are a number of lines spoken by actors that you likely wouldn't realize were dubbed. It is a very slow paced, unnerving film, but worth a watch I think. Here are some IMDB specs for it: Camera Bolex H16 SBM, Kern Macro-Switar and Zeiss Vario-Sonnar Lenses Laboratory Kodak Film Lab, London, UK Negative Format 16 mm(Kodak Vision3 50D 7203, Vision3 250D 7207, Vision3 500T 7219)
-
Very nice footage. After looking around a bit it seems like type of camera used was possibly a Redlake Locam? Looks like they topped out at around 500fps. I could imagine they had to modify them to handle the amount of film they would need to eat through for this footage.
-
Super 8 Magazine #10: 3x Test of the new Kodak Super 8 Camera
Kamran Pakseresht replied to Jurgen Lossau's topic in Super-8
Would love to see the sync sound test footage, if there is any. -
16mm Camera Battery Pack Designs with Replaceable Cells
Kamran Pakseresht replied to Kamran Pakseresht's topic in 16mm
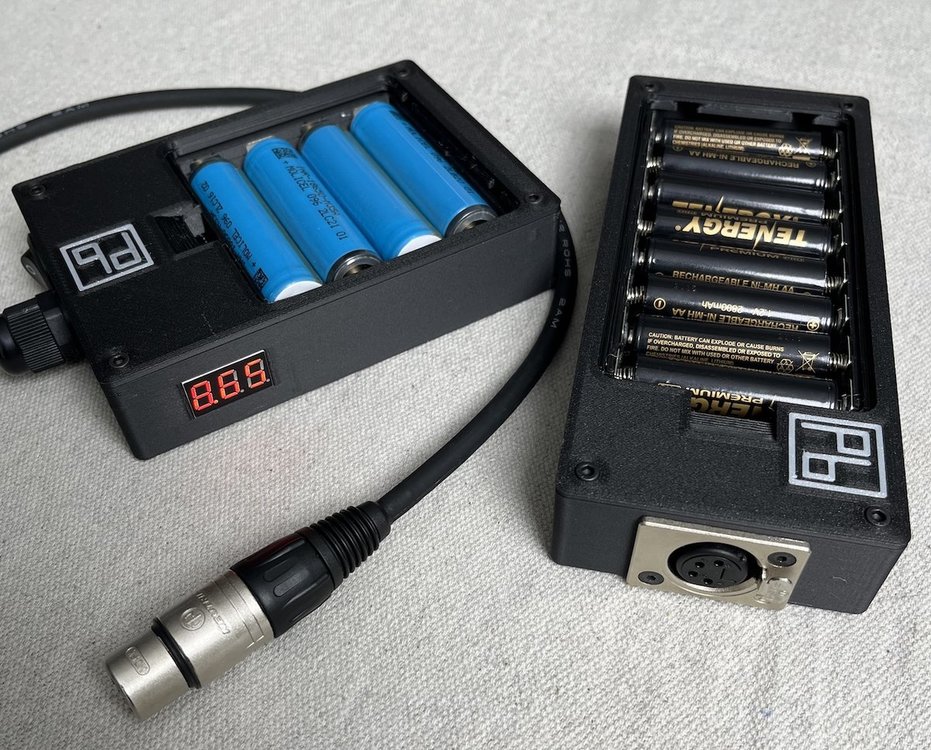
Thank you for the advice, I hadn’t thought about that - I will definitely put these up on Ebay today, that is a really great idea. And yes the voltage regulator is really nice for that and it’s pretty easy to adjust with the readout on the side. I considered making a knob so you would not have to remove the cover to adjust it - but figured that might over-complicate the design a bit. As it is now, you take the top off and use a small screw driver to make the adjustment on a trim-pot that lives on the voltage regulator- but you can see the readout as you adjust so it’s very easy to dial in an exact voltage. -
"Fallen Leaves"
Kamran Pakseresht replied to David Mullen ASC's topic in On Screen / Reviews & Observations
Had a chance to watch this film last night, really beautiful film. The comedic timing and style reminded me quite a bit of Roy Andersson films, which I love. -
I wanted to share some designs I made for 3d printing your own 16mm camera battery packs that use replaceable cells. My motivation was that I kept acquiring these old 16mm cameras with dead battery packs and I wanted to create a pack that would basically never become trash because you can always replace the cells. There are two packs: a pack for the Arri 16s which uses 8x nimh rechargeable double-a batteries (around 9.6v) a universal pack which is a bit more complicated and uses 4x protected 18650 button top lithium ion cells - it uses a voltage regulator so you can tune the voltage to whatever range your camera needs. Because these packs use replaceable cells, they do not charge anything - they are solely for powering your camera - you take the cells out and charge them properly using a balanced charger. The repository for the packs is here. In the repository you can find part lists and some additional information. If you just want to download the 3d files for printing - you can find them here. I've recorded a video tutorial that explains how to build the Arri 16s pack here. The Universal pack is a very similar build process but requires a few more components (on/off switch, voltage regulator and voltage readout) If you don't want do go through the trouble of building one of these but you still want one - you can buy them from pluriboom.com (does not include batteries or charger) and I'll make it for you and send it to your door. I am just learning design with onshape so this has been a fun project - but I am very new to this - if you have any recommendations or changes you think might be nice to add - I'm happy to update the designs. All of my onshape work is totally public so you can also just view the designs here. If you do make any changes I would love to incorporate them back into the repository so others can benefit. If you would like to try making one of these yourself - let me know and I can help with some tips - having others go through the build will probably help me work out some of the kinks in my documentation and make it easier for others in the future.