Frank Wylie
-
Posts
521 -
Joined
-
Last visited
Everything posted by Frank Wylie
-
That is truly weird. In addition to a light leak, see the stable perforations on the left-hand side but the image is jumping around. Are you doing straightforward location shooting? You aren't shooting off a monitor or anything like that are you?
-
How about a few basic bits of information, first? Bolex is not a generic term, but I assume it must be a 16mm camera at least... What model? What type of film are you shooting? Is it new or old stock? If I had to hazard a guess with the total absence of information to work from, I would say you are losing your loop below the gate, because once you lose it above the gate, you cannot recover just running the camera. It could indicate: 1. dirty, sticky gate. 2. take down claw dirty or damaged 3. pressure pad not seated properly 4. all of the above. More information is needed!
-
Not a problem... I might have found some information related to this camera in an old SMPTE Journal, but it's not clear. Hoping to write to the Case Research Lab (http://cayugamuseum.org/case-research-lab/) and see if they have any records of it.
-
As I posted, I put the nikon mount and animation motor on the camera; the rest was already as it was. Beyond getting it surplus, we (now) know very little other than anecdotal information about the camera. Terra incognito...
-

Good rundown of hi-end commercial film scanners
Frank Wylie replied to Daniel D. Teoli Jr.'s topic in Post Production
True what Perry says... So many of these "professional" organizations are hopelessly uninformed. -
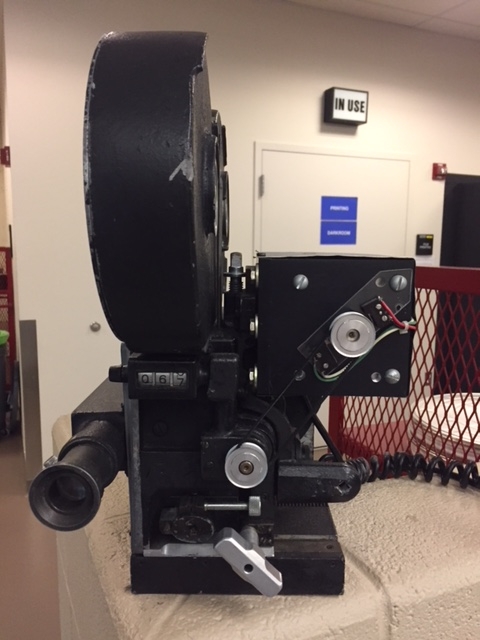
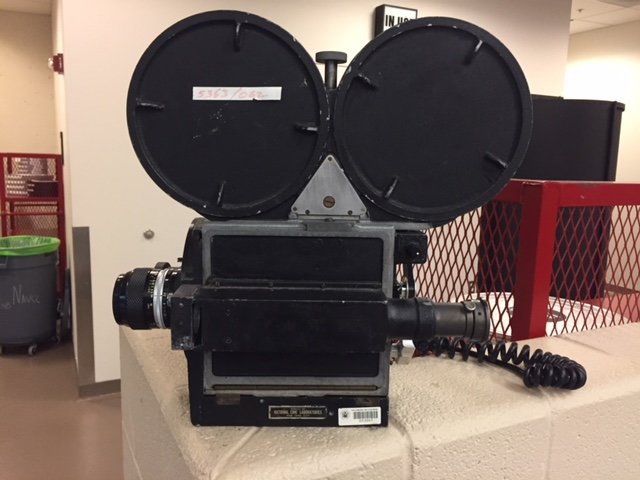
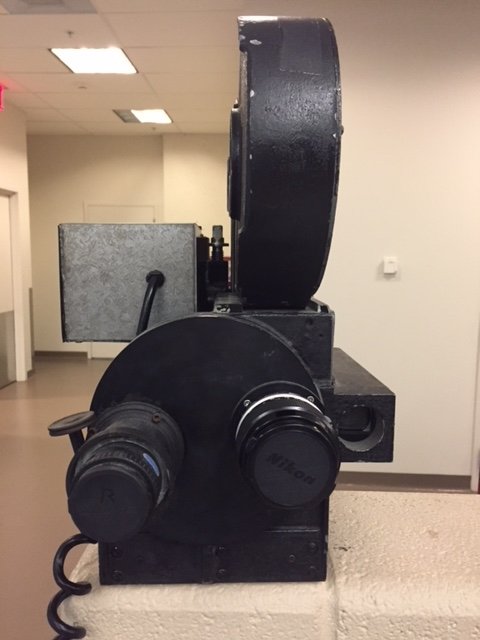
As you can see, the camera is a 2709 body on a Mitchell Standard rackover base with a Mitchell-like movement. The Turret was replaced with a fixed 2 lens port; one Nikon F and one rack type focus mount with an enlarging lens for flat field copying.


-
I use a lot of DN2, PF2 and TF12d; why try to pull a print using DN2? DN2 is a good dupe negative stock; a bit more contrasty than Kodak 2234, but still very good. TF12d is only used in our lab to make dupe negative tracks and we process it at 2.40 gamma in the positive developer to give it the proper contrast for Variable Area tracks. I would never dream of printing a continuous tone image on this stock without a lot of expensive testing and, perhaps, flashing; it is just too contrasty. PF2 is a very good print stock and it makes fabulous prints! The snap is incredible; especially when printing directly from a nitrate negative! DP31 is a good interpositive stock, but I do prefer Kodak 2366, as it has a longer grey scale.
-
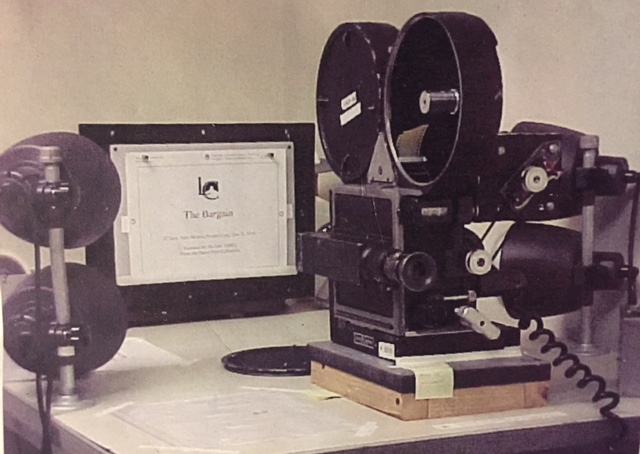
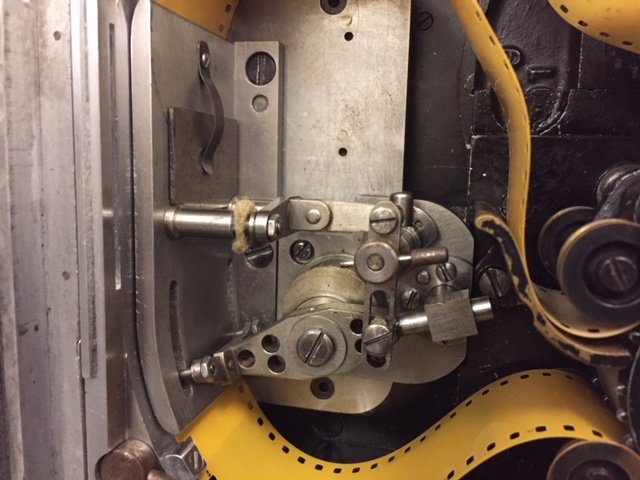
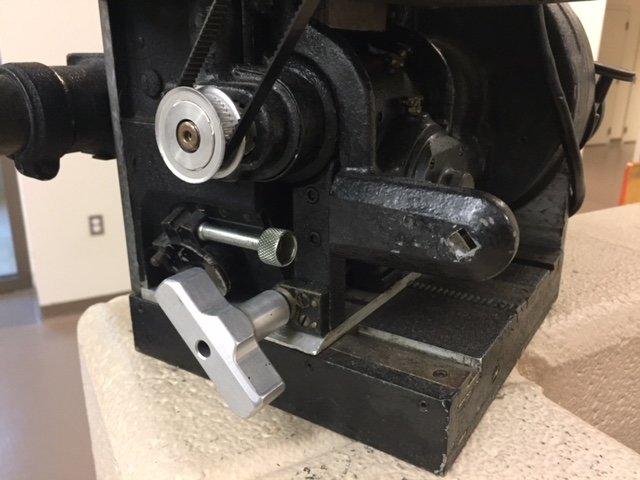
We have what we believe to be one of the earliest Movietone Cameras in our film lab; a modified 2709 with a Mitchell-like movement. Strangely enough, we acquired it via Government Surplus channels, sight unseen, to press into service for recreating film title cards during the restoration of some of the Paper Print Collection. It was only an accident that it arrived at our lab how and when it did... I will try to get photos to post next week; it is an interesting camera. It still sports the animation motor and Nikon F mount lens I adapted to the camera to make it functional. James Cozart, our former Quality Control Expert, did a lot of research into that camera that is now regrettably lost when he passed-away a couple of years ago. Anecdotally, I recall discussing this subject with him and he indicated that Wall initially attempted to build the Fox Movietone cameras on the B&H 2709 platform, but that the problems of silencing the shuttle movement were insurmountable at the time, so they switched to a movement that is very similar to the Mitchell, but not exact (as you will see in the photos). If you examine the actual Wall camera body backside under the sheet metal cover, it DOES have more than a passing resemblance to the body of a 2709! Just a general note: if you know someone who has this sort of history floating around in their head, you might want to do what I didn't do; document it. I wish I had...
-
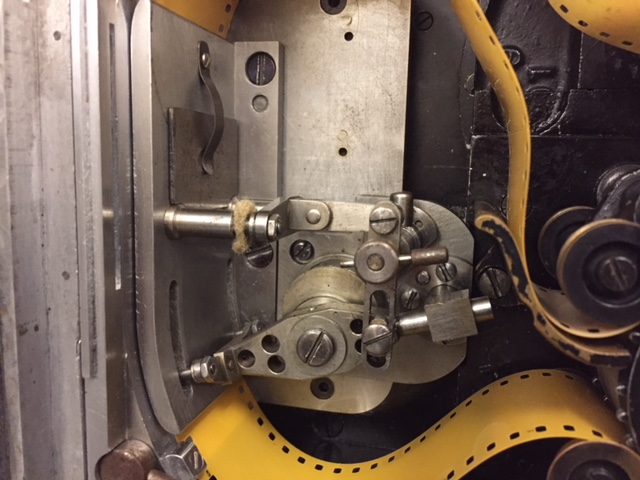
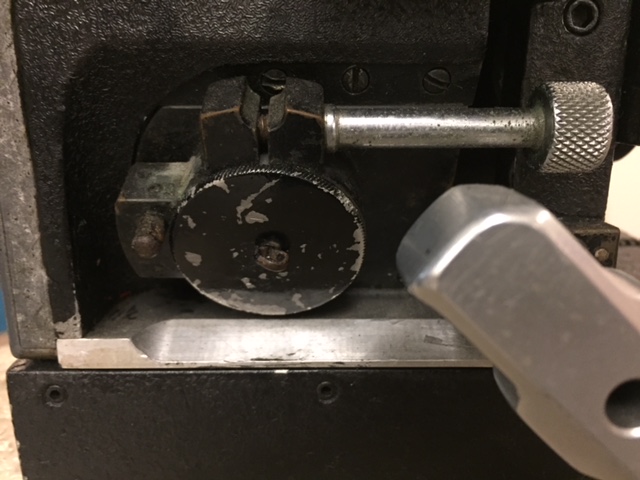
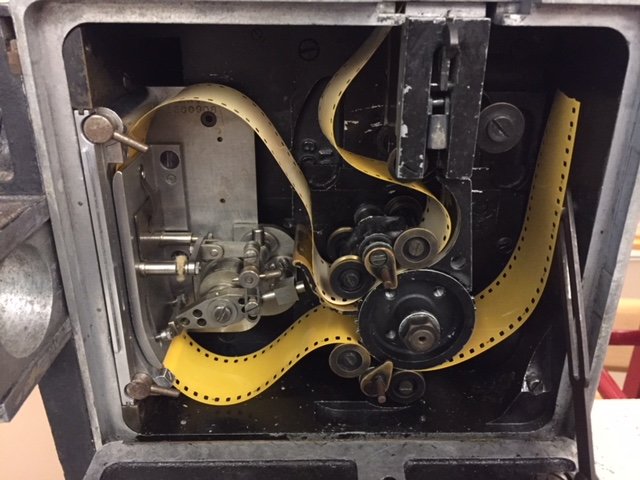
I believe the Wall was developed and primarily geared toward newsreel photography in the very late 20's and early 1930's. Look at the AEO light port on the bottom, right side of the camera body (open camera door). That's where the optical sound valve protruded into the camera body and exposed the track onto the main drive sprocket. Like most newsreel cameras of that era, the track displacement was shorter than projection advancement; roughly 9 frames verses the typical 20. So, if you ever find a composite negative camera original with only 9 frame advance on the track, there is a good chance it was shot with a newsreel camera. We preserved a large portion of the Fox Movietone News Archive and that 9 frame displacement initially caused some confusion when printing directly from camera original negatives. Having examined a Wall in a collection at a University I once worked at, I will agree they are beautiful chunks of precision metal!
-
I personally do not but check with this entity via the YouTube link it they might have something:
-
Check your wiring harness. When I worked at a Major University, we had a BL develop an internal short and the wiring from the shutter release to the motor burned all the insulation off the wires. Not pretty.
-
https://www.walmart.com/ip/Torin-Jacks-750lbs-Engine-Stand/14560055?wmlspartner=wlpa&selectedSellerId=0&adid=22222222227010127866&wl0=&wl1=g&wl2=c&wl3=40839141272&wl4=pla-89278556585&wl5=9010923&wl6=&wl7=&wl8=&wl9=pla&wl10=8175035&wl11=online&wl12=14560055&wl13=&veh=sem&gclid=EAIaIQobChMItpf-r_n13QIVmonICh19FgbyEAQYASABEgKZBvD_BwE If that doesn't give you some ideas, I don't know what to tell you...
-
How to degrade an image in-camera to simulate Old Spyglass
Frank Wylie replied to Joe Taylor's topic in General Discussion
Get some very cheap, thin diffraction grating material and cut a ring out of it to just go around the inside 1/4 of the lens; a doughnut shape. Might have to experiment with ring thickness and edge roughness to make it subtle enough. Shouldn't take much... https://www.amazon.com/Sheets-Diffraction-Gratings-Lines-inch/dp/B07D9K1582/ref=sr_1_14?ie=UTF8&qid=1538970309&sr=8-14&keywords=diffraction+grating+sheet That should give you some weird aberrations... Maybe you could remove the front lens element and find an arrowhead maker to knapp the element; chip it up on the edge and then replace it. Not hard to remove those front elements... -
huge bizzare lens on A Clockwork Orange
Frank Wylie replied to panagiotis agapitou's topic in Lenses & Lens Accessories
Appears to be an Elemack. -
huge bizzare lens on A Clockwork Orange
Frank Wylie replied to panagiotis agapitou's topic in Lenses & Lens Accessories
Dammit! He could have busted an Eyemo instead of Newman-Sinclair! -
Have owned? 35mm 2 x B&H 2709 Hand cranked cameras Art Reeves Reflex (1944) Several B&H Eyemos (can't remember all of them) DeVry Lunchbox 16mm Every Auricon ever made (no kidding) Every variant of the Bolex spring wound camera Frezzolini CW16 BH DR 70 Cine Kodak Series (all) Super 8mm too many to list Now, I have about 200 still cameras, having sold off all of my motion picture equipment, except for some Oxberry 35 and 16mm gates, a pair of Acme 35mm gates (pins above and below gate) and a smattering of Super 8 / Regular 8mm cameras. You should have seem my collection of 14 silent, hand cranked projectors; Mainly Powers 5 and 6 variants with mazda lamps. Heavy iron is too much for me to collect anymore, but I would like to eventually get another 2709. Sorry I ever sold that pair...
-
I'm trying to figure out the cause of this CCD imager issue.
Frank Wylie replied to Mike Krumlauf's topic in Sony
That I couldn't tell you. I still suggest you try to have a broadcast engineer look at the signal and give you advice. HD is the norm in broadcasting now... -
Cine-Kodak Special masks
Frank Wylie replied to Timothy Fransky's topic in Accessories (Deprecated SubForum)
Yeah, sorry to bother you. Good luck with your future. -
I'm trying to figure out the cause of this CCD imager issue.
Frank Wylie replied to Mike Krumlauf's topic in Sony
Eliminate the converter as a potential problem before you go cranking around on the camera! -
Cine-Kodak Special masks
Frank Wylie replied to Timothy Fransky's topic in Accessories (Deprecated SubForum)
Well then here's a reading list for you: Kevin Brownlow "The Parade's Gone By" "The War, The West and The Wilderness" "Hollywood; The Pioneers" "Behind the Mask of Innocence" Barry Salt "Film Style and Technology: History and Analysis - 3rd Edition Mr. Reese V. Jenkins "Images and Enterprise: Technology and the American Photographic Industry, 1839-1925 Albert E. Smith "Two Reels and a Crank" and about a hundred or so free, scanned books and trade periodicals from 1894 to 1930 on http://mediahistoryproject.org/ "Silent Film" is not monolithic. There are roughly 4 periods of production in U.S. silent film production; 1894 to 1904, 1905 to 1912, 1913 to 1918 and 1919 to 1927. Which do you wish to emulate? Major or independent? West Coast or East Coast? It is not a simple topic. -
Cine-Kodak Special masks
Frank Wylie replied to Timothy Fransky's topic in Accessories (Deprecated SubForum)
Depends on what you want to do and, beyond a general expressed desire to do an iris-in, you haven't defined what that it is you want to do. As for cameras being "designed to employ" a mechanical/manual effect, 99% of film cameras were not designed with specific special effects in mind, but gave the cinematographer a precision framework from which to made it possible with a lot of hard work, experimentation and imagination. In the past several decades I have corresponded with others on how silent film special effects were made, this is about the point where most people drop their ambitions and do something easier. -
Cine-Kodak Special masks
Frank Wylie replied to Timothy Fransky's topic in Accessories (Deprecated SubForum)
The Elmo fader is two polarizers; one fixed, the other you rotate to extinction of the image. You can make this yourself, but it is NOT an iris and you lose a ton of light when you stack polarizers, even at 100% transmission... Just like any other camera, you get a set of rods or a plate (heck it could be a simple board) that mounts between the tripod and camera body and extends beyond the lens. You then mount a riser upon which you attach a filter frame that can accommodate a lens hood and any attachments you wish to use. You'll need to carefully measure the distance from the tripod mount to the lens front and the height from a plane extending from the bottom of the tripod mount to lens center to either purchase or fabricate the mattebox holder. Something like this might be suitable, but do some research, as I only grabbed a quick link or two on Ebay... Matte box: https://www.ebay.com/itm/FOTGA-DP3000-M3-PRO-Swing-Away-Matte-Box-f-15mm-Rod-DSLR-Rail-Support-Rig-System/201249894356?hash=item2edb6dafd4:g:zU0AAOSw3KFWfOCA Support Base and rods: https://www.ebay.com/itm/Perfeclan-15mm-Rail-Rod-Support-for-Lens-Adapter-Follow-Focus-Matte-Box-A10/292674435735?hash=item4424c17a97:g:4jcAAOSwAllbbFvx Mechanical Iris: https://www.etsy.com/listing/495370001/laser-cut-mechanical-iris-14-craft?gpla=1&gao=1&&utm_source=google&utm_medium=cpc&utm_campaign=shopping_us_ts1-b-toys_and_games-games_and_puzzles-puzzles-other&utm_custom1=a3dcf623-b1d6-4288-96b7-8d3a68810a66&gclid=EAIaIQobChMI9sL_k9HC3QIVAb83Ch3AfgkwEAEYAyAAEgJYKPD_BwE Do some Google searches like; DIY Mechanical Iris, DIY Matte Box, etc. -
Cine-Kodak Special masks
Frank Wylie replied to Timothy Fransky's topic in Accessories (Deprecated SubForum)
Many cameras had gelatine slots for filters that could accommodate very thin shim stock (brass usually). How far from the film plane the slot is located determines the sharpness of the matte or mask. Some variants of silent film cameras like the Mitchel Standard could be fitted with a factory option, built-in iris behind the lens mount that could be adjusted for center point and diameter, as well as hand cut hard matte cards (https://archive.org/stream/motionpicturenew24moti_6#page/2330). However the majority of cinematographers used a custom mattebox in front of the lens. Goerz seems to be the most popular manufacturer I run across in literature from the silent era. Read this article on camera specifications by Carl Louis Gregory in 1917 under the section "Attachments and Mattes" (https://archive.org/stream/moviwor31chal#page/n637). Here is another article by the same author in 1920; https://archive.org/stream/motionpicturenew21moti_1#page/1736. It depends upon the camera and how it was designed. All cameras can use a Matte box with shape masks, but they are ill defined and not of much use for precise in-camera split-screens and such. To do seamless matte work, the matte must be almost in direct contact with the surface of the film and the matte slot would have to be directly over the taking aperture, as is the case with the Cine Kodak. While there are few existing vintage matte boxes with working iris attachments, you can build your own iris mechanism by adapting a large format adjustable iris lens mount to fit on a matte box. You can see an example on this webpage: http://picssr.com/photos/132059798@N02/page159?nsid=132059798@N02. -
I'm trying to figure out the cause of this CCD imager issue.
Frank Wylie replied to Mike Krumlauf's topic in Sony
I agree. Start simple, move to complex and only change one thing at a time and evaluate. -
While not specific to cine lenses, https://richardhaw.com/lens-repair-articles/ is a good site to learn basic lens disassembly and cleaning. Now, while most people on this site would probably rather throw their mother on the streets than crack open a lens themselves, it can be done IF you are careful and use the proper tools. You can also watch a series of Youtube videos by Mikeno62 (https://www.youtube.com/channel/UCgANrFnm3Sdai8zvA2iJGQg) which deal with many types of lenses that are far more complex than your lens. Do a lot of research before you start and gather the right tools. Work in a place with good light, a work surface that will stop small bouncing parts and screws and document every step with a digital camera or video camera or both. It is imperative that all rings, lens elements and focusing helicoils are returned to their proper orientation. Carefully note each lens element orientation and if there is room, draw a pencil arrow showing the direction the lens faced outward. Pay particular attention to the videos where they show how to mark where infinity is and where the helicoils separate from each other. Sounds scary but with practice, it not only makes sense, it is fairly easy to do. Do yourself a favor and go buy a junk store lens to practice on BEFORE you work on this lens. Buy small plastic containers or a parts bin to place each part in sequence (I use dollar store plastic parts bins) and anchor them to the table with gaffer tape! Nothing like hitting your carefully segregated, in sequence parts bin and tossing it to the floor! Ask me how I know... Always remember, when you get frustrated, walk away and come back in an hour. Don't get in a hurry. Good luck.